
Subscribe to Our Youtube Channel
Related Manuals for Thetford Domino MK II SHB9028X Series


Summary of Contents for Thetford Domino MK II SHB9028X Series
- Page 1 Domino MK II 2 Zone Induction Hob Installation & User Manual SHB9028X Series For EU, UK & Australian Markets...
-
Page 2: Table Of Contents
16. Disposal ..................26 17. Service and Questions ..............26 1. Introduction This manual is for the Thetford SHB9028X series hob. Please visit www.thetford.com for the most recent version. The manual is meant for both the qualified installers who will install the hob (Caravan/ RV / holiday homes) and the user. -
Page 3: Symbols
2. Symbols Warning. Risk of injury and/or damage. Attention. Important information. Note. Additional information. 3. Safety General READ THESE INSTRUCTIONS FOR USE CAREFULLY. FAMILIARISE YOURSELF WITH THE APPLIANCE. KEEP THESE INSTRUCTIONS FOR FUTURE REFERENCE. This appliance complies with the applicable standards on electromagnetic interference and complies fully with the European Directive 2014/30/EU or UNECE Regulation 10. - Page 4 Use the appliance for cooking only and not for anything else, for example room heating. The manufacturer cannot be held liable for damage resulting from improper use or incorrect setting of the controls This appliance is not intended to be operated by an external timer or separate remote-control system.
- Page 5 Electrical appliances should only be installed by qualified and certified professionals. Pay close attention to current regulations on ventilation in the country of use. If it is not possible to install the appliance in accordance with these instructions, please refer to Thetford for further guidance.
- Page 6 For more information about ventilation regulations and requirements, see 8. Installation Initial use This appliance is designed to function on AC current only. Before using it for the first time, check that your main supply voltage and current matches that indicated on the appliance data badge.
- Page 7 Usage The induction cooking zone is hot during and after use. Allow all parts to cool before touching them, as this can cause serious injury. ONLY use the appliance on a level surface. Unattended cooking on a hob with fat or oil can be dangerous and may result in fire.
- Page 8 If the glass surface becomes cracked, switch off and disconnect the appliance from the electrical supply to avoid the possibility of electric shock and contact your Service Agent. The appliance has an automatic overheat protection which, if activated, may limit functions, or completely turn off the hob.
-
Page 9: Serviceability
This is to claim any warranty during the warranty period after the purchase date. In case of any queries on this subject, a Thetford local service representative can be contacted for additional support related to the installation of the products. -
Page 10: Main Components
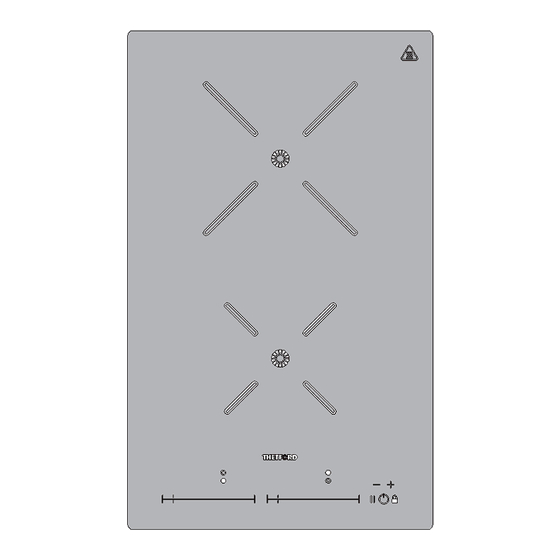
5. Main Components 1.Heat Zone 2 2.Heat Zone 1 3.Control Panel 6. Technical Specifications Table 1: Heat zone specifications SHB9028X Series Heat Zone 1 Heat Zone 2 (145mm ø) (200mm ø) Without Power Boost (kW) With Power Boost (kW) 1.85 Voltage 220-240V AC 50Hz Power max (kW) -
Page 11: Before Installation
Table 2: Dimensions, weight & class SHB9028X Series Dimensions (mm) Appliance weight (Kgs) Class I Class Table 3: Environmental Conditions Environmental Condition Value Operation Max. air intake temperature +70C (at sea level) * Temperature inside cooktop 0-85C (at sea level) * 95% relative humidity (no condensation –air humidity test to be Humidity... -
Page 12: Installation
8. Installation Install the induction hob in a worktop cut−out, prepared as shown. ■ 274mm 3.5mm R 8mm 16mm R 9.5mm This appliance may be installed in a kitchen/kitchen diner but not in a room containing a bath or a shower Follow the minimum dimensions shown in this manual. - Page 13 Maintain the minimum distances between the burners and side, rear, and ■ overhanging parts. 1. Distance between hob and overhanging parts: min. 500mm 2. Distance between hob and the side: min. 100mm 3. Distance between hob and the rear: min. 40mm If you are unable to maintain these minimum distances, protect with non−combustible material.
- Page 14 ■ Fix the appliance in place using 4 clamping screws along with fixings provided as per image below. Check the position of the hob in the worktop and perimeter seal before tightening the wing nuts to 1.2Nm The underside of the appliance must be shielded. It is recommended the shield is manufactured from non−combustible material and located a minimum of 30mm below the lowest part of the appliance.
-
Page 15: Connecting Electricity
9. Connecting Electricity This appliance is supplied with a double insulated cord H05V2V2-F Black cable ■ 90C (BS EN 50525-1), which has a current capacity of up to 15A. This should be connected to a double pole switched mains supply, with 3mm ■... -
Page 16: Use Of The Induction Hob
11. Use of the Induction Hob Read the instructions in Section 3. Safety, first. For the exact location of the controls, see 5. Main Components. Cooking with an induction hob is different to a conventional hob which has either heating elements or hotplates. An induction hob uses powerful electromagnets below the glass surface. - Page 17 NEVER slide the pan across the glass surface. This causes scratches. Place the cookware directly on the ceramic glass. DO NOT put any papers, cloths or trivets. RISK OF BURNING! Using the hob Each heating zone on the hob can be controlled individually using the touch controls. Illuminated displays for both zones provide information on power settings, timer function, pause/resume, power boost, etc.
- Page 18 Controlling each heat zone With the appliance turned on and a suitable pan in place. Press anywhere on the relevant heat zone control to start heating. Power 0 to 9 can be selected (left to right). Power Boost Function (P) The boost function can be activated only for a limited time of 10 minutes for each cooking zone.
- Page 19 Table 4: Cooking Level & Maximum operating time (Automatic switch off) Cooking Level Operating time limit (minutes) Low Temp 6 & 7 Warming Function Selecting below the 0 point puts the heat zone into its warming function “ ”. To keep cooked food warm.
- Page 20 Residual Heat Indicator (H) After use the indicator will show “H” whilst the glass is still hot (≥65C). Setting the timer With the appliance turned ON, press both the plus and minus keys. Setting a timer value can be added or subtracted by using the plus or minus keys. If the timer plus key is pressed first, the display starts with: 1 minute and can be increased in 1-minute increments to the next full 10 ■...
- Page 21 At the end of the selected time a beeper will sound until acknowledgment with the power button. A cooking zone timer can be set for each active cooking zone, by simultaneously pressing the two timer keys. If press several times denotes the timer for all different cooking zones (2), then the egg timer.
-
Page 22: Safe Cooking
Selecting overall current limit With the appliance turned off press the timer plus and minus key together for 2 seconds, confirmed with a "beep". Then press both sliders for 2 seconds (position on the slider irrelevant). Timer Display shows “P0”, power management can be changed on the left slider (0-2) and will be shown on the left display. -
Page 23: Troubleshooting -Error Codes
Cookware/glass/electronics Cool down system. temperature is too high. Use appropriate Cookware is losing its magnetic characteristics cookware Contact Thetford's Internal error Customer Service If the error is automatically cancelled after 8s and the cooking Corresponding zone can be used again. - Page 24 Incorrect power supply and connect cooktop connection properly. The induction unit should not be dismantled, any issues contact Thetford’s Customer Service in www.thetford.com for further guidance. If no error code is displayed, however the unit is suffering poor performance,...
-
Page 25: Cleaning And Maintenance
After each service, the appliance MUST be checked for electrical safety. All servicing must be carried out by an approved competent person. Questions If you have questions about your product, parts, accessories, or authorised services visit www.thetford.com. - Page 26 For our warranty clause, please refer to the conditions mentioned on www.thetford.com. Declaration of Conformity (DoC) Thetford hereby declares that this product is in compliance with the essential requirements and other relevant provisions of the applicable Directives and Standards. A copy of the Declaration of Conformity can be found at...
- Page 28 Copyright 2023-2024 Thetford BV. All rights reserved. SINS2003-0224-V02...
Need help?
Do you have a question about the Domino MK II SHB9028X Series and is the answer not in the manual?
Questions and answers