
Related Manuals for Fantini Rubinetti Acquafit K042BU


Summary of Contents for Fantini Rubinetti Acquafit K042BU
- Page 1 ACQUAFIT Istruzioni / Instructions / Instructions De Montage / Bedienungsanleitung / Instrucciones K042BU K032BU K041BU K031BU...
- Page 2 INDEX - SOMMAIRE - ÍNDICE - ÍNDICE PRE-INSTALLATION - PRÉ-INSTALLATION - PREINSTALACIÓN Safety notices - Consignes de sécurité - Advertencias de seguridad .......pag.3 Thecnical data - Données techniques - Datos técnicos ...............pag.9 Dimensions - Dimensions d’encombrement - Dimensões totais........pag.10 Pre-installation - Pré-installation - Preinstalación................pag.15 INSTALLATION...
-
Page 3: Pre-Installation
PRE-INSTALLATION - PRÉ-INSTALLATION - PREINSTALACIÓN SAFETY NOTICES : please read before installing and using the device - The Manufacturer declines all liability if the product is installed in rooms with systems or structures which do not meet the required legal standards or for work carried out by untrained or unqualified personnel. -
Page 4: Consignes De Sécurité
PRE-INSTALLATION - PRÉ-INSTALLATION - PREINSTALACIÓN CONSIGNES DE SÉCURITÉ : lire avant l’installation et l’utilisation - Le Fabricant décline toute responsabilité au cas où le produit serait installé dans des locaux avec des structures et des installations non conformes ou pour des travaux effectués par un personnel ni qualifié... -
Page 5: Advertencias De Seguridad
PRE-INSTALLATION - PRÉ-INSTALLATION - PREINSTALACIÓN ADVERTENCIAS DE SEGURIDAD: léalas antes de la instala- ción y el uso - El fabricante no asume ninguna responsabilidad si se instala el producto en lo- cales cuyas estructuras e instalaciones no sean conformes, ni tampoco por obras ejecutadas por personal no cualificado y habilitado. -
Page 6: Technical Details
TECHNICAL DETAILS - DONNÉES TECHNIQUES - DATOS TÉCNICOS DHydraulic data - Données hydrauliques - Datos hidráulicos K031U K041U K032U K041U Minimum hydraulic pressure - Pression hydraulique minimale - Presión hidráulica mínima 2 BAR =30 PSI 2 BAR =30 PSI 3 BAR =43 PSI 3 BAR =43 PSI Maximum hydraulic pressure - Pression hydraulique maximale - Presión hidráulica máxima... - Page 7 PRE-INSTALLATION - PRÉ-INSTALLATION - PREINSTALACIÓN Environmental conditions - Conditions environnementales - Condiciones del entorno Room temperature range 41 - 104°F Plage de la Température ambiante - 41 - 104°F Rango de temperatura ambiente - 41 - 104°F This product can be used with pressurised hot water tanks or with instant water heaters. Before installing the product, the water supply pipes must be drained thoroughly Cet article peut être utilisé...
- Page 8 PRE-INSTALLATION - PRÉ-INSTALLATION - PREINSTALACIÓN K041BU 3/8” 1/2” 3 15/16” 17 3/8” 3/16” 21 7/8” 12 5/8”...
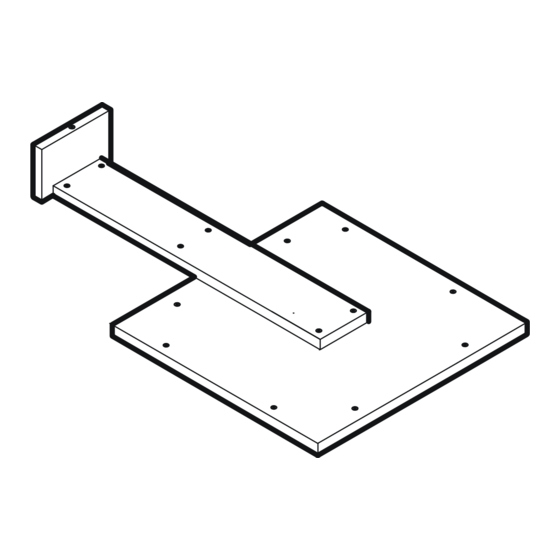
- Page 9 PRE-INSTALLATION - PRÉ-INSTALLATION - PREINSTALACIÓN K042BU 1/2” 16 5/16” 3 15/16” 3/16” 21 7/8” 11 13/16”...
- Page 10 PRE-INSTALLATION - PRÉ-INSTALLATION - PREINSTALACIÓN K032BU 1/2” 3 15/16” 16 5/16” 3/16” 21 7/8” 2 3/4” 11 13/16”...
- Page 11 PRE-INSTALLATION - PRÉ-INSTALLATION - PREINSTALACIÓN K031BU 3/8” 1/2” 3 15/16” 16 5/16” 3/16” 21 7/8” 2 3/4” 12 5/8”...
- Page 12 PRE-INSTALLATION - PRÉ-INSTALLATION - PREINSTALACIÓN K042BU K041BU + K101U DN 15 DN 15 (1/2”) (1/2”) K032BU K031BU + K101U DN 15 DN 15 (1/2”) (1/2”)
-
Page 13: Installation Examples
INSTALLATION EXAMPLES - EXEMPLES D’INSTALLATION - EJEMPLOS DE INSTALACIÓN K042BU DN 15 1/2” H MIXED WATER DN 15 1/2” H EAU MIXTE DN 15 1/2” H AGUA MEZCLADA DN 15 1/2” N°1 (K041U/K042U) N°1 (K041U/K042U) N°1 (K041U/K042U) - Page 14 INSTALLATION EXAMPLES - EXEMPLES D’INSTALLATION - EJEMPLOS DE INSTALACIÓN K032BU DN 15 1/2” DN 15 1/2” H MIXED WATER DN 15 1/2” H EAU MIXTE DN 15 1/2” H AGUA MEZCLADA DN 15 1/2” N°2 (K031U/K032U) N°2 (K031U/K032U) N°2 (K031U/K032U)
- Page 15 INSTALLATION EXAMPLES - EXEMPLES D’INSTALLATION - EJEMPLOS DE INSTALACIÓN K041BU Ø 5/8” DN 15 1/2” Ø 1” DN 15 1/2” 110V RCD≤30ma H MIXED WATER DN 15 1/2” H EAU MIXTE DN 15 1/2” H AGUA MEZCLADA DN 15 1/2” N°1 (K041U/K042U) N°1 (K041U/K042U) N°1 (K041U/K042U)
- Page 16 INSTALLATION EXAMPLES - EXEMPLES D’INSTALLATION - EJEMPLOS DE INSTALACIÓN K031BU Ø 5/8” DN 15 1/2” Ø 1” DN 15 1/2” 110V RCD≤30ma H MIXED WATER DN 15 1/2” H EAU MIXTE DN 15 1/2” H AGUA MEZCLADA DN 15 1/2” N°2 (K031U/K032U) N°2 (K031U/K032U) N°2 (K031U/K032U)
- Page 17 PRE-INSTALLATION - PRÉ-INSTALLATION - PREINSTALACIÓN The control unit with power supply must be installed corrugated conduit ø 5/8” outside of areas 0-1-2-3, inside a closed compartment, corrugated conduit ø mm- 1” which can only be opened using a tool and which complies with control unit the characteristics specified in standard EN 60335-2-105.
-
Page 18: Installation
INSTALLATION - INSTALLATION - INSTALACIÓN URING ALL THE INSTALLATION STAGES, WE RECOMMEND: - to use protective gloves to prevent leaving any marks on the stainless steel surfaces; - to NEVER place the shower head on the surface where the delivery nozzles are. WARNING: before connecting the hose/s, make sure to check that the inside is free from impurities (e.g. - Page 19 NECESSARY TOOLS - OUTILS NÉCESSAIRES - HERRAMIENTAS NECESARIAS 5/64” PACKAGING CONTENTS - CONTENU DE L’EMBALLAGE - CONTENIDO DEL EMBALAJE K042BU K041BU K032BU K031BU...
- Page 20 INSTALLATION - INSTALLATION - INSTALACIÓN A L T O...
- Page 21 INSTALLATION - INSTALLATION - INSTALACIÓN...
- Page 22 INSTALLATION EXAMPLES - EXEMPLES D’INSTALLATION - EJEMPLOS DE INSTALACIÓN K041BU K042BU 5/64” K031BU K032BU 5/64”...
- Page 23 INSTALLATION - INSTALLATION - INSTALACIÓN 5/8” K041BU K042BU Before starting with the installation, it is advisable to let some water run out of the water system so that any impurities con- tained in the system itself may flow out and be removed. If these foreign bodies were to get into the shower head, they could damage its seals and O-rings;...
- Page 24 INSTALLATION - INSTALLATION - INSTALACIÓN 5/8” K031BU K032BU Before starting with the installation, it is advisable to let some water run out of the water system so that any impurities contained in the system itself may flow out and be removed. If these foreign bodies were to get into the shower head, they could damage its seals and O-rings;...
- Page 25 INSTALLATION - INSTALLATION - INSTALACIÓN K031BU/K041B...
- Page 26 INSTALLATION - INSTALLATION - INSTALACIÓN · When installed on glass panels, mirrors or plasterboard walls, leave the head of the screws protruding 1 mm beyond the cladding edge. · En cas d’installation sur verres, miroirs ou parois en placoplâtre, laisser dépasser la tête des vis de 1mm au-delà du ras du revêtement.
- Page 27 INSTALLATION - INSTALLATION - INSTALACIÓN K031BU K041BU...
- Page 28 INSTALLATION - INSTALLATION - INSTALACIÓN...
- Page 29 INSTALLATION - INSTALLATION - INSTALACIÓN...
- Page 30 INSTALLATION - INSTALLATION - INSTALACIÓN 5/8” K041BU/K042BU...
- Page 31 INSTALLATION - INSTALLATION - INSTALACIÓN K031BU/K032BU 5/8”...
- Page 32 INSTALLATION - INSTALLATION - INSTALACIÓN 5/8”...
- Page 33 INSTALLATION - INSTALLATION - INSTALACIÓN K031BU/K041BU...
- Page 34 INSTALLATION - INSTALLATION - INSTALACIÓN...
- Page 35 INSTALLATION - INSTALLATION - INSTALACIÓN...
- Page 36 INSTALLATION - INSTALLATION - INSTALACIÓN ELECTRICAL CONNECTIONS (only modd. K031BU – K041BU– K061U) BEFORE CONNECTING UP THE ELECTRICS, PLEASE READ THE SAFETY NOTICES AT THE START OF THIS MANUAL CAREFULLY. The power supply unit and cabling must be installed by authorised, qualified technicians in line with standard IEC 60364 or the local standards in force.
- Page 37 INSTALLATION - INSTALLATION - INSTALACIÓN désactivant l’interrupteur principal en amont de la ligne électrique. CONSIGNES ÉLECTRIQUES • L’unité de contrôle avec l’alimentation doit être installée à l’intérieur d’un compartiment fermé, ouvrable seulement à l’aide d’un ustensile et conforme aux caractéristiques prévues par l’EN 60335-2- 105, en dehors des zones 0-1-2-3.
- Page 38 INSTALLATION - INSTALLATION - INSTALACIÓN Mod. K041BU – K031BU TOUCH PANEL K101U + EXTERNAL PANEL OPTION - OPTION DU PANNEAU TOUCH K101U + BOÎTIER DE COMMANDE EXTERNE - TASTATUR – OPCIÓN PANEL TOUCH K101U + PANEL EXTERNO. see page 49 voir la page 49 ver pág.
- Page 39 INSTALLATION - INSTALLATION - INSTALACIÓN Installation example with the rectangular version (K031BU). The square version (K041BU) are connected in the same way. For information on using the Touch control panel K101U and external panel (optional), see page 42. CL -> LED cable: extended to 15 3/4”, supplied. CP ->...
- Page 40 INSTALLATION - INSTALLATION - INSTALACIÓN Mod. K031BU – K041BU TOUCH PANEL K101U OPTION - OPTION PANNEAU TOUCH K101U - OPCIÓN PANEL TOUCH K101U see page 49 voir la page 49 ver pág. 49 Ø 5/8” Z o n 110V Z o n RCD≤30ma Z o n Z o n...
- Page 41 INSTALLATION - INSTALLATION - INSTALACIÓN Installation example with the rectangular version (K031BU). The square version (K041BU) is connected in the same way. For information on using the Touch control panel K101U, see page 42. CL -> LED cable: extended to 15 3/4”, supplied. CP ->...
- Page 42 INSTALLATION - INSTALLATION - INSTALACIÓN Mod. K031BU – K041BU EXTERNAL PANEL OPTION - OPTION BOÎTIER DE COMMANDE EXTERNE - OPCIÓN DE PANEL EXTERNO see page 49 voir la page 49 ver pág. 49 Ø 16mm Z o n 110V Z o n RCD≤30ma Z o n Z o n...
- Page 43 INSTALLATION - INSTALLATION - INSTALACIÓN Installation example with the rectangular version (K031BU). The square version (K041BU) is connected in the same way. For information on using the external panel (optional), see page 42. CL -> LED cable: extended to 15 3/4”, supplied. CPE ->...
- Page 44 INSTALLATION - INSTALLATION - INSTALACIÓN IN 2 IN 1 CONNECTING THE CONTROL UNIT Power supply terminal: 110V 4-way connector for Touch panel K101U (optional) Terminal for external panel (optional) LED light connector The connections to terminals are the only ones factory setting) that need to be made by the installer.
- Page 45 INSTALLATION - INSTALLATION - INSTALACIÓN CL -> Cable led: extendido a 157,5”, suministrado de serie. CONNEXIONS UNITÉ DE CONTRÔLE CP -> Cable del panel de mandos Touch K101U (opcional): suministrado con el equipo (distancia máxima de 5 m) Borne d’alimentation : 110V CPE ->...
- Page 46 INSTALLATION - INSTALLATION - INSTALACIÓN OPTIONAL...
- Page 47 INSTALLATION - INSTALLATION - INSTALACIÓN CONNECTING THE CONTROL PANEL (OPTIONAL) Insert the probe in the corrugated conduit and thread it through until it reaches the outlet at the ceiling. Hook up and guide the cable up to the control unit it will be connected to, according to the wiring diagram.
- Page 48 - UTILISATION - USO TOUCH PANEL K101U (OPTIONAL) + EXTERNAL PANEL (OPTIONAL) PANNEAU DE COMMANDES TOUCH K101U (EN OPTION) + BOÎTIER EXTERNE (EN OPTION) PANEL DE MANDOS TOUCH K101U (OPCIONAL) + PANEL EXTERNO (OPCIONAL) TOUCH PANEL K101U (OPTIONAL) PANNEAU DE COMMANDES TOUCH K101U (EN OPTION) PANEL DE MANDOS TOUCH K101U (OPCIONAL)
- Page 49 - UTILISATION - USO Release the button when you reach the desired feel. The chosen feel will remain on. When you turn on FEEL, the last feel selected is activated. Press the button to turn the white light on/off. Advice and recommendations •...
- Page 50 - UTILISATION - USO activa el último color previamente seleccionado. Presione el botón para encender / apagar la cromoterapia LED RGB (secuencias de colores). Manteniendo presionado el botón, inicia una secuencia repetitiva de los siguientes escenarios: ALBA - ENTRE LAS HOJAS - PUESTA DEL SOL - NOCHE.
- Page 51 - UTILISATION - USO NOTES: Activating a function when another one is already active deactivates the one already running. If you have a Touch panel, this panel adjusts the button backlighting to the function selected using the buttons. Signaux d’Avertissement INITIALISATION : •...
- Page 52 - UTILISATION - USO PANEL EXTERNO (OPCIONAL) Botón de luz blanca (On/Off): Una breve pulsación del botón enciende/apaga la luz blanca. Botón de función COLOR - FEEL (On/Off + Change): Pulsando brevemente el botón: la lámpara de cromoterapia se enciende/apaga. Pulsando y manteniendo pulsado el botón se inicia una secuencia repetitiva de: •...
- Page 53 CLEANING - NETTOYAGE - LIMPIEZA CLEANING THE NOZZLES - NETTOYAGE DES BUSES - LIMPIEZA DE LAS BOQUILLAS CLEANING STAINLESS STEEL SURFACES Clean all surfaces using a soft, damp, soapy cloth. Rinse and dry carefully. When cleaning, do NOT use: • aggressive, corrosive or abrasive detergents (e.g. acetone, hydrochloric/muriatic/sulphuric acid, sodium hy- droxide, chlorine, bleach, ammonia, silver-cleaning products, powdered detergents, etc.);...
- Page 54 CLEANING - NETTOYAGE - LIMPIEZA LIMPIEZA DE SUPERFICIES DE ACERO INOXIDABLE Limpie todas las superficies con un paño suave empapado en agua y jabón. Termine con un enjuague y un secado cuidadoso. Para la limpieza NO utilice: • detergentes agresivos, corrosivos o abrasivos (por ejemplo, acetona, ácido clorhídrico/muriático o sulfúrico, sosa cáustica, cloro, lejía, amoniaco, productos de limpieza de plata, detergentes en polvo, etc.).
- Page 55 CLEANING - NETTOYAGE - LIMPIEZA Unhook the fixed shower head described on page 63. Dismantle the shower head arm. To open the fixed shower head: unscrew the screws holding it in place, then open up the head to access the nozzles inside. To replace the nozzles, simply slide them off upwards. Décrocher le pommeau en suivant dans le sens inverse les opérations à...
- Page 56 CLEANING - NETTOYAGE - LIMPIEZA...
- Page 57 PERSONAL NOTES - REMARQUES PERSONNELLES - NOTAS PERSONALES...
- Page 58 Fratelli Fantini SpA via Buonarroti, 4 Pella (NO) Italia T +39 0322 918411 r.a. F +39 0322 969530 fantini@fantini.it www.fantini.it...
Need help?
Do you have a question about the Acquafit K042BU and is the answer not in the manual?
Questions and answers