Table of Contents
Advertisement
Quick Links
Advertisement
Table of Contents

Related Manuals for Ronix 1250


Summary of Contents for Ronix 1250
- Page 1 CARPET VACUUM CLEANER 1250...
-
Page 3: Technical Specifications
TECHNICAL SPECIFICATIONS Model 1250 Power 1400W Voltage 220-240V Frequency 50-60Hz Dust Capacity Vacuity >18KPA Airflow Rate 1.8m³/min 32mmx1.8m plastic hose with detergent gun 2pcs 32mmx44cm plastic tubes(New material) HEPA filter + Sponge filter Accessory 20L dust bag 32mm sofa brush... -
Page 4: General Safety Rules
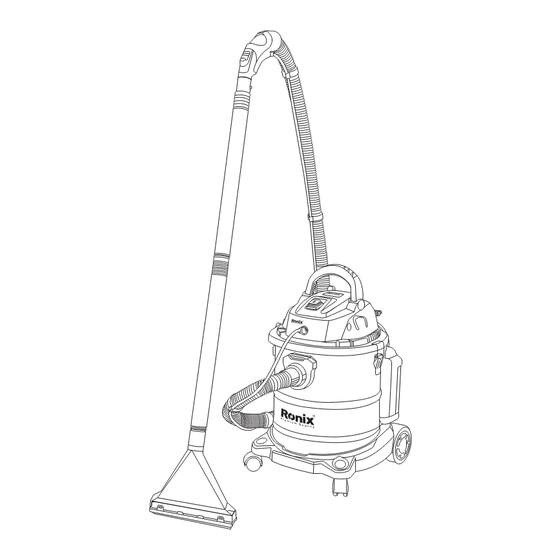
1- Tank unit (head, Tank, base) 2- Flexible hose + detergent spray gun 3- Connection tubes 4- Washing brush (for carpet) 5- Front wheels 6- Rear wheels 7- Detergent tank 8- HEPA filter 9- Sponge filter 10- Dust bag (for dry use) 11- Washing brush (for sofa) 12- Wet&dry floor brush 13- Crevice nozzle... -
Page 5: Installation Process
INSTALLATION PROCESS BASE & WHEELS DETERGENT TANK Press the 2pcs front wheels into the Fit the detergent tank on the base, base position, and screw the 2pcs with the humps into the slots; rear wheels. Press the detergent tank onto the stainless steel one, and buckle it FILTERS 1.head unit... - Page 6 4.Buckle the head unit on the tank well after upper process. HOSE, TUBE, BRUSH & DETERGENT PIPE Check the leakproofness and tightness of the following junctures of different parts, in case of suction and sewage leakage. hose end CARPET VACUUM CLEANER...
- Page 7 hose end 1-Connect the hose, 2pcs tubes and different kinds of brushes together according to the picture; different brushes should be connected with the detergent spray gun, or 2pcs tubes respectively; twist the hose end clockwise. USER MANUAL...
- Page 8 sealing lock of the detergent pipe 2. Before operating the detergent sprayer, fit all the sealing locks at the right position and twist them clockwise CARPET VACUUM CLEANER...
-
Page 9: Operation
DETERGENT detergent level indicator 1-Fill the detergent tank with detergent; The detergent level indicator should the max volume is 3L; always be under the opening of the 2-Thick detergent should be diluted or detergent tank, otherwise detergent the pipe might be clogged. will be hard to pumped out. - Page 10 CARPET & SOFA WASHING Choose the corresponding brush for cleaning and please review Part 2 for learning what brush it should be; make sure that there’s enough detergent in the tank for keeping the best performance; dust bag should be removed as sewage will ruin it.
-
Page 11: Floor Cleaning
FLOOR CLEANING AIRFLOW ADJUSTMENT Use the wet&dry floor brush for Press the button on the detergent cleaning floor, dust, rubbish, spray gun to adjust the suction. spillage, etc. blower FLOOR CLEANING hose end blower hose end 1. Insert the end of the plastic hose into The blower, and twist it clockwise to Lock;... -
Page 12: Safety Instruction
FILTER-CLEANING FUNCTION filter-cleaning button Under use of cleaning thick dust in garden, workshop, newly decorated room, the filters will get clogged easily. In this case, press the filter cleaning button on the back of the unit head ( with finger or the spray gun ) for several times, and the suction power will recover for a while. - Page 13 6-Do not wrest, tramp, or haul hose in case of making it damaged. 7-Do not immerse the head unit in water or wash with water in case that water goes into the electrophorus parts and causes personal injury. 8-The electrical parts must be replaced by the designated repairing center or professionals 9-Do not use this appliance in 10-Do not jam the air inlet mouth, in...
- Page 14 13-Do not collect objects which can 14-Do not overturn the machine in case easily attach on the filter such as water goes into the motor and damages calcareousness powder, gesso and the motor. graphite powder. Because those will block the ventilation damage motor. PROTECTIVE DEVICE (WATER VALVE) 1-When the water in the barrel is full, the device begins to work.
-
Page 15: Lubricating Oil
MAINTENANCE CLEANING After heavy work or when the barrel is full of dust and sewage which causes suction decrease, please follow the procedure for maintenance. 1-Unfasten the clips and leave the head unit. 2-Take off the filter bag, pour out and clean up the dust and sewage in tank, and wipe the tank dry. - Page 16 Symptom Possible cause Corrective action Dust / liquid / detergent 1. Accessories are not 1. Follow the instruction in Part leaks from the hose / tubes installed well thus the 3 and check the tightness of / pipes leakproofness is not good accessory joints.
- Page 17 Regularly clean the tool’s air vents or whenever the vents start to become obstructed. To maintain product SAFETY and RELIABILITY, repairs, carbon brush inspection and replacement, any other maintenance or adjustment should be performed by RONIX SERVICE Authorized or RONIX SERVICE Centers, always using RONIX SERVICE replacement parts. USER MANUAL...
Need help?
Do you have a question about the 1250 and is the answer not in the manual?
Questions and answers