Table of Contents
Advertisement
Quick Links
USER GUIDE
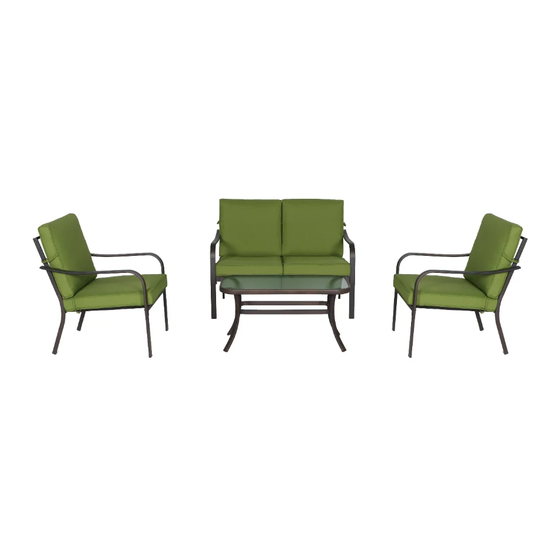
STANTON 4-PIECE PATIO FURNITURE
CONVERSATION SET
CAUTION
For outdoor
use only!
For product assistance &
THIS GUIDE CONTAINS
missing or replacement parts:
IMPORTANT SAFETY
WE CAN HELP
INFORMATION.
Email: Walmar t@aeoutdoor.com
PLEASE READ AND KEEP
877-980-6928
FOR FUTURE REFERENCE.
Monday-Friday 7:30 am to 4:30 pm PST
Walmart.com
Find more at
Advertisement
Table of Contents

Subscribe to Our Youtube Channel
Summary of Contents for Mainstays STANTON
- Page 1 USER GUIDE STANTON 4-PIECE PATIO FURNITURE CONVERSATION SET CAUTION For outdoor use only! For product assistance & THIS GUIDE CONTAINS missing or replacement parts: IMPORTANT SAFETY WE CAN HELP INFORMATION. Email: Walmar t@aeoutdoor.com PLEASE READ AND KEEP 877-980-6928 FOR FUTURE REFERENCE.
-
Page 2: Table Of Contents
Contents & Information CONTENTS & INFORMATION ..2 ASSEMBLY ........ 7-12 OVERVIEW ........3 CARE AND MAINTENANCE ....12 SAFETY PRECAUTIONS ....3-4 WARRANTY ......13-14 MODEL DESCRIPTION ....5 SPECIFICATIONS ......14 Setup ........5 Tools Needed ......5 Hardware ........5 Parts List........ -
Page 3: Overview
Overview LOVE SEAT SINGLE CHAIR TABLE Safety Precautions CAUTION PLANNING ASSEMBLY • Read all instructions before assembly To avoid damaging this product, assemble it on a soft non-abrasive surface such as carpet or cardboard. NOTE: • Will require two or more people to assemble this product. - Page 4 Safety Precautions ATTENTION • Use the correct bolts as indicated. Do not tighten any of the bolts until the product is completely assembled. • Do not discard of any of the packaging until you have checked that you have all of the parts required for assembly, and have no damage pieces.
-
Page 5: Model Description
Model Description SETUP TOOLS NEEDED ×2 Wrench Phillips Screwdriver Ratchet Tool HARDWARE Part Description Picture Part Description Picture Lock Nut Bolt (18MM) Bolt (30MM) Washer Bolt (40MM) ST 4.8*13 Bolt (55MM) PARTS Part Description Part Description Leg Connector Bracket Single Chair Seat Panel Table Leg Single Chair Back Panel Single Chair Seat Cushion... -
Page 6: Parts Diagram
Model Description PARTS DIAGRAM... -
Page 7: Assembly
Assembly 1. ASSEMBLY SINGLE CHAIR REQUIRED 1. Insert Seat (A) to the protruding tube on Back (B). (A) Single Chair Seat Panel x2 (B) Single Chair Back Panel x2 2. Using Bolts (DD) and ratchet assemble Seat (A) and Back (B) together. REQUIRED Ratchet Tool (DD) Bolt... - Page 8 Assembly 1. ASSEMBLY SINGLE CHAIR REQUIRED 3. Using Bolts (AA) and (BB) attach Left and Right Armrest (C&D) to the seat and back. RATCHET (C) Left Armrest x2 (D) Right Armrest x2 (AA) Bolt (18MM) x8 (BB) Bolt (30MM) x4 4.
- Page 9 Assembly 2. ASSEMBLY LOVE SEAT REQUIRED 1. Insert Seat (E) to the protruding tube on Back (F). (E) Love Seat Panel (F) Loveseat Back Panel 2. Using Bolts (DD) and ratchet assemble Seat (E) and Back (F) together. REQUIRED RATCHET (DD) Bolt (55MM) x3...
- Page 10 Assembly 2. ASSEMBLY LOVE SEAT REQUIRED 3. Using Bolts (AA) and (BB) attach Left and Right Armrest (C&D) to the seat and RATCHET (C) Left Armrest x1 back. (D) Right Armrest x1 (AA) Bolt (18MM) x4 (BB) Bolt (30MM) x2 4.
- Page 11 Assembly 3. ASSEMBLY TABLE REQUIRED 1. Insert Table Leg (I) into the joint on Table Top (G) (G) Table Top x1 and tighten Bolts (GG). RATCHET (I) Table Leg x4 (GG) ST 4.8*13 x4 REQUIRED 2. Assemble Leg Connector Bracket (H) to legs using Bolts 40MM (CC) ,Washers (FF) and Lock Nut (EE).
-
Page 12: Care And Maintenance
Assembly 3. ASSEMBLY TABLE 3. Complete assembly. Care and Maintenance • Use a furniture cover when not in use. • Inspect and tighten all bolts and fasteners on a regular basis to ensure the proper performance and safety of your product. •... -
Page 13: Warranty
Warranty YEAR LIMITED WARRANTY COVERING DEFECTIVE PARTS Contact Manufacturer for Additional Information For a period of two (2) years after date of purchase, the Manufacturer will either repair or replace defective components in accordance with this Limited Warranty. This warranty is between the Manufacturer and the original purchaser and is valid only when accompanied by the original purchaser’s sales receipt showing original date of purchase and location of purchase. -
Page 14: Specifications
Warranty THIS IS THE ENTIRE EXCLUSIVE EXPRESS LIMITED LIABILITY. THE MANUFACTURER NEITHER MAKES NOR IS RESPONSIBLE FOR ANY OTHER WARRANTIES, EITHER EXPRESS OR IMPLIED, INCLUDING THOSE OF RETAILING DEALERS. THIS EXCLUSIVE REMEDY IS LIMITED TO RECEIPT OF A CREDIT IN CONNECTION WITH THE REPAIR OR REPLACEMENT OF ANY PRODUCT OR COMPONENT DEEMED TO BE DEFECTIVE UNDER THE TERMS AND CONDITIONS AS STATED IN THIS WARRANTY.


Need help?
Do you have a question about the STANTON and is the answer not in the manual?
Questions and answers