Advertisement
Quick Links
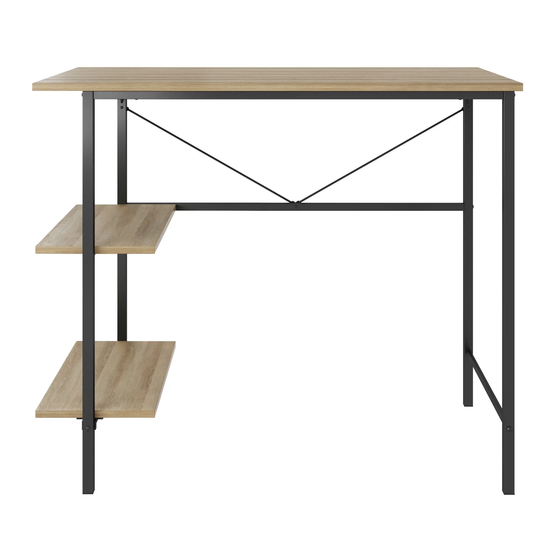
Mainstays Side Storage Desk
LOT NUMBER:
2079382640
Examine all packaging material for small parts that may have come loose during shipment. Periodic checks are recomended to ensure that all
3114084726
components are in proper position, tight and free from damage. THIS INSTRUCTION BOOKLET CONTAINS IMPORTANT SAFETY
1248095673
INFORMATION. PLEASE READS AND KEEP FOR FUTURE REFERENCE. Adult assembly is required.
Made in China
Contact Hillsdale Furniture for parts / 502-562-0000 / https://hillsdalefurniture.com/Main/Home/ContactUs
INTERACTIVE ASSEMBLY INSTRUCTIONS
For immediate help with assembly or product information
DATE PURCHASED:
call our toll-free number:
1-800-243-9758
Mon - Fri 9:00 am to 5:00 pm Eastern Time
/
/
Version 1.0 ; Date : 02-23-2023
page 1
Advertisement

Related Manuals for Mainstays Side Storage Desk


Summary of Contents for Mainstays Side Storage Desk
- Page 1 Mainstays Side Storage Desk INTERACTIVE ASSEMBLY INSTRUCTIONS For immediate help with assembly or product information call our toll-free number: 1-800-243-9758 Mon - Fri 9:00 am to 5:00 pm Eastern Time LOT NUMBER: DATE PURCHASED: Version 1.0 ; Date : 02-23-2023 2079382640 Examine all packaging material for small parts that may have come loose during shipment.
- Page 2 DANGER • Risk of suffocation! • Keep any packaging materials away from children. Cleaning & Maintenance Metal Furniture Care Instructions Before Getting Started • Read the instructions carefully prior to • Keep the product away from direct heat and • For everyday cleaning, chrome, brass, assembling the product.
- Page 3 PARTS CONTENTS Before getting started, ensure the package contains the following components: Down Shelf Up Shelf Top Panel Left Back Leg Left Front Leg Up Front Supporting Tube Right Front Leg Up Rear Supporting Tube Right Back Leg Metal Wire Right Bottom Supporting Tube Bracket Left Bottom Supporting Tube...
- Page 4 HARDWARE 1. M6 x 40mm 2. M4 x 26mm 10 x 4. M4.2 x 40mm 3. M4 x 12mm 10 x 5. M4 x 15mm 6. M4 x 15mm TOOLS REQUIRED FOR ASSEMBLY (NOT INCLUDED) 3.5m / 12" DO NOT USE POWER TOOLS TO ASSEMBLE THIS PRODUCT. USE OF POWER TOOLS WILL INVALIDATE ANY CLAIM AND MAY DAMAGE THIS PRODUCT MAKING IT UNSAFE.
- Page 5 Assembly M6 x 40mm STEP 1 by using screws 1 Install parts STEP 2 M4 x 26mm The second step is to join the structure in the first step to Part , using screws M4 x 12mm Contact Hillsdale Furniture for parts / 502-562-0000 / https://hillsdalefurniture.com/Main/Home/ContactUs page 5 Version 1.0 ;...
- Page 6 Assembly M6 x 40mm STEP 3 by using screws 1 Install parts STEP 4 M4 x 26mm In this step is to join the structure in the step three to Part , using screws M4 x 12mm Contact Hillsdale Furniture for parts / 502-562-0000 / https://hillsdalefurniture.com/Main/Home/ContactUs page 6 Version 1.0 ;...
- Page 7 Assembly STEP 5 Installing the part to part , using screw M6 x 40mm Contact Hillsdale Furniture for parts / 502-562-0000 / https://hillsdalefurniture.com/Main/Home/ContactUs page 7 Version 1.0 ; Date : 02-23-2023...
- Page 8 Assembly M6 x 40mm STEP 6 In this step, the installation of part To Part is mounted together with Part using screws 1 Contact Hillsdale Furniture for parts / 502-562-0000 / https://hillsdalefurniture.com/Main/Home/ContactUs page 8 Version 1.0 ; Date : 02-23-2023...
- Page 9 Assembly M4 x 12mm STEP 7 Installing Part and part , it is necessary to lay the structure as in the diagram. Attach Part and part to the structure with screws Screw from the bottom as shown in the diagram. Contact Hillsdale Furniture for parts / 502-562-0000 / https://hillsdalefurniture.com/Main/Home/ContactUs page 9 Version 1.0 ;...
- Page 10 Assembly STEP 8 M4.2 x 40mm To keep the middle shelf stable, screw part together. Using screws 4 Contact Hillsdale Furniture for parts / 502-562-0000 / https://hillsdalefurniture.com/Main/Home/ContactUs page 10 Version 1.0 ; Date : 02-23-2023...
- Page 11 Assembly M4 x 15mm STEP 9 M4 x 15mm To keep this table solid, part is fixed at both side of the leg with screw and tightening head Contact Hillsdale Furniture for parts / 502-562-0000 / https://hillsdalefurniture.com/Main/Home/ContactUs page 11 Version 1.0 ; Date : 02-23-2023...
- Page 12 Assembly M4 x 15mm STEP 10 M4 x 15mm For the final step, lock the both parts in the middle of Part by using screws and tightening head Contact Hillsdale Furniture for parts / 502-562-0000 / https://hillsdalefurniture.com/Main/Home/ContactUs page 12 Version 1.0 ; Date : 02-23-2023...
- Page 13 Assembly STEP 11 Contact Hillsdale Furniture for parts / 502-562-0000 / https://hillsdalefurniture.com/Main/Home/ContactUs page 13 Version 1.0 ; Date : 02-23-2023...
Need help?
Do you have a question about the Side Storage Desk and is the answer not in the manual?
Questions and answers