Sennheiser EM 3031-U Instructions For Use Manual
Hide thumbs
Also See for EM 3031-U:
- Instructions for use manual (100 pages) ,
- Service manual (76 pages) ,
- Datasheet (4 pages)
Table of Contents
Advertisement
Quick Links
Advertisement
Table of Contents

Subscribe to Our Youtube Channel
Related Manuals for Sennheiser EM 3031-U


Summary of Contents for Sennheiser EM 3031-U
- Page 1 EM 3031-U EM 3032-U Instructions for use...
-
Page 2: Table Of Contents
All of Sennheiser’s professional expertise and more than fifty years of experience have gone into the creation of this state-of-the-art product. Please take a few moments to read these instructions carefully. We want you to enjoy your new receiver quickly and to the full. -
Page 3: Brief Description, Variants, Special Features
With the EM 3031-U and EM 3032-U receivers, Sennheiser offers the professional user high quality RF receivers with a high level of operational reliability and ease of use. The EM 3031-U and EM 3032-U receivers together with the suitable hand-held and pocket transmitters permit wireless transmission with studio quality sound. -
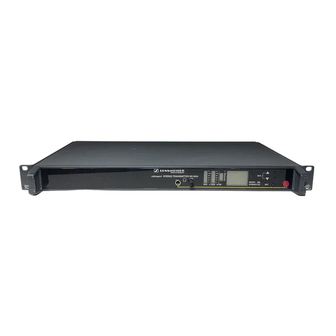
Page 4: Connections And Operating Elements
Connections and operating elements Headphone socket “ (6.3 mm) ø Headphone volume control Multi-function display panel Buttons for selecting the receiving frequency SET/storage button for channel programming Changing the receiving frequency: Button ° Buttons ° Button for about 3 seconds... - Page 5 Fuse holder and mains voltage selection 2-pin IEC mains connector Squelch control Straw relief clamp for mains cable Service interface (not used in normal operation) AF output XLR-3, balanced Control for AF output level at the XLR socket Antenna input B Antenna input A...
-
Page 6: Noise Reduction With Hidyn Plus
AF level on the transmitter side in a ratio of 2:1 (related to dB), and expands it in an exactly the same way on the receiver side. The optimisation of the dynamic range and the supporting effect of the control amplifier in the transmitter effectively reduce modulation problems. -
Page 7: Diversity Reception
A receiving antenna receives not only the electromagnetic waves which reach it by a direct path, but also the reflections of these waves which are created in the room by walls, windows, ceilings and fittings. When these waves are superimposed, destructive interference occurs, which can also be called “field strength gaps”. -
Page 8: Assembly And Mounting, Assembly Instructions
For use as a stand-alone receiver, it is recommended that the supplied telescopic antennæ are used. They can be mounted quickly and easily to the rear of the receiver and are suitable for all applications where – good reception conditions provided – a wireless transmission system is to be used without a large amount of installation work. - Page 9 Mounting the receiver into a rack With the two rack mount “ears“ supplied, the receiver can be mounted into a 19" rack (1 U). The rack mount “ears“ are screwed to the receiver on the left and right Note If you wish to connect the antennæ to the front side, you must now pull the cables of the GA 3030-AM antenna mount through the holes on the rack mount “ears“...
-
Page 10: Connection And Mounting Of Remote Antennæ
The best reception quality is obtained with the Sennheiser A12 AD-UHF active antenna. Antenna and receiver can be connected with a RG 58 co-axial cable. Ready made up antenna cables from Sennheiser are available as accessories with lengths of 1 m, 5 m and 10 m (see chapter 20) Attention! To supply the antenna booster integrated in the A12 AD-UHF active antenna, a direct voltage (which can not be switched off) is output via the antenna sockets. -
Page 11: Switching The Mains Voltage / Mains Connection
Note A straw relief clamp is particularly important when the receiver is permanently rack mounted. Inside the rack there are often a large number of cables - a straw relief clamp bracket prevents the cables from pressing each other out. -
Page 12: Putting The Receiver Into Operation
The receiver is switched on with the ON / OFF switch . Display panel is now lit up to show that the receiver is switched on, and the last frequency set is shown (see chapter 10). The display “ “ (see chapter 13) is lit up . -
Page 13: Changing The Receiving Frequency
With buttons you can now select a different frequency. The display always jumps to the next fixed frequency setting in the program. 8 channels are allocated to each range. The 4 possible ranges are always shown by the display in display panel Have you set the frequency correctly? Then press button (“... -
Page 14: Selection And Combination Of Possible Receiving Frequencies
Selection and combination of possible receiving frequencies Each EM 3031 receiver (or each of the two EM 3032 receivers) can be programmed with a maximum of 32 receiving frequencies within the switching bandwidth. These receiving frequencies are divided into 4 groups. -
Page 15: Reprogramming The Receiving Frequencies - No Problem
Number of receiving frequencies For ease of use, or if required by country-specific restrictions on the frequency usage, it is also possible to program less than 32 receiving frequencies. Your local Sennheiser distributor will be happy to help you in the selection of your receiving frequencies. -
Page 16: Power Of The Received Radio Signal
( V) and the level control of the AF signal – i.e. the modulation of the RF signal (in %) are shown. Both displays have an overmodulation display. If the signal is too high, the text “PEAK“ lights up briefly. Short overmodulation is not critical. -
Page 17: Advanced Muting Function
This receiver also features AMF (Advanced Muting Function). This special electronic feature comes into effect when an RF signal drops by about 50 dB in a short time. The reception is then muted for 3 seconds. AMF thus suppresses the annoying switch-off click when a transmitter is switched off. -
Page 18: Monitoring The Sound Signal, Headphone Connection
The Sennheiser HD 25 headphone is especially usefull for this purpose. In order to judge the quality of the received sound signal even under unfavourable conditions (low AF level in the transmitter) and with high ambient noise (e.g. on the stage), the sound signal at socket can be monitored at an amplification of up to 30 dB compared with the LINE output. -
Page 19: Replacing A Fuse
A faulty fuse should always be regarded as a warning. In most cases, the cause is harmless – a short voltage surge or some similar cause has triggered the protective mechanism. When the fuse has been replaced, the receiver works again. -
Page 20: Sennheiser Transmitters Report Their Battery Status
This information can be evaluated with the EM 3031 / EM 3032 receivers. When the battery capacity is so low that only a transmission time of about 20 to 30 minutes BATT“ flashes on the display panel remains, the text “LOW... -
Page 21: Suitable Sennheiser Transmitters
Suitable Sennheiser transmitters For the optimum use of the excellent reception qualities of the EM 3031 / EM 3032 receivers, Sennheiser offers hand-held and pocket transmitters in a variety of configurations: Pocket transmitters: SK 1063-U (without display of battery condition) -
Page 22: Error Messages
™, ERR £ ¢, there messages for service purposes. If you see error messages such as is a fault in the receiver unit which can only be corrected by your local Sennheiser service departement. Error checklist Error Possible cause Receiver does not work;... -
Page 23: Recommended Accessories
Active antenna A 12 UHF Cat. no. 04156 • Ground plane antenna GZA 1036-9 Cat. no. 02332 • Co-axial cable, 1 m GZL 1019 A1 Cat. no. 02324 • Co-axial cable, 5 m GZL 1019 A5 Cat. no. 02325 •... -
Page 24: Technical Data
115/230 V AC +10%/-15% Power consumption EM 3031 / 3032 max 10 VA / max 15 VA Dimensions (without rack mount “ears”) 436 x 215 x 43 mm (19", 1 U) Weight approx EM 3031 / 3032 3300 g / 4000 g... - Page 25 Änderungen vorbehalten Subject to alterations Sous réserve de modification Con riserva di modifiche Reservado el derecho a introducir modificaciones Wijzigingen voorbehouden Sennheiser electromic GmbH & Co. KG Telefon +49 (0)5130/600 0 D-30900 Wedemark Telefax +49 (0)5130/600 300 Printed in Germany Publ.
Need help?
Do you have a question about the EM 3031-U and is the answer not in the manual?
Questions and answers