Table of Contents
Advertisement
Advertisement
Table of Contents

Related Manuals for THOMSON RR640CD


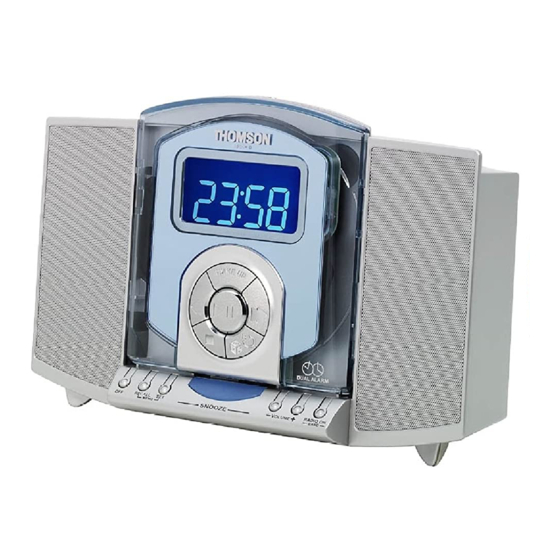
Summary of Contents for THOMSON RR640CD
- Page 2 MAINS CONNECTIONS MAINS OUTLET POWER SUPPLY: 230V ~50Hz Note: Power is fed to the unit even when it is not functioning. To cut the power supply off, the power cable must be unplugged.
- Page 3 ALERTING YOU OF I M P O R T A N T S I D E . R E F E R S E R V I C I N G " D A N G E R O U S...
- Page 4 The descriptions and characteristics in this owner’s manual are for the purpose of general reference only and not as a guarantee. In order to provide you with the highest quality product, we may make changes or modifications without prior notice. The English version serves as the final reference on all...
-
Page 5: Table Of Contents
Setting Wake to Radio ......7 Setting Wake to CD ......... 8 Adjusting Snooze Duration ..... 9 To Silence the alarm momentarily ... 9 To Stop alarm from sounding ..9 To cancel alarm completely ....9 Setting NAP Duration ...... 10... -
Page 6: Before Your Begin
AC power is restored so substantially reduced. Memory you will not have to reset the time or holding time for a fresh alkaline the alarm. With battery back-up, if battery is approximately 8 hours... -
Page 7: General Controls
General Controls VOLUME - / + - Adjusts volume level. Front View RADIO ON / BAND - Turns radio on. Selects between FM and MW radio band. WAKE UP - Selects Wake to CD mode track number and saves selected radio station as wake up station. -
Page 8: Top View
WAKE 1 - Activates Wake 1 settings Back View and change wake 1 mode. WAKE 2 - Activates Wake 2 settings RADIO FM MONO / STEREO - In radio and change wake 2 mode. mode, selects between mono and stereo CANCEL - Cancels wake settings. -
Page 9: Display
Note: Note: Note: Note: Note: back of the unit to LO for dimmer display The display backlight colour will light or set to HI for brighter display. be in red regardless of what you have selected in the followng Selecting Display Colour... -
Page 10: Operating The Clock
2. Press SET CLOCK / WAKE until WAKE 1 Setting Time appears on the display. 3. Press << REV or FWD >> to set the 1. Press SET CLOCK / WAKE, will wake time. appear on the display. -
Page 11: Setting Wake To Radio
3. Press << REV or FWD >> to select • To change to another wake the time you want music to start mode (e.g. from CD to radio), playing. -
Page 12: Setting Wake To Cd
WAKE TO 3. Press << REV or FWD >> to select CD mode is selected. the time you want music to start • To change to another wake playing. -
Page 13: Adjusting Snooze Duration
• If you press WAKE 1 or WAKE 2 1. Press and hold SNOOZE. button again, the previous preset time 2. Press << REV or FWD >> on the top remains unchanged. of the unit to set the “quiet” period... -
Page 14: Setting Nap Duration
Nap will not be activated again switch back to real clock time after the following day at the same about 3 seconds. time. 2. Press << REV or FWD >> to set nap Nap alarm is equipped with time. GRAD-U-WAKE GRAD-U-WAKE... -
Page 15: Radio
Radio 4. Adjust VOLUME - or + to your desired Listening to the Radio listening level. 1. Press RADIO ON/BAND to turn on the radio. “UP” will show briefly 2. Press RADIO ON/BAND again to on the display when you select FM/MW. -
Page 16: Radio Frequency Memory
1 alarm memory location) 3. Press MEMO SET to cofirm your preset stations can be stored. settings. You can also overwrite preset If memory is full, you will see “--” on the display. station numbers by pressing MEMO SET MEMO SET... -
Page 17: Cd Player
CD Player Listening to compact disc Play Mode 1. Press OPEN / CLOSE to open the door Press to select any repeat and 2. Insert a disc and press OPEN / CLOSE shuffle options. to close the door Repeat current track - 3. -
Page 18: Sleep
Sleep You can drift off to sleep to CD or radio knowing that the unit will turn itself off automatically. If alarm is set, the unit Note: Note: Note: Note: Note: will turn on again as programmed. • The next time you reactivate 1. -
Page 19: Care And Maintenance
Prior to cleaning the exterior, be sure to • Do not touch the signal surfaces. Hold unplug the power cord from the AC by the edges, or by one edge and the power outlet. Wipe the exterior with a hole.
Need help?
Do you have a question about the RR640CD and is the answer not in the manual?
Questions and answers