
Related Manuals for Corriveau Sorento B101279


Summary of Contents for Corriveau Sorento B101279
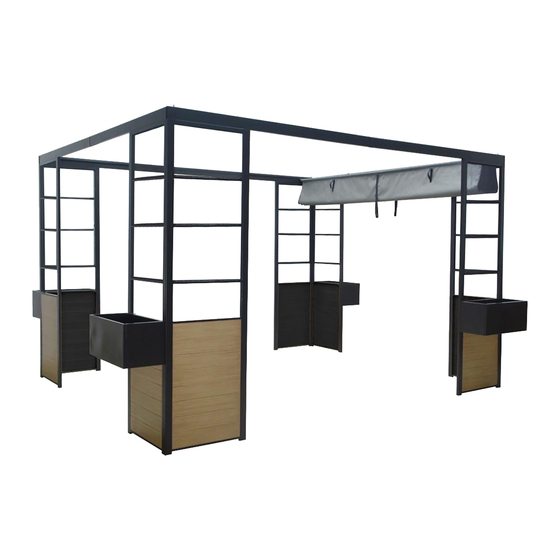
- Page 1 Sorento pergola 10'x12' - Pergola Sorento 10'x12' B101279- (2024) Assembly instruction - Plan d’assemblage...
-
Page 2: Important Notice
IMPORTANT NOTICE Pour le français voir pages 4 et 5 Please read and follow all safety statements, warnings, assembly instructions, use & care directions before attempting to assemble. Each of the recommendations must be followed to ensure the utmost solidity. Security Rules Warning : Keep flame and heat sources away from the pergola. - Page 3 Care Avoid using a pressure washer. The use of a mild soap with warm water is the best solu- tion for the frame only. A clear water rinse is necessary then. Never use soap on fabric, this will reduce their durability, consequently their lifespan and general look. Warranty Covered : We warrant to the original purchaser for 1 year.
- Page 4 AVIS Veuillez lire et suivre toutes les notifications relatives à la sécurité, précautions générales, ins- tructions d’assemblage, directives d’utilisation et d’entretien avant de procéder à l’assemblage. Règles de sécurité Avertissement : Tenir toutes flammes ou sources de chaleur éloignées de cette pergola. L’armature et le tissu peuvent brûler s’il est exposé...
- Page 5 Entretien Ne jamais laver à l’aide d’une machine à pression élevée. On recommande d’utiliser un savon doux combiné à une eau chaude pour le lavage de la structure. Un rinçage à l’eau claire est requis ensuite. Ne jamais utiliser de savon sur les tissus, cette pratique réduirait leurs propriétés et par conséquent leur longévité...
- Page 6 Parts list: Liste de pièce: Drawing Description Illustration QTÉ Post Poteau Post Poteau Post Poteau Post Poteau Long crossbar Traverse longue Long crossbar Traverse longue Short crossbar Traverse courte Short crossbar Traverse courte Canopy tubing Tube de toile...
- Page 7 Parts list: Liste de pièce: Drawing Description Illustration QTÉ Connecting tube Tube de liaison Sliding hook Crochet de glissement Canopy Toile Flower pot back panel Panneau arrière du pot de fleurs Flower pot front panel Panneau avant du pot de fleurs Flower pot side panel Panneau de côté...
- Page 8 Hardware: Quincaillerie: Drawing Description Illustration QTÉ Bolt M6x15mm Vis M6x15mm Bolt M6x30mm Vis M6x30mm Bolt M6x40mm Vis M6x40mm Bolt half-threaded M6x30mm Vis semi-fileté M6x30mm Washer Rondelle Allen key Clé Allen...
- Page 10 Step 1: Do not tight the bolts completely yet. Fix the posts (A) to the posts (C) by using the bolts (CC) with washers (EE) as shown in fig. 1. Then, fix the posts (B) to the posts (D) by using the bolts (CC) with washers (EE) as shown in fig.
- Page 11 Step 2: 1. Bolts can be tightened completely. Insert the long crossbars (E) into the long crossbars (F) by using the bolts (AA) as shown in fig. 1. Then, insert the short crossbars (G) into the short cross- bars (H) by using the bolts (AA) as shown in fig. 1. 2.
- Page 12 Step 4: Bolt can be tightened completely. Fix the connecting tubes (J) into the canopy tubing (I) by using the bolts (AA) as shown in fig. 1. Then, insert the sets (I/J) though the canopy (L) sleeves as shown in fig. 2. Étape 4: La vis peut être serrée complètement.
- Page 13 Step 5: Insert the bolts (DD) through the sliding hooks (K) and fix to the canopy tubing (I) as shown in fig. 1. Étape 5: Insérer les vis (DD) au travers des crochets de glissement (K) et les fixer au tube de toile (I) tel qu'illustré...
- Page 14 Step 6: 1. Install the sliding hooks (K) of the assembly from step 5 onto the long crossbars (E & F). Then, using the bolts (BB) as shown in fig. 1. Tighten the bolts to prevent the sliding hooks (K) from slipping out of the crossbars (E &...
- Page 15 Step 7: 1. Do not tight the bolts completely yet. Fix the flower pot side panel (O) to the flower pot back panel (M) by using the bolts (AA) as shown in fig. 1. Then fix the flower pot bottom panel (P) to the flower pot back panel (M) by using the bolts (AA) as shown in fig 2.
- Page 16 3. Pendant des périodes de vent, la toile doit être fermée pour prolonger la durée de vie. Nous vous souhaitons de nombreux moments de plaisir avec votre nouvelle pergola de Corriveau Essentiels! Laissez-nous vos commentaires sur le site de Corriveau Meubles de Jardin. Au plaisir de vous lire !
Need help?
Do you have a question about the Sorento B101279 and is the answer not in the manual?
Questions and answers