Table of Contents

Related Manuals for Patpet T144


Summary of Contents for Patpet T144
- Page 1 1600ft Remote Training Collar MANUAL BEFORE BEGINING Please read the user manual carefully before use. If the product you got is not suitable or damaged, please contact us immediately. We will give you a satisfactory reply.
-
Page 2: Warning
1. Make sure the remote and receiver are full charged before using for the first time 2. Please use vibration or tone mode first. Shock mode is only recommended in emergency situation and not advised as a form of positive behavior training. 3. -
Page 3: Table Of Contents
Content Warning.................2 Package List................4 Usage Instruction..............5 Main Functions..............5 Functions Instruction..............6 Remote Range..............6 Outdoor Waterproof.............6 Static Shock..............7 Vibration & Beep..............8 Sleep Mode...............8 Button Definition..............9 LCD Screen...............9 Turning up & off and Indicator..........10 Product Synchronizing............11 Fit the collar................13 Charging & Battery..............14 Charging ................14 Battery................14 Trouble Shooting..............15... -
Page 4: Package List
Package List... -
Page 5: Usage Instruction
Usage Instruction Main Functions Static Shock: 16 adjustable intensity levels Vibration: 16 adjustable intensity levels Beep: tone warning Waterproof:IP67 full waterproof receiver collar Safe Screen-lock:Avoid pressing buttons by accident Fast Charging:2-hour full charging... -
Page 6: Functions Instruction
Functions Instruction Remote Range • This item uses 433MHz frequency to send and receive signals, the theoretical range is up to 1600ft. • The distance is used in most dog training environments such as indoor, courtyard, parks, streets and so on. •... -
Page 7: Static Shock
Static Shock • Before using for the first time, you can use the test bulb to test whether the current is normal. • Different dogs have different resistance values. You can gradually use the equipment when you start to use it to find the appropriate electric shock level for your dog. -
Page 8: Vibration & Beep
Vibration & Beep • Before using the static shock, you can use the sound and vibration first, which allows the dog to form a conditioned reflex, and stops the current wrong behavior before feeling the vibration or sound. It is the safest method of training. -
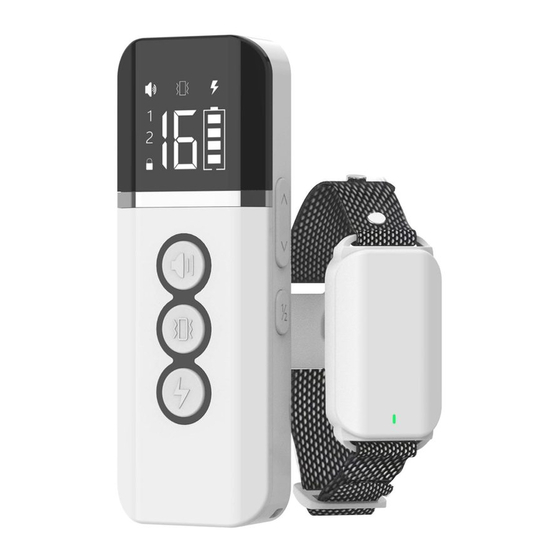
Page 9: Button Definition
Button Definitions LCD Screen ①Beep mode ②Vibration mode ③Shock mode ④Show receivers in using (If keeping 2 receivers) ⑤Screen-lock state ⑥Intensity level ⑦Power state of remote... -
Page 10: Turning Up & Off And Indicator
Turning up & off and Indicator Screen-lock button: Push down to unlock buttons. Push up to lock buttons and turn it off, and any other buttons can’t activate remote. Turning on/off receiver: ON: The receiver vibrates and is accompanied by a sound. OFF: Press power button, it will make a long beep. -
Page 11: Product Synchronizing
Product Synchronizing This product works by radio channel. Only do remote transmitter and receiver keep on the same channel, they can work synchronously . Before delivery, we will complete synchronizing. If remote lost contact with receiver because of signal interrupt and power outage, please synchronize by hand. - Page 12 Step 3: Turn on the receiver Press the power button to turn on the receiver (see Picture 3), and the LED indicator on the receiver will flash (see Picture 4) (3) (4) Step 4: Remote receiver signal to complete synchronizing. Press the power button and hold for 3 seconds, the LED indicator on the receiver will flickering alternately red and green (see picture 5).
-
Page 13: Fit The Collar
Fit the collar 1. Make sure your pet is standing comfortably to fit it correctly(3A). 2. Place receiver collar on the middle of your pet’s neck and avoid it being loose(3B). 3. Adjust the most comfortable collar length to your dog, do not too loose or too tight. -
Page 14: Charging & Battery
Charging & Battery Charging 1. Please do not use an adapter larger than 5V2A to charge the product. 2.You can also charge the product through the USB port of your car, laptop,desktop computer or power bank. 3.When the receiver is low on power,the indicator light on the receiv er turns red,please charge it as soon as possible. -
Page 15: Trouble Shooting
Trouble Shooting •Make sure the Receiver Collar has been turned on. •Check if you are currently in a paired channel, My pet does not press the 1/2 button to select the channel you want respond when I to control. press a button. •If both channels...
Need help?
Do you have a question about the T144 and is the answer not in the manual?
Questions and answers