thomann Millenium MPS-150 User Manual
E-drum module
Hide thumbs
Also See for Millenium MPS-150:
- User manual (77 pages) ,
- User manual (64 pages) ,
- Assembly instructions manual (16 pages)
Table of Contents
Advertisement
Quick Links
Advertisement
Table of Contents

Related Manuals for thomann Millenium MPS-150


Summary of Contents for thomann Millenium MPS-150
- Page 1 MPS-150 E-Drum Module...
- Page 2 Thomann GmbH Hans-Thomann-Straße 1 96138 Burgebrach Germany Telephone: +49 (0) 9546 9223-0 Internet: www.thomann.de 26.04.2024, ID: 360221 (V4)
-
Page 3: Table Of Contents
Table of contents Table of contents General information..........................6 1.1 Symbols and signal words....................... 6 Safety instructions............................. 8 Features............................... 10 Installation..............................11 Connections and controls........................13 Operation..............................17 6.1 Functions............................. 17 6.2 Demo song............................18 6.3 Playing and adjusting patterns....................19 6.4 Selecting and adjusting drum kits..................... - Page 4 Table of contents Protecting the environment......................39 MPS-150 E-Drum Module...
- Page 5 MPS-150 E-Drum Module...
-
Page 6: General Information
Our products and documentation are subject to a process of continuous development. They are therefore subject to change. Please refer to the latest version of the documentation, which is ready for download under www.thomann.de. 1.1 Symbols and signal words In this section you will find an overview of the meaning of symbols and signal words that are used in this document. - Page 7 General information Signal word Meaning DANGER! This combination of symbol and signal word indicates an immediate dangerous situation that will result in death or serious injury if it is not avoided. WARNING! This combination of symbol and signal word indicates a pos‐ sible dangerous situation that can result in death or serious injury if it is not avoided.
-
Page 8: Safety Instructions
Safety instructions Safety instructions Intended use Drum modules are intended to be used for converting digital trigger signals from drum pads to various percussion sounds. Use the unit only as described in this manual. Any other use or use under other operating conditions is considered to be improper and may result in personal injury or property damage. - Page 9 Safety instructions WARNING! Possible hearing damage due to high volumes on speakers or headphones! With speakers or headphones connected, the device can produce volume levels that may cause temporary or permanent hearing impairment. Over an extended period of time, even levels that seem to be uncritical can cause hearing damage. Do not operate the device permanently at a high volume level.
-
Page 10: Features
Features Features 108 voices 10 pre-programmed drum kits 40 pre-programmed patterns 128 MIDI sounds Metronome Flexible assignment of pad voices Reverb effect, voice tuning Individual adjustment of accompaniment and drum track Connections for headphones, AUX, USB and MIDI Power adapter (included) Operating system: Windows®... -
Page 11: Installation
Installation Installation Setup, connecting pads and Setup and assembly of the pads and pedals are described in detail in the enclosed assembly pedals instructions. Finally, check that all connecting cables are correctly connected between the pads and the drum module. Connecting the power supply Connect the included power supply to the 9-V connector of the device and then plug the power adapter into a wall outlet. - Page 12 Installation Connecting audio devices Connect the inputs of your amplifier or active monitor to the OUTPUT sockets of the drum module. If you are using a mono amplifier, connect its input to the L/MONO output socket of the module. Connecting a CD or MP3 player Connect a CD or MP3 player to the AUX IN input socket of the drum module.
-
Page 13: Connections And Controls
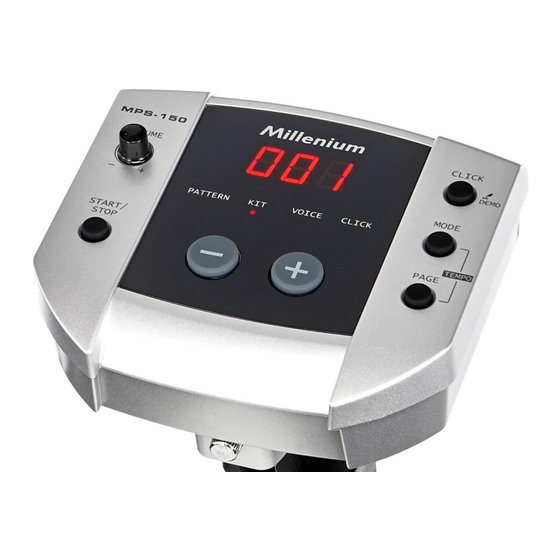
Connections and controls Connections and controls Front & ö MPS-150 E-Drum Module... - Page 14 Connections and controls [START/STOP] | Button for starting and stopping the playback of songs [VOLUME] | Volume control for the audio and headphone output of the device 3-digit LED display [CLICK]/[DEMO] | Button for switching the metronome on and off and for playing the demo song [MODE] | Button for opening the selection menu [PAGE] | Button for scrolling in the open menu [+]/[–] | Increases or decreases the currently displayed value...
- Page 15 Connections and controls Back ö # $ % & '( [9 V] | Connection socket for the plug-in power supply for power supply [ON / OFF] | Main switch for switching the device on and off [USB] | Connection socket for a USB cable [MIDI OUT] | Socket for an external MIDI device to send MIDI commands [OUTPUT –...
- Page 16 Connections and controls Underside ö Multiple socket for connecting the pads MPS-150 E-Drum Module...
-
Page 17: Operation
Operation Operation 6.1 Functions Switching on Check all cable connections for correct fit before turning on Before switching the device on, turn the [VOLUME] control to minimum. Use the [ON/OFF] switch on the back of the device to switch on the drum module. Automatic shutoff –... -
Page 18: Demo Song
Operation Adjusting the volume To adjust the volume, hit a pad while slowly turning the [VOLUME] control clockwise. 6.2 Demo song To play the pre-programmed demo piece, proceed as follows: Press [CLICK] for about two seconds. ð The pre-programmed demo song sounds, the display shows ‘dE’ . Stop playback with [START/STOP]. -
Page 19: Playing And Adjusting Patterns
Your digital drum set features a total of 40 pre-programmed patterns. Pattern ‘001’ is dis‐ played by default when the drum module is turned on. The pattern list is available for download on the product page at www.thomann.de. Press [MODE] repeatedly until the [PATTERN] LED lights up. - Page 20 Operation Press [PAGE] repeatedly until the display shows the pattern volume in the ‘Axx’ format. Use [–] and [+] to adjust the volume between 00 and 32. The setting is automatically stored. Adjusting drum volume Press [MODE] repeatedly until the [PATTERN] LED lights up. ð...
-
Page 21: Selecting And Adjusting Drum Kits
The drum kit list and the voice list are available for download on the product page at www.thomann.de. Selecting a drum kit To select a certain drum kit, proceed as follows: Press [MODE] repeatedly until the [KIT] LED lights up. - Page 22 Operation Press [PAGE] repeatedly until the display shows the kit volume appears in the ‘Lxx’ format. Use [–] and [+] to adjust the volume between 00 and 32. The setting is automatically stored. Turning reverb on and off To turn the reverb effect on or off, proceed as follows: Press [MODE] repeatedly until the [KIT] LED lights up.
- Page 23 Operation Assigning a voice To programme a certain voice for a pad, proceed as follows: Press [MODE] until the [VOICE] LED lights up. Hit the respective pad to activate it. Press [PAGE] repeatedly until the display shows the number of the currently assigned voice.
- Page 24 Operation Adjusting the voice volume You have the option to adjust the volume of each voice independently. To do so proceed as follows: Press [MODE] until the [VOICE] LED lights up. Hit the respective pad to activate it. Press [PAGE] repeatedly until the display shows the Voice volume in the ‘Lxx’ format. Adjust the volume using [–]/[+] (setting range: 0 to 32).
- Page 25 Operation Adjusting an assigned MIDI note You have the option to change the MIDI note assigned to a pad. To do so proceed as follows: Press [MODE] until the [VOICE] LED lights up. Hit the respective pad to activate it. Press [PAGE] repeatedly until the display shows the assigned MIDI note in the ‘Nxx’...
-
Page 26: Setting Up And Using The Click (Metronome)
Operation Name Assigned MIDI note Hi-hat close Hi-hat open Hi-hat pedal 6.5 Setting up and using the click (metronome) Using the click function Press [CLICK] to turn on the click. ð The [CLICK] LED flashes along to the beat, the click sounds. Press [CLICK] again to turn off the click function. - Page 27 Operation Setting the time signature Press [MODE] until the [CLICK] LED lights up. Press [PAGE] repeatedly until the display shows the set time signature, e.g. ‘4-4’ . Choose the time signature using [–] and [+] from a selection of 1/4 to 7/4, 3/8 and 6/8. The setting is automatically stored.
- Page 28 Operation Setting the click sound Press [MODE] until the [CLICK] LED lights up. Press [PAGE] repeatedly until the display shows the set sound, the so-called “click instru‐ ment”, in the ‘CLx’ format. Use [–] and [+] to select the sound. Possible values are: CL1 – CL5, default value: CL1. The setting is automatically stored.
-
Page 29: Reset To Factory Default Setting
Operation 6.6 Reset to factory default setting Simultaneously hold down [–] and [+] Press [ON/OFF] to switch the device on. ð The device is reset to factory defaults. MPS-150 E-Drum Module... -
Page 30: Menu Overview
Operation 6.7 Menu overview PATTERN VOICE CLICK Number Number Number Tempo Acmp Volume Volume Volume Time Signature Drum Volume Reverb MIDI note Interval Click Instrument Volume MPS-150 E-Drum Module... -
Page 31: Midi Implementation
MIDI implementation MIDI implementation Function Transmitted Recognized Remarks Basic channel Default Ch 10 1-16 Changed Mode Default Messages Altered ******** ******** Note number 0…127 0…127 True voice ******** 0…127 Velocity Note ON Yes (99H, V=1…127) 0…127 Note OFF Yes (99H, V=0) 0…127 Aftertouch Keys... - Page 32 MIDI implementation Function Transmitted Recognized Remarks Portamento time Data entry Volume Expression Sustain pedal Portamento ON/OFF Sostenuto pedal Soft pedal Reverb program Chorus program Reverb level Chorus level All Sound Off Reset All Controllers All Notes Off MPS-150 E-Drum Module...
- Page 33 MIDI implementation Function Transmitted Recognized Remarks Program change System exclusive System common Song Position Song Select Tune System real time Clock START and STOP only Command Aux messages Local ON/OFF All Notes OFF Active Sense System reset MPS-150 E-Drum Module...
-
Page 34: Technical Specifications
1 × 6.35-mm jack socket MIDI out 2 × DIN panel socket, 5-pin Voices MIDI sounds 128 (The MIDI lists are available for download on the product page at www.thomann.de.) Effects Reverb Drum kits 10 preset kits Demo and practise songs... - Page 35 Technical specifications Operating voltage 9 V , 2,000 mA, centre positive Operating system Windows® 8 and later, Mac OS X® 10.8 and later Dimensions (W × H × D) 260 mm × 130 mm × 185 mm Weight 0.37 kg Ambient conditions Temperature range 0 °C…40 °C...
-
Page 36: Plug And Connection Assignment
Plug and connection assignment Plug and connection assignment Introduction This chapter will help you select the right cables and plugs to connect your valuable equip‐ ment in such a way that a perfect sound experience is ensured. Please note these advices, because especially in ‘Sound & Light’ caution is indicated: Even if a plug fits into the socket, an incorrect connection may result in a destroyed power amp, a short circuit or ‘just’... - Page 37 Plug and connection assignment 1/4" TS phone plug (mono, unbalanced) Signal Ground, shielding 1/4" TRS phone plug (mono, bal‐ anced) Signal (in phase, +) Signal (out of phase, –) Ground MPS-150 E-Drum Module...
-
Page 38: Cleaning
Cleaning Cleaning Device parts Clean the accessible parts of the device regularly. The frequency of cleaning depends on the operating environment: moist, smoky or particularly dirty environments may cause a higher accumulation of dirt on the components of the device. Use a dry soft cloth for cleaning. - Page 39 Protecting the environment Protecting the environment Disposal of the packing material Environmentally friendly materials have been chosen for the packaging. These materials can be sent for normal recycling. Ensure that plastic bags, packaging, etc. are disposed of in the proper manner. Do not dispose of these materials with your normal household waste, but make sure that they are collected for recycling.
- Page 40 When disposing of the device, comply with the rules and regulations that apply in your country. You can also return your old device to Thomann GmbH at no charge. Check the current conditions on www.thomann.de.
- Page 41 Notes MPS-150 E-Drum Module...
- Page 42 Notes MPS-150 E-Drum Module...
- Page 44 Musikhaus Thomann · Hans-Thomann-Straße 1 · 96138 Burgebrach · Germany · www.thomann.de...
Need help?
Do you have a question about the Millenium MPS-150 and is the answer not in the manual?
Questions and answers