
Subscribe to Our Youtube Channel
Related Manuals for GME XRS Connect XRS-330CTP


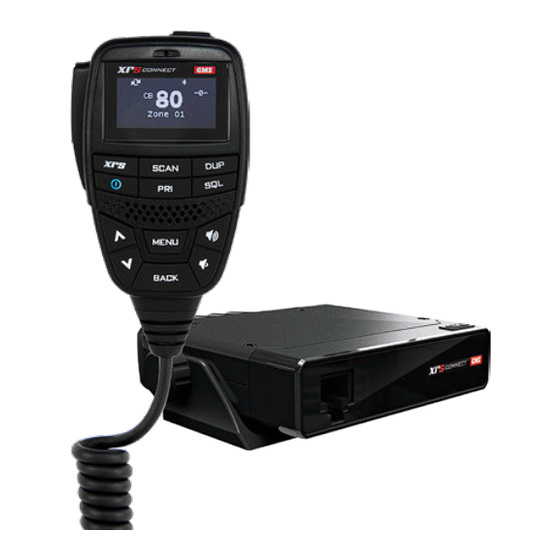
Summary of Contents for GME XRS Connect XRS-330CTP
- Page 1 Connect ™ COMPACT HIDEAWAY 80 CHANNEL UHF CB RADIO XRS-330C XRS-370C XRS-390C INSTRUCTION MANUAL...
-
Page 2: Table Of Contents
CONTENTS CONTENTS ................2 INTRODUCTION .................6 FEATURES .................6 XRS CONNECT APP ..............8 XRS Connect ................8 Pairing ..................9 GENERAL OPERATION .............10 Front Panel ................10 Rear Panel ................. 10 Controller Microphone .............. 11 GENERAL ................11 Power ..................11 Auto Power-Down ..............11 Volume .................. - Page 3 Microphone Gain............... 17 Squelch Tail ................17 Roger Beep ................18 Repeater and Duplex Mode ............18 Priority Channel ................ 19 SCANNING ................20 Scan Groups ................20 Programming the Scan Memories ..........21 Auto Skip .................. 21 Dual Watch ................22 Open Scan .................
- Page 4 The Quiet Mode ................ 32 Sending a SelCall ..............32 Receiving a SelCall ..............32 Quiet Mode ................33 GROUP CALLING ..............35 Programming and Sending Group Calls ........35 Call acknowledge in Group Mode ..........36 Storing Group Call Idents ............36 Receiving Group Calls ...............
- Page 5 Editing your Radio’s Own SelCall Number........ 57 Adding a New Contact to the SelCall Memory ......58 XRS FEATURES ...............59 Location Services ..............59 GPS Data Acquisition ..............59 Location Services ..............61 Voice Playback ................64 Active Mute ................65 CrewTalk ...................
-
Page 6: Introduction
INTRODUCTION Your GME XRS Connect 80 channel radio is Australian designed and manufactured and is the most advanced UHF Citizen Band radio available. It combines the very latest in electronic hardware with the most up-to-date computer aided design manufacturing techniques to produce a compact mobile radio with outstanding specifications, features and performance. - Page 7 Priority Channel: A user programmable Priority channel for instant • recall at the press of a key. • Signal processing Digital Signal Processing (DSP): Measures, filters and compresses • standard analogue audio signals and converts them into digital format. Allows advanced RF and audio processing techniques to be applied to maximise the radio’s performance.
-
Page 8: Xrs Connect App
OLED Display: Bright, high contrast, dot matrix OLED display is • readable under all lighting conditions. For a more detailed description of all key functions, refer the ‘General Operation’ section. XRS CONNECT APP This section provides details about the XRS Connect app. To download the app for iOS or Android: Visit App Store or Google Play. -
Page 9: Pairing
GME values your privacy, and does not collect any of your location data. The location data is only stored within the XRS Connect app and is transmitted by your XRS Connect radio. PAIRING To pair your smart device with your XRS Connect radio: Open the Radios section of the XRS Connect app. -
Page 10: General Operation
GENERAL OPERATION FRONT PANEL Microphone Socket REAR PANEL XRS-330C 12V DC Socket Antenna Socket Extension Speaker Socket XRS-370C Extension Speaker Socket Antenna Socket 12V DC Socket XRS-390C 12V DC and Extension Speaker Harness Antenna Socket Connect ™... -
Page 11: Controller Microphone
CONTROLLER MICROPHONE Programmable (Top) Func on Microphone Push to Talk Bu on OLED Display Programmable (XRS) Scan Func on Key Duplex Power Squelch Priority Speaker Channel Up Volume + Menu/Enter Volume - Channel Down Back GENERAL POWER Press and hold the key to turn the radio on. -
Page 12: Volume
Press MENU and select RADIO SETTINGS. Next select AUTO POWER. Select RECV RESETS and press MENU. Select ON to turn the feature By default, the radio will not automatically power down while it is connected to a device via Bluetooth. If you would like to power down the radio while you have a Bluetooth connection, turn this setting off. -
Page 13: Adjusting The Squelch Level
When the Squelch is open the receiver’s background noise can be heard and the icon is displayed. When the Squelch is closed the receiver remains quiet while there are no signals present but any incoming signals will override the Squelch and be heard in the speaker. -
Page 14: Transmitting
To assign the Dim function to a key, press the MENU key and navigate to PROG BUTTONS and its options to configure this feature. TRANSMITTING Prior to transmitting, always check the channel is clear. This can be done by listening to the channel or by visually checking that the icon is not visible or the signal meter is not indicating a signal. -
Page 15: Voice Scrambler
The scrambler is compatible with the majority of scramblers used by other manufacturers, allowing you to enjoy scrambled communications with owners of non-GME radios. Once the scrambler has been activated your transmission and reception will only be intelligible to others using the same scrambler technology. -
Page 16: Dynamic Volume Control (Dvc)
DYNAMIC VOLUME CONTROL (DVC) The modulation level of signals heard on the UHF CB band has always varied considerably resulting in noticeable differences in received audio volume between stations. Generally, users have compensated for this by adjusting the Volume control for each incoming signal. -
Page 17: Microphone Gain
MICROPHONE GAIN The microphone gain controls the sensitivity of the microphone to your voice input level. If you are quietly spoken or are operating in a quiet environment you can increase the microphone gain to make your voice sound clearer. If your voice is quite loud or you are working in a noisy environment and wish to minimise the amount of background noise that is picked up, you should reduce the microphone gain. -
Page 18: Roger Beep
ROGER BEEP The Roger Beep is a tone that is automatically transmitted whenever the PTT is released. This tone serves to alert the receiving party that your transmission has ended. Press MENU and select RADIO SETTINGS. Select ROGER BEEP and press MENU to select ON or OFF. When the Roger Beep tone is enabled, the ROG icon is displayed. -
Page 19: Priority Channel
To enable duplex on a repeater channel: Select the required repeater channel (1 - 8, 41 - 48). Briefly press the DUP key. The icon will appear on the display accompanied by a high beep. To remove duplex from a repeater channel: Select the required repeater channel (1 - 8, 41 - 48). -
Page 20: Scanning
To recall a priority channel: Briefly press the PRI key. The radio will immediately switch to the Priority channel and the ‘PRI’ icon will be displayed. NOTE: If the radio was scanning when the Priority channel was recalled, the scan will be cancelled. -
Page 21: Programming The Scan Memories
PROGRAMMING THE SCAN MEMORIES Each Scan Group has its own separate channel memory allowing you complete freedom to program your choice of channels into each group. To add/remove channels from the selected scan memory: Select the required channel using the key. -
Page 22: Dual Watch
If the unwanted active channel continues to interrupt the scan even after the 30 second skip period has elapsed, hold SCAN while the radio is paused on that channel. The ‘nuisance’ channel will be completely removed from the Scan Group for the duration of that scan session. -
Page 23: Open Scan
OPEN SCAN Open Scan allows a group of channels to be scanned in an ascending sequence. If a signal is found, the scan will pause on that channel. During this time you can press the PTT on the microphone and talk on the channel. Once the channel has been clear for 5 seconds the scan will resume. -
Page 24: Priority Scan
Operating in the Open Scan Mode If a busy channel is found, scanning will pause to allow the signal to be heard and will remain there for as long as the channel remains busy. Once the channel has been clear for 5 seconds, scanning will resume automatically. If you don’t wish to listen to a busy channel, briefly press while the radio is paused on that channel. -
Page 25: Selecting Priority Scan
SELECTING PRIORITY SCAN To select Priority Scan, refer to the Menu/Scan Settings options. To begin scanning: Briefly press SCAN. A high beep will be heard, ‘SCANNING’ will be displayed and icon will animate. During this time the scan mode and the number of channels being scanned will be displayed along with the selected Zone. -
Page 26: Network Scan (Net-Scan)
to become clear again and scanning will continue. The skipped channel will be automatically reinstated in the scan sequence after 30 seconds (see ‘Auto skip’). • To transmit on the Priority channel at any time, simply press the PTT. The radio will switch straight to the Priority channel. When you have finished your conversation and there has been no further activity for 5 seconds, the radio will resume scanning the other channels. -
Page 27: Using Net-Scan
USING NET-SCAN With Net-Scan mode enabled, briefly press SCAN. A high beep will be heard, ‘SCANNING’ will be displayed and the icon will animate. During this time the scan mode and the number of channels being scanned will be displayed along with the selected Zone. -
Page 28: Ctcss And Dcs
CTCSS TONE SET COMPATIBILITY The GME CTCSS tone set comprises 50 tones made up of the standard CCIR-38 Tone Set plus an additional 12 tones added to the end. If communicating with other brands of radios that only use the CCIR-38 tone set, please select from one of the first 38 tones to ensure compatibility with these radios. -
Page 29: Enabling Ctcss/Dcs On A Channel (Silent Mode)
ENABLING CTCSS/DCS ON A CHANNEL (SILENT MODE) Enabling CTCSS/DCS on a channel will prevent the Squelch from opening on that channel unless the incoming signal matches your selected CTCSS/DCS tone. Other users on the same channel who are not using your CTCSS/DCS tone will still be received by your radio (the con will still appear on the display) but they will not be heard in the speaker. -
Page 30: Busy Lockout
Busy Lockout in the menu which will automatically prevent your radio from transmitting if the channel is already in use. BUSY LOCKOUT When using Silent mode with CTCSS/DCS, your radio’s receiver remains quiet to all signals outside your CTCSS/ DCS group. As a result, if you do not notice when others are transmitting on your channel you could accidentally transmit over the top of them. -
Page 31: Selective Calling
NOTE: You will only have a brief moment to monitor the channel for signals because holding the key for more than a few seconds will switch the radio off. SELECTIVE CALLING Your radio has a Selective Calling system known as SelCall that operates like a telephone. -
Page 32: The Quiet Mode
THE QUIET MODE Your radio can be set to monitor signals on a busy channel but remain Quiet unless it receives its own SelCall Ident. In this way, you won’t be disturbed unless someone calls you. When your SelCall Ident is received, the Quiet mode is deactivated and an alarm sounds to alert you to the call. -
Page 33: Quiet Mode
To cancel the alarm and talk on the channel: Press the PTT and talk in the usual way. The alarm will be canceled, the display will return to normal and the channel will be open for normal communication. To clear the alarm completely: Briefly press BACK. - Page 34 Activating the Quiet mode Select a channel that has been stored in the Quiet memory. ‘Q’ will be displayed. NOTE: You cannot activate the Quiet mode unless you have selected a stored channel. Press the MENU key, and navigate to select FUNCTIONS > TOGGLE QMode.
-
Page 35: Group Calling
GROUP CALLING The SelCall system includes a Group Call function that allows you to call up to 1000 radios simultaneously. This can be useful in an emergency situation where you may need to transmit a message to a large number of radios in your group. By default, your radio is factory-set to allow up to 10 radios to be called at once. -
Page 36: Call Acknowledge In Group Mode
Repeat until the first 4 digits have been entered. At the last digit use keys to select ‘A’. Hold MENU [HLD:CALL] to send. icon will be display as the SelCall is transmitted. NOTE: Where your radio allows it, programming Group Calls for 100 radios is identical except that you will need to select ‘A’... -
Page 37: Menu Options
MENU OPTIONS The Menu provides access to all the settings, adjustments and functions listed in the table below. All menu items are controlled using the MENU, BACK keys. To access the menu, press the MENU key. To scroll through the list of menu items press the keys. - Page 38 SEL:EDIT = Press MENU for EDIT HLD:OPTIONS = Hold MENU for OPTIONS When entering text (e.g. zone names or SelCall numbers), the following characters are available; Text Available Uppercase Letters A B C D E F G H I J K L M N O P Q R S T U V W X Y Z Lowercase Letters a b c d e f g h i j k l m n o p q r s t u v w x y z Numbers...
-
Page 39: Menu Table
MENU TABLE Menu Options Option Settings ZONES Zone 01 GO/EDIT Zone 02 Zone 03 Zone 04 Zone 05 Zone 06 Zone 07 Zone 08 BLUETOOTH Secure pair ON/OFF Pair PROG XRS BUTTON PRESS DISPLAY DIM BUTTONS XRS BUTTON HOLD CB SCAN MEMORY TOP BUTTON HOLD QUIET MEM QUIET MODE... - Page 40 Menu Options Option Settings TIMEOUT 30-180 min/None RADIO AUTO POWER SETTINGS RECV RESETS ON/OFF B’TOOTH HALTS ON/OFF BEEP VOLUME 0 to 10 BRIGHTNESS 0 to 10 BUSY LOCKOUT ON/OFF CB SUBTONE CTCSS/DCS Tones DISPLAY None / Volts / S-Lin / S-Met DYNAMIC VOLUME CONTROL ON/OFF MIC GAIN...
-
Page 41: Receive-Only Channels (Zones)
8 zones with each zone containing up to 50 channels. Zones and channels can each be individually named for easy identification. Programming is done either through the radio menu or through the GME XRS Connect App. The XRS Connect App also offers a range of pre-programmed frequencies in various categories sorted by locations making the selection of suitable channels and frequencies much easier. -
Page 42: Select A Zone
SELECT A ZONE Press the MENU button. Select ZONES and press MENU. Select the desired zone from the Zone list. Press MENU [SEL:GO]. EDIT A ZONE NAME Press the MENU key. Select ZONES and press MENU. Select the desired Zone from the Zone list. To edit the zone, select HOLD the MENU key [HLD:EDIT]. - Page 43 Use the keys to change the character at the cursor position. Press the MENU key to step forward to the NEXT character position or the BACK key to step back to the previous character position. Continue until the desired name has been entered. Zone names can be up to 16 characters long.
-
Page 44: Add Channels To A Zone
The radio returns to the main screen with the selected zone displayed below the channel number. All channels in the selected zone will now be available along with the usual 80 CB channels. Zone channels can be found immediately above CB Channel 80. ADD CHANNELS TO A ZONE Press the MENU key. -
Page 45: Edit Existing Channels In A Zone
Use the keys to change the character at the cursor position. Press MENU to step forward to the NEXT character position or the BACK key to step back to the previous character position. When the desired name has been entered, press the MENU key repeatedly to step to the RX frequency. - Page 46 Use the keys to select a channel Hold MENU [HLD:OPTIONS] for the Options menu. Use the keys to select from the options list them press MENU. • Select Go Channel to jump to the select channel Select Del Channel to delete the selected channel •...
-
Page 47: Bluetooth
Continue until the name or frequency has been edited. Hold MENU [HLD:SAVE] to save. BLUETOOTH Secure Pairing Use this to turn secure PIN pairing on or off for your Bluetooth connection. If Secure Pairing is turned on when pairing your mobile device with the XRS Connect radio for the first time, you will be asked to confirm a security PIN on both the mobile device with the XRS Connect app and your radio. -
Page 48: Programmable Buttons
PROGRAMMABLE BUTTONS Programmable (Top) Func on Programmable (XRS) Func on Key Menu Options XRS button Display Dim Dims the display and keypad backlight. press CB Scan Cycles through the three scan memories. Memory XRS button hold Quiet Memory Stores channels in the SelCall Quiet memory. Quiet Mode Toggles SelCall Quiet mode between on or off. - Page 49 Menu Options Top button Cycle Scan Cycles through the channels stored in the current scan memory. press Channel SelCall Call Provides the standard Call button functions i.e. Press to enter SelCall entry menu Hold to send last SelCall. function Voice Playback Plays back recorded transmissions.
-
Page 50: Functions
FUNCTIONS The Function option allows you to set the state of several functions related to Scan, SelCall and CTCSS/DCS. Press the MENU key. Use the keys to select FUNCTIONS then press MENU. Use the keys to select from one of the options below; •... -
Page 51: Radio Settings
RADIO SETTINGS Press the MENU key. Use the keys to select RADIO SETTINGS then press MENU. Use the keys to select from one of the setting options (see the options table below). To alter a value (e.g. Beep Volume) press MENU then use the keys to adjust the value. - Page 52 Radio Setting Options Table Menu DESCRIPTION OPTIONS AUTO POWER Turns the radio off after a time period specified None/30-180 by the user. ON/OFF ON/OFF BEEP VOLUME Adjusts the volume of the key press beeps. 0 to 10 [4] BRIGHTNESS Adjusts the OLED and keypad brightness. 0 to 10 [5] BUSY LOCK Disables the transmitter when the radio is busy...
-
Page 53: Scan Settings
Menu DESCRIPTION OPTIONS VERSIONS Displays model number, serial number, Model, Serial #, firmware, Bluetooth wireless technology Firmware, Bluetooth enabled hardware and Bluetooth wireless H/W, Bluetooth S/W technology enabled software. RESET Cancel: Exits without changes. SETTINGS Reset Radio: Restores the radio to its default settings (i.e Squelch level, beep level, Subtone, etc. -
Page 54: Net-Scan
NET-SCAN To use Net-Scan you must also select a CTCSS or DCS sub-tone. Use the keys to select NETSCAN SUBT then press MENU. Use the keys to scroll through the list of sub-tones then press MENU to select. NOTE: If you select Netscan as your CB Scan Memory without selecting a sub- tone, you will not be able to scan. -
Page 55: Making A Selcall
MAKING A SELCALL To enter and send a SelCall number, select MAKE SelCall and press MENU [SEL:ENTER]. Use the keys to change the digit at the cursor position. Press MENU [SEL:NEXT] to step forward to the NEXT digit position or BACK to step back to the previous digit position. -
Page 56: Resending The Last Selcall Number
RESENDING THE LAST SELCALL NUMBER Use the keys to select Last, then HOLD MENU [HLD:CALL] to resend the last SelCall number. Use the keys to scroll down to an empty SelCall memory. Press MENU [SEL:EDIT]. The ‘Edit Contact’ screen is displayed and the SelCall number is automatically inserted into the contact. -
Page 57: Editing Your Radio's Own Selcall Number
Continue until the required name has been entered then hold MENU [HLD:SAVE] to save the contact. EDITING YOUR RADIO’S OWN SELCALL NUMBER keys to select Own then press the MENU key to Use the edit your radio’s own SelCall number. The ‘Edit Contact’... -
Page 58: Adding A New Contact To The Selcall Memory
ADDING A NEW CONTACT TO THE SELCALL MEMORY Use the keys to scroll to an empty SelCall memory then press MENU [SEL:EDIT] to edit. Use the keys to change the letter or number at the cursor position. Press MENU [SEL:NEXT] to step forward to the NEXT character or digit position or the BACK key to step back to the previous character or digit position. -
Page 59: Xrs Features
The radio returns to the previous screen and displays the new contact entry. XRS FEATURES There are three main feature options available under XRS Features: • Location Services • Voice Playback • Active Mute LOCATION SERVICES This feature is used together with the XRS Connect app or with the GPS enabled MC668 microphone and allows the radio to broadcast its GPS location at the end of a normal voice transmission. - Page 60 Navigating to the Location Services feature: Press the MENU key. Navigate through the following selections: XRS FEATURES > LOCATION SERVICES. Location Services Options Table Menu Description Options Enables/disables whether the radio ON/OFF LOCATION TX transmits location to other radios (same as share location in XRS Connect app).
-
Page 61: Location Services
LOCATION SERVICES To enable/disable TX location transmit: Press the MENU key. Navigate through the following selections XRS FEATURES > LOCATION SERVICES. Select LOCATION TX and press MENU to select ON or OFF. To select GPS location source: Press the MENU key. Navigate through the following selections XRS FEATURES >... - Page 62 To set location timeout: Press the MENU key. Navigate through the following selections XRS FEATURES > LOCATION SERVICES Select LOC TIMEOUT and press MENU. Use the keys to increase or decrease the location timeout then press MENU. To set mic display: Press the MENU key.
- Page 63 To enable/ disable Sellcall UID: Press the MENU key. Navigate through the following selections XRS FEATURES > LOCATION SERVICES. Select SELCALL UID and press MENU to select ON or OFF. To view GPS Location: Press the MENU key. Navigate through the following selections XRS FEATURES > LOCATION SERVICES.
-
Page 64: Voice Playback
VOICE PLAYBACK You can enable this feature to allow the radio to record voice transmissions that it receives from other radios, and then playback recorded transmissions. The following are the basic functionalities of the Voice Playback feature: • Records the first 30 seconds of every transmission received by your radio. -
Page 65: Active Mute
To playback voice recordings: When navigating from the main menu: Press the MENU key. Navigate through the following selections: XRS FEATURES > VOICE PLAYBACK > PLAYBACK. Alternatively, you can assign the Voice Playback feature to one of the programmable keys (XRS key, or the top programmable key). When the key is pressed, it will begin playback. -
Page 66: Crewtalk
To turn on/off active mute in the XRS Connect app: Open the XRS Connect app. to display the left navigation menu. Tap the Active Mute slider to turn on/off. When the slider turns green, the active mute feature is on. To navigate to the Active Mute feature on your radio: Press the MENU key. - Page 67 3. Select ENABLE and press MENU to select ON or OFF. 4. Select GROUP NUMBER and press MENU. 5. Use the keys to select a Group Number and press MENU. When CrewTalk is configured, normal scan functionality is overridden. Whenever scanning is started by pressing the SCAN button, CrewTalk will be active.
-
Page 68: Installation
INSTALLATION GENERAL Your XRS Connect radio is supplied with either a slim, slide on mounting cradle or a U-shaped cradle depending on the model. If the radio contains a built-in speaker, for maximum sound projection from the internal speaker we recommend the cradle be mounted above the radio to minimise any obstruction of the speaker. -
Page 69: Fitting The Controller Microphone
FITTING THE CONTROLLER MICROPHONE Plug the 8 pin plug into the socket on the front of the main unit or alternatively you can use the adapter and extension cable supplied with the radio (XRS-330C and XRS-370C only). If the main unit is not easily accessible this adapter will allow you to bring the microphone socket to a more convenient position. -
Page 70: Radio Turns On And Off With The Ignition Switch
If you are connecting directly to the battery, please review the ‘Auto Power-Down’ feature for information on options to turn the radio off after a user-selectable time. RADIO TURNS ON AND OFF WITH THE IGNITION SWITCH Connect the radio’s negative (black) lead to the vehicle’s chassis, or if preferred, directly to the battery’s negative terminal. -
Page 71: Mounting The Radio
MOUNTING THE RADIO XRS-330C XRS-370C Slide the radio fully into cradle until it clicks into place. XRS-390C Connect ™... -
Page 72: Antenna Connection
It is essential to select a good quality, high efficiency, 477 MHz antenna. A poor quality antenna or one not designed for the specific frequency band you are using will give very poor performance. GME has a wide range of suitable 477 MHz UHF CB antennas to suit most installations and applications. We recommend contacting your local GME retailer for advice. -
Page 73: Wiring
WIRING XRS-330C and XRS-370C UHF antenna Optional extension speaker (not applicable for XRS-370C)" 12V DC MC664B microphone Red+ -Black Coax cable Fuse Connector plug XRS-390C UHF antenna Optional extension speaker MC668B-IP 12V DC Microphone -Black Red+ Fuse Coax Cable Connector Plug Connect ™... -
Page 74: Frequency And Subtone Tables
FREQUENCY AND SUBTONE TABLES The table that follows details the CTCSS tone frequencies of the XRS Connect radio. CTCSS Tone Frequencies Frequency Frequency Frequency Frequency 67.0 107.2 167.9 159.8 71.9 110.9 173.8 165.5 74.4 114.8 179.9 171.3 77.0 118.8 186.2 177.3 79.7 123.0... - Page 75 The table that follows details the DCS tones of the XRS Connect radio. DCS Tone Chart Code Code Code Code Code Code – – – – – – – – The table that follows details the UHF CB operating frequencies of the XRS Connect radio.
- Page 76 UHF CB Operating Frequencies Frequency Frequency Frequency (MHz) (MHz) (MHz) 476.425 477.100 476.7875 476.450 477.125 476.8125 476.475 477.150 476.8375 476.500 477.175 476.8625 Emergency use only 476.525 477.200 476.8875 Telemetry / 476.550 477.225 476.9125 Selcall use 476.575 477.250 476.9375 only. Voice transmission 476.600 477.275...
-
Page 77: Specifications
SPECIFICATIONS ELECTRICAL General Compliant Meets AS/NZS 4365 for radio communications equipment in the Specification: UHF citizen and personal radio service Frequency Range TX: 476.425-477.4125 MHz Number of Channels: Channel Spacing: 12.5 kHz Operation Mode: Simplex or half Duplex with repeater talk-around Scanning Speed: 20 ms per channel (50 channels per second) Antenna Impedance:... - Page 78 Transmitter RF Output: 5 watts Spurious Emission: < - 70 dBc Frequency Error: < ± 1.5 kHz Modulation: Maximum Deviation: < ± 2.5 kHz at + 20 Db AF limiting Transmit Frequency +6 dB per octave 300 Hz to 3 kHz + 1 . 3 dB Response: Demodulated Audio >45 dB unweighted...
-
Page 79: Mechanical Specifications And Connections
MECHANICAL SPECIFICATIONS AND CONNECTIONS XRS-330C Dimensions: 22 (H) x 99.5 (L) x 86 (D) mm Weight: 137 grams 12 Volt Power Supply: Two core cable with bulkhead connector in rear panel Antenna: FME panel socket External Speaker: 3.5 mm mono jack Front Microphone Port: 8 Pin RJ45 Connection XRS-370C... - Page 80 GME Pty Ltd 17 Gibbon Road, Winston Hills NSW 2153, Australia Part Number: 311147 Drawing Number: 52210-2 Connect ™...
Need help?
Do you have a question about the XRS Connect XRS-330CTP and is the answer not in the manual?
Questions and answers