GME XRS-370C Instruction Manual
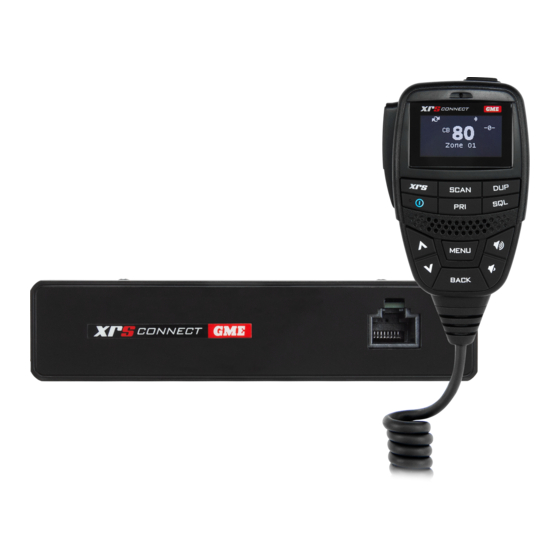
Compact hideaway 80 channel uhf cb radio
Hide thumbs
Also See for XRS-370C:
- Instruction manual (61 pages) ,
- Quick start manual (7 pages) ,
- Instruction manual (21 pages)
Table of Contents
Advertisement
Quick Links
Advertisement
Table of Contents

Subscribe to Our Youtube Channel
Related Manuals for GME XRS-370C


Summary of Contents for GME XRS-370C
- Page 1 XRS-370C COMPACT HIDEAWAY 80 CHANNEL UHF CB RADIO INSTRUCTION MANUAL...
-
Page 2: Table Of Contents
Adjusting the Squelch Level ............. 13 Signal Meter ................13 Brightness ................. 13 Transmitting ................14 Time-out Timer ................. 14 Busy Lockout ................15 Voice Scrambler ................ 15 Beep Tone Volume ..............16 Dynamic Volume Control (DVC) ..........16 XRS-370C... - Page 3 Choosing CTCSS or DCS ............28 CTCSS tone set compatibility ............ 28 Enabling CTCSS/DCS on a channel (Silent mode) ..... 29 Busy Lockout ................30 Monitor function ............... 30 Selective Calling ..............31 SelCall Identification Number ........... 31 SelCall naming ................. 31 XRS-370C...
- Page 4 Programming the XRS Button: ..........50 Programming the top button: ..........51 Functions .................. 52 Radio Settings ................53 Scan Settings ................55 Net-Scan ................... 56 SelCall ..................56 Making a SelCall ............... 57 Resending the last SelCall number ........... 58 XRS-370C...
- Page 5 Radio turns ON and OFF with the ignition switch ....69 High voltage detection ............. 69 Antenna connection ..............70 Noise suppression ..............70 Wiring ..................71 Frequency and Subtone Tables ..........72 Specifications .................75 Electrical ................... 75 Mechanical Specifications and Connections ......77 XRS-370C...
-
Page 6: Introduction
INTRODUCTION Your GME XRS-370C 80 channel radio is Australian designed and manufactured and is the most advanced UHF Citizen Band radio available. It combines the very latest in electronic hardware with the most up-to-date computer aided design and manufacturing techniques to produce a super compact mobile radio with outstanding specifications, features and performance. - Page 7 • Rugged Construction: With die-cast chassis. • User controls and interface • Full Function Controller Microphone: Includes front mounted speaker to channel clear audio towards the user. XRS-370C...
-
Page 8: Xrs Apps
Bluetooth. The app allows users to share their location using the mobile device’s GPS location. The location is broadcast by the radio at the end of a normal voice transmission. The location cannot be shared by the app without being connected to an XRS Connect radio. XRS-370C... -
Page 9: Pairing
CB channels. This feature complies with the Radio Communications (Citizen Band Radio Stations) Class Licence 2015. GME values your privacy, and does not collect any of your location data. The location data is only stored within the XRS Location Services app and is transmitted from your XRS Connect radio. -
Page 10: General Operation
GENERAL OPERATION FRONT PANEL Microphone Socket REAR PANEL Extension Speaker Socket Antenna Socket 12V DC Socket XRS-370C... -
Page 11: Controller Microphone
By default, while the Auto Power-Down feature is enabled, the radio will turn off after the preselected time even if the radio is receiving transmissions. If you would like to keep the radio on while it is receiving transmissions, this setting needs to XRS-370C... -
Page 12: Volume
To select a channel, press the key. • Press to select a higher channel or to select a lower channel. The selected channel is displayed on the OLED Display. • Press and hold either key to advance quickly through the channels. XRS-370C... -
Page 13: Squelch
The backlight remains on whenever the radio is switched on. The brightness level can be smoothly adjusted in steps from 0 to 10. To adjust brightness level: Press the MENU key. Navigate to RADIO SETTINGS > BRIGHTNESS. You can use the key to adjust the brightness. XRS-370C... -
Page 14: Transmitting
ACMA to prevent accidental blocking of the frequency should your PTT become jammed or be otherwise pressed accidentally. When the time-out timer activates, the radio will give a low tone for a few seconds and the transmitter will be temporarily disabled. Release the PTT to restore normal operation. XRS-370C... -
Page 15: Busy Lockout
The scrambler is compatible with the majority of scramblers used by other manufacturers, allowing you to enjoy scrambled communications with owners of non-GME radios. Once the scrambler has been activated your transmission and reception will only be intelligible to others using the same scrambler technology. -
Page 16: Beep Tone Volume
To activate/deactivate Dynamic Volume Control: Press the MENU key. Navigate through the menu to select RADIO SETTINGS > DYNAMIC VOL. You can use the MENU key to turn this function on or off. XRS-370C... -
Page 17: Selecting The Active Speaker
SELECTING THE ACTIVE SPEAKER The XRS-370C radio has two speakers - one mounted inside the radio and the other mounted inside the microphone. By default, sound is reproduced by both speakers; however if you prefer, one of these speakers can be switched off, leaving either the radio’s internal speaker or the microphone’s speaker to reproduce sound. -
Page 18: Roger Beep
When Duplex is selected, your radio receives on the selected channel (e.g. CH 1) but transmits 30 channels higher (CH 31). The repeater hears your signal on CH 31 and retransmits it on CH 1 for others to hear. XRS-370C... -
Page 19: Priority Channel
The channel number will flash for a few seconds then a high beep will be heard as the channel is stored. The PRI icon will now be visible whenever that channel is selected. NOTE: The Priority channel can also be set through the Menu. XRS-370C... -
Page 20: Scanning
To select open scan/priority scan/network scan: Press the MENU key. Navigate to select SCAN SETTINGS, and the required scan option. XRS-370C... -
Page 21: Programming The Scan Memories
If the unwanted active channel continues to interrupt the scan even after the 30 second skip period has elapsed, hold SCAN while the radio is paused on that channel. The ‘nuisance’ channel will be completely removed from the Scan Group XRS-370C... -
Page 22: Dual Watch
‘DW’ is displayed and the SCAN icon will animate. You can change your working channel by pressing the keys. To exit Dual Watch, press or hold your programmable button (depends on how the key is configured for your radio), or press the SCAN button. XRS-370C... -
Page 23: Open Scan
Zone. If there are less than 2 channels programmed into the scan memory when you press SCAN, a low beep will be heard and the command will be ignored. XRS-370C... -
Page 24: Priority Scan
Priority channel. Example: Scanning channels 1 - 8 with priority channel 20 in Priority Scan NOTE: By default the priority channel will be scanned after every 5th scan channel. This timing can be adjusted using the XRS Connect App. XRS-370C... -
Page 25: Selecting Priority Scan
If you don’t wish to listen to a busy channel, briefly press the key while the radio is paused on that channel. The busy channel will be temporarily removed from the Scan Group to allow time for the channel XRS-370C... -
Page 26: Network Scan (Net-Scan)
ENABLING NET-SCAN To select network scan and a suitable CTCSS/DCS code: Press the MENU key. Navigate through the menu to select SCAN SETTINGS and choose from the options available. XRS-370C... -
Page 27: Using Net-Scan
To stop scanning, briefly press SCAN. A low beep will be heard and the icon will stop animating. As long as the radio was not on a busy channel, it will return to the last channel you selected, otherwise it will stay on the busy channel. XRS-370C... -
Page 28: Ctcss And Dcs
CTCSS TONE SET COMPATIBILITY The GME CTCSS tone set comprises 50 tones made up of the standard CCIR-38 Tone Set plus an additional 12 tones added to the end. If communicating with other brands of radios that only use the CCIR-38 tone set, please select from one of the first 38 tones to ensure compatibility with these radios. -
Page 29: Enabling Ctcss/Dcs On A Channel (Silent Mode)
NOTE: When Silent mode is enabled on a channel you should always check the icon for signs of traffic on the channel before transmitting to ensure you do not accidentally transmit over the top of another user. Alternatively, you can enable XRS-370C... -
Page 30: Busy Lockout
The Silent mode will be temporarily disabled while the key is pressed allowing you to hear signals on the channel. When you release the key, Silent mode is restored and the radio becomes quiet again. XRS-370C... -
Page 31: Selective Calling
When storing SelCall numbers, you can add names to each one to make it easier to identify whose number you are recalling. In addition, if an incoming SelCall matches one of your stored numbers, the name will be displayed to identify the caller. XRS-370C... -
Page 32: The Quiet Mode
Briefly press the TOP key on the top of the microphone. The alarm will stop but the caller’s name and SelCall number will remain on the display and the channel will remain open to any incoming signals. This feature is useful if you are currently busy but intend to call the person back later. XRS-370C... -
Page 33: Quiet Mode
Quiet memory. When Quiet memory is switched OFF on the selected channel, ‘Q’ will disappear from the display indicating the channel is no longer stored in the Quiet memory. XRS-370C... - Page 34 Quiet channels or a combination of Quiet and Open channels. NOTE: To ensure reliable SelCall detection when scanning in the Quiet mode, it is recommended that you restrict the number of channels in the Scan Group. XRS-370C...
-
Page 35: Group Calling
Use the Select MAKE SELCALL and press MENU. Use the keys to change the digit at the cursor position. Press MENU [SEL:NEXT] to step forward to the NEXT digit position or BACK to step back to the previous digit position. XRS-370C... -
Page 36: Call Acknowledge In Group Mode
Receiving a Group Call is identical to receiving a normal SelCall except that the alarm sound is a LOW tone beep instead of the normal High tone beep. The caller’s name and number is displayed in the usual way. XRS-370C... -
Page 37: Menu Options
SEL:OPTION = briefly press the MENU key to select the option. HLD: OPTION = press and hold the MENU key to select the option. CONTEXT MENU EXAMPLES SEL:NEXT = Press MENU for NEXT HLD:CALL = Hold MENU for NEXT XRS-370C... - Page 38 Numbers 0 1 2 3 4 5 6 7 8 9 Punctuation . * + <space> XRS-370C...
-
Page 39: Menu Table
QUIET MEMORY QUIET MODE SCRAMBLER SQUELCH LEVEL ZONES VOICE PLAYBACK ACTIVE MUTE DUAL WATCH SELCALL RESEND TOP BUTTON PRESS CYCLE SCAN CHANNEL SELCALL VOICE PLAYBACK ACTIVE MUTE DUAL WATCH FUNCTIONS TOGGLE Q MEMORY ON/OFF TOGGLE Qmode TOGGLE SCAN TOGGLE SILENT XRS-370C... - Page 40 Model, Serial #, Firmware, Bluetooth H/W, Bluetooth F/W RESET SETTINGS Cancel, Reset radio, Factory Reset CB SCAN MEMORY A Open Scan SCAN SETTINGS B Priority Scan C Network Scan NETSCAN SUBTONE CTCSS/DCS SELCALL MAKE SELCALL Last Memory - 20 XRS-370C...
-
Page 41: Receive-Only Channels (Zones)
8 zones with each zone containing up to 50 channels. Zones and channels can each be individually named for easy identification. Programming is done either through the radio menu or through the GME XRS Connect App. The XRS Connect App also offers a range of pre-programmed frequencies in various categories sorted by locations making the selection of suitable channels and frequencies much easier. -
Page 42: Select A Zone
Press MENU [SEL:GO]. EDIT A ZONE NAME Press the MENU key. Select ZONES and press MENU. Select the desired Zone from the Zone list. To edit the zone, select HOLD the MENU key [HLD:EDIT]. The zone edit screen appears. XRS-370C... - Page 43 Press the MENU key to step forward to the NEXT character position or the BACK key to step back to the previous character position. Continue until the desired name has been entered. Zone names can be up to 16 characters long. XRS-370C...
-
Page 44: Add Channels To A New Zone
All channels in the selected zone will now be available along with the usual 80 CB channels. Zone channels can be found immediately above CB Channel 80. ADD CHANNELS TO A NEW ZONE Press the MENU key. Select ZONES and press MENU. XRS-370C... - Page 45 Press MENU [SEL:EDIT] to edit the new channel. Use the keys to change the character at the cursor position. Press MENU to step forward to the NEXT character position or the BACK key to step back to the previous character position. XRS-370C...
-
Page 46: Edit Existing Channels In A Zone
To save the new channel, hold MENU [HLD:SAVE]. The display returns to the Zone screen. EDIT EXISTING CHANNELS IN A ZONE Press the MENU key. Select ZONES and press MENU. Select the desired Zone from the Zone list and hold MENU [HLD:EDIT] to edit the zone. XRS-370C... - Page 47 • Select Del Channel to delete the selected channel • Select Add Channel to add a new channel • Select Edit to edit the selected channel Next select MENU [SEL:EDIT]. To add a new channel or EDIT an existing channel; XRS-370C...
-
Page 48: Bluetooth
XRS Location Services app. Pair When Secure Pairing is turned on you must select PAIR in the Bluetooth menu to put the radio into pair mode before you can connect for the first time. Pair mode will timeout after 90 seconds. XRS-370C... -
Page 49: Programmable Buttons
Mutes/reduces the volume of the radio/unmutes the radio, based on how the Active Mute feature is set. Dual Watch Allows you to monitor a selected channel and the Priority Channel simultaneously. SelCall Resend Automatically resends to the last Selcall ID you sent. XRS-370C... -
Page 50: Programming The Xrs Button
XRS BUTTON PRESS or XRS BUTTON HOLD then press MENU. The XRS Button option list is displayed. The currently selected option is marked with a dot. Use the keys to select to desired option then press MENU to select. XRS-370C... -
Page 51: Programming The Top Button
PROGRAMMING THE TOP BUTTON: Press the MENU key. keys to select PROG BUTTONS then press MENU Use the to select. keys to select TOP BUTTON PRESS or TOP Use the BUTTON HOLD then press MENU. BUTTON HOLD then press MENU. XRS-370C... -
Page 52: Functions
• TOGGLE ‘Q’ MEM: Store channels in the SelCall Quiet memory. • TOGGLE Qmode: Toggle Quiet mode for SelCall. • TOGGLE SCAN: Enable/Disable the Scan function. • TOGGLE SILENT: Toggle Silent mode for CTCSS/DCS channels. Press MENU to toggle the selected function ON or OFF. XRS-370C... -
Page 53: Radio Settings
To alter a value (e.g. Beep Volume) press MENU then use the keys to adjust the value. Press MENU to accept. To toggle an ON/ OFF setting, press MENU. Press BACK to return to the previous menu or hold the BACK key to return to the main screen. XRS-370C... - Page 54 Adjusts the present squelch level. 1 to 9 [2] LEVEL SQUELCH TAIL Enables/Disables the squelch tail. When set to ON/OFF [ON] OFF the squelch tail is silent. SELCALL ACK Enables/disables automatic transmission of an ON/OFF acknowledge beep when your SelCall Ident is received. XRS-370C...
-
Page 55: Scan Settings
CB SCAN MEM then press MENU. Use the keys to select from memory ‘A’, ‘B’ or ‘C’ then press MENU. The default scan memory allocations are; • A – Open Scan • B – Priority Scan • C – Netscan XRS-370C... -
Page 56: Net-Scan
• Select MAKE SELCALL to enter and send a SelCall number. • Select Last to resend or save the last SelCall number you sent. • Select Own to edit your radio’s own SelCall number. Continue scrolling downwards to access a further 20 user programmable SelCall memories. XRS-370C... -
Page 57: Making A Selcall
Press MENU [SEL:NEXT] to step forward to the NEXT digit position or BACK to step back to the previous digit position. Continue until all 5 SelCall digits have been entered. Hold MENU [HLD:CALL] to send. XRS-370C... -
Page 58: Resending The Last Selcall Number
EDITING THE CONTACT NAME Use the keys to change the character or the cursor position. Press MENU [SEL:NEXT] to step forward to the NEXT character position or BACK to step back to the previous character position. XRS-370C... -
Page 59: Editing Your Radio's Own Selcall Number
Press MENU [SEL:NEXT] to step forward to the NEXT digit position or BACK to step back to the previous digit position. Continue until the required name has been entered, then hold MENU [HLD:SAVE] to save the new number. XRS-370C... -
Page 60: Adding A New Contact To The Selcall Memory
Press MENU [SEL:NEXT] to step forward to the NEXT character or digit position or the BACK key to step back to the previous character or digit position. Continue until the required name and SelCall number has been entered then hold MENU [HLD:SAVE] to save the new number. XRS-370C... -
Page 61: Xrs Features
Services app). LOC TIMEOUT This setting allows you to set the location timeout. The None - 180 radio will not transmit locations with timestamps that minutes are past the timeout specified in this setting. ‘30 minutes’ is the default option. XRS-370C... -
Page 62: Voice Playback
• Elapsed time since the recording was made (If the radio is switched off, this information will be no longer be available when the radio is switched on). • The CB channel on which the recording was made. • Recording also works when the radio is in the Active Mute mode. XRS-370C... - Page 63 PTT key will also immediately exit the voice playback feature. To clear all recordings: Press the MENU key. Navigate to the following selections: XRS FEATURES > VOICE PLAYBACK > CLEAR ALL. This selection erases all recordings from the radio. XRS-370C...
-
Page 64: Active Mute
Tap the Active Mute slider to turn on/off. When the slider turns green, the active mute feature is on. To navigate to the Active Mute feature on your radio: Press the MENU key. Navigate through the following selections: XRS FEATURES > ACTIVE MUTE. XRS-370C... -
Page 65: Installation
Alternatively, if it is necessary to mount the unit in a less audible location, an extension speaker can used. The extension speaker plugs into the extension speaker socket on the radio’s rear panel. XRS-370C... -
Page 66: Installing The Cradle
Screw the mounting cradle to a firm surface then slide the radio’s main unit into the cradle from the front until it clicks into place. Finally, connect the power lead, antenna cable and extension speaker (if required) to the sockets on the radio’s rear panel. MOUNTING THE CRADLE Option 1 Option 2 XRS-370C... -
Page 67: Fitting The Radio
If the main unit is installed in a remote location, you may need to install an extension speaker inside the cabin. The extension speaker plugs into the extension speaker socket on the rear panel of the main unit. Gently spread tabs Slide radio from cradle Gently spread tabs XRS-370C... -
Page 68: Fitting The Controller Microphone
+13.8 volts continuously available (on the battery side of the ignition switch) via the 2 amp fuse. Radio remains ON when igni on switch is OFF Fuse To Radio BLACK Igni on Switch Chassis Car ba ery XRS-370C... -
Page 69: Radio Turns On And Off With The Ignition Switch
NOTE: The High DC warning will remain on the display even if the normal voltage level is restored. You will need to switch the radio OFF then ON again to reset it and clear the ‘High DC’ warning. IMPORTANT: The power source should never exceed 30 volts. XRS-370C... -
Page 70: Antenna Connection
It is essential to select a good quality, high efficiency, 477 MHz antenna. A poor quality antenna or one not designed for the specific frequency band you are using will give very poor performance. GME has a wide range of suitable 477 MHz UHF CB antennas to suit most installations and applications. We recommend contacting your local GME retailer for advice. -
Page 71: Wiring
WIRING UHF antenna Optional extension speaker 12V DC MC664B microphone Red+ -Black Coax cable Fuse Connector plug XRS-370C... -
Page 72: Frequency And Subtone Tables
177.3 79.7 123.0 192.8 183.5 82.5 127.3 203.5 189.9 85.4 131.8 210.7 196.6 88.5 136.5 218.1 199.5 91.5 141.3 225.7 206.5 94.8 146.2 233.6 229.1 97.4 151.4 241.8 254.1 100.0 156.7 250.3 – – 103.5 162.2 69.4 – – XRS-370C... - Page 73 The table that follows details the DCS tones of the XRS Connect radio. DCS Tone Chart DCS Code Code DCS Code DCS Code DCS Code DCS Code – – – – – – – – XRS-370C...
- Page 74 476.775 476.4625 477.1375 476.800 476.4875 477.1625 476.825 476.5125 477.1875 476.850 476.5375 477.2125 476.875 476.5625 477. 2375 476.900 476.5875 477.2625 476.925 476.6125 477.2875 476.950 476.6375 477.3125 476.975 476.6625 477.3375 477.000 476.6875 477.3625 477.025 476.7125 477.3875 477.050 476.7375 477.4125 477.075 476.7625 XRS-370C...
-
Page 75: Specifications
Scanning Speed: 20 ms per channel (50 channels per second). Antenna Impedance: 50 Ohms nominal Nominal Battery 12 volts DC Voltage: Operating Voltage 10 - 16 volts DC Range: Battery Polarity: Negative Earth Standard Test Voltage: 13.8 volts DC XRS-370C... - Page 76 1.7 amps with 50 Ohms termination. Receiver Menu Options Intermediate 38.85 MHz, 450 kHz Frequencies: Sensitivity: -122 dBm for 12 dB SINAD unweighted Selectivity: -6 dB at ± 3.5 kHz, -60 dB at ± 12.5 kHz Intermodulation -72 dB Immunity: Blocking Immunity: -98 dB XRS-370C...
-
Page 77: Mechanical Specifications And Connections
Two core cable with bulkhead connector in rear panel. Antenna: SO 239 panel socket External Speaker: 3.5 mm mono jack Front Microphone Port: 8 way telephone style with rubber strain relief. Specifications are subject to change without notice or obligation XRS-370C... - Page 78 Standard Communications Pty Ltd trading as GME. 17 Gibbon Road, Winston Hills NSW 2153, Australia Part Number: 311022 Drawing Number: 49290-5 XRS-370C...
Need help?
Do you have a question about the XRS-370C and is the answer not in the manual?
Questions and answers