Table of Contents
Advertisement
Quick Links
Getting Started Guide – XBee Cellular
Overview
Digi XBee Global LTE modules offers the easiest way to integrate cellular connectivity into an
OEM device. With the introduction of modern standards like LTE Cat 1, Cat 4, LTE-M and NB-
IoT, Digi has the cellular modem for your design. Digi XBee Cellular modems provide easy
cellular connectivity without having to go through a costly FCC or carrier end-device
certification process.
Digi XBee is more than a module. It's a complete ecosystem of radio frequency modems,
gateways, adapters, and software, all engineered to accelerate wireless development for global
deployments. One socket allows you to connect to IoT networks around the globe. With the
authentic Digi XBee footprint, you can future-proof your design and know that Digi has you
covered for new technologies as they emerge.
Why You'll Love It
• FCC cer'fied and carrier end-device cer'fied
• Excellent coverage and building penetra'on
• LTE-M or NB-IoT protocol
• MicroPython: on-module programmability to add local intelligence
• Available with Digi-provided SIM cards and data plans
• Bluetooth Low Energy
• GNSS/GPS
• Digital and analog I/O, i2c, SPI, UART
• Extended baOery life with PSM, deep sleep, pin sleep and cyclic sleep modes
• Digi TrustFence security
• Remotely manage and configure with XBee Studio or Digi Remote Manager
Getting Started
The fastest learning happens hands-on. This guide will help you set up your hardware, connect to
the mobile data LTE network, create and run XBee MicroPython applications, use Bluetooth
services, and leverage remote operations with Digi Remote Manager. Let's get started!
Identify the kit contents
This evaluation and development kit includes the following:
GSG v.1.1.2
1
Advertisement
Table of Contents

Related Manuals for sparkfun XBee Cellular


Summary of Contents for sparkfun XBee Cellular
- Page 1 OEM device. With the introduction of modern standards like LTE Cat 1, Cat 4, LTE-M and NB- IoT, Digi has the cellular modem for your design. Digi XBee Cellular modems provide easy cellular connectivity without having to go through a costly FCC or carrier end-device certification process.
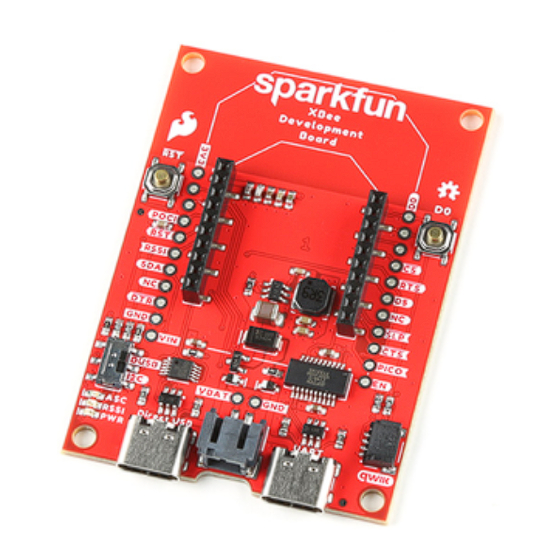
- Page 2 Includes LTE, BLE, MicroPython, GNSS, security/encryption chip, SPI, UART, GPIOs, ADCs, secure remote access to all features. One SparkFun XBee Development Board Provides USB-C connectivity, battery power, battery charge controller, user button switch, user LED, firmware programming interface, access to all pinouts.
- Page 3 Item Description One GNSS / GPS antenna Receives GNSS location satellite data outdoors. One SparkFun Temperature/Humidity Sensor Breakout - SHTC3 (Qwiic) Delivers temperature and humidity information via a standardized I2C interface One SparkFun Qwiic Cable - 50mm Connects Qwiic sensors to the development board...
-
Page 4: Connect The Hardware
Cellular Bundled Service plans. You can also purchase a subscription for cell service or a Digi Remote Manager package at shop.digi.com, or when purchasing new XBee Cellular modules, choosing the option to have a SIM included (SKUs ending -101 or -102). - Page 5 10. Note the APN, which is usually: hologram Install and update XBee Studio XBee Studio is a desktop application for configuring Digi XBee Cellular radio modules. It’s available for Windows, MacOS and Linux. The program includes built-in tools to make it easy to set up, configure, program and test cellular XBees.
- Page 6 3. The software may ask to update itself to the current version. If so, allow that to happen before continuing. Add device to XBee Studio These instructions show you how to add an XBee 3 Cellular to XBee Studio. 1. Launch XBee Studio. 2.
- Page 7 3. The Device menu will be displayed. The Device menu items operate only on the selected device, as identified by the IMEA number in its top tab. Note that the navigation menu to the very left has several similar icons but our exercises will focus on the Device menu items indicated above.
- Page 8 cellular component is needed you will be guided through downloading addi'onal drivers and connec'ng to the USB direct port on your development board for that por'on of the update. Set APN, protocol, carrier profile (AN, N#, CP) To connect to the LTE-M network, you will need to configure a few settings on your XBee Cellular.
-
Page 9: Troubleshooting
LTE-M Only [2] which will prevent the device from searching for other protocols. If you do this, remember to click the pencil icon to save that value to the XBee Cellular. 7. Search again, this time for CP. Scroll to see the highlighted command if needed. -
Page 10: Option 1: Manual Configuration
Echo server This basic example shows how to use XBee Cellular’s Transparent Mode to confirm round-trip communications with a remote server that simply echoes back whatever text you type. This exercise will require configuring a few more settings. It’s good practice to do that manually, and full instructions are below. - Page 11 2. Ensure XBee Studio is open and that your XBee Cellular has been discovered. 3. From the Device menu select Settings. 4. Click in the AT command to search… field at the top and type IP to highlight the IP Protocol setting.
- Page 12 2. From the Device menu select Profile Update. 3. Click on Load a Profile. 4. Navigate to where you downloaded the echo_server_profile.xpro file onto your computer and open it. 5. The profile’s details will be shown. Click on Apply Profile at the boOom to load it onto your XBee.
- Page 13 Note: For full instructions on using the Console, see the XBee Console topic in the XBee Studio User Guide. TCP/IP transparent mode Now that you have a simple round-trip transaction working, let’s extend this concept to any TCP/IP interaction. Here’s how you can set up a connection to any IP address using TCP protocol.
- Page 14 You can you any destination address and port you like, but something needs to accept the connection. Perhaps you’ve opened port 1234 on a server that has the address of 207.159.88.121. Your DL would be 207.159.88.121 and your DE would be 4D2 (1234 in decimal is 4D2 in hex.) If you don’t have access to a server where you can open ports, Digi has provided one that you can connect to for testing.
-
Page 15: Get Started With Micropython
Get started with MicroPython The Digi XBee 3 Cellular line features edge intelligence to help execute local tasks and a whole lot more. By running simple Python-based scripts on Digi XBee 3, you can actuate equipment, process sensor data, save money, extend battery life, improve responsiveness and enhance system reliability. - Page 16 Use XBee Studio to enter the MicroPython environment From the Device menu select MicroPython Terminal. At the top of the Terminal screen, click the Open connec#on icon to connect. If MicroPython mode was not previously enabled on the serial interface you will be prompted to do that.
-
Page 17: Example: Hello World
For now, we’ll start out with the simplest version of the commands and keep things easy. 1. Note the IO4 LED on the SparkFun XBee Development board. This LED is normally off. (Note: If you have Digi’s XBIB evaluation board use its DIO10 LED instead.) 2. -
Page 18: Exit Micropython Mode
from machine import # Loads the Pin library = Pin("D4", Pin.OUT) # Defines a pin as output led.on() # Turns on that LED 3. To turn it off, type the following and press Enter: led.off() # Turns off that LED We will return to this example in the next section, where you will create a program to blink the LED and then load it onto the XBee’s file system to run automatically. -
Page 19: Download File
followed by a list of files on your XBee. The XBee file root is always /flash. Inside it you will find a lib and cert folder. There is also a folder with two dots (..) instead of a name. Use this to go back up a level in the hierarchy. The lib folder can hold libraries, also known as modules in MicroPython. - Page 20 6. Next, navigate back to the MicroPython Terminal. No'ce that you can do this using the submenu for the device: 7. At the MicroPython Terminal click the icon to connect 8. We’ll load and run from the REPL prompt first. At the >>> prompt, type import main to start running your code.
- Page 21 With PS enabled, the main.py program you loaded into the XBee’s /flash directory will be run automatically on startup. So now all we need to do is reset the XBee: Reset the XBee 1. In XBee Studio, with your device selected, click on its icon in the sidebar 2.
- Page 22 Get started with Bluetooth Low Energy Cellular LTE is only one way to communicate wirelessly with Digi XBee 3 Cellular. If you’d like to configure your XBee from a phone or tablet, or set up an indoor location system using proximity beaconing, or read information from local low-power sensors, Bluetooth Low Energy (BLE) can be enabled on the XBee.
- Page 23 4. Click Apply to save the configura'on. The authen'ca'on values will be wriOen to your XBee automa'cally. Get the Digi XBee Mobile phone application To see the nearby XBee 3 devices that have BLE enabled, you must get the free Digi XBee Mobile application from the iOS App Store or Google Play and install it on your phone.
- Page 24 4. Tap the XBee device name in the list. A password dialog appears. 5. Enter the password you previously configured for the device in XBee Studio. 6. Tap OK. The Device Informa'on screen displays. You can now scroll through the seings for the XBee device and change the device's configura'on as needed.
- Page 25 GSG v.1.1.2...
- Page 26 Digi Remote Manager (DRM) is a secure platform for monitoring and controlling distributed IoT devices. DRM can be used to configure and update any Digi XBee Cellular, modify its file system, monitor for outages and many other useful remote interactions. Users can create or manage data streams coming from the XBee device, and send command messages to control it asynchronously.
- Page 27 Add Remote Manager account to XBee Studio 1. In XBee Studio, with your device connected and selected, click on its Dashboard icon in device menu. 2. Scroll down to the Quick Ac#ons sec'on and click on REMOTE MANAGER ACCOUNT 3. An account list will be displayed, which is probably blank. Use the Add it now link at the boOom of this list to access your new Remote Manager account.
- Page 28 4. On the Manage Accounts screen, enter your new Remote Manager username and password, then click the Add buOon. Add device to Remote Manager Now that your Remote Manager account is attached to XBee Studio, you can use XBee Studio to add XBee devices to your Remote Manager account inventory.
- Page 29 1. Staying at the for your device, note that the cloud icon at the top of the Dashboard shows Disconnected. 2. Next, scroll down to the Quick Ac#ons sec'on again, but this 'me click on REMOTE MANAGER CONNECTION. 3. In the CONFIGURE REMOTE MANAGER CONNECTION interface, for Connec#on Mode select Always connected to Remote Manager through TCP and click Apply.
- Page 30 At this point your XBee should already be mounted in the Development board with a SIM inserted and the cellular antenna attached. 1. Plug the Qwiic cable into one of the sockets on the SparkFun SHT3 Humidity sensor. Plug the other end of the cable into the Qwiic connector on the Development Board. Be sure the connector is properly seated.
- Page 31 Load MicroPython Code 1. Download this code repository and unzip it 2. In the device menu, click on XBee File System. 3. Use the lef panel of the File System to navigate to the xbee-temp-humidity-demo directory you just unzipped on your computer. 4.
- Page 32 2. Scroll down to the Quick Ac#ons sec'on and click on DEVICE RESET. 3. When you are asked to confirm, click Reset to restart the firmware on the module. 4. Afer about one minute the device should be fully reconnected and the MicroPython “main.py”...
- Page 33 5. In the right panel above the graph, select Tabular, Last Hour, and Raw Data to see the most recent data points. 6. The data you see here can be exported locally. Use the three-dot menu to select Export as CSV to download the selected data as a comma-separated values file that can be loaded into Excel or any other data management program.
- Page 34 Settings are grouped into categories for convenience. As an example we will use one of the I/O settings to send power to a general-purpose input/output (GPIO) pin connected to the LED on your Development Board. 1. Click on I/O in the list of Config seings. Here we can control the state of each GPIO pin on the XBee.
-
Page 35: Next Steps
2. Scroll down to the Quick Ac'ons sec'on and click on Factory Defaults 3. You will be asked to confirm. Press the Restore buOon. This will restore all seTngs on the device to the factory-default values. Any modifica+ons you have made to any seTngs will be lost. - Page 36 Practical Guide to Using BLE on Digi XBee 3: Application Note XBee Studio XBee Studio User Guide Getting Started with Digi XBee Studio Hardware SparkFun Digi XBee Kit SparkFun Digi XBee Development Board SparkFun Humidity Sensor Breakout - SHTC3 (Qwiic) * * * GSG v.1.1.2...
Need help?
Do you have a question about the XBee Cellular and is the answer not in the manual?
Questions and answers