Advertisement
Quick Links
Page 1 of 22
Spectacle Sound Kit Hookup Guide
Introduction
The Spectacle Sound Kit contains everything you need to make a button-
triggered sound-playback project.
Spectacle Sound Kit
KIT-1417 2
Suggested Reading
Before proceeding, you should read through the Spectacle User's Guide. It
will give you the basics you'll need to know about how Spectacle works to
follow the rest of this tutorial.
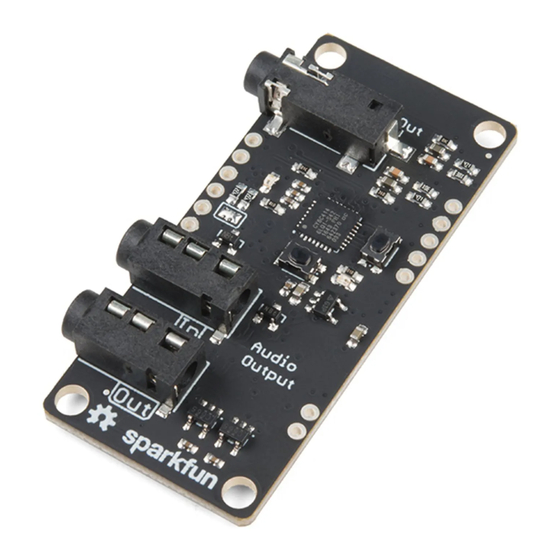
Spectacle Audio Board
The Spectacle Audio Board allows you to add sound to your Spectacle
projects. It accepts a microSD card with sounds in .ogg format (more on
this later), and has a 1/8" (3.5mm) audio jack to connect to external
amplifiers.
Advertisement

Related Manuals for sparkfun Spectacle Sound Kit


Summary of Contents for sparkfun Spectacle Sound Kit
- Page 1 Page 1 of 22 Spectacle Sound Kit Hookup Guide Introduction The Spectacle Sound Kit contains everything you need to make a button- triggered sound-playback project. Spectacle Sound Kit KIT-1417 2 Suggested Reading Before proceeding, you should read through the Spectacle User’s Guide. It will give you the basics you’ll need to know about how Spectacle works to...
- Page 2 The audio output is designed for amplified devices only. This means that any attempt to use the Spectacle Audio Board with headphones or unamplified speakers will fail to produce audible output. SparkFun sells a small, amplified, rechargeable speaker which is specifically intended for use...
- Page 3 Page 3 of 22 The Spectacle Audio Board uses a Micro SD card to store the audio files to be played. The files should be stored as .ogg Vorbis encoded files. This free audio file format can be played and created on any type of computer. Later in the tutorial we’ll show you how to convert from MP3, WAV, or other file formats to the .ogg format.
-
Page 4: The Configuration Utility
Page 4 of 22 Designed to bring simple signals from the world into your Spectacle projects, the Spectacle Button Board provides input for any of your Spectacle projects. It has two 1/8" (3.5mm) jacks for connecting to other boards in a Spectacle system. - Page 5 Page 5 of 22 The Spectacle Audio Board only supports one action: Play Sound. As you can see above, there are a number of settings associated with this action. • “Listen to channel number…” - This is the channel number which triggers the audio to start playing.
- Page 6 Page 6 of 22 For the Button board, there are five options: three which produce a momentary pulse type output and two that produce a continuous switch type output. Action on press Trigger an action when a button is first pressed, regardless of how long it is subsequently held down.
- Page 7 Page 7 of 22 Trigger an action when a button is released, regardless of how long it has been held down prior to being released. • “When button number … is released” - This is the number of the button we wish to assign to this action. The button numbers are printed on the board, and run from 0 through 8.
- Page 8 Page 8 of 22 Trigger an event as soon as a button is pressed, then continue to trigger that event as long as the button is held down. • “While button number … is pressed” - This is the number of the button we wish to assign to this action.
- Page 9 Page 9 of 22 Format The files used by the Spectacle Audio Board must be in OGG Vorbis format. This free, lossy codec has a higher compression ratio than MP3, and, more importantly, can be used without paying a licensing fee to any third part organization.
- Page 10 Page 10 of 22 Once you select which file you wish to edit, a rather alarmist message may pop up warning you about editing files without making a copy of them. Just click “OK”. You’ll see, then, something like this show up. This is what your audio file looks like, to the computer.
- Page 11 Page 11 of 22 This one allows you to set metadata about the file. You can ignore everything and just click “OK” to skip past this. Congratulations! You’ve successfully converted a file to OGG Vorbis format. You may now copy that file to the Micro SD card (don’t forget to rename it to a number!) for use with the Spectacle Audio Board.
- Page 12 Page 12 of 22 Now, let’s see what we can do about volume. Under the “Edit” menu, look for the “Select” submenu, and choose “All” to select the entire sound. You can also just use the drag-and-highlight method from above. Now that you’ve got the entire sound selected, click on the “Effect”...
- Page 13 Now that you’ve successfully edited the sound, export it to OGG Vorbis as we covered above. Example Project Let’s use the contents of the Spectacle Sound Kit to put together a working project! Connect the boards All of the required hardware for this tutorial is included in the kit.
- Page 14 Page 14 of 22 Then take the other end of the first TRRS cable (the one connected to the “Direct” jack on the Director Board) and plug it into the “In” jack on the Button board. Grab another of the TRRS cables and plug it into the “Out” jack on the button board.
- Page 15 Page 15 of 22 You can now insert the micro SD card into the slot on the back of the board. Finally, plug the Micro B end of the power adapter into the Director board, and the other end into the wall. You should see one solid light and one blinking light on both the Audio board and the Button board.
- Page 16 Page 16 of 22 Click anywhere in the “Button” box in the list that pops up to add a Button Board to your project. Now, repeat the process and click in the “Audio” box to add an Audio Board to your project. You’ll be back to the main page, then, but there will be a couple of new lines present: one for the Button Board and one for the Audio Board.
- Page 17 Page 17 of 22 To edit the actions assigned to these boards, click on the clapboard icon in the row of the board you wish to edit. We’ll start by editing the Button Board’s actions. Any time you bring up a new board to add actions, you’ll see the same screen as below.
- Page 18 Page 18 of 22 This will present you with a list of actions that the current board is capable of implementing. In the case of the button board, there are five different options. Click on the first one, “Action on Press”. You’ll now see the window as above.
- Page 19 Page 19 of 22 Back on the main page, you can see that the action you added is visible on the Button Board’s row in the window. Let’s edit the actions for the Sound board next. There’s only one option for actions for the Audio Board, and that’s “Play Sound”.
- Page 20 Page 20 of 22 You’ll be back on the main page, now, and you’ll see the actions you’ve added under each of the lines in the project. It’s time to upload the configuration to your hardware! Uploading Now that you’ve created your Spectacle program it’s time to upload it to the Director Board.
-
Page 21: Further Reading
Page 21 of 22 Make sure the volume on your device is turned all the way up, and that no other audio source (music, video, etc) is playing in the background. Then press and hold the “RST” button on the Director Board, press and hold the “PROG”... - Page 22 Spectacle Light and Sound Hookup Guide Kit Hookup Guide All the information you need to use All the information you need to use the Spectacle Motion Kit in one the Spectacle Light and Sound Kit in place. one place. https://learn.sparkfun.com/tutorials/spectacle-sound-kit-hookup-guide?_ga=2.150497909.21... 6/6/2017...
Need help?
Do you have a question about the Spectacle Sound Kit and is the answer not in the manual?
Questions and answers