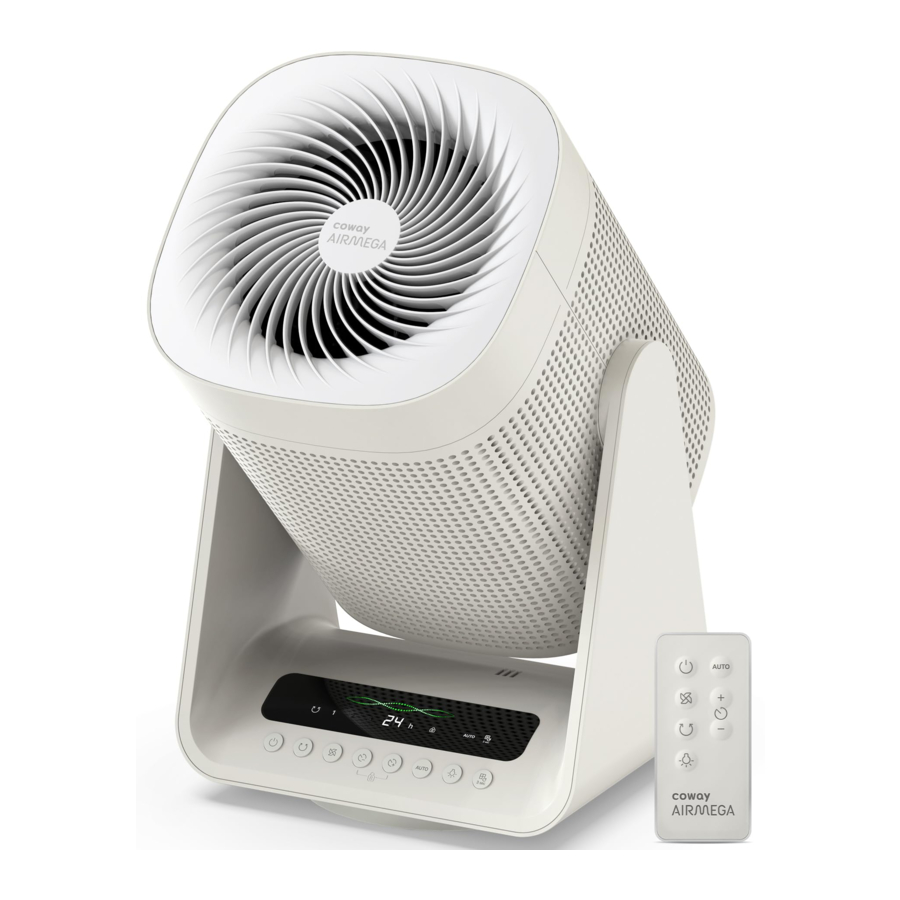
Coway Airmega AIM - Air Purifier Manual
- User manual (76 pages) ,
- User manual (164 pages)
Advertisement
INTRODUCTION
Before operating the product, you must remove the plastic wrapping of the inserted filter.
Do not operate the product until completing these steps first.

FEATURE HIGHLIGHTS
- Electronic buttons;
- Three airflow speed levels;
- With IR remote control function;
- Light-off function by control panel or remote control;
- Oscillation: horizontal automatically 80°, vertical oscillation by hand with five angles: -15°, 0°, 30°, 60°, 90°;
- 1-24 hours timing and pre-setting;
- AI Air quality detection and intelligent purification (AI purification): the default is high speed; after one minute of air quality detection with high speed, it will switch to high level if the color is red, to middle level if the color is yellow, and to low level if the color is green.
- Filter replacement reset button;
- All lights will dim to 30% without operation in 1 minute (except for the tricolor light)
PREPARATION
PARTS DIAGRAM
Check the parts of the product (exterior in the front and top view and control panel) and how they function.
Exterior
Check the parts and functions of the exterior of the product.
Front / Back

- Body Grille
- Front Grille
- Fan Blades
- Display Panel
- Button
- Bottom Cover
- Back Cover
- Remote Control
- Swing Bracket
- Swing Bracket Cover
- Base Cover
- Power Cord
Accessories

Control Panel

Remote Control

USE OF EACH FUNCTION BUTTON
After plugging in the power supply, the power-on sound "Bi~Bi~" will be emitted and enter the standby state and all function indicators will not light up. Except for the Power Button ![]() and the Timer Button, other buttons are invalid.
and the Timer Button, other buttons are invalid.
- Power Button
![]()
- After power-on in standby state, press the Power Button
![]() to turn on the power. The default state of power-on is:
to turn on the power. The default state of power-on is: - Fan: low level airflow speed, display panel has no display.
- Oscillation Off.
- Timer: No.
- Auto mode: Off
![]()
- After power-on in standby state, press the Power Button
- Oscillation Button
![]()
Press the Oscillation Button to start and stop oscillation function. - Airflow Speed Button
![]()
Press the Airflow Speed Button to increase and decrease the airflow speed.
Level 1→ Level 2 → Level 3
The Airflow speed indicator is shown on the control panel corresponding to the set speed. - Timer (+) Button
![]()
- In the power-on state, press the Timer Button
![]() to reset the schedule function. The timer range is 0-24 hours, displayed on display panel. (00 means no timer set)In the power-on state, press the
to reset the schedule function. The timer range is 0-24 hours, displayed on display panel. (00 means no timer set)In the power-on state, press the ![]() button, LED flashes and displays the current set timer, and the LED "h" lights up, which is the timer setting state; press the
button, LED flashes and displays the current set timer, and the LED "h" lights up, which is the timer setting state; press the ![]() button again, the set working time is increased by 1 hour, the timer indicator lights up and Display panel shows corresponding digits. Press and hold the
button again, the set working time is increased by 1 hour, the timer indicator lights up and Display panel shows corresponding digits. Press and hold the ![]() button for more than 2 seconds to increase the time rapidly and the display changes accordingly.
button for more than 2 seconds to increase the time rapidly and the display changes accordingly. - In the standby state, press the
![]() timer/presetting button to set the scheduled start time. The timer range is 0-24 hours, which is incremented by hours and displayed. In the standby state, press the
timer/presetting button to set the scheduled start time. The timer range is 0-24 hours, which is incremented by hours and displayed. In the standby state, press the ![]() button, LED flashes and the Led "h" lights up, which is the timer setting state; press the
button, LED flashes and the Led "h" lights up, which is the timer setting state; press the ![]() button again to adjust the schedule time up, and the adjustment does not cycle. During the setting process, LED flashes to display the currently set time; wait for 3 seconds to set the schedule time successfully.
button again to adjust the schedule time up, and the adjustment does not cycle. During the setting process, LED flashes to display the currently set time; wait for 3 seconds to set the schedule time successfully.
- In the power-on state, press the Timer Button


 button for more than 2 seconds to increase the time rapidly and the display changes accordingly.
 timer/presetting button to set the scheduled start time. The timer range is 0-24 hours, which is incremented by hours and displayed. In the standby state, press the
  button, LED flashes and the Led "h" lights up, which is the timer setting state; press the
  button again to adjust the schedule time up, and the adjustment does not cycle. During the setting process, LED flashes to display the currently set time; wait for 3 seconds to set the schedule time successfully.
After plugging in the power supply, the power-on sound "Bi~Bi~" will be emitted and enter the standby state and all function indicators will not light up. Except for the Power Button ![]() and the Timer Button, other buttons are invalid.
and the Timer Button, other buttons are invalid.
- Timer (-) Button
![]()
- In the power-on state, press the Timer Button
![]() to reset the schedule function. The timer range is 0-24 hours, displayed on display panel. (00 means no timer set) In the power-on state, press the
to reset the schedule function. The timer range is 0-24 hours, displayed on display panel. (00 means no timer set) In the power-on state, press the ![]() button, LED flashes and displays the current set timer, and the LED "h" lights up, which is the timer setting state; press the
button, LED flashes and displays the current set timer, and the LED "h" lights up, which is the timer setting state; press the ![]() button again, the set working time is reduced by 1 hour, the timer indicator lights up and the display panel displays the corresponding digits. Press and hold the
button again, the set working time is reduced by 1 hour, the timer indicator lights up and the display panel displays the corresponding digits. Press and hold the ![]() for more than 2 seconds to reduce the time rapidly and the display changes accordingly.
for more than 2 seconds to reduce the time rapidly and the display changes accordingly. - In the standby state, when the presetting function has been turned on, press the
![]() button to adjust the schedule time down, and the adjustment will not cycle. When it is adjusted to "00", the timer function will be canceled. During the setting process, LED flashes to display the currently set time; wait for 3 seconds to set the schedule time successfully.
button to adjust the schedule time down, and the adjustment will not cycle. When it is adjusted to "00", the timer function will be canceled. During the setting process, LED flashes to display the currently set time; wait for 3 seconds to set the schedule time successfully.
- In the power-on state, press the Timer Button
- Auto Mode Button
![]()
- In the power-on state, press the
![]() button to turn on or off the auto mode function, and the LED "AUTO" lights up when it is turned on.
button to turn on or off the auto mode function, and the LED "AUTO" lights up when it is turned on. - The product automatically adjusts the airflow speed (Levels 1, 2, and 3) for efficient operation depending on the indoor air quality detected by the sensor. The product requires 60 seconds to calibrate the sensors. The mode is intended for general users' convenience.
- The air quality sensor will automatically adjust the fan speed along with the color indicator on the control panel.
Green - healthy
Yellow - moderate
Red - unhealthy
- In the power-on state, press the
- Light On/Off Button
![]()
Press the![]() button to turn on/off the LED on the display panel.
button to turn on/off the LED on the display panel. - Filter Replacement Reset Button
![]()
![]() will pop up on the display panel when its time to replace the filter. After replacing the filter, press and hold the
will pop up on the display panel when its time to replace the filter. After replacing the filter, press and hold the ![]() for 3 seconds to reset the filter replacement indicator.
for 3 seconds to reset the filter replacement indicator. - Child Lock Function
![]()
In the power-on state or schedule state, the fan enters the child-lock mode when you press and hold " for 3 seconds, the LED light on, and all buttons will be locked. In child-lock state, press and hold![]() again for 3 seconds to cancel the child-lock mode. the LED light off. The child lock is automatically released after automatic shutdown
again for 3 seconds to cancel the child-lock mode. the LED light off. The child lock is automatically released after automatic shutdown - Coway Smart Features
- Auto dim display: The display panel will auto-dim until further action when the unit is idle for one minute.
- Last setting memory: When the fan is turned on for the second time or more, it will resume its previous settings (excluding the timer) before the product was shut off.


 will pop up on the display panel when its time to replace the filter. After replacing the filter, press and hold the
 again for 3 seconds to cancel the child-lock mode. the LED light off. The child lock is automatically released after automatic shutdown
USE OF REMOTE CONTROL
- Open the battery cover and replace the battery.
![]()
How to open the battery cover: first press and hold in the direction of arrow 1 in the figure to release the upper snap of the battery cover, and then pull it out in the direction of arrow 2.
When using, please align the position of the receiver.
Hold and press the latch as shown in the left digram to release the battery.
- Remove the battery.
![]()
- Please make sure to use the correct coin battery, CR2032 3V.
![]()
When replacing the battery, please pay attention to the polarity, and then put away the battery cover.- The battery shall be disposed of properly, including keeping them away from children; and
- Even used battery may cause injury


MAINTENANCE
CLEANING OF BODY SURFACE
- Before cleaning the product, please be sure to turn off the power and unplug the machine.
![]()
- When the exterior is dirty, use a dry cloth. Do not use detergents that contain solvents, thinners, bleach, chlorine, or abrasives.
![]()
- Place the product in a well-ventilated shade.


FILTER INSTALLATION INSTRUCTIONS
- How to open and close the rear cover. Grab the handle and turn clockwise to close and turn counter clockwise to open the rear cover.

- Install the filter
Please take the used filter out and replace with a new filter.
![]()


FUSE REPLACEMENT
- Grasp plug and remove from the receptacle or other outlet device. Do not unplug by pulling on cord. (A)

- Open the fuse (B) by sliding the fuse cover on the top of the plug towards the blades.

- Remove fuse (C) carefully by gently prying out the ends of the fuse from the receptacle.

- Risk of fire. Replace the fuse only with 2.5 Amp, 125 Volt fuse. Gently install replacement fuse back into the pins that will hold it in place. (D)

- Close fuse cover (E) by sliding the fuse cover back over the fuse box in the plug until it is completely closed.
- Plug the fan back in and resume use.


SPECIFICATION
The specification is subject to minor changes to improve the product performance.
| Item | Specification |
| Model Name | Airmega AIM |
| Rated voltage | 120 V~ |
| Rated frequency | 60 Hz |
| Rated power | 33 W |
| Filter | Pre-filter + HEPA filter + Deodorization filter |
| Product dimensions | 10.6 x 9.2 x 16.7 inch (26.8 x 23.4 x 42.3 cm) |
| Unit weight | 7.3 lb (3.3 kg, including remote control) |
| Gross weight | 9.9 lb (4.5 kg) |
Product design and specification may change without any prior notice for application of statutes, product improvement, and quality enhancement.
SAFETY INFORMATION
Several warnings and precautions are given below to avoid the danger caused by misoperation and make it more convenient to use this device.
- Do not exceed the voltage and power rating of the power outlet or connection device. This may generate excessive heat and cause electric shock or fire.
- Only use the appropriate type of electric socket for the product. Connecting the product to an incorrect socket may result in damage.
- Do not immerse the product or any of its parts in water. Operate the product only after a qualified technical examines and replaces the parts that were under water.
- Do not touch the power plug with wet hands.
- If the electric outlet is wet, do not connect the power plug of the product. Wait till the electric outlet dries completely before use.
- Do not operate the product if the motor fan fails to operate or is damaged.
- Disconnect the power plug from the electric outlet if strange sounds, smells, or smoke come from the product. Contact the customer service center immediately for instructions.
- Disconnect the power plug from the electric outlet when the product is not in use and before cleaning, inspecting, or replacing parts.
- Use a dedicated electric outlet for the product. Do not connect the product to a power strip that has connections to several other products.
- Do not operate the product if the power plug or cords are damaged.
- Do not forcibly bend, twist, pinch, or damage the power cord.
- Do not force the power plug into an incorrect electric outlet or into a loose electric outlet. Contact a qualified technician to install a proper electric outlet.
- A damaged power plug or cord must be replaced by the manufacturer or a qualified technician
- Remove the power plug from the electric outlet by grasping the power plug and pulling it gently. Never pull the cord to remove the power plug.
- Keep the electric cord away from heat sources.
- Do not repair the product unless this manual recommends it. Doing so will void your warranty. All repair work must be carried out by a qualified technician.
- This product has a polarized plug (one blade is wider than the other). To reduce the risk of electric shock, this plug is intended to fit in a polarized outlet only one way. If the plug does not fit fully in the outlet, reverse the plug. If it still does not fit, contact a qualified electrician. Do not attempt to defeat this safety feature.
- Do not use this product in industrial areas or factories where oil, grease, or dust particles may be present. This product is for household use only.
- Do not change the filter while the product is operating. Always turn off the product and unplug the power plug before accessing the components inside the product.
- Do not place the product near a humidifier or in humid areas, such as bathrooms or laundry rooms, where the product may come into contact with water.
- Do not place the product near flammable gases, cigarettes, incense, and other combustible materials.
- Do not place the product on a bed or against soft objects, such as curtains.
- Do not clean the product using detergents, paint thinner, or other household solvents.
- Do not spray insecticides or other flammable materials near the product.
- This product should not be used by children under 8 without supervision.
- This appliance is not intended for use by persons (including children) with reduced physical, sensory or mental capabilities, or lack of experience and knowledge, unless they have been given supervision or instruction concerning use of the appliance by a person responsible for their safety.
- Children should be supervised to ensure that they do not play with the appliance.
![]()
To Reduce The Risk Of Fire Or Electric Shock, Do Not Use This Fan With Any Solid-State Speed Control Device.- Do not use an adapter or extension cord, as it may cause fire, shock, or personal injury.
- Do not use attachments or filters not recommended by the manufacturer.
- Exercise caution while removing the components from the product. Ensure that your body parts do not get stuck or scratched while servicing the product.
- Do not insert any objects or finger into the openings of the product. If any objects fall into the openings, immediately turn off the product and unplug the power plug. Contact a qualified technician or the manufacturer to remove the object.
- Do not wash or reuse the Max2 filter.
- Do not block the air outlet of the product. Doing so may decrease the efficiency of the product and increase the risk of injury.
- This product is for household use as described in this manual. Using it in an industrial environment or any other place not recommended by the manufacturer and may result in electric shock, fire, and injury to person.
- Do not place anything on top of the product.
- Do not run the power cord under carpets or cover it with rugs.
- Change the filters at the recommended intervals so that excess dust does not accumulate.
- This product employs overload protection (fuse). A blown fuse indicates an overload or short-circuit situation. If the fuse blows, unplug the product from the outlet. Replace the fuse as per the user servicing instructions (follow product marking for proper fuse rating) and check the product. If the replacement fuse blows, a short-circuit may be present and the product should be discarded or returned to an authorized service facility for examination and/or repair.
- Do not operate any fan with a damaged cord or plug. Discard fan or return to an authorized service facility for examination and/or repair.
- Do not run cord under carpeting. Do not cover cord with throw rugs, runners, or similar coverings. Do not route cord under furniture or appliances. Arrange cord away from traffic area and where it will not be tripped over.
![]()
Chemical burn hazard. Keep batteries away from children.- Do not place the product where the both sides of product are blocked.
- Do not place the product in direct sunlight.
- Do not place the product next to or on windows.
- Place the product on a firm, flat, and dry surface that provides sufficient air circulation.
- Keep the product and its cord out of way, where it cannot be stepped on or tripped over.
- The end user has to be informed to keep at least 20 cm separation with the antenna while this end product is installed and operated.
- Operation is subject to the following two conditions:
- this device may not cause harmful interference and
- this device must accept any interference received, including interference that may cause undesired operation.
- Do not ingest battery, Chemical Burn Hazard;
- This product contains a coin / button cell battery. If the coin / button cell battery is swallowed, it can cause severe internal burns in just 2 hours and can lead to death;
- Keep new and used batteries away from children. If the battery compartment does not close securely, stop using the product and keep it away from children.
- If you think batteries might have been swallowed or placed inside any part of the body, seek immediate medical attention.
- The batteries contain materials, which are hazardous to the environment; they must be removed from the appliance before it is scrapped and that they are disposed of safely.


READ AND SAVE THESE INSTRUCTION
Documents / Resources
References
Download manual
Here you can download full pdf version of manual, it may contain additional safety instructions, warranty information, FCC rules, etc.
Advertisement


Need help?
Do you have a question about the Airmega AIM and is the answer not in the manual?
Questions and answers