
Related Manuals for Spirax Sarco Hiter 45 Series


Summary of Contents for Spirax Sarco Hiter 45 Series
- Page 1 IM-P418-08-EN-ISS1 Out. 2023 / Rev.01 45 Series Installation and Maintenance Manual 1. Warranty term 2. General safety information 3. Introduction 4. Installation 5. Maintenance 6. Part list. IM-P418-08-EN-ISS1...
-
Page 2: Warranty Term
Hiter Controls only obligation with the Warranty Term is to repair or replace any product that we deem defective. Spirax Sarco reserves the right to inspect the product at the end customer's facility or request the return of the product with prepaid freight by the buyer. - Page 3 Viton seal, special care must be taken to avoid potential health hazards associated with decomposition/burning of this item. Additional Information Additional information and help is available worldwide at any Spirax Sarco service center.produto, se realizado de maneira apropriada 3. Introduction The 45 Series is a pilot valve usually used together with a control valve (plug or butterfly-type, etc.), measuring the pressure of a process, comparing it to the desired pressure and commanding...
-
Page 4: Installation
4. Installation 4.1 The valve is inspected and shipped in a special packing with protection covers in the body openings. However, a carefully inspection should be performed in order to ensure there is no damage and that no material has penetrated in the valve during transportation or storage. 4.2 Several valves are damaged when they are firstly in service due to the lack of a proper and complete internal cleaning of piping before the installation. -
Page 5: Maintenance
Feeding air and escape of the actuator – Fittings E2 and E1 (Table 1) shall be used, taking into account the valve action type (air-for-opening or air-for-closing) and the ponto de tomada of pressure controlled by valve (upstream or downstream the valve). Signal for the actuator –... - Page 6 5.1.4. Relieve all the spring pressure (15) through regulator (11). 5.1.5. Remove the yoke bolts (20), cover (19) and diaphragm (18). In case of pilot with metallic diaphragm, also remove the yoke gasket (21). 5.1.6. Pull up the diaphragm disk assembly (17), stem (14) and stem nut (16). 5.1.7.
-
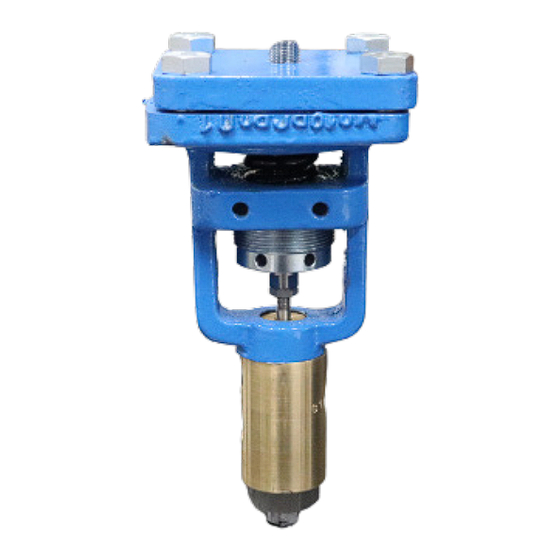
Page 7: Cleaning, Inspection And Repair
Fig. 3 – Type-01 pilot METALIC DIAPHRAGM Fig. 4 – Type 02 pilot 5.2 CLEANING, INSPECTION AND REPAIR All valve metallic parts must be cleaned using solvent and dried with compressed air after inspection. Those approved should be kept clean and very well protected up to the assembly. The oil protector application to the steel carbon non-painted parts is recommended. - Page 8 5.2.2 Check the seat conditions. Material flowing in resilient seats means the valve has been submitted to differentials of pressure above the allowed limit, or operated with elevated temperature. Deep scratches in the seat sealing area with the valve body also may cause leaking in operation. In these cases it is recommended seat replacement.
-
Page 9: Part List
5.4 ADJUSTMENTS 5.4.1 For type 01 pilot valves, the controlled pressure adjustment is performed by rotating the spring regulator (11). 5.4.2 For type 02 pilot valves, the controlled differential adjustment is performed by rotating the spring regulator (21). 5.4.3 For pilot sensibility adjustments the locking nut (2) must be loosen and the bottom sea (1) must be rotated. - Page 10 TABLE 3 – PART LIST – TYPE 02 (Fig. 4) Item Description • 1 BOTTOM SEAT LOCKING NUT • 3 SEAT O-RING BODY • 5 PLUG • 6 TOP SEAT • 7 PLUG O-RING FIXING NUT • 9 BODY GASKET BOTTOM COVER METALLIC DIAPHRAGM DIAPHRAGM...
- Page 11 More information on our website in English: Darci Rocha International Sales Manager Telephone: +55 15 3225-0355 Cell phone/WhatsApp: +55 15 99171-1448 E-mail: darci.rocha@br.hiter.com hiter.com.br/en IM-P418-08-EN-ISS1...
Need help?
Do you have a question about the Hiter 45 Series and is the answer not in the manual?
Questions and answers