Table of Contents
Advertisement
Quick Links
Translated from Italian to English - www.onlinedoctranslator.com
INSTALLATION MANUAL
RKK-KIT5A – WIFI CAMERA/NVR KIT
Page:1
RKK-KIT5A
Plug & Play WiFi video surveillance kit
Installation manual
How to install the system
How to connect to the network How to
insert an additional camera
DSE SRL – ITALY – WWW.DSE.EU
Advertisement
Table of Contents

Related Manuals for DSE RKK-KIT5A


Summary of Contents for DSE RKK-KIT5A
- Page 1 Translated from Italian to English - www.onlinedoctranslator.com INSTALLATION MANUAL RKK-KIT5A – WIFI CAMERA/NVR KIT Page:1 RKK-KIT5A Plug & Play WiFi video surveillance kit Installation manual How to install the system How to connect to the network How to insert an additional camera...
-
Page 2: Contents Of The Manual
INSTALLATION MANUAL RKK-KIT5A – WIFI CAMERA/NVR KIT Page:2 Contents of the manual The RKK series WiFi kits are designed to create small wireless video surveillance systems ready to work in a few minutes and can be installed without any specific knowledge. -
Page 3: Package Contents
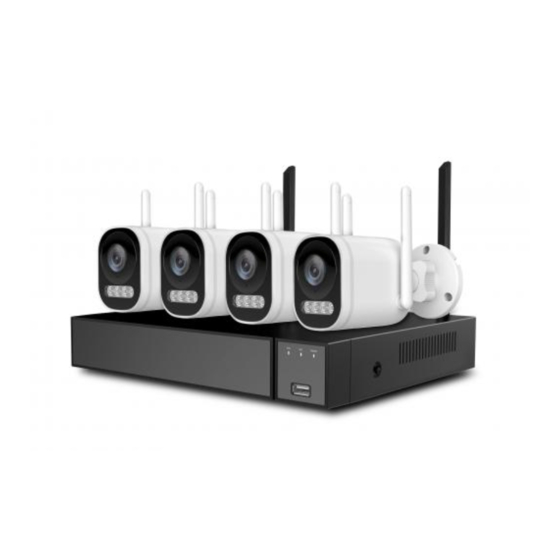
INSTALLATION MANUAL RKK-KIT5A – WIFI CAMERA/NVR KIT Page:3 Package contents The kit you purchased is a complete wireless video surveillance system. The package includes: 1 – WI-FI VIDEO RECORDER (NVR) 2 – From 1 to 8 WI-FI CAMERAS FOR OUTDOOR/INTERNAL use 3 –... -
Page 4: Connect The Cameras
INSTALLATION MANUAL RKK-KIT5A – WIFI CAMERA/NVR KIT Page:4 Connect the cameras The cameras in this system are designed to require no configuration and are delivered already combined with the kit's NVR. You just need to connect the power supply to the socket. Initially it is best to power the cameras near the NVR, before installing them in their position, in order to conveniently configure the system. - Page 5 INSTALLATION MANUAL RKK-KIT5A – WIFI CAMERA/NVR KIT Page:5 You can fix the camera to the wall or even to the ceiling and orientate it thanks to the articulated bracket. The plugs and the drilling template are supplied. The retaining ring of the bracket must be unscrewed to be able to orient the joint and closed completely once the camera has been positioned.
- Page 6 INSTALLATION MANUAL RKK-KIT5A – WIFI CAMERA/NVR KIT Page:6 Connect the NVR The central unit of your system is a WiFi network video recorder, a device that is also called NVR. To use it you have to make some connections on the back. The diagram below may vary slightly depending on the kit model DSE SRL –...
-
Page 7: Connect The Mouse
INSTALLATION MANUAL RKK-KIT5A – WIFI CAMERA/NVR KIT Page:7 Follow this sequence to connect your NVR 1 – SCREW THE ANTENNAS If they are not built-in, screw the two antennas to the back of the NVR. Eastern straight up. 2 - CONNECT A COMPUTER MONITOR To use your NVR you need a monitor where you can view the cameras and configure the options. -
Page 8: Choice Of Language
INSTALLATION MANUAL RKK-KIT5A – WIFI CAMERA/NVR KIT Page:8 Make the first ignition As soon as you connect the power plug, the NVR starts up and displays an image on the screen. If you don't see the image you need to check your cable and monitor settings. - Page 9 INSTALLATION MANUAL RKK-KIT5A – WIFI CAMERA/NVR KIT Page:9 Your password must be at least 8 characters long and include uppercase, lowercase letters, numbers, and special characters. 3 – PASSWORD RECOVERY Here you need to set the information to recover your password if you forget it. You can set a question and an answer that only you know (pay attention to the spelling) and also an email inbox to receive a recovery code.
- Page 10 INSTALLATION MANUAL RKK-KIT5A – WIFI CAMERA/NVR KIT Page:10 4 – NETWORK Here you set the network parameters of the NVR relating to the wired connection network towards the router and towards the Internet. By default you will find the DHCP setting enabled, so that the NVR automatically receives the correct parameters from the router.
- Page 11 INSTALLATION MANUAL RKK-KIT5A – WIFI CAMERA/NVR KIT Page:11 5 – SYSTEM SETTINGS Here you set the system date and time. The time zone in Italy is GMT+1. You can choose the time and date format according to your taste. You can also enable automatic time synchronization via the Internet (NTP).
- Page 12 INSTALLATION MANUAL RKK-KIT5A – WIFI CAMERA/NVR KIT Page:12 FINISHED! At the end of the wizard your wifi CCTV system is already working. DSE SRL – ITALY – WWW.DSE.EU...
- Page 13 INSTALLATION MANUAL RKK-KIT5A – WIFI CAMERA/NVR KIT Page:13 Login To control the NVR with the mouse you need to log in using the username: admin and the password you set when you first started the NVR DSE SRL – ITALY – WWW.DSE.EU...
-
Page 14: Live Viewing
INSTALLATION MANUAL RKK-KIT5A – WIFI CAMERA/NVR KIT Page:14 Live viewing In live viewing you have various commands available In the command bar at the bottom you have a button available forsplit the screenin the number of boxes you prefer. Double-clicking on a panel automatically brings it to full screen. - Page 15 INSTALLATION MANUAL RKK-KIT5A – WIFI CAMERA/NVR KIT Page:15 Click on a window to show the channel command bar DSE SRL – ITALY – WWW.DSE.EU...
- Page 16 INSTALLATION MANUAL RKK-KIT5A – WIFI CAMERA/NVR KIT Page:16 Review recordings To review the recordings stored by your NVR perform the following operations. To record you must have a hard disk installed in the NVR. 1 – OPEN THE PLAYBACK WINDOW Right-click the mouse and choose the PLAY icon, second from the left in the top menu 2 –...
- Page 17 INSTALLATION MANUAL RKK-KIT5A – WIFI CAMERA/NVR KIT Page:17 3 – CHOOSE THE DAY AND TIME YOU WANT TO SEE AGAIN Choose the day you are interested in at the bottom left. The days that contain recordings are marked by the colored box. Click on one of these. Colored bands indicating recordings will appear in the timeline at the bottom DSE SRL –...
- Page 18 INSTALLATION MANUAL RKK-KIT5A – WIFI CAMERA/NVR KIT Page:18 4 – PLAY THE INSTANT YOU WANT TO SEE AGAIN In the time bar at the bottom you will find the 24 hours of the day with the continuous recording colored in green and the recordings made following the measurements in other colours. With the box above the timeline you can change its scale so as to enlarge the sector you want to analyse.
- Page 19 INSTALLATION MANUAL RKK-KIT5A – WIFI CAMERA/NVR KIT Page:19 DSE SRL – ITALY – WWW.DSE.EU...
- Page 20 INSTALLATION MANUAL RKK-KIT5A – WIFI CAMERA/NVR KIT Page:20 Search videos and images You can export and save recorded videos and images by also searching for files with the SEARCH button Choose camera, date and type of recording, press the search button and then choose the files...
- Page 21 INSTALLATION MANUAL RKK-KIT5A – WIFI CAMERA/NVR KIT Page:21 Finally export with the backup button DSE SRL – ITALY – WWW.DSE.EU...
- Page 22 INSTALLATION MANUAL RKK-KIT5A – WIFI CAMERA/NVR KIT Page:22 Connect the NVR to your network To be able to connect to the surveillance system via PC or mobile phone you must connect the NVR to your network. To do this use a network cable and connectthe WAN NETWORK portof the NVR to a free port on your router or switch.
- Page 23 INSTALLATION MANUAL RKK-KIT5A – WIFI CAMERA/NVR KIT Page:23 Check the network parameters of your NVR Your NVR configures itself on the network automatically (DHCP), therefore it directly receives the network address and configuration from your router. You don't have to worry about entering any parameters.
- Page 24 INSTALLATION MANUAL RKK-KIT5A – WIFI CAMERA/NVR KIT Page:24 Connect with the browser on the internal network If you have a computer connected to the same network as your WiFi Kit, you can view your cameras simply with the browser. You can use any browser.
- Page 25 INSTALLATION MANUAL RKK-KIT5A – WIFI CAMERA/NVR KIT Page:25 3 – CONNECTED You are now connected and can see live camera images by clicking on the camera icon. You can also review the recordings by clicking PLAY and modify the system configuration which we will see in the advanced settings manual.
- Page 26 INSTALLATION MANUAL RKK-KIT5A – WIFI CAMERA/NVR KIT Page:26 Connect with IoVedo.RK software and apps To connect with your mobile phone, consult the IoVedo.RK app manual. To connect from a computer without a browser, consult the IoVedo.RK software manual. Both of these clients work both on the internal network and via the Internet through our P2p cloud server.
- Page 27 INSTALLATION MANUAL RKK-KIT5A – WIFI CAMERA/NVR KIT Page:27 DSE SRL – ITALY – WWW.DSE.EU...
-
Page 28: Install A Hard Drive
INSTALLATION MANUAL RKK-KIT5A – WIFI CAMERA/NVR KIT Page:28 Install a Hard Drive If you want your system to be able to record, you need to install a Hard Disk inside the video recorder. Any 3.5" SATA hard disk for computers is fine, but for longer life it would be better to purchase a specific model for video recording. - Page 29 INSTALLATION MANUAL RKK-KIT5A – WIFI CAMERA/NVR KIT Page:29 2 – FORMAT THE DISK To use the new disk you must initially format it. Open the setup menu and choose FORMAT in Hard Disk Management. You will need to enter your administrator password.
- Page 30 Add an additional camera to your kit These RKK-KIT5A wifi kits have a maximum capacity of 8 wifi cameras. If you purchased a kit with fewer cameras than its maximum capacity, for example a 6-camera kit that can accept up to 8, you can expand it later by purchasing just the additional cameras.
- Page 31 INSTALLATION MANUAL RKK-KIT5A – WIFI CAMERA/NVR KIT Page:31 3 – Go to the CHANNELS section and press the + button next to the channel where you want to add the camera. A message opens telling you what you need to do.
- Page 32 Add an external camera to the NVR The RKK-KIT5A wifi kits use a specific wifi NVR, which can only manage the specific cameras for these kits. If you want to connect other cameras you must consider one of our onvif wifi NVRs..
Need help?
Do you have a question about the RKK-KIT5A and is the answer not in the manual?
Questions and answers