Advertisement
Quick Links
Technical Support and E-Warranty Certificate www.vevor.com/support
OUTDOOR ENTERTAINMENT
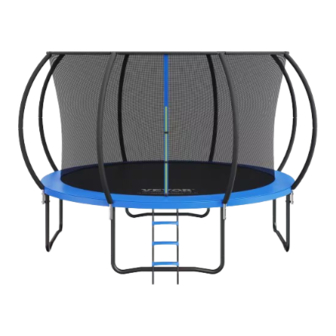
TRAMPOLINE
MODEL: TX-B7123-10FT
TX-B7123-12FT
TX-B7123-14FT
We continue to be committed to provide you tools with competitive price.
"Save Half", "Half Price" or any other similar expressions used by us only represents an
estimate of savings you might benefit from buying certain tools with us compared to the major
top brands and does not necessarily mean to cover all categories of tools offered by us. You
are kindly reminded to verify carefully when you are placing an order with us if you are
actually saving half in comparison with the top major brands.
Advertisement

Subscribe to Our Youtube Channel
Related Manuals for VEVOR TX-B7123-10FT


Summary of Contents for VEVOR TX-B7123-10FT
- Page 1 Technical Support and E-Warranty Certificate www.vevor.com/support OUTDOOR ENTERTAINMENT TRAMPOLINE MODEL: TX-B7123-10FT TX-B7123-12FT TX-B7123-14FT We continue to be committed to provide you tools with competitive price. "Save Half", "Half Price" or any other similar expressions used by us only represents an estimate of savings you might benefit from buying certain tools with us compared to the major top brands and does not necessarily mean to cover all categories of tools offered by us.
- Page 2 - 1 -...
- Page 3 This is the original instruction, please read all manual instructions carefully before operating. VEVOR reserves a clear interpretation of our user manual. The appearance of the product shall be subject to the product you received. Please forgive us that we won't inform you again if there are any technology or software updates on our product.
- Page 4 Warning-To reduce the risk of injury, user must read instructions manual carefully. Not suitable for children under 36 months Do not use during pregnancy! Do not use when suffering from high blood pressure! Only one person on the trampoline! Use only bare feet! No somersaults! No smoking! Remove all sharp objects from trampoline and jumper!
-
Page 5: Safety Warnings And Precautions
SAFETY WARNINGS AND PRECAUTIONS Thank you for using this product. In order to make sure that you can operate the machine correctly, read this instruction carefully before operation and keep it properly for future reference. Please read the precautions and safety rules on this page to ensure your safe use. - Page 6 10. Pay attention to pedestrians and vehicles when using. 11. Do not apply this unit to any other purposes than the indicated usage. No changes to any Part or structure of the product are allowed. 12. The trampoline net cannot place items to avoid damage. 13.
- Page 7 28. Do not install the trampoline over concrete, asphalt, or any other hard surface. Make sure there are no children, pets, animals, obstructions underneath the trampoline. 29. Don't intentionally jump against the protection net as this will weaken it. 30. Artificial illumination may be required for indoor or shady areas. 31.
- Page 8 5. The product should be placed on a flat surface. 6. The product requires two people to assemble. NOTE:The quantity of Part shown in the manual is the actual usage and the unused Part are spare Part. Model TX-B7123-10FT TX-B7123-12FT TX-B7123-14FT 242.5 Pound 264.5 Pound 308.6 Pound...
- Page 9 W Shaped Spring Tool T-Hook Bottom Pole Upper Pole Long 16pc 16pc 16pc Screw 16pc 16pc 16pc Plastic 16pc 16pc 16pc Enclosure Fiberglass Stick Plastic T-Connector Pole 16pc 16pc 16pc Foam Wrench - 8 -...
-
Page 10: Assembly Steps
Screw Nut 16pc 16pc 16pc Ladder Pipe Ladder Steps Ladder Screw Ladder ASSEMBLY STEPS Step 1 ● Insert the Leg Extension (F) into the W-Shaped Legs (G). Make sure the bumps are aligned with the holes in the bars and stick out through them completely. Bumps should face back and front. - Page 11 Step 2 ● Attach The Frame (C) to T-Connectors (D). Continue until you form the circle. Tip: Have a second person or use a wall to apply some resistance against the frame to help it shift into place. Step 3 ●...
- Page 12 Step 4 ● Layout the jumping mat (B) inside the circle frame. Insert one end of the spring (E) in the triangle ring of the jumping mat (B) and the other end pull it with the spring tool (H) and insert it into the frame hole. Step 5 ●...
- Page 13 Step 6 ● Firmly fix the bottom pole (I) to the plastic pad (M) then insert a long screw (K) through the pole, plastic pad, and leg extension then secure it at the end with a nut (L). Then insert the Upper Pole (J) into the Bottom Pole (I). Step 7 ●...
- Page 14 Step 8 ● Insert the fiberglass stick through the designated area in the safety net and connect it to the T-Connector. TIPS: You can connect all the fiberglass sticks through the safety net and to the T connectors until you have a circle.After this, you can insert all the T-Connectors into the Pole.
- Page 15 Step 10 ● Cover the spring frame with the soft padding Frame Cover (A). Secure the padding parts together using the Velcro on each side, and tie the straps located underneath. Lay down the Frame Cover (A) so all the springs are covered. It should be fitted like a shower cap.
- Page 16 STEP LADDER Step 11 ● Align the two Ladder Pipes (T) and slide up the Steps one by one (U). Secure with the screws (V) and Ladder Nuts (W). Step 12 ● Hook the step ladder to the Metal Frame (C) of the trampoline under the Frame Cover (A).
-
Page 17: Cleaning And Storage
closed before use. Follow the manual safety information and enjoy your trampoline. CLEANING AND STORAGE 1. Wipe with a soft, dry cloth. Never use an abrasive cleanser or harsh pad. 2. Children are not allowed to wipe the product to avoid tipping and falling injuries. After disassembling the product, please assemble the parts and accessories. - Page 18 Address:Baoshanqu Shuangchenglu 803long 11hao 1602A-1609shi Shanghai Imported to AUS: SIHAO PTY LTD, 1 ROKEVA STREETEASTWOOD NSW 2122 Australia Imported to USA: Sanven Technology Ltd., Suite 250, 9166 Anaheim Place, Rancho Cucamonga, CA 91730 Pooledas Group Ltd Unit 5 Albert Edward House, The Pavilions Preston, United Kingdom SHUNSHUN GmbH Römeräcker 9 Z2021, 76351...
- Page 20 Technical Support and E-Warranty Certificate www.vevor.com/support...
Need help?
Do you have a question about the TX-B7123-10FT and is the answer not in the manual?
Questions and answers