Advertisement
Quick Links
PAL Spider 101I Wireless Controller
Quick Start Guide
Download the user manual here:
https://transmittersolutions.com/wp-content/uploads/2023/10/Spider-User-Manual-Ver-1.3-FINAL-8-28-2023.pdf
1. Package Contents
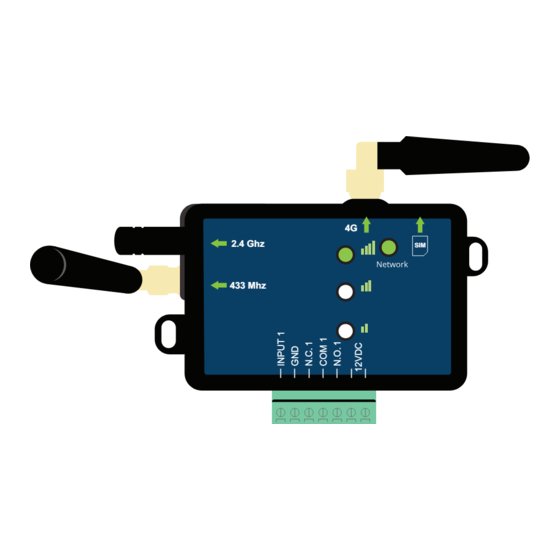
2.4 Ghz
433 Mhz
4 Button Transmitter
4G Antenna (1)
2. Mounting Controller
2.4 Ghz
433 Mhz
Mounting - When mounting the PAL be sure the RFID antenna is
pointing as close to vertical as possible. For the best signal strength.
The 4G antenna needs to be pointing to the right
Note: When mounting the PAL unit inside a gate operator,
use external antenna (PALANT3G
4G
SIM
SIM Card
433 Mhz Antenna (1)
4G
SIM
1
Advertisement

Subscribe to Our Youtube Channel
Related Manuals for Transmitter Solutions PAL Spider 101I


Summary of Contents for Transmitter Solutions PAL Spider 101I
- Page 1 PAL Spider 101I Wireless Controller Quick Start Guide Download the user manual here: https://transmittersolutions.com/wp-content/uploads/2023/10/Spider-User-Manual-Ver-1.3-FINAL-8-28-2023.pdf 1. Package Contents 2.4 Ghz 433 Mhz 4 Button Transmitter SIM Card 433 Mhz Antenna (1) 4G Antenna (1) 2. Mounting Controller 2.4 Ghz 433 Mhz Mounting - When mounting the PAL be sure the RFID antenna is pointing as close to vertical as possible.
-
Page 2: Power Connection
3. Power Connection LEDs key Meaning Action 2.4 Ghz Fast flashing of the SIM light System is booting 12 - 24V DC 433 Mhz Slow flashing of the SIM light Searching for a cellular network Transformer 2 blinks and break connecting to the Internet process 4 Short flash of the SIM Connecting to the PAL interface... - Page 3 5. PAL Registration Request web portal login information. THE PAL CONTROLLER MUST BE ADDED THROUGH THE PAL ONLINE WEB PORTAL BEFORE Login to your account at portal.pal-es.com USING THE PHONE APP select devices on the left hand side and click add on the top right hand corner.
-
Page 4: Adding Users
7. Electric Strike Connection Optional Magnetic Sensor 2.4 Ghz 433 Mhz Installation allows you to receive a gate status notification Input voltage 12VDC / 3A Door or Gate Position switch - Mount this on the door frame or on the gate in the desired location with the wire running to the Electric Strike input on the PAL controller, like shown above. - Page 5 9. PAL Settings General – Allows you to configure the relay output hold time. Timer Events – Allows for setting a 7-day automatic unlock/open, lock/close schedule. Time Groups – Allows for creating groups to restrict Wiegand and phone application access to the PAL controller.
- Page 6 11. PAL 4-Button Transmitter Programming Each PAL Spider Controller includes a PAL 4-button Transmitter. This transmitter can be programmed by: 1. Choose the Spider unit from the "Devices" section 2. Click on "Settings" 3. Click on the "Remote Control" You will then see the menu below: Buttons are designated 1-4 starting at the top and going clockwise around...
Need help?
Do you have a question about the PAL Spider 101I and is the answer not in the manual?
Questions and answers