fluenta Flarecal FGM 160 User Manual
Hide thumbs
Also See for Flarecal FGM 160:
- Maintenance procedures (4 pages) ,
- Installation instructions manual (40 pages) ,
- Operating instructions manual (27 pages)
Table of Contents
Advertisement
Quick Links
Advertisement
Table of Contents

Subscribe to Our Youtube Channel
Related Manuals for fluenta Flarecal FGM 160


Summary of Contents for fluenta Flarecal FGM 160
- Page 1 Fluenta Flarecal User Manual 62.400.027.C | EN...
- Page 2 • This user guide enables routine on-site calibration of Fluenta ultrasonic flow sensors using the FlareCal calibration box. • This product is designed to be used in designated non- hazardous areas only. It is not designed or certified to be operated or taken into hazardous locations.
-
Page 3: Table Of Contents
FlareCal Contents Document Information ..........1 Setting up the laptop ..........10 Described product ..........1 Download FGM 160 data ........11 Manufacturer ............1 Firmware update ..........12 Legal information ..........1 Transducer removal and cleaning .......14 Cautions..............1 Transducer transportation .........15 Operational ............1 Calibration procedure ..........16 Environmental ............1 Location ..............16 Introduction ...............2... -
Page 4: Document Information
Do not N-5501 Haugesund, use the Flarecal unit if you believe it is damaged Norway or defective in any way. Contact Fluenta technical Phone: +47 210 21 927 support for advice before use. E-mail: support@fluenta.com... -
Page 5: Introduction
Original document This document is an original document for Fluenta. We reserve the right to make technical changes to the documentation and the products, at any time. Please review this document carefully before working with the Fluenta Flarecal instrument. -
Page 6: Product Description
- Intended use • Windows laptop or PC with an installation of The Fluenta Flarecal™ is intended for use to verify Fluenta UFM Manager software, version 5.0.6 and re-calibrate your flare meter as needed, without or later, and a valid user licence for both UFM requiring a certified engineer to be present. -
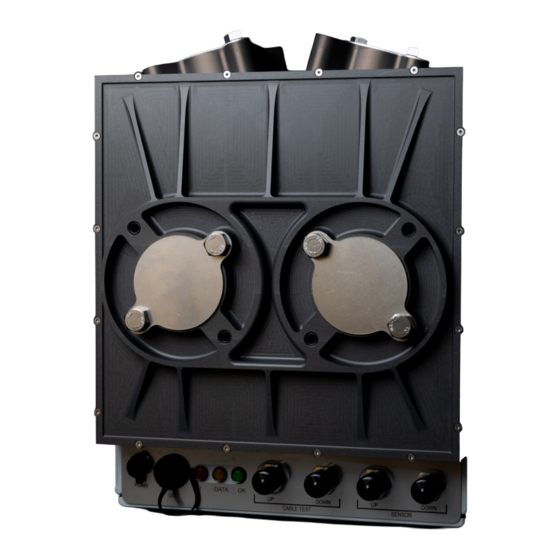
Page 7: Product Overview
FlareCal Product overview Flarecal calibration box j 1) 1! 1@ 1. Flange connections for transducers in lateral 45 configuration 8. USB socket with blanking plates 9. Error indicator 2. Transducer depth stop rod 10. Data indicator 3. 3” Packing box fixings 11. -
Page 8: Calibration Flow
FlareCal Calibration flow The flowchart below lists the major steps in the Follow all steps to complete the full calibration calibration process. Each step of the full calibration procedure. process is described in this document, starting on the next page. Prepare and set up the laptop, installing software etc. -
Page 9: Calibration Software
These steps appear as a row of buttons both UFM Manager and the Flarecal module add-in. at the top of the “Calibration with FlareCal” screen. You can request a licence from your local Fluenta The steps are: representative or by contacting Fluenta customer support at support@fluenta.com. -
Page 10: Ufm Manager User Interface
FlareCal Calibration software UFM Manager user interface The UFM Manager software is a typical Windows application with indicators, buttons, toggle buttons, progress bars, and information displays. The table below indicates their use. Button Selects an operation. Buttons may change colour to indicate status. -
Page 11: Precalibration Procedure
A converter is required to enable connection between a USB port of the laptop and the Modbus RS-485 port of the FGM 160. Fluenta recommends using either the Moxa 1130 or Moxa 1250 converter which must be available before calibration can commence. -
Page 12: Setting Up The Laptop
• Connect the USB cable between a USB port of the • Run the UFM Manager software on the laptop. USB/Modbus RS-485 converter and a USB port of • Select the ‘Calibration with Fluenta FlareCal’ the laptop as shown below. option from the calibrations menu as shown below. -
Page 13: Setting Up The Laptop
FlareCal Precalibration procedure Setting up the laptop • Select the “Precalibration Procedure” button and • On completion of each step within the calibration progress down the page shown below, checking process, select the “Save progress” button the listed items. located at the bottom of the screen. Guidelines on the inspection criteria can be This allows you to continue the calibration process from the current stage even if operation of the... -
Page 14: Download Fgm 160 Data
If the cause of the failed operation is obvious, rectify the problem and repeat the download procedure. If not, Contact Fluenta technical support with details of these results for help. Contents page... -
Page 15: Firmware Update
FGM 160 firmware. If the message below is displayed, firmware update will not be required. • Close the message. • Contact your local Fluenta representative to obtain the latest version of the FGM 160 firmware, or request it from support@fluenta. com. - Page 16 FlareCal Precalibration procedure Transducer components This reference image shows a cross- section of the main components of the transducer assembly with the ball valve open and the transducer installed in its working position. 1. Ball valve control handle 5. Transducer shaft 2.
-
Page 17: Transducer Removal And Cleaning
• Visually inspect each transducer face for scratches or dents. • Photograph any observed damage and append the photos to the service and calibration data sent to Fluenta. • Retract the transducer into the body of the packing box. • Close the ball valve. -
Page 18: Transducer Transportation
FlareCal Precalibration procedure Transducer transportation Transducer carry bags are provided with the Fluenta Transducers can be hand or shoulder carried safely Flarecal calibration system and should be used to when in a carry bag. protect the ultrasonic transducers whenever they are moved from one location to another. -
Page 19: Calibration Procedure
FlareCal Calibration procedure Location • With the transducers still retracted into the Calibration of transducers using Fluenta Flarecal packing boxes, line up the packing boxes with the must be carried out in a designated non-hazardous area. appropriate mounting points. Mounting the transducers... -
Page 20: Setting The Depth Of Lateral 45 Transducers
FlareCal Calibration procedure Setting the depth of lateral 45 Setting the depth of bias 90 transducers transducers • Ensure that the depth-stop rod is in place inside There are internal cradles opposite each transducer the calibration box. mounting that locate the transducer heads. The depth stop rod is not used to set the depth for bias •... -
Page 21: Connecting The Laptop
FlareCal Calibration procedure Connecting the laptop • Use the up/down nudge controls to set the FGM 160 cable length in metres. USB connector OK indicator • Connect the USB cable from the laptop to the calibration box USB connector. • The green “OK”... -
Page 22: Calibration Menu
Once stability has been achieved the calibration process can continue. This should take approximately 45 seconds to achieve. Contact support@fluenta.com if stable values cannot be achieved within this time frame. Cable loop back test During this stage the calibration box performs an... - Page 23 FlareCal Calibration procedure Transducer test During this stage the Fluenta Flarecal calibration box performs a transducer test and calibration, correcting for the previously measured delays in cabling and internal electronics. • Save progress before proceeding. The operator will be prompted to correctly connect the signal cables to the transducers.
- Page 24 FlareCal After calibration If the calibration result is successful then calibration data will have been acquired and testing in the designated non-hazardous area is now complete. The calibration system can now be dismantled, the calibration box packed up and the transducers returned to the site.
-
Page 25: Re-Fit The Transducers
FlareCal Re-fit the transducers Ensure that all relevant site-specific permits are in place before the commencement of this operation. • Refit the transducers into the line, which is the and then 1 ¼ further turns with a wrench to reverse of the removal procedure. ensure a gas tight seal. -
Page 26: Upload Calibration Data
FGM 160. This should take approximately 30 seconds to complete. If the upload is not successful, check the connections to the FGM 160. If failure persists contact support@ fluenta.com. • Save progress before proceeding. Contents page... -
Page 27: Completion Of Calibration
Any open work permits can now be closed in accordance with site working requirements. Validation Fluenta must validate all transducer calibrations. The calibration results will be checked by Fluenta and, if the calibration has been successful, a calibration certificate will be issued. Contents page... -
Page 28: Storage
Storage Replacement parts When not in use the Fluenta Flarecal • Contact your Fluenta distributor if you require spare instrument should be stored in a location that parts for the calibration box system. will not experience extremes of temperature or humidity. -
Page 29: Technical Specifications
FlareCal Technical specifications Power supply ...... 5.0 V (+0.25V, -0.6V), 0.5 A Power is supplied to the calibration box via the USB 2.0 port (or later) of a laptop or PC. (via USB connection) The Flarecal Weight ..............17.6 kg calibration box is intended for indoor (including all accessories) use. -
Page 30: Recycling And Disposal
12 months after first use, environment. whichever comes first. At end of life, The Fluenta Flarecal instrument Note that the warranty will be deemed void if the should be disposed of according to local legislation by... -
Page 31: Product Certification
FlareCal Product certification CE | EU declaration of conformity The manufacturer hereby declares that: Fluenta Flarecal™ fulfils all the relevant provisions of the following Directives: • 2014/30/EU – Electromagnetic Compatibility Directive • 2014/35/EU – Low Voltage Directive And is in conformity with the applicable requirements of the following standards:... -
Page 32: Ukca | Uk Conformity Assessed
FlareCal Product certification UKCA | UK conformity assessed The manufacturer hereby declares that: Fluenta Flarecal™ fulfils all the relevant provisions of the following Directives: • 2014/30/EU – Electromagnetic Compatibility Directive • 2014/35/EU – Low Voltage Directive And is in conformity with the applicable requirements of the following standards:... -
Page 33: Further Information
FlareCal Further information Definitions • FGM 160: Fluenta Flare Gas Meter 160 • UKCA: UK Conformity Assessed • CE: Conformité Européenne • EMCD: Electromagnetic Compatibility Directive • RED: Radio Equipment Directive • LVD: Low Voltage Directive (safety) References All references are available upon request. -
Page 34: Contact
FlareCal Contact WE’RE FLUENT. WE’RE FLUENTA. With over 3,000 installs across 6 continents, Fluenta Contact details may be subject to change. Check has the experience to help you more accurately the fluenta website www.fluenta.com for up to date measure flare gas, to make better business decisions contact details.
Need help?
Do you have a question about the Flarecal FGM 160 and is the answer not in the manual?
Questions and answers