Table of Contents
Advertisement
Available languages
Available languages
Quick Links
Advertisement
Table of Contents

Subscribe to Our Youtube Channel
Related Manuals for Yoer RoastMaster EG05BK


Summary of Contents for Yoer RoastMaster EG05BK
- Page 1 Grill elektryczny Electric grill Elektrogrill EG05BK RoastMaster PL ● EN ● DE...
-
Page 3: Warunki Bezpieczeństwa
POLSKI WARUNKI BEZPIECZEŃSTWA Podczas korzystania z urządzeń elektrycznych należy przestrzegać podstawowych zasad bezpieczeństwa w tym następujących: 1. Przed przystąpieniem do użytkowania dokładnie zapoznaj się z niniejszą instrukcją i zachowaj ją na przyszłość. 2. Upewnij się, że napięcie w gniazdku elektrycznym odpowiada napięciu podanemu na tabliczce znamionowej. - Page 4 POLSKI zwrócić szczególną uwagę, aby dzieci nie bawiły się urządzeniem. Czyszczenie i konserwacja urządzenia nie powinny być wykonywane przez dzieci bez odpowiedniego nadzoru. 8. Zwróć uwagę, aby dzieci w wieku poniżej 8 lat będące bez nadzoru trzymały się z dala urządzenia. 9.
- Page 5 POLSKI 17. Nie używaj i nie przechowuj w urządzeniu akcesoriów nierekomendowanych przez producenta, gdyż może to spowodować niepoprawną pracę urządzenia, jego uszkodzenie, bądź zranienia. 18. Nigdy nie podłączaj urządzenia do zewnętrznego regulatora czasowego, bądź odrębnego systemu zdalnego sterowania. 19. Umieść urządzenie w suchym miejscu, na płaskiej i odpornej na ciepło powierzchni.
- Page 6 POLSKI podobnych łatwopalnych materiałów. 29. Dołączony do grilla termostat jest częścią dedykowaną wyłącznie dla modelu Yoer EG05BK. Producent posiada wyłącznie prawo do konserwacji wspomnianej części. 30. Aby uniknąć przegrzania, urządzenie nie powinno być przykryte żadnym masywnym lub elastycznym materiałem, takim jak aluminiowa taca, folia aluminiowa lub tace wykonane z innego odpornego na ciepło materiału.
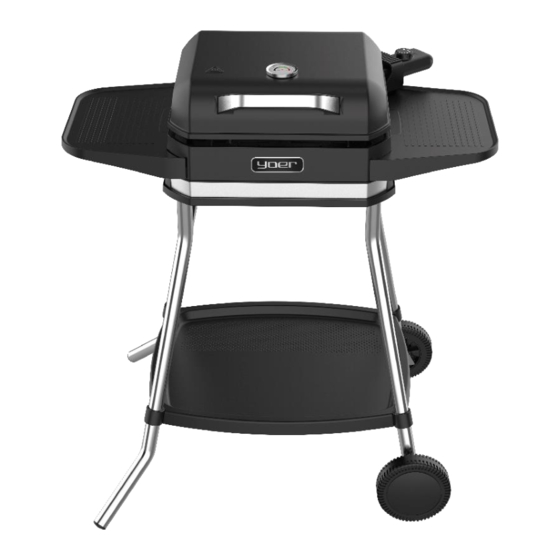
- Page 7 POLSKI POZNAJ SWÓJ GRILL 14. Prawe kółko 1. Osłona 8. Półka 15. Oś łącząca kółka 2. Pokrętło termostatu 9. Korpus 10. Nóżka z 16. Lewe kółko 3. Termostat kółkiem 17. Uchwyt osłony 4. Osłona skrzynki 11. Nóżka z sterowniczej 18. Miejsce mocowania zawiasu kółkiem 5.
- Page 8 POLSKI 21. Zabezpieczenie kółek G 22. Element A 23. Pokrętło 24. Element B 25. Element C 26. Element H 27. Element F 28. Element E 29. Element H...
- Page 9 POLSKI 30. Tacka ociekowa 31. Element D LISTA ZAŁĄCZONYCH AKCEOSRIÓW MONTAŻOWYCH ST4×12 8szt. ST4×14 2szt. φ20*φ5.2 2 szt. ST3×10 2szt. Lining 2PCS M4×8+M4 4szt. 2szt. 2szt. 2szt. 1szt. 1szt. 1szt.
- Page 10 POLSKI INSTRUKCJA MONTAŻU GRILLA STOJĄCEGO 1. Przymocuj odpowiednio nóżki do korpusu urządzenia. Kierunek i rozkład nóżek ma znaczenie (patrz rysunek obok). Prawidłowe przymocowanie nóżek zostanie zasygnalizowane słyszalnym „kliknięciem”. 2. Przymocuj odpowiednio dolną tackę do czterech wsporników, a następnie dociśnij. 3. Zamontuj kółka zgodnie z rysunkiem obok. 4.
- Page 11 POLSKI 5. Zamontuj wspornik skrzynki sterowniczej za pomocą 2 śrub 3x10. 6. Umieść podstawę urządzenia na ramie. 7. Obróć znajdujące się u dołu podstawy pokrętła (23) w lewo, aby zablokować podstawę. 8. Wsuń tackę ociekową do odpowiedniego otworu znajdującej się w podstawie urządzenia.
- Page 12 POLSKI 9. Umieść płytę grzewczą zgodnie z rysunkiem obok. Upewnij się, że 4 nóżki płyty znalazły się w odpowiednich otworach. Uwaga: Korzystaj z płyty grzewczej wyłącznie po umieszczeniu jej w podstawie urządzenia. 10. Użyj śrubokrętu krzyżakowego (nie dołączono do zestawu) by odpowiednio zamontować...
- Page 13 POLSKI 12. Przymocuj osłonę do urządzenia zgodnie z rysunkiem obok. 13. Umieść termostat zgodnie poprzez wsunięcie go do skrzynki sterowniczej, a następnie dociśnij. INSTRUKCJA MONTAŻU GRILLA STOŁOWEGO Uwaga: W celu uniknięcia uszkodzenia urządzenia lub obrażeń, podczas korzystania z grilla wewnątrz budynku nie montuj nóżek grilla.
- Page 14 POLSKI 2. Zamontuj wspornik skrzynki sterowniczej za pomocą 2 śrub 3x10. 3. Wsuń tackę ociekową do odpowiedniego otworu znajdującej się w podstawie urządzenia. 4. Umieść płytę grzewczą zgodnie z rysunkiem obok. Upewnij się, że 4 nóżki płyty znalazły się w odpowiednich otworach.
- Page 15 POLSKI 6. Odkręć nakrętkę z termometru, a następnie umieść termometr w otworze na osłonie urządzenia. Przytrzymaj termometr i przykręć odkręconą nakrętkę od wewnętrznej strony osłony do momentu, aż poczujesz opór. 7. Przymocuj osłonę do urządzenia zgodnie z rysunkiem obok. 8. Umieść termostat zgodnie poprzez wsunięcie go do skrzynki sterowniczej, a następnie dociśnij.
-
Page 16: Przed Pierwszym Użyciem
POLSKI PRZED PIERWSZYM UŻYCIEM 1. Usuń wszystkie opakowania foliowe. 2. Wykonaj czynności z sekcji „Czyszczenie i konserwacja”. 3. Zamontuj prawidłowo urządzenie postępując zgodnie z sekcją „INSTRUKCJA MONTAŻU GRILLA STOJĄCEGO” lub „INSTRUKCJA MONTAŻU GRILLA STOŁOWEGO”. 4. Pozwól grillowi nagrzewać się przez około 3-5 minut z maksymalną mocą bez jedzenia. Upewnij się, że pomieszczenie jest dostatecznie wentylowane, jako iż... -
Page 17: Korzystanie Z Urządzenia
POLSKI KORZYSTANIE Z URZĄDZENIA UWAGA: Niektóre elementy grilla, takie jak płyta grzewcza czy osłona nagrzewają się do bardzo wysokich temperatur. Nigdy nie dotykaj ich, gdy grill jest rozgrzany, aby uniknąć ryzyka poparzenia! Korzystaj wyłącznie z uchwytu osłony. 1. Umieść urządzenie w suchym miejscu, na płaskiej i odpornej na ciepło powierzchni. 2. -
Page 18: Czyszczenie I Konserwacja
POLSKI • Nigdy nie używaj przyborów wykonanych z metalu do obracania jedzenia na grillu. Do tego celu użyj szczypiec lub innych przyborów kuchennych wykonanych z drewna lub tworzywa sztucznego odpornego na wysokie temperatury. • Obracaj mięso i ryby tylko raz podczas grillowania. Nie trzeba obracać ich więcej niż raz, ponieważ... - Page 19 W przypadku roszczenia gwarancyjnego należy zwrócić się do specjalistycznego punktu sprzedaży lub bezpośrednio do autoryzowanego serwisu Yoer. W momencie składania reklamacji należy podać rodzaj usterki oraz dołączyć kopię dowodu zakupu.
-
Page 20: Important Safeguards
ENGLISH IMPORTANT SAFEGUARDS When using electrical appliances, basic safety precautions should always be followed, including the following: 1. Read all instructions before using and keep for future reference. 2. Make sure that your outlet voltage corresponds to the voltage stated on the rating label. Ensure that the wall socket is properly grounded. - Page 21 ENGLISH 9. Do not operate any appliance with a damaged cord or plug or after the appliance malfunctions, or has been damaged in any manner. The power cord and the device, along with all its accessories, should be regularly checked for any damage. 10.
- Page 22 28. Charcoal or similar combustible material cannot be used with this appliance. 29. The thermostat included with the grill is a dedicated component exclusively designed for the Yoer EG05BK model. The manufacturer retains the sole right for maintenance of this particular part.
- Page 23 ENGLISH 35. After each use, before cleaning or moving it away, turn off the appliance and pull out the plug from the socket. 36. This appliance is intended to be used for household use only (not for commercial use). Any other use is considered inappropriate and dangerous.
-
Page 24: Know Your Grill
ENGLISH KNOW YOUR GRILL 1. Wind and 8. Shelf 15. Axle Connecting wheels splash guard 16. Left wheel 9. Body 2. Thermostat 17. Guard handle 10. Leg with knob 18. Highe mounting point wheel 3. Thermostat 19. Leg without wheel 11. - Page 25 ENGLISH 21. Wheel protection G 22. Element A 23. Knob 24. Element B 25. Element C 26. Element H 27. Element F 28. Element E 29. Element H...
- Page 26 ENGLISH 30. Drip tray 31. Element D LIST OF ATTACHED MOUNTING ACCESSORIES ST4×12 8 pcs. ST4×14 2 pcs. φ20*φ5.2 2 pcs. ST3×10 2 pcs. M4×8+M4 4 pcs. 2pcs. 2 pcs. 2pcs. 1pcs. 1 pcs. 1 pcs.
- Page 27 ENGLISH ASSEMBLY INSTRUCTIONS FOR STANDING GRILL 1. Attach the legs to the frame of the appliance. The direction and arrangement of the legs matter (see the illustration next to it). 2. Attach the lower tray to the brackets according to the illustration.
- Page 28 ENGLISH 5. Mount the bracket of the control box using 2 screws 3x10. 6. Place the base of the device on the frame. 7. Turn the bottom base knobs (23) to the left to lock the base.
- Page 29 ENGLISH 8. Insert the drip tray into the corresponding hole in the base of the appliance. 9. Place the heating plate according to the illustration. Ensure that the 4 legs of the plate are placed in the appropriate holes. Note: Only use the heating plate after placing it in the base of the appliance. 10.
- Page 30 ENGLISH 11. Unscrew the nut from the thermometer, and then place the thermometer in the hole on the guard. Hold the thermometer and screw the unscrewed nut from the inside of the guard until you feel resistance. 12. Mount the guard according to the illustration. 13.
- Page 31 ENGLISH ASSEMBLY INSTRUCTIONS FOR TABLE GRILL Note: In order to avoid damaging the device or injury, do not install the grill legs when using the grill inside a building. 1. Attach the side shelves using 8 screws 4x12 2. Mount the bracket of the control box using 2 screws 3x10.
- Page 32 ENGLISH 5. Use a crosshead screwdriver (not included in the set) to properly mount the guard according to the diagram next to it. Unscrew the nut from the thermometer, and then place the thermometer in the hole on the guard. Hold the thermometer and screw the unscrewed nut from the inside of the guard until you feel resistance.
-
Page 33: Before First Use
ENGLISH BEFORE FIRST USE 1. Remove all plastic packaging. 2. Perform the actions outlined in the "Cleaning and Maintenance" section. 3. Properly assemble the device following the "ASSEMBLY INSTRUCTIONS" sections. 4. Allow the grill to heat for approximately 3-5 minutes at maximum power without food. Ensure that the room is adequately ventilated, as the device may emit a little smoke on the first use. - Page 34 ENGLISH SUGGESTED TEMPERATURES AND COOKING TIMES Meal Temperature level Preparation time Steak / beef High 10-15 min Lamb High 10-15 min Chicken drumsticks High 15-20 min Chops High 20-25 min Chicken wings High 15-20 min Fillet of pork Medium or high 7-8 min While fish High...
-
Page 35: Cleaning And Maintenance
ENGLISH Electric diagram CLEANING AND MAINTENANCE WARNING: Never dip the grill, heating element, power cord in water or any other liquid! WARNING: Maintain cleanliness of all grill components. Clean the grill regularly. 1. Always unplug the appliance and allow it to cool down completely before cleaning. Remove the thermostat along with the cable from the control box. -
Page 36: Warranty And Repair
The warranty does not apply to defects resulting from natural wear of components or nor breakables such as glass and ceramic items. If you need a help, please contact seller or directly Yoer service. -
Page 37: Wichtige Sicherheitshinweise
DEUTSCH WICHTIGE SICHERHEITSHINWEISE Beim Gebrauch elektrischer Geräte sind grundlegende Sicherheitsvorkehrungen beachten, einschließlich folgenden: 1. Lesen Sie alle Anweisungen vor Gebrauch durch und bewahren Sie sie zur späteren Verwendung auf. 2. Stellen Sie sicher, dass die Spannung Ihrer Steckdose der auf dem Bewertungsetikett angegebenen Spannung entspricht. - Page 38 DEUTSCH nur unter Aufsicht erfolgen. 8. Kinder unter 8 Jahren sollten ferngehalten werden, es sei denn, sie werden kontinuierlich beaufsichtigt. 9. Betreiben Sie kein Gerät mit beschädigtem Kabel oder Stecker oder nachdem das Gerät fehlerhaft funktioniert hat oder in irgendeiner Weise beschädigt wurde. Das Netzkabel und das Gerät sowie all sein Zubehör sollten regelmäßig auf Beschädigungen überprüft werden.
- Page 39 28. Kohle oder ähnliches brennbares Material darf nicht mit diesem Gerät verwendet werden. 29. Das im Elektrogrill enthaltene Thermostat ist ein spezielles Bauteil, das ausschließlich für das Modell Yoer EG05BK entwickelt wurde. Der Hersteller behält sich das alleinige Recht zur Wartung dieses speziellen Teils vor.
- Page 40 DEUTSCH 30. Um Überhitzung zu vermeiden, darf dieses Gerät nicht von festen oder flexiblen Materialien wie Aluminiumschalen, Aluminiumfolie oder Tabletts aus anderen hitzebeständigen Materialien bedeckt werden. Die Verwendung solcher Gegenstände oder Materialien auf dem Grill könnte zu schweren Schäden führen. 31.
- Page 41 DEUTSCH KENNEN SIE IHREN GRILL 6. Halterung für 1. Windschutz- 13. Unterer Regalhalter 14. Rechtes Rad Spritzschutz Steuerknopf 15. Achse zur Verbindung der Räder 2. Thermostat- 7. Basis 16. Linkes Rad Knopf 8. Regal 17. Schutzgriff 3. Thermostat 9. Körpel 18.
- Page 42 DEUTSCH 21. Schutz für Rad G 22. Element A 23. Knauf 24. Element B 25. Element C 26. Element H 27. Element F 28. Element E 29. Element H...
- Page 43 DEUTSCH 30. Auffangschale 31. Element D LISTE DER BEIGEFÜGTEN MONTAGEZUBEHÖRTEILE ST4×12 8 St. ST4×14 2 St. φ20*φ5.2 2 St. ST3×10 2 St. M4×8+M4 4 St. 2 St. 2 St. 2 St. 1 St. 1 St. 1 St.
- Page 44 DEUTSCH MONTAGEANLEITUNG FÜR DEN STEHENDEN GRILL 1. Befestigen Sie die Beine am Rahmen des Geräts. Die Ausrichtung und Anordnung der Beine sind wichtig (siehe die Abbildung daneben). 2. Befestigen Sie die untere Ablage gemäß der Abbildung an den Halterungen. 3. Befestigen Sie die Räder gemäß der Abbildung daneben.
- Page 45 DEUTSCH 5. Befestigen Sie die Halterung der Steuerbox mit 2 Schrauben 3x10. 6. Platzieren Sie die Basis des Geräts auf dem Rahmen. 7. Drehen Sie die unteren Basisknöpfe (23) nach links, um die Basis zu verriegeln.
- Page 46 DEUTSCH 8. Setzen Sie die Tropfschale in das entsprechende Loch in der Basis des Geräts ein. 9. Platzieren Sie die Heizplatte gemäß der Abbildung. Stellen Sie sicher, dass die 4 Beine der Platte in die entsprechenden Löcher gesteckt werden. Hinweis: Verwenden Sie die Heizplatte nur, nachdem Sie sie in der Basis des Geräts platziert haben. 10.
- Page 47 DEUTSCH 11. Schrauben Sie die Mutter vom Thermometer ab und platzieren Sie dann das Thermometer in das Loch am Schutz. Halten Sie das Thermometer fest und schrauben Sie die abgeschraubte Mutter von innen am Schutz fest, bis Sie Widerstand spüren. 12.
- Page 48 DEUTSCH MONTAGEANLEITUNG FÜR DEN TISCHGRILL Hinweis: Um das Gerät nicht zu beschädigen oder Verletzungen zu vermeiden, installieren Sie die Grillbeine nicht, wenn Sie den Grill in einem Gebäude verwenden. 1. Befestigen Sie die Seitentische mit 8 Schrauben 4x12. 2. Befestigen Sie die Halterung der Steuerbox mit 2 Schrauben 3x10.
- Page 49 DEUTSCH 5. Verwenden Sie einen Kreuzschlitzschraubendreher (nicht im Set enthalten), um den Schutz gemäß dem nebenstehenden Diagramm ordnungsgemäß zu montieren. Schrauben Sie die Mutter vom Thermometer ab und platzieren Sie dann das Thermometer in das Loch am Schutz. Halten Sie das Thermometer fest und schrauben Sie die abgeschraubte Mutter von innen am Schutz fest, bis Sie Widerstand spüren.
-
Page 50: Vor Der Ersten Verwendung
DEUTSCH VOR DER ERSTEN VERWENDUNG 1. Entfernen Sie alle Kunststoffverpackungen.. 2. Führen Sie die in der "Reinigung und Wartung" beschriebenen Schritte aus. 3. Montieren Sie das Gerät gemäß den "MONTAGEANLEITUNGEN". 4. Lassen Sie den Grill etwa 3-5 Minuten bei maximaler Leistung ohne Lebensmittel aufheizen. Stellen Sie sicher, dass der Raum ausreichend belüftet ist, da das Gerät möglicherweise beim ersten Gebrauch etwas Rauch abgibt. - Page 51 DEUTSCH VORGESCHLAGENE TEMPERATUREN UND GARZEITEN Gericht Temperaturniveau Vorbereitungszeit Steak / Rindfleisch Hoch 10-15 Minuten Lamm Hoch 10-15 Minuten Hähnchenunterschenkel Hoch 15-20 Minuten Koteletts Hoch 20-25 Minuten Hähnchenflüges Hoch 15-20 Minuten Schweinefilets Mittel oder hoch 7-8 Minuten Ganzer Fisch Hoch 8-12 Minuten Spieße Mittel oder hoch 7-9 Minuten...
-
Page 52: Reinigung Und Wartung
DEUTSCH Elektrisches Diagramm REINIGUNG UND WARTUNG WARNUNG: Tauchen Sie niemals den Grill, das Heizelement oder das Netzkabel in Wasser oder eine andere Flüssigkeit ein! WARUNG: Bewahren Sie die Sauberkeit aller Grillkomponenten. Reinigen Sie den Grill regelmäßig. 1. Ziehen Sie immer das Gerät aus der Steckdose und lassen Sie es vollständig abkühlen, bevor Sie es reinigen. -
Page 53: Garantie Und Reparatur
Missbrauch oder Transport beschädigt wurde. Die Garantie gilt nicht für Mängel, die auf natürlichen Verschleiß von Komponenten oder nicht zerbrechlichen Materialien wie Glas- und Keramikartikel zurückzuführen sind. Wenn Sie Hilfe benötigen, wenden Sie sich bitte an den Verkäufer oder direkt an den Yoer-Kundendienst. - Page 56 Yoer sp. z o.o. Bernardyńska 2 64-000 Kościan Poland www.yoer.pl...
Need help?
Do you have a question about the RoastMaster EG05BK and is the answer not in the manual?
Questions and answers