Beurer BM 54 - Bluetooth Upper arm blood pressure monitor Manual
- Instructions for use manual (182 pages) ,
- Instructions for use manual (148 pages) ,
- Instructions for use manual (52 pages)
Advertisement
- 1 Included in delivery
- 2 Signs and symbols
- 3 Intended use
- 4 Warnings and safety notes
- 5 Device description
- 6 Initial use
- 7 Usage
- 8 Cleaning and maintenance
- 9 Accessories and replacement parts
- 10 What if there are problems
- 11 Technical specifications
- 12 Documents / Resources
Included in delivery
Check that the exterior of the delivery cardboard packaging is intact and make sure that all contents are present. Before use, ensure that there is no visible damage to the device or accessories and that all packaging material has been removed. If you have any doubts, do not use the device and contact your retailer or the specified Customer Service address.
1 x Blood pressure monitor
1 x Upper arm cuff
4 x 1.5V LR03 AAA batteries
1 x Storage bag
1 x Instructions for use
1 x Quick Start Guide
Signs and symbols
The following symbols are used on the device, in these instructions for use, on the packaging and on the type plate for the device:
 | WARNING Warning notice indicating a risk of injury or damage to health |
 | IMPORTANT Safety note indicating possible damage to the device/accessory |
 | Note Note on important information |
 | Application part, type BF |
 | Direct current |
 | Permissible storage and transport temperature and humidity |
 | Permissible operating temperature and humidity |
 | Protected against solid foreign objects 12.5 mm in diameter and larger, and against vertically falling drops of water |
 | Serial number |
Intended use
The BM 54 upper arm blood pressure monitor is intended for home use and serves as a non-invasive way of measuring and monitoring arterial blood pressure and pulse values in adults with an upper arm circumference of 22-44 cm.
As a result, you can quickly and easily measure your blood pressure and pulse and view various average values from previous measurements. The recorded measurements are classified and evaluated graphically. A symbol in the display also warns of possible existing cardiac arrhythmia.
Warnings and safety notes
Notes on use
- In order to ensure comparable values, always measure your blood pressure at the same time of day.
- Do not take a measurement within 30 minutes of eating, drin-king, smoking or exercising.
- Before the initial blood pressure measurement, make sure al-ways to rest for about 5 minutes.
- Furthermore, if you want to take several measurements in suc-cession, make sure always to wait for at least 1 minute between the individual measurements.
- Repeat the measurement if you are unsure of the measured value.
- The measurements taken by you are for your information only – they are no substitute for a medical examination! Discuss the measured values with your doctor and never base any medical decisions on them (e.g. medicines and their dosages).
- Using the blood pressure monitor outside your home envi-ronment or whilst on the move (e.g. whilst travelling in a car, ambulance or helicopter, or whilst undertaking physical activity such as playing sport) can influence the measurement accuracy and cause incorrect measurements.
- Do not use the blood pressure monitor on newborns or patients with preeclampsia. We recommend consulting a doctor before using the blood pressure monitor during pregnancy.
- Cardiovascular diseases may lead to incorrect measurements or have a detrimental effect on measurement accuracy. The same also applies to very low blood pressure, diabetes, circulatory disorders and arrhythmias as well as chills or shaking.
- This device is not intended for use by people (including child-ren) with restricted physical, sensory or mental skills or a lack of experience and/or a lack of knowledge, unless they are supervised by a person who is responsible for their safety or are instructed by such a person in how to use the device. Supervise children around the device to ensure they do not play with it.
- The blood pressure monitor must not be used in connection with a high-frequency surgical unit.
- Only use the device on people that have the upper arm circum-ference specified for the device.
- Please note that when inflating, the functions of the limb in question may be impaired.
- During the blood pressure measurement, the blood circulation must not be stopped for an unnecessarily long time. If the device malfunctions remove the cuff from the arm.
- Avoid any mechanical restriction, compression or bending of the cuff line.
- Do not allow sustained pressure in the cuff or frequent measurements. The resulting restriction of the blood flow may cause injury.
- Make sure that the cuff is not placed on an arm in which the arteries or veins are undergoing medical treatment, e.g. intravascular access or intravascular therapy, or an arteriovenous (AV) shunt.
- Do not use the cuff on people who have undergone a mas-tectomy.
- Do not place the cuff over wounds as this may cause further injury.
- Place the cuff on your upper arm only. Do not place the cuff on other parts of the body.
- Please note that data can only be transferred and stored when your blood pressure monitor is supplied with power. As soon as the batteries are empty, the blood pressure monitor loses the date and time.
- To conserve the batteries, the blood pressure monitor swit-ches off automatically if you do not press any buttons for 30 seconds.
- The device is only intended for the purpose described in these instructions for use. The manufacturer is not liable for damage resulting from improper or incorrect use.
Notes on storage
- The blood pressure monitor is made from precision and electronic components. The accuracy of the measured values and service life of the device depend on its careful handling:
- Protect the device from impacts, moisture, dirt, marked temperature fluctuations and direct sunlight.
- Do not drop the device.
- Do not use the device in the vicinity of strong electromagnetic fields and keep it away from radio systems or mobile telephones.
- Only use the cuff included with the delivery or original replacement cuffs. Otherwise incorrect measured values will be recorded.
Notes on handling batteries
- If your skin or eyes come into contact with battery fluid, rin-se the affected area with water and seek medical assistance.
![]()
Choking hazard! Small children may swallow and choke on batteries. Therefore, store batteries out of the reach of small children.- Observe the plus (+) and minus (-) polarity signs.
- If a battery has leaked, put on protective gloves and clean the battery compartment with a dry cloth.
- Protect batteries from excessive heat.
![]()
Risk of explosion! Do not throw batteries into a fire.- Do not charge or short-circuit batteries.
- If the device is not to be used for a relatively long period, take the batteries out of the battery compartment.
- Use identical or equivalent battery types only.
- Always replace all batteries at the same time.
- Do not use rechargeable batteries.
- Do not disassemble, open or crush the batteries.
Notes on electromagnetic compatibility
- The device is suitable for use in all environments listed in these instructions for use, including domestic environments.
- The use of the device may be limited in the presence of elec-tromagnetic disturbances. This could result in issues such as error messages or the failure of the display/device.
- Avoid using this device directly next to other devices or stacked on top of other devices, as this could lead to faulty operation. If, however, it is necessary to use the device in the manner stated, this device as well as the other devices must be monitored to ensure they are working properly.
- The use of accessories other than those specified or provided by the manufacturer of this device can lead to an increase in electromagnetic emissions or a decrease in the device's electromagnetic immunity; this can result in faulty operation.
- Failure to comply with the above can impair the performance of the device.
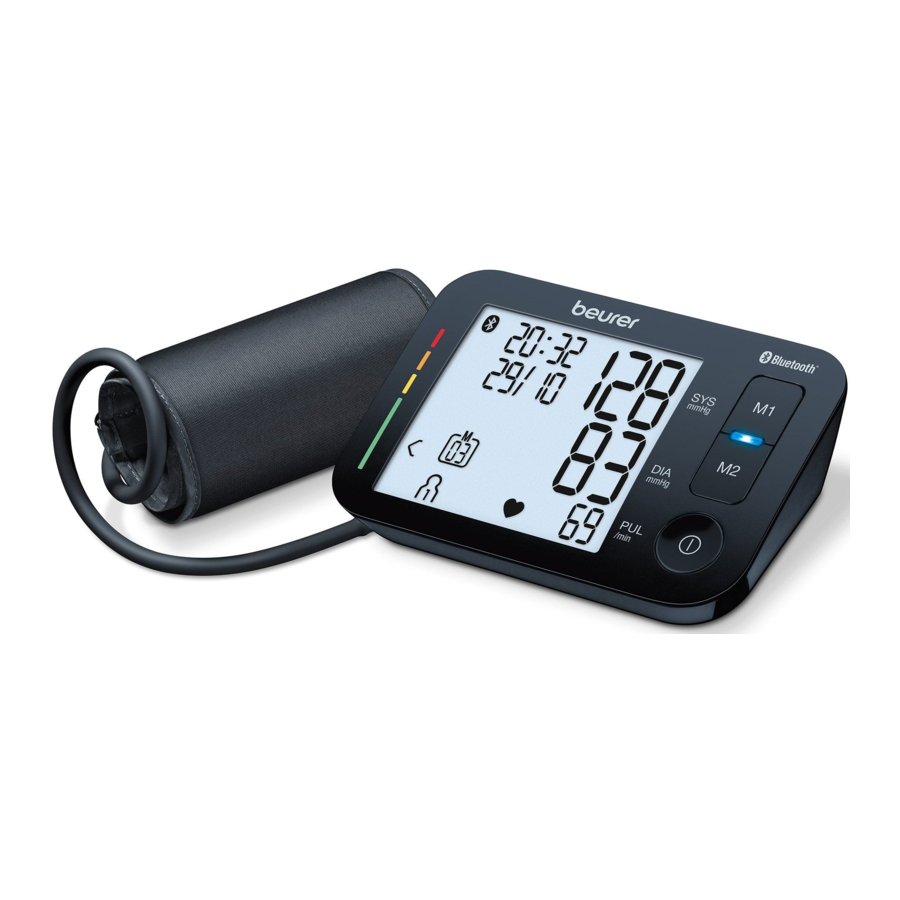
Device description

- Cuff
- Cuff line
- Cuff connector
- Display
- Memory buttons M1/M2
- START/STOP button
![]()
- Risk indicator
- Connection for cuff connector (left-hand side)
Information on the display

- Time/date
- Systolic pressure
- Diastolic pressure
- Calculated pulse value
- Cardiac arrhythmia symbol
![]()
- Pulse symbol
![]()
- User memory
![]()
- Risk indicator
- Number of memory space/memory display for average value (
![]() ), morning (
), morning ( ![]() ), evening (
), evening ( ![]() )
) - Release air (arrow)
- Battery display symbol
- Symbol for Bluetooth transfer
![]()


 ), morning (
  ), evening (
  )
)
System requirements for the beurer HealthManager app
- iOS ≥ 10.0 / Android ≥ 5.0
- Bluetooth ≥ 4.0
List of compatible devices:

Initial use
Inserting the batteries
- Remove the battery compartment lid on the rear of the device.
- Insert four 1.5 V AAA (alkaline type LR03) batteries. Make sure that the batteries are inserted the correct way round in accordance with the markings. Do not use rechargeable batteries.
![]()
- Close the battery compartment lid again carefully.
- All display elements are briefly displayed,
![]() or
or ![]() in the display. Now set the date and time as described below.
in the display. Now set the date and time as described below.

 or
or  in the display. Now set the date and time as described below.
If the battery replacement symbol  is permanently displayed, you can no longer perform any measurements and must replace all batteries. Once the batteries have been removed from the device, the date and time must be set again. Any saved measured values are retained.
Setting the hour format/date/time and Bluetooth
It is essential that you set the date and time. Otherwise, you will not be able to save your measured values correctly with a date and time and access them again later.
 There are two different ways to access the menu from which you can adjust the settings:
- Before initial use and after each time you replace the battery:
When inserting batteries into the device, you will be taken to the relevant menu automatically. - If the batteries have already been inserted:
With the device switched off, press and hold the START/ STOP button![]() for approx. 5 seconds.
for approx. 5 seconds.
In this menu you can adjust the following settings in succession:

The hour format flashes on the display.

- Select the desired hour format using the M1/ M2 memory buttons and confirm with the START/STOP button
![]() .
.
If you press and hold the M1 or M2 memory button, you can set the values more quickly.
The year flashes on the display.

- Select the year using the M1/M2 memory buttons and confirm with the START/STOP button
![]() .
.
The month flashes on the display.

- Select the month using the M1/M2 memory buttons and confirm with the START/STOP button
![]() .
.
The day flashes on the display.
![]()
- Select the current day using the M1/M2 memory buttons and confirm with the START/ STOP button
![]() .
.
If you have set the 12h hour format, the month is displayed before the day.

The hours flash on the display.
- Select the current hours using the M1/ M2 memory buttons and confirm with the START/STOP button
![]() .
.
The minutes flash on the display.

- Select the current minutes using the M1/ M2 memory buttons and confirm with the START/STOP button
![]() .
.
The Bluetooth symbol flashes on the display.
- Use the M1/M2 memory buttons to select whether automatic Bluetooth data transfer is to be activated (Bluetooth symbol flashes) or deactivated (Bluetooth symbol is not shown) and confirm with the START/STOP button
![]() .
.
Bluetooth transfers will reduce the battery life.
Usage
Ensure the device is at room temperature before measuring. The measurement can be performed on the left or right arm.
Attaching the cuff

Place the cuff onto the bare upper arm. The circulation of the arm must not be hindered by tight clothing or similar.

The cuff must be placed on the upper arm so that the bottom edge is positioned 2 – 3 cm above the elbow and above the artery. The line should point to the centre of the palm.

Now tighten the free end of the cuff, but make sure that it is not too tight around the arm and close the hook-and-loop fastener. The cuff should be fastened so that two fingers fit under the cuff.

Now insert the cuff line into the connection for the cuff connector.
The cuff is suitable for you if the index mark (![]() ) is within the OK range after fitting the cuff.
) is within the OK range after fitting the cuff.

If the measurement is performed on the right upper arm, the line should be located on the inside of your elbow. Ensure that your arm is not pressing on the line.
Blood pressure may vary between the right and left arm, which may mean that the measured blood pressure values are different. Always perform the measurement on the same arm.
If the values between the two arms are significantly different, please consult your doctor to determine which arm should be used for the measurement.
The device may only be operated with the original cuff. The cuff is suitable for an arm circumference of 22 to 44 cm.
Adopting the correct posture
- Before the initial blood pressure measurement, make sure always to rest for about 5 minutes. Otherwise deviations can occur.
- You can take the measurement while sitting or lying. Always make sure that the cuff is at heart level.

- To take your blood pressure, make sure you are sitting comfortably with your arms and back leaning on something. Do not cross your legs. Place your feet flat on the ground.
- To avoid falsifying the measurement, it is important to remain still during the measurement and not to speak.
- Wait for at least 1 minute before taking another measurement.

Taking a blood pressure measurement
As described above, attach the cuff and adopt the posture in which you want to perform the measurement.
- Press the START/STOP button
![]() to start the blood pressure monitor. All display elements are briefly displayed.
to start the blood pressure monitor. All display elements are briefly displayed.
![]()

The blood pressure monitor will begin the measurement automatically after 3 seconds.
You can cancel the measurement at any time by pressing the START/STOP button ![]() .
.
As soon as a pulse is found, the pulse symbol  will be displayed.
- Systolic pressure, diastolic pressure and pulse measurements are displayed.
![]()
![]() appears if the measurement could not be performed properly (see chapter "What if there are problems"). Repeat the measurement.
appears if the measurement could not be performed properly (see chapter "What if there are problems"). Repeat the measurement.
![]()
- Now select the desired user memory by pressing the M1 or M2 memory buttons. If you do not select a user memory, the measurement is stored in the most recently used user memory. The relevant
![]() or
or ![]() symbol appears on the display.
symbol appears on the display. - Press the START/STOP button
![]() to switch off the blood pressure monitor. The measurement is then stored in the selected user memory.
to switch off the blood pressure monitor. The measurement is then stored in the selected user memory. - If the device is not switched off manually, it will switch off automatically after 30 seconds.

 appears if the measurement could not be performed properly (see chapter "What if there are problems"). Repeat the measurement.
 or
or  symbol appears on the display.
If Bluetooth data transfer has been activated, then after having confirmed the user memory by pressing the START/ STOP button ![]() , the data is transferred to the "beurer HealthManager" app (see chapter "Transferring measurements").
, the data is transferred to the "beurer HealthManager" app (see chapter "Transferring measurements").
When connecting for the first time, a randomly generated six-digit PIN code is displayed on the device, and at the same time an input field appears on the smartphone in which you must enter this six-digit PIN code. After successfully entering the code, the device will be connected to your smartphone.
- The Bluetooth symbol on the display flashes and the blue LED lights up. The blood pressure monitor now attempts to connect to the app for approx. 30 seconds.
- The Bluetooth symbol stops flashing as soon as a connection is established. All measurement data is automatically transferred to the app. Once the data has been successfully transferred, the device switches off. If the data transfer was unsuccessful, the blue LED goes out and "
![]() " appears on the display.
" appears on the display. - If a connection to the app cannot be established after 30 seconds, the Bluetooth symbol goes out and the blood pressure monitor switches off automatically after 3 minutes.
 " appears on the display.
 Please note that you must add the blood pressure monitor to "My devices" in the "beurer HealthManager" app to enable data transfer. The "beurer HealthManager" app must be activated to allow data transfer. If the latest data is not displayed on your smartphone, repeat the data transfer as described in chapter "Transferring measurements".
If you forget to turn off the blood pressure monitor, it will switch off automatically after approx. 30 seconds. In this case too, the value is stored in the selected or most recent user memory and the data is transferred if Bluetooth data transfer has been activated.
- Wait for at least 1 minute before taking ano-ther measurement.
![]()

Evaluating the results
Cardiac arrhythmia:
This device can identify potential disruptions of the heart rhythm when measuring and, if necessary, indicates this after the measurement with the symbol  .
.
This can be an indicator for arrhythmia. Arrhythmia is a condition in which the heart rhythm is abnormal because of flaws in the bioelectrical system that regulates the heartbeat. The symptoms (skipped or premature heart beats, pulse being slow or too fast) can be caused by factors such as heart disease, age, physical make-up, excess stimulants, stress or lack of sleep. Arrhythmia can only be determined through an examination by your doctor. If the symbol ![]() is shown on the display after the measurement has been taken, repeat the measurement. Please ensure that you rest for 5 minutes beforehand and do not speak or move during the measurement. If the symbol
is shown on the display after the measurement has been taken, repeat the measurement. Please ensure that you rest for 5 minutes beforehand and do not speak or move during the measurement. If the symbol ![]() appears frequently, please consult your doctor.
appears frequently, please consult your doctor.
Self-diagnosis and treatment based on the measurements can be dangerous. Always follow your doctor's instructions.
Risk indicator:
The measurements can be classified and evaluated in accordance with the following table.
However, these standard values serve only as a general guideline, as the individual blood pressure varies in different people and different age groups etc.
It is important to consult your doctor regularly for advice. Your doctor will tell you your individual values for normal blood pressure as well as the value above which your blood pressure is classified as dangerous.
The classification on the display and the scale on the device show which category the recorded blood pressure values fall into. If the values of systole and diastole fall into two different categories (e.g. systole in the 'High normal' category and diastole in the 'Normal' category), the graphical classification on the device always shows the higher category; for the example given this would be 'High normal'.
| Blood pressure value category | Systole (in mmHg) | Diastole (in mmHg) | Action | |
| Level 3: severe hypertension | red | ≥ 180 | ≥ 110 | Seek medical attention |
| Level 2: moderate hypertension | orange | 160 – 179 | 100 – 109 | Seek medical attention |
| Level 1: mild hypertension | yellow | 140 – 159 | 90 – 99 | Regular monitoring by doctor |
| High normal | green | 130 – 139 | 85 – 89 | Regular monitoring by doctor |
| Normal | green | 120 – 129 | 80 – 84 | Selfmonitoring |
| Optimal | green | < 120 | < 80 | Selfmonitoring |
Source: WHO, 1999 (World Health Organization)
Displaying and deleting measured values
User memory
The results of every successful measurement are stored together with the date and time. The oldest measurement is overwritten in the event of more than 60 measurements.
- Using the memory button M1 or M2, select the desired user memory (
![]() ) when the device is switched off.
) when the device is switched off. - To view the measurements for user memory
![]() , press the M1 memory button.
, press the M1 memory button. - To view the measurements for user memory
![]() , press the M2 memory button.
, press the M2 memory button.
 , press the M1 memory button.
 , press the M2 memory button.
Average values
 flashes on the display.
The average value of all saved measured values in this user memory is displayed.

If Bluetooth is activated (the ![]() symbol flashes on the display), the blood pressure monitor attempts to connect to the app. If you press the M1 button in the meantime, the transfer is cancelled and the average values are displayed. If you press the M2 button, the transfer is cancelled and the measurement data of user memory
symbol flashes on the display), the blood pressure monitor attempts to connect to the app. If you press the M1 button in the meantime, the transfer is cancelled and the average values are displayed. If you press the M2 button, the transfer is cancelled and the measurement data of user memory ![]() is displayed. The
is displayed. The ![]() symbol is no longer shown. The buttons are deactivated as soon as a connection is established and the data is transferred.
symbol is no longer shown. The buttons are deactivated as soon as a connection is established and the data is transferred.
- Press the relevant memory button (M1 or M2)
 flashes on the display.
The average value of the morning measurements for the last 7 days is displayed (morning: 5 a.m. – 9 a.m.).

- Press the relevant memory button (M1 or M2).
 flashes on the display.
The average value of the evening measurements for the last 7 days is displayed (evening: 6 p.m. – 8 p.m.).

Individual measured values
- If you press the relevant memory button (M1 or M2) again, the last individual measurement is displayed (in this example, measurement 03).
![]()
- If you press the relevant memory button (M1 or M2) once more, you can view all previous individual measurements.
- To switch the device off again, press the START/STOP button
![]() .
.

You can exit the menu at any time by pressing the START/STOP button ![]() .
.
Deleting measured values
- To clear the relevant user memory, you must first select a user memory.
- Start the retrieval of the average measured values.
![]() flashes on the display and the average value of all saved measured values in this user memory is displayed.
flashes on the display and the average value of all saved measured values in this user memory is displayed. - Press and hold the memory button M1 or M2 for 5 seconds depending on the user memory you are in.
 flashes on the display and the average value of all saved measured values in this user memory is displayed.
All the values in the current user memory are deleted.
Deleting individual measurements
- To clear individual measurements from the relevant user memory, you must first select a user memory.
- Start the retrieval of the individual measured values.
- Press and hold the memory button M1 or M2 for 5 seconds (depending on the user memory you are in).
- The selected value is deleted. The device briefly displays
![]() .
.
![]()
- If you would like to delete other values, repeat the pro-cess described above.
 .
.
You can switch off the device at any time by pressing the START/STOP button.
Transferring measurements
Transfer via Bluetooth low energy technology
It is also possible to transfer the measured values saved on the device to your smartphone using Bluetooth low energy technology.
You will need the "beurer HealthManager" app for this. The app is available free of charge on the Apple App Store and from Google Play.


Proceed as follows to transfer values:
If Bluetooth is activated in the settings menu, the data is transferred automatically after the measurement. The ![]() symbol appears in the top left of the display (see chapter "Taking a blood pressure measurement").
symbol appears in the top left of the display (see chapter "Taking a blood pressure measurement").
When connecting for the first time, a randomly generated sixdigit PIN code is displayed on the device, and at the same time an input field appears on the smartphone in which you must enter this six-digit PIN code. After successfully entering the code, the device will be connected to your smartphone
| |
|
|


 .
. The "beurer HealthManager" app must be activated to allow data transfer.
If your smartphone has a protective cover, remove this to ensure that there is no interference during the transfer. Begin the data transfer in the "beurer HealthManager" app.
Cleaning and maintenance
- Clean the device and cuff carefully using a slightly damp cloth only.
- Do not use any cleaning agents or solvents.
- Under no circumstances hold the device and cuff under wa-ter, as this can cause liquid to enter and damage the device and cuff.
- If you store the device and cuff, do not place heavy objects on the device and cuff. Remove the batteries. The cuff line should not be bent sharply.
Accessories and replacement parts
Accessories and replacement parts are available from the corresponding service address (according to the service address list).
Please state the corresponding order number.
| Designation | Item number and/or order number |
| Universal cuff (22-44 cm) | 163.952 |
What if there are problems
| Error message | Possible cause | Solution |
 | Unable to record a pulse. | Please wait one minute and repeat the measurement. Ensure that you do not speak or move during the measurement. |
 | You moved or spoke during the measurement. | |
 | The cuff was not attached correctly. | Please observe the information in chapter "Attaching the cuff". |
 | An error occurred during the measurement. | Please wait one minute and repeat the measurement. Ensure that you do not speak or move during the measurement. |
 | The inflation pressure is higher than 300 mmHg. | Please take another measurement to check whether the cuff can be correctly inflated. Make sure that neither your arm nor other heavy objects are pressing on the line, and that the line is not bent. |
 | The batteries are almost empty. | Insert new batteries into the device. |
 | Unable to transfer the data via Bluetooth. | Please observe the information in chapter "Transferring measurements". |
Technical specifications
| Model no. | BM 54 |
| Measurement method | Oscillometric, non-invasive blood pressure measurement on the upper arm |
| Measurement range | Cuff pressure 0-250 mmHg, systolic 50-250 mmHg, diastolic 30-200 mmHg, pulse 40-180 beats/minute |
| Display accuracy | Systolic ± 3 mmHg, diastolic ± 3 mmHg, pulse ± 5% of the value shown |
| Measurement uncertainty | Max. permissible standard deviation according to clinical testing: systolic 8 mmHg / diastolic 8 mmHg |
| Memory | 2 x 60 memory spaces |
| Dimensions | L 139 mm x W 94 mm x H 48 mm |
| Weight | 360 g (without batteries, with cuff) |
| Cuff size | 22 to 44 cm |
| Permissible operating conditions | + 5°C to + 40°C, 15-93% relative humidity (non-condensing) |
| Permissible storage conditions | -25°C to + 70°C, ≤ 93% relative humidity, 700-1060 hPa ambient pressure |
| Power supply | 4x 1.5 V  AAA batteries AAA batteries |
| Battery life | Lasts for approx. 200 measurements depending on the blood pressure and inflation pressure as well as the number of Bluetooth connections. |
| Classification | Internal supply, IP21, no AP or APG, continuous operation, application part type BF |
| Data transfer via Bluetooth wireless technology | The blood pressure monitor uses Bluetooth low energy technology, 2402 MHz – 2480 MHz frequency band, max. 4 dBm transmission power, compatible with Bluetooth 4.0 smartphones/tablets |
The serial number is located on the device or in the battery compartment.
Technical information is subject to change without notification to allow for updates.
Documents / Resources
References
Download manual
Here you can download full pdf version of manual, it may contain additional safety instructions, warranty information, FCC rules, etc.
Download Beurer BM 54 - Bluetooth Upper arm blood pressure monitor Manual
Advertisement


Need help?
Do you have a question about the BM 54 and is the answer not in the manual?
Questions and answers