Table of Contents
Advertisement
Quick Links
Advertisement
Table of Contents

Related Manuals for IPC CT50


Summary of Contents for IPC CT50
- Page 1 CT50 Automatic Scrubber Operator Manual...
- Page 2 Before operating or using this machine, please read and understand this manual carefully. How the CT50 works: Water and cleaning agent flows to the brush or pad when the brush motor is activated. When the machine moves forward, the dirty water is sucked through the squeegee hose and then into the recovery tank.
-
Page 3: Table Of Contents
CT50 Automatic Scrubber | Operator Manual Table of Contents: Safety precautions Draining Solution Tank Machine components Battery charging Console symbols Installation and use of batteries Unpacking the machine Battery Charger Status Light Battery Installation Machine maintenance Machine installation Daily maintenance... -
Page 4: Safety Precautions
CT50 Automatic Scrubber | Operator Manual Safety precautions: • This machine is a commercial product. It is specifically used for cleaning hard indoor floors and cannot be used for other purposes. Please be sure to use the recommended cleaning pads, brushes, and neutral cleaning agents suitable for this machine. -
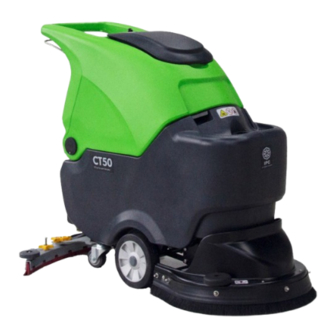
Page 5: Machine Components
Machine components: 1. Recovery tank cover 2. Recovery tank release lever 3. Clean water and chemical inlet 4. Brush cover 5. Guiding wheel 6. Brush 7. Rear wheels 8. Motor activation lever 9. Water flow control lever 10. Charger connection clip 11. - Page 6 CT50 Automatic Scrubber | Operator Manual 19. Brush motor switch 20. Vacuum motor switch 21. Circuit breaker 22. Hour meter 23. Main power key switch 24. Vacuum motor 25. Electric control panel 26. Battery 27. Clean water inlet filter 28. Power supply negative line (black) 29.
-
Page 7: Console Symbols
Console symbols: Unpacking the machine: Carefully inspect the packaging box of the machine for any damage. If there is any damage, please report it to the carrier immediately. Check the list of shipping contents. If there are any missing items, please contact the dealer. Package content: •... -
Page 8: Machine Installation
CT50 Automatic Scrubber | Operator Manual Lift the recovery tank so that you can reach the battery compartment. (Figure 1) Figure 1 Figure 2 Carefully install the battery in the battery compartment and arrange the battery terminals. (Figure 2) Connect the battery wiring to the battery terminal as shown in the figure (Figure 2), with the red connected to the positive pole (+) and the black connected to the negative pole (-). -
Page 9: Connecting The Squeegee Assembly
CT50 Automatic Scrubber | Operator Manual • Install the squeegee assembly onto the squeegee installation bracket as shown in the figure (Figure 7). Be sure to fully insert the fastening knob into the slot before tightening the knob. • Connect the suction hose to the squeegee assembly, as shown in the figure (Figure 8). -
Page 10: Pour The Solution Into The Solution Tank
CT50 Automatic Scrubber | Operator Manual Place the brush/pad driver in the middle of the brush cover (Figure 11) Figure 11 Press the scrub head pedal and move left, then lower the brush head. Turn on the power, press the brush motor switch to 'on', and hold the motor handle to activate. -
Page 11: Pre-Operation Inspection
CT50 Automatic Scrubber | Operator Manual Note: If using a bucket to pour the solution into the solution tank, please ensure that the bucket is clean. Attention: If using traditional floor scrubbing methods, please always use the recommended cleaning agent. If the machine is damaged due to improper use of cleaning agents, the manufacturer will not be responsible for the warranty. -
Page 12: Machine Operation
CT50 Automatic Scrubber | Operator Manual Machine Operation: Press the pedal of the scrub head and move it to the left (as shown by the arrow) and raise up your foot to lower the scrub head to the floor. (Figure 17-1) Put the squeegee down to lower the squeegee to the floor and activate the vacuum motor. -
Page 13: During Machine Operation
Battery Power Meter: • The CT50 battery meter displays the battery level. When the battery is fully charged, the rightmost green light remains on. As the battery runs out, the indicator lights will light up from right to left in sequence (Figure 20). -
Page 14: Hour Meter
CT50 Automatic Scrubber | Operator Manual Hour Meter: • The hour meter (Figure 20) will record the total number of hours when the brush motor is started. Please use a timer to determine when the recommended maintenance procedure should be executed and record the repair history. -
Page 15: Draining Solution Tank
CT50 Automatic Scrubber | Operator Manual 3. Disassemble and flush the vacuum motor filter screen located in the recovery tank (Figure 22) Figure 22 Draining solution tank: To drain the remaining water from the water tank, please open the drain cap of the solution tank (Figure 23). -
Page 16: Installation And Use Of Batteries
CT50 Automatic Scrubber | Operator Manual Battery Installation Preparation: 1. Place the machine on a flat, dry surface. 2. Lift up the squeegee and brush plate. 3. Turn off all power switches and take out the key. Connecting the Charger: 1. -
Page 17: Battery Charger Status Light
CT50 Automatic Scrubber | Operator Manual 9. The battery should not be disassembled arbitrarily to avoid danger. 10. Waste batteries must be recycled and cannot be discarded arbitrarily, which may affect the environment. 11. When charging, attention should be paid to the temperature changes of the battery to prevent overheating, damage and danger to the battery. - Page 18 CT50 Automatic Scrubber | Operator Manual • Remove and flush the vacuum motor filter located in the recovery tank (Figure 26). Figure 26 • Drain the solution tank, (Figure 27). Figure 27 • Removing / cleaning the brush or pad: With the scrub head in the raised position, press the brush motor button to the on position, hold the motor switch handle, and immediately release it.
-
Page 19: Weekly Maintenance
CT50 Automatic Scrubber | Operator Manual • Check the wear condition of the edge of the squeegee blade (Figure 30). If there is any wear, switch the ends of the blade. (Refer to "Replacement of squeegee blades” on page 25) Figure 30 •... -
Page 20: Replacement Of Squeegee Blade
CT50 Automatic Scrubber | Operator Manual • Check the cover seal of the recovery tank for foreign objects or damage (Figure 35). If there is any damage, please replace it. Figure 35 Replacement of squeegee blade: Each squeegee blade has four sides. When the squeegee blade is worn, Rotate the blade to an unused side. When all 4 sides are worn then replace the blade. -
Page 21: Adjustment Of Squeegee Blade
CT50 Automatic Scrubber | Operator Manual Adjustment of squeegee blade: • The squeegee blade is set at the factory and usually doesn't need adjusting. Only adjust it if the squeegee gets out of adjustment. Adjusting for brush pressure wheel: • If the machine feels too hard to push, the brush pressure wheel's adjusting nut might be too loose. In that case, give it a slight tightening. -
Page 22: Troubleshooting
CT50 Automatic Scrubber | Operator Manual Anti-freezing • Pour all 1 gallon (4 liters) of antifreeze into a solution Tank without diluting it. • For safety: Avoid contact between antifreeze and eyes. Wear protective glasses. Important: Before operating the machine, rinse the antifreeze in the solution tank thoroughly. - Page 23 CT50 Automatic Scrubber | Operator Manual Troubleshooting Continued: Proble ms Cause Solution The brush rises off the floor or the Replace the brush motor microswitch brush motor button is damaged Motor switch damaged Replace the motor microswitch Troubleshooting, press the overload reset...
-
Page 24: Battery Charger Fault Code
CT50 Automatic Scrubber | Operator Manual Troubleshooting Continued: Proble ms Cause Solution The recovery tank is full or the Drain the recovery tank or replace the suction suction hose is damaged hose The drain hose cap is not sealed Replace the drain hose cap... -
Page 25: Specifications
CT50 Automatic Scrubber | Operator Manual Specifications: General machine size/capacity: Mode l CT50 Length 48.4” / 1230mm Height 38.6” / 980mm Width 20.9” / 530mm Squeegee Width 30.3” / 770mm Brush Diameter 19" Scrubbing Width 19.7” / 500mm Solution tank capacity 13.2 Gal / 50L...
Need help?
Do you have a question about the CT50 and is the answer not in the manual?
Questions and answers