Table of Contents
Advertisement
Available languages
Available languages
Quick Links
B
Diagram 2
Diagram 1
L
CAUTION!
BATTERY SAFETY:
This product contains a button
battery. If swallowed, it could
cause severe injury or death
in just 2 hours. Seek medical
attention immediately.
O
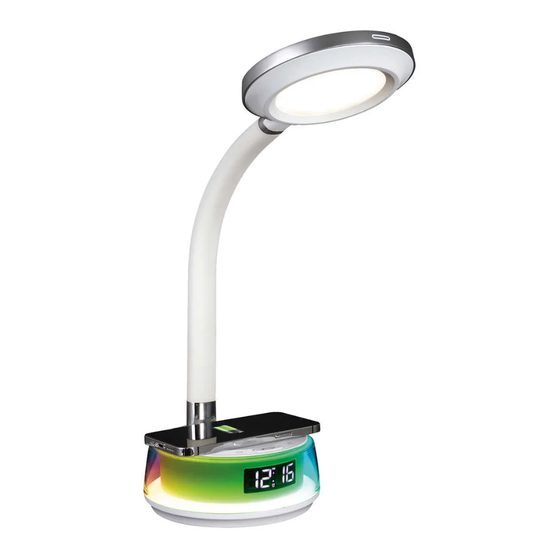
LED Lamp with Wireless Charging and Rainbow Colour Changing Base
CS3QE00Z-CA
CS3QEG5Z-CA
2702705
INS230743
F
Read instructions
prior to use.
G
H
Q
K
J
R
P
C
M
D
E
N
ENGLISH
CONGRATULATIONS! You've purchased the finest in natural lighting technology with your new
OttLite
®
product.
WARNING: To prevent electric shock, make sure the lamp is not plugged in until all steps
are complete.
NOTE: THIS UNIT IS FULLY ASSEMBLED
1. Remove lamp from packing, placing lamp body base (A) flat on a steady surface.
2. Connect power adapter input (J) into connector (K) in the rear-bottom of the lamp.
3. Plug the power adapter (L) into a standard household 120V outlet. Note: Only use with
the supplied power adapter to avoid damage or fire.
4. When lamp is first plugged in and receives power, a momentary green light (P) and beep
sound will occur indicating that a proper electrical connection is made.
5. Power switch (B) is a "touch" switch that controls ON/OFF power, the LED brightness
settings and the colour mode function of the lamp.
6. To power the main light, slightly touch the switch (B) to achieve the following:
• Turn lamp "ON" to 1st brightness setting; touch the switch "once";
• for 2nd brightness setting; touch the switch "two-times";
• for 3rd brightness setting; touch the switch "three-times";
• to turn lamp "OFF"; touch the switch "four-times".
7. This lamp provides three colour modes. To adjust lighting colour mode slightly "press
and hold" switch (B) for three seconds to switch light colour temperature mode; 5000K,
2700K, 4000K.
8. To reposition the light, hold the lamp base (A) steady and grasp either lamp body (H) or
shade (F) depending on needed adjustment.
9. Refer to Diagram 1 and 2 for lamp maximum adjustment range. NOTE: DO NOT FORCE the
shade outside the allowable adjustment range as excessive adjustment may cause damage.
REFER TO THE FOLLOWING ICON LEGEND FOR CONTROL PANEL (M) and (N), AS
IT PERTAINS TO THE INSTRUCTIONS FOR VARIOUS SETTING FUNCTIONS BELOW.
CONTROL PANEL (M) IS LOCATED ON THE UNDERSIDE OF THE LAMP BASE.
"SETTING BUTTON" – to set time, date. and alarms.
ˆ
"UP BUTTON" – In setting mode, push to increase
.
ˇ
"DOWN BUTTON" – In setting mode, push to decrease.
"COLOUR CHANGING BASE ON/OFF BUTTON" – Turns colour changing base ON/OFF.
"COLOUR CHANGING MODE BUTTON" – Switches between the colour changing modes.
/
zz
"SNOOZE/CLOCK DISPLAY BRIGHTNESS BUTTON" – Functions as the alarm
Z
snooze button and adjusts display brightness.
ADJUST COLOUR CHANGING BASE MODES
• Press "COLOUR CHANGING BASE ON/OFF BUTTON" to turn ON the color changing base.
Press and hold this button for 3 seconds to turn it OFF.
• Press "COLOUR CHANGING MODE BUTTON" to switch between 3 colour changing modes:
Circulating Rainbow – Circulating Pastel – Colour Changing Fade.
• When in Colour Changing Fade mode, the colour will change automatically. Press "COLOUR
CHANGING BASE ON/OFF BUTTON" to select and hold the current colour. Press this button
again to resume automatic Colour Changing Fade.
CLOCK SETTING:
• When in Normal Mode and time is displayed, press and hold "SETTING BUTTON" to
enter Setting Mode, press "SETTING BUTTON" again for next setting. The sequence of
setting is: 12 HR or 24 HR Mode – HOUR - MINUTE
• Press "SETTING BUTTON" to quit setting, or it will automatically quit to Normal Mode if idle.
CALENDAR SETTING:
• Press "SETTING BUTTON" to display date. When date is displayed (i.e. 101 for January 1),
press and hold the "SETTING BUTTON" to adjust the date. The sequence of setting is:
YEAR – MONTH - DAY.
A
• Press "SETTING BUTTON" to quit setting, or it will automatically quit to Normal Mode if idle.
ALARM & SNOOZE FUNCTION SETTING:
• Three alarms can be set: A1 – A2 – A3.
• Press "SETTING BUTTON" 2, 3, or 4 times to display A1, A2, or A3.
• Once the desired alarm is displayed (A1, A2, or A3), press and hold the "SETTING BUTTON"
to adjust the alarm time.
• The sequence of setting is: HOUR – MINUTE – LENGTH OF SNOOZE (in minutes)
• Press "SETTING BUTTON" to quit setting, or it will automatically quit to normal mode if idle.
OT17A
LED Lamp with Wireless Charging and Rainbow Colour Changing Base
TURNING ALARM ON AND OFF
• To turn ON the alarm, Press "SETTING BUTTON" 2, 3, or 4 time to display A1, A2, or A3.
Press "UP BUTTON" to turn alarm ON and OFF. When alarm is enabled, the left two
--
characters on the display will switch from "
will appear on the display.
• Press "SETTING BUTTON" to quit setting, or it will automatically quit to normal mode if idle.
• When the alarm sounds, press "SNOOZE BUTTON" to enter Snooze Mode and a "Z z " icon
will appear on the clock display. If "SNOOZE BUTTON" is not pressed within 10 minutes,
the alarm will automatically shut off.
• Press and Hold "SNOOZE BUTTON" for 3 seconds to exit Snooze Mode. Alarm will sound
at the same time the next day unless Alarm Mode is turned off.
ADJUST CLOCK DISPLAY BRIGHTNESS
• To adjust the clock display brightness, press "SNOOZE/CLOCK DISPLAY BRIGHTNESS
BUTTON". There are 4 settings: OFF, L1, L2, L3.
WIRELESS CHARGING INSTRUCTIONS:
Wireless charging requires a Qi-certified device. To determine if your device is
Qi-certified, please visit the Wireless Power Consortium website.
To wirelessly charge a device, perform the following:
• Place the device, which supports Qi wireless charging standard, face up on the middle of
the Qi wireless charging icon (R).
• When the device is centered on the Qi wireless charging area (R), a solid RED light (P) will
come on noting charging mode active. Your device should show charging is taking place.
• Check charge level on your device periodically to determine when device is fully charged
NOTE: Product DOES NOT provide any indication of when device is fully charged.
CAUTION! Device may become warm during charging. This is normal and part of the
process. Charging times vary by device.
SAFETY WARNING:
TO REDUCE THE RISK OF FIRE, ELECTRIC
SHOCK, OR INJURY TO PERSONS
1. Turn lamp off and WAIT UNTIL LAMP HEAD (F) IS COOL before handling.
2. The LED panel (G) might get hot after several hours of continuous use DO NOT place your
hands directly on LED light panel.
3. Never use with an extension cord unless the plug can be fully inserted into the
receptacles in the extension cord.
4. Do not alter the plug.
5. The lamp head included with this unit cannot be replaced by the consumer.
6. INDOOR USE ONLY.
NOTE: The important safety instructions appearing in this instruction sheet are not meant
to cover all possible conditions and situations that may occur. It must be understood that
common sense, caution, and care must be used with any electrical product.
BATTERY REPLACEMENT
• This lamp uses a CR2032 battery. For battery replacement see diagram. Battery
compartment is located on the underside of lamp base (A), and below battery
compartement door (O).
• To remove/install button cell battery: use a screwdriver to remove battery
compartment door (O). Button cell battery is to be installed with the "+" or flat side
facing upward.
BATTERY DISPOSAL: Battery disposal should be in compliance with local regulations
pertaining to the disposal of hazardous materials. DO NOT INCINERATE.
SAFETY WARNING:
CAUTION: DO NOT INGEST BATTERY; CHEMICAL BURN HAZARD!
•
• This lamp contains a coin/button cell battery. If the coin/button cell battery is
swallowed, it can cause severe internal burns in just two hours and can lead to death.
• Keep new and used batteries away from children.
• If the battery compartment does not close securely, stop using the product and
keep it away from children.
• If you think batteries might have been swallowed or placed inside any part of the
body, seek immediate medical attention.
NOTE: Coin/button cell batteries are small, single cell devices having a diameter greater
than their height.
on
" to "
" and an "Alarm Clock" icon
REV021023
Advertisement
Table of Contents

Related Manuals for OttLite CS3QE00Z-CA


Summary of Contents for OttLite CS3QE00Z-CA
- Page 1 NOTE: Coin/button cell batteries are small, single cell devices having a diameter greater • Press “SETTING BUTTON” to quit setting, or it will automatically quit to normal mode if idle. LED Lamp with Wireless Charging and Rainbow Colour Changing Base than their height. CS3QE00Z-CA CS3QEG5Z-CA 2702705 OT17A...
- Page 2 CAN RSS-216/CNR-216 CAN ICES-005 (B)/NMB-005 (B) CAUTION: Any change or modification to product not expressly recognized by OttLite Technologies voids OttLite’s responsibility for proper function of product. POWER ADAPTER SPECIFICATION: Input: 100-240 V~, 50/60 Hz, 0.9 A Output: 12V DC 2.5A with a Male DC Plug...
- Page 3 • Appuyez sur le « BOUTON DE RÉGLAGE » pour quitter les réglages, ou l’appareil passera FÉLICITATIONS! Vous avez fait l’achat de la plus innovatrice technologie naturelle et de renom en éclairage avec votre produit OttLite. ® automatiquement en mode normal s’il est inactif.
- Page 4 CAN RSS-216/CNR-216 CAN ICES-005 (B)/NMB-005 (B) ATTENTION! Toute modification ou tout changement apporté au produit, lorsque non reconnu expressément par OttLite Technologies, annule la responsabilité d’OttLite en ce qui a trait au bon fonctionnement du produit.
Need help?
Do you have a question about the CS3QE00Z-CA and is the answer not in the manual?
Questions and answers