
Related Manuals for DataCan LineWise AE304UU0002

Summary of Contents for DataCan LineWise AE304UU0002
- Page 1 LineWise System AE304UU0002 – Standard version AE304UU0008 – 4-20mA version User Manual Property of DataCan Services Corp. No duplication or distribution without written consent...
- Page 2 Revision Date: March 7, 2019 NL Property of DataCan Services Corp. No duplication or distribution without written consent Property of DataCan Services Corp. No duplication or distribution without written consent...
-
Page 3: Table Of Contents
Zoom Y Axis 2.2.3.3 Redo Zoom 2.2.3.4 Undo Zoom 2.2.3.5 Reset Zoom 2.2.3.6 Refresh Data (Auto) 2.2.4 Property of DataCan Services Corp. No duplication or distribution without written consent Property of DataCan Services Corp. No duplication or distribution without written consent... -
Page 4: Title Section
4.1.1 Calibrate the Load Cell Select the Load Cell Type 4.2.1 Define a New Transducer 4.2.2 Property of DataCan Services Corp. No duplication or distribution without written consent Property of DataCan Services Corp. No duplication or distribution without written consent... - Page 5 Tool String Dialog Box 5.1.6 Fonts Dialog Box 5.1.7 Calibrate Depth Encoder 5.2.1 Counter 5.2.2 Change the Display Units Property of DataCan Services Corp. No duplication or distribution without written consent Property of DataCan Services Corp. No duplication or distribution without written consent...
- Page 6 Disable Tracking 5.9.2 Change the Display Fonts 5.10 Troubleshooting 5.11 Parts of the Linewise Font Back Property of DataCan Services Corp. No duplication or distribution without written consent Property of DataCan Services Corp. No duplication or distribution without written consent...
-
Page 7: System Description And Specifications
The LineWise software can be used by itself, but is a requirement when logging with the rest of the DataCan system. The Premier Logging program needs these programs to collect depth, line tension, wellhead pressure, and shooting CCL data. These programs do not need to be on the same computer as the Premier Logging program, but they do need to be able to communicate with the Premier Logging software over a network. -
Page 8: Ccl Meter Program Features
Multiple format depth output file, compatible with DataCan Download software • Four analog inputs (0-5V, 4-20mA, 0-10V configurable) and 4 digital (frequency) inputs Property of DataCan Services Corp. No duplication or distribution without written consent Property of DataCan Services Corp. No duplication or distribution without written consent... -
Page 9: Linewise Report Revision
2.0 LineWise Report Revision 3.98 2.1 LineWise Report Interface Figure 2-1: Linewise Main Interface with Sample Graph Property of DataCan Services Corp. No duplication or distribution without written consent Property of DataCan Services Corp. No duplication or distribution without written consent... -
Page 10: File Menu
Defines the parameters used to copy the graph to the clipboard. Copies the OLE Copy Preferences height and width preference information. Property of DataCan Services Corp. No duplication or distribution without written consent Property of DataCan Services Corp. No duplication or distribution without written consent... -
Page 11: Format Menu
Repeats the last zoom action. Shows or hides the crosshairs at the Show Crosshairs cursor location on the graph. Property of DataCan Services Corp. No duplication or distribution without written consent Property of DataCan Services Corp. No duplication or distribution without written consent... -
Page 12: Tools Menu
Shows a check mark beside the current Current Window active window. Allows users to activate other open windows. Property of DataCan Services Corp. No duplication or distribution without written consent Property of DataCan Services Corp. No duplication or distribution without written consent... -
Page 13: Tools>Report Preferences>Preferences Dialog Box
2.1.8 Tools>Report Preferences>Preferences dialog box Property of DataCan Services Corp. No duplication or distribution without written consent Property of DataCan Services Corp. No duplication or distribution without written consent... - Page 14 Accepts the parameters set in the Preferences dialog box. Exits the dialog box without accepting any changes. Property of DataCan Services Corp. No duplication or distribution without written consent Property of DataCan Services Corp. No duplication or distribution without written consent...
-
Page 15: Customize Job Summary Template
Open button, then select the required template file, then save that template as the default. Property of DataCan Services Corp. No duplication or distribution without written consent Property of DataCan Services Corp. No duplication or distribution without written consent... -
Page 16: Graph Title And Comments
Label column to add a new label. Click once in the Comments column to add job infor- mation. Property of DataCan Services Corp. No duplication or distribution without written consent Property of DataCan Services Corp. No duplication or distribution without written consent... - Page 17 • Click cancel to close the dialog box without changing any data in the dialog box. Property of DataCan Services Corp. No duplication or distribution without written consent Property of DataCan Services Corp. No duplication or distribution without written consent...
-
Page 18: Graph Axis Properties Dialog Box
The Preset Limit button allows the user to access a list of commonly used minimum values. Property of DataCan Services Corp. No duplication or distribution without written consent Property of DataCan Services Corp. No duplication or distribution without written consent... - Page 19 Accepts the current values and applies them to the graph report, then closes the dialog box. Exits the dialog box without accepting any changes. Property of DataCan Services Corp. No duplication or distribution without written consent Property of DataCan Services Corp. No duplication or distribution without written consent...
-
Page 20: Time Tab
The Time tab lets users show time on the X axis of the graph report either as real time or as elapsed time. Property of DataCan Services Corp. No duplication or distribution without written consent Property of DataCan Services Corp. No duplication or distribution without written consent... - Page 21 The Day, Hr, Min, and Sec fields allow user to define the duration of time shown on the X axis. Property of DataCan Services Corp. No duplication or distribution without written consent Property of DataCan Services Corp. No duplication or distribution without written consent...
- Page 22 Accepts the current values and applies them to the graph, then closes the dialog box. Closes the dialog box without accepting any changes. Property of DataCan Services Corp. No duplication or distribution without written consent Property of DataCan Services Corp. No duplication or distribution without written consent...
-
Page 23: Common Procedures And Tasks
Include Job Summary in the Graph Report check box is selected on the Preferences dialog box. Property of DataCan Services Corp. No duplication or distribution without written consent Property of DataCan Services Corp. No duplication or distribution without written consent... - Page 24 NOTE: This returns you to the main LW Report screen where the Real-Time graph log is visible. When the logging job is complete, click the STOP icon. Property of DataCan Services Corp. No duplication or distribution without written consent Property of DataCan Services Corp. No duplication or distribution without written consent...
- Page 25 File Name field, then click the Save button. Property of DataCan Services Corp. No duplication or distribution without written consent Property of DataCan Services Corp. No duplication or distribution without written consent...
-
Page 26: Adjust The Graph Axis Properties
Click the Graph’s Axis Properties icon in the toolbar. • From the Format menu, select Axis Properties. Property of DataCan Services Corp. No duplication or distribution without written consent Property of DataCan Services Corp. No duplication or distribution without written consent... -
Page 27: Use Autoscale For Data On The Left Y Axis
5. Click the OK button to apply the changes to the graph report. Property of DataCan Services Corp. No duplication or distribution without written consent Property of DataCan Services Corp. No duplication or distribution without written consent... -
Page 28: Use Autoscale For Data On The X Axis
4. Click the OK button to accept the AutoScale changes and close the dialog box. X Axis BEFORE AutoScale is Applied. X Axis AFTER AutoScale is Applied. Property of DataCan Services Corp. No duplication or distribution without written consent Property of DataCan Services Corp. No duplication or distribution without written consent... -
Page 29: Manually Scale Data On The X Axis
When you release the mouse button, the program refreshes the graph to show the section you selected. Property of DataCan Services Corp. No duplication or distribution without written consent Property of DataCan Services Corp. No duplication or distribution without written consent... -
Page 30: Zoom Y Axis
When you zoom in on the graph while the graph is collecting data in real time it will stop auto scaling. To restart the auto scaling click the Refresh Data (Auto) icon. Property of DataCan Services Corp. No duplication or distribution without written consent Property of DataCan Services Corp. No duplication or distribution without written consent... -
Page 31: Pressure Indicator
3.0 Pressure Indicator 3.1 Pressure Indicator Interface Figure 3-1: Pressure Indicator Main Interface Elements Property of DataCan Services Corp. No duplication or distribution without written consent Property of DataCan Services Corp. No duplication or distribution without written consent... - Page 32 Pressure Indicator program. The marker is a blue triangle that appears along the perimeter of the primary gauge. Property of DataCan Services Corp. No duplication or distribution without written consent Property of DataCan Services Corp. No duplication or distribution without written consent...
-
Page 33: Primary Gauge Menu
Reset Marker Allows the user to reset the PRESSURE DIFF field on the primary gauge to zero. Property of DataCan Services Corp. No duplication or distribution without written consent Property of DataCan Services Corp. No duplication or distribution without written consent... -
Page 34: Calibrate The Pressure Indicator
3. Select an existing connection type, or define a new connection type (see “3.2.2 Define a New Transducer” on page 29). NOTE: The choices are Analog, Simple Digital, or Quartzdyne. Property of DataCan Services Corp. No duplication or distribution without written consent Property of DataCan Services Corp. No duplication or distribution without written consent... -
Page 35: Define A New Transducer
3. Continue to the calibration procedures (see “3.2.3 Calibrate the Transducer (Analog and Digital)” on page 30). CAUTION! The transducer must be calibrated to ensure correct measurements. Property of DataCan Services Corp. No duplication or distribution without written consent Property of DataCan Services Corp. No duplication or distribution without written consent... -
Page 36: Quartzdyne Transducers
3. Click the OK button to accept the selection and return to the Transducer Selection dialog box. Property of DataCan Services Corp. No duplication or distribution without written consent Property of DataCan Services Corp. No duplication or distribution without written consent... -
Page 37: Calibrate The Transducer (Analog And Digital)
Raw Zero field in the Transducer Calib. dialog box. The number reads volts for an analog calibration and Hertz (frequency) for a digital calibration. Property of DataCan Services Corp. No duplication or distribution without written consent Property of DataCan Services Corp. No duplication or distribution without written consent... -
Page 38: How To Perform A Full-Scale Calibration
Pressure Indicator (see “3.7.5 Define the Primary Gauge Units” on page 43). Property of DataCan Services Corp. No duplication or distribution without written consent Property of DataCan Services Corp. No duplication or distribution without written consent... -
Page 39: Set The Advanced Transducer Features
PressChn • TimeSample • TempChn • TimeSample 3. Click the OK button to accept the changes. Property of DataCan Services Corp. No duplication or distribution without written consent Property of DataCan Services Corp. No duplication or distribution without written consent... -
Page 40: Set The Maximum Pressure Alarm
You have to set and enable the alarms for each gauge definition separately. Alarms are disabled by default. Property of DataCan Services Corp. No duplication or distribution without written consent Property of DataCan Services Corp. No duplication or distribution without written consent... -
Page 41: Set The Pressure Differential
NOTE: Do not right-click on the sub-gauge, this will bring up the sub-gauge menu. 2. From the primary gauge menu, select Fonts. NOTE: The Font dialog box appears. Property of DataCan Services Corp. No duplication or distribution without written consent Property of DataCan Services Corp. No duplication or distribution without written consent... -
Page 42: Change The Logo Image
3. Adjust the size of the logo as required. NOTE: The default size is set to 0.5. Property of DataCan Services Corp. No duplication or distribution without written consent Property of DataCan Services Corp. No duplication or distribution without written consent... -
Page 43: Work With Primary Gauges
3. Select the required gauge definition from the Gauge sub menu. NOTE: The primary gauge changes to the selected gauge definition. Property of DataCan Services Corp. No duplication or distribution without written consent Property of DataCan Services Corp. No duplication or distribution without written consent... -
Page 44: Method
NOTE: The selected gauge appears and a check mark appears beside the gauge name in the Gauge sub menu. Property of DataCan Services Corp. No duplication or distribution without written consent Property of DataCan Services Corp. No duplication or distribution without written consent... -
Page 45: Add A Primary Gauge Definition
NOTE: The Gauge sub menu appears. 3. Select Edit from the sub menu. NOTE: The Available Gauges dialog box appears. Property of DataCan Services Corp. No duplication or distribution without written consent Property of DataCan Services Corp. No duplication or distribution without written consent... - Page 46 The selected unit will appear beside the name. 6. Click the OK button to accept the new primary gauge definition. Property of DataCan Services Corp. No duplication or distribution without written consent Property of DataCan Services Corp. No duplication or distribution without written consent...
-
Page 47: Delete A Primary Gauge Definition
NOTE: A dialog box appears that asks “Do you want to delete the gauge?” 6. Click the Yes button to delete the gauge definition. Property of DataCan Services Corp. No duplication or distribution without written consent Property of DataCan Services Corp. No duplication or distribution without written consent... -
Page 48: Edit A Primary Gauge Definition
NOTE: The Available Gauges dialog box appears. 4. In the Available Gauges dialog box, select a gauge name in the list box. Property of DataCan Services Corp. No duplication or distribution without written consent Property of DataCan Services Corp. No duplication or distribution without written consent... -
Page 49: Define The Primary Gauge Units
2. Select Gauge from the primary gauge menu. NOTE: The Gauge sub menu appears. Property of DataCan Services Corp. No duplication or distribution without written consent Property of DataCan Services Corp. No duplication or distribution without written consent Property of DataCan Services Corp. No duplication or distribution without written consent... - Page 50 0.5. The defaults are set to 6 o’clock. Property of DataCan Services Corp. No duplication or distribution without written consent Property of DataCan Services Corp. No duplication or distribution without written consent...
- Page 51 Div setting. 12. Click the OK button to accept the definition. Property of DataCan Services Corp. No duplication or distribution without written consent Property of DataCan Services Corp. No duplication or distribution without written consent Property of DataCan Services Corp. No duplication or distribution without written consent...
-
Page 52: Change The Size Of The Primary Gauge
Select Zoom Out to make the gauge smaller. • Select Zoom In to make the gauge larger. Property of DataCan Services Corp. No duplication or distribution without written consent Property of DataCan Services Corp. No duplication or distribution without written consent... -
Page 53: Work With The Sub-Gauge
2. O the primary gauge menu, select SubGauge. NOTE: A check mark beside SubGauge indicates a “show” condition. Property of DataCan Services Corp. No duplication or distribution without written consent Property of DataCan Services Corp. No duplication or distribution without written consent... - Page 54 Property of DataCan Services Corp. No duplication or distribution without written consent Property of DataCan Services Corp. No duplication or distribution without written consent...
-
Page 55: Weight Indicator
4.0 Weight Indicator 4.1 Weight Indicator Interface Figure 4-1: Weight Indicator Main Interface Elements Property of DataCan Services Corp. No duplication or distribution without written consent Property of DataCan Services Corp. No duplication or distribution without written consent... - Page 56 Weight Indicator program. The marker is a blue triangle that appears along the perimeter of the primary gauge. Property of DataCan Services Corp. No duplication or distribution without written consent Property of DataCan Services Corp. No duplication or distribution without written consent...
-
Page 57: Primary Gauge Menu
Set Marker Allows the user to set the weight marker to the current weight. Property of DataCan Services Corp. No duplication or distribution without written consent Property of DataCan Services Corp. No duplication or distribution without written consent... -
Page 58: Calibrate The Load Cell
2. From the primary gauge menu, select Load Cell. NOTE: The transducer Selection dialog box appears. Property of DataCan Services Corp. No duplication or distribution without written consent Property of DataCan Services Corp. No duplication or distribution without written consent... -
Page 59: Define A New Transducer
2. On the Transducer Selection dialog box, click the Calib button. NOTE: The Tension Calibration dialog box appears. Property of DataCan Services Corp. No duplication or distribution without written consent Property of DataCan Services Corp. No duplication or distribution without written consent... - Page 60 The number reads the volts for an analog calibration and Hertz (frequency) for a digital calibration. Property of DataCan Services Corp. No duplication or distribution without written consent Property of DataCan Services Corp. No duplication or distribution without written consent...
-
Page 61: How To Perform A Full-Scale Calibration
Weight Indicator (see “4.8.5 Define the Primary Gauge Units” on page 67). Property of DataCan Services Corp. No duplication or distribution without written consent Property of DataCan Services Corp. No duplication or distribution without written consent... -
Page 62: Set The Advanced Load Cell Features
Enter the Time Sample value. 3. Click the OK button to accept the changes. Property of DataCan Services Corp. No duplication or distribution without written consent Property of DataCan Services Corp. No duplication or distribution without written consent Property of DataCan Services Corp. No duplication or distribution without written consent... -
Page 63: Set The Maximum Tension Alarm
You have to set and enable the alarms for each gauge definition separately. Alarms are disabled by default. Property of DataCan Services Corp. No duplication or distribution without written consent Property of DataCan Services Corp. No duplication or distribution without written consent... -
Page 64: Set The Tension Differential
6. Type a value in the Set Slider Range field. 7. Click the OK button to accept the values and exit the dialog box. Property of DataCan Services Corp. No duplication or distribution without written consent Property of DataCan Services Corp. No duplication or distribution without written consent... -
Page 65: Change The Display Fonts
3. Modify the font family, font styles, or font colours as desired. 4. Click OK to accept changes. Property of DataCan Services Corp. No duplication or distribution without written consent Property of DataCan Services Corp. No duplication or distribution without written consent... -
Page 66: Change The Logo Image
4.8 Work with Primary Gauges Use the following procedures to select, add, delete, and modify gauges. Property of DataCan Services Corp. No duplication or distribution without written consent Property of DataCan Services Corp. No duplication or distribution without written consent... -
Page 67: Select An Existing Primary Gauge Definition
3. Select the required gauge definition from the Gauge sub menu. NOTE: The primary gauge changes to the selected gauge definition. Property of DataCan Services Corp. No duplication or distribution without written consent Property of DataCan Services Corp. No duplication or distribution without written consent... -
Page 68: Method
NOTE: The selected gauge appears and a check mark appears beside the gauge name in the Gauge sub menu. Property of DataCan Services Corp. No duplication or distribution without written consent Property of DataCan Services Corp. No duplication or distribution without written consent... -
Page 69: Add A Primary Gauge Definition
NOTE: The Gauge sub menu appears. 3. Select Edit from the sub menu. NOTE: The Available Gauge dialog box appears. Property of DataCan Services Corp. No duplication or distribution without written consent Property of DataCan Services Corp. No duplication or distribution without written consent... - Page 70 The selected unit will appear beside the name. 6. Click the OK button to accept the new primary gauge definition. Property of DataCan Services Corp. No duplication or distribution without written consent Property of DataCan Services Corp. No duplication or distribution without written consent...
-
Page 71: Delete A Primary Gauge Definition
NOTE: A dialog box appears that asks “Do you want to make X the current gauge?” 6. Click the Yes button to delete the gauge definition. Property of DataCan Services Corp. No duplication or distribution without written consent Property of DataCan Services Corp. No duplication or distribution without written consent... -
Page 72: Edit A Primary Gauge Definition
NOTE: The Available Gauge dialog box appears. 4. In the Available Gauges dialog box, select a gauge definition from the list box. Property of DataCan Services Corp. No duplication or distribution without written consent Property of DataCan Services Corp. No duplication or distribution without written consent... -
Page 73: Define The Primary Gauge Units
1. Right-click on the primary gauge. The primary gauge menu appears. NOTE: Do not right-click on the sub-gauge, as this will activate the sub-gauge menu. Property of DataCan Services Corp. No duplication or distribution without written consent Property of DataCan Services Corp. No duplication or distribution without written consent... - Page 74 6. In the Lower Limit and Upper Limit fields, type the minimum and maximum tension values for the gauge. Property of DataCan Services Corp. No duplication or distribution without written consent Property of DataCan Services Corp. No duplication or distribution without written consent...
- Page 75 Div setting. 12. Click the OK button to accept the definition. NOTE: The medium divisions are indicated Property of DataCan Services Corp. No duplication or distribution without written consent Property of DataCan Services Corp. No duplication or distribution without written consent...
-
Page 76: Change The Size Of The Primary Gauge
Select Zoom Out to make the gauge smaller. • Select Zoom In to make the gauge larger. Property of DataCan Services Corp. No duplication or distribution without written consent Property of DataCan Services Corp. No duplication or distribution without written consent... -
Page 77: Work With The Sub-Gauge
2. On the primary gauge menu, select Sub-gauge. NOTE: A check mark beside Sub-gauge indicates a “show” condition. Property of DataCan Services Corp. No duplication or distribution without written consent Property of DataCan Services Corp. No duplication or distribution without written consent... - Page 78 Property of DataCan Services Corp. No duplication or distribution without written consent Property of DataCan Services Corp. No duplication or distribution without written consent...
-
Page 79: Depth Panel
Speed is calculated from depth; a positive speed means the depth is increasing (running in the hole) and a negative speed means the depth is decreasing (running out of the hole). Property of DataCan Services Corp. No duplication or distribution without written consent... -
Page 80: Toolbar
(grey). The alarm is set on the Alarm tab of the Settings dialog box (see “5.4.2 Depth Alarm” on page 85). Property of DataCan Services Corp. No duplication or distribution without written consent Property of DataCan Services Corp. No duplication or distribution without written consent... -
Page 81: Menu Descriptions
Used to simulate depth. Reverses Secondary the measurements on the secondary odometer. Resets the troubleshooting test. Reset Property of DataCan Services Corp. No duplication or distribution without written consent Property of DataCan Services Corp. No duplication or distribution without written consent... -
Page 82: Settings Dialog Box
This will depend on which side of the measuring wheel the encoder is mounted. Property of DataCan Services Corp. No duplication or distribution without written consent Property of DataCan Services Corp. No duplication or distribution without written consent... - Page 83 Enter the gear ratio, or the number of measuring wheel rotations per encoder revolution. Figure 5-3: Settings Dialog Box, Units Tab Property of DataCan Services Corp. No duplication or distribution without written consent Property of DataCan Services Corp. No duplication or distribution without written consent...
- Page 84 Down List the primary depth reaches any of the alarms listed in the depth value list. Property of DataCan Services Corp. No duplication or distribution without written consent Property of DataCan Services Corp. No duplication or distribution without written consent...
- Page 85 The Line Size is required only if the counter wheel does not take the line size into account. Property of DataCan Services Corp. No duplication or distribution without written consent Property of DataCan Services Corp. No duplication or distribution without written consent...
- Page 86 TVD table. The table includes a list of measured depths and their corresponding vertical depths. Property of DataCan Services Corp. No duplication or distribution without written consent Property of DataCan Services Corp. No duplication or distribution without written consent...
-
Page 87: Well Schematic Dialog Box
Click this button to add another row above the current selected row. Insert Row Button Click this button to delete the current selected row. Delete Row Button Property of DataCan Services Corp. No duplication or distribution without written consent Property of DataCan Services Corp. No duplication or distribution without written consent... -
Page 88: Tool String Dialog Box
Type the length of the tool string, relative to the Top of Tool value. Bottom of Tool Property of DataCan Services Corp. No duplication or distribution without written consent Property of DataCan Services Corp. No duplication or distribution without written consent... -
Page 89: Fonts Dialog Box
The odometer style box is available only in black and white, so the Colour drop-down list is disabled. If depth should go negative, the odometer box is changed to red. Property of DataCan Services Corp. No duplication or distribution without written consent Property of DataCan Services Corp. No duplication or distribution without written consent... -
Page 90: Calibrate Depth
5. Click the OK button to accept the changes. Property of DataCan Services Corp. No duplication or distribution without written consent Property of DataCan Services Corp. No duplication or distribution without written consent Property of DataCan Services Corp. No duplication or distribution without written consent... -
Page 91: Alarms
To delete a row, select the appropriate row(s), and click the Delete Row button. 4. Click OK to accept the changes. Property of DataCan Services Corp. No duplication or distribution without written consent Property of DataCan Services Corp. No duplication or distribution without written consent... -
Page 92: Well Schematic
NOTE: The two measurements together equals the length of the tool string. 4. Click the OK button. Property of DataCan Services Corp. No duplication or distribution without written consent Property of DataCan Services Corp. No duplication or distribution without written consent... -
Page 93: Reset Depth
2. Select the required font type and style. 3. Ensure the Odometer check box is selected. 4. Click the OK button.. Property of DataCan Services Corp. No duplication or distribution without written consent Property of DataCan Services Corp. No duplication or distribution without written consent... -
Page 94: Troubleshooting
Click the “add value” button. Select the Enable Depth Alarm check box. Click the OK button. Property of DataCan Services Corp. No duplication or distribution without written consent Property of DataCan Services Corp. No duplication or distribution without written consent... -
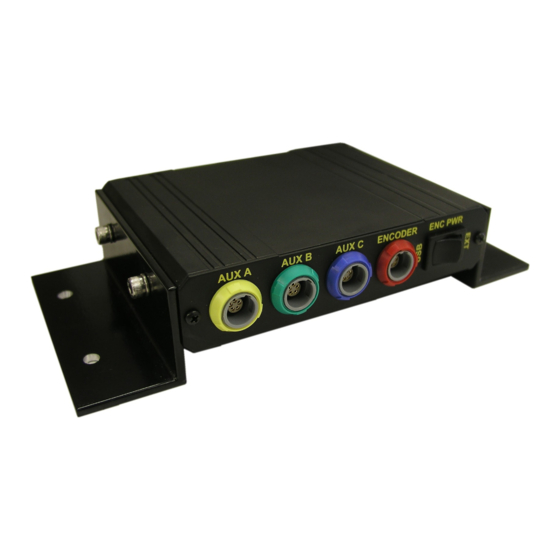
Page 95: Parts Of The Linewise
Connects the Linewise unit to a computer. This provides power to the Linewise box, and transmits data USB Port to the computer. Property of DataCan Services Corp. No duplication or distribution without written consent Property of DataCan Services Corp. No duplication or distribution without written consent... - Page 96 Power Switch Place holder only. The power switch is no longer used to turn the unit on/off. Property of DataCan Services Corp. No duplication or distribution without written consent Property of DataCan Services Corp. No duplication or distribution without written consent...
Need help?
Do you have a question about the LineWise AE304UU0002 and is the answer not in the manual?
Questions and answers