Table of Contents
Advertisement
Quick Links
Advertisement
Table of Contents

Related Manuals for Stihl BT 121


Summary of Contents for Stihl BT 121
- Page 1 STIH) HSS2133 (V28A) STIHL BT 121 Instruction Manual...
-
Page 2: Table Of Contents
Guide to Using this Manual ....2 Safety Precautions and Thank you for choosing a quality Working Techniques ......3 engineered STIHL product. Assembling the Machine ....9 This machine has been built using Adjusting the Throttle Cable ..... 9 modern production techniques and Fuel .......... -
Page 3: Guide To Using This Manual
Engineering improvements in different ways: individual components. STIHL’s philosophy is to continually Note or hint which is not essential A bullet marks a step or procedure improve all of its products. As a result, for using the machine, but may... -
Page 4: Safety Precautions And Working Techniques
To torque, the sharp-edged reduce health risks, STIHL recommends When the machine is not in use (work augers and the high speed of the auger that persons with pacemaker consult break), shut it off so that it does not in certain applications. - Page 5 (e.g. with a hair net, Always turn off the engine. for this power tool model by STIHL or cap, hard hat, etc.). are technically identical. If you have any When carrying the machine over longer...
- Page 6 To reduce the risk of serious or fatal burn injuries, check for fuel leakage. If fuel leakage is found, do not start or run the engine until leak is fixed. BT 121...
- Page 7 –auger brake lever against your to trip or stumble. left thigh. Make sure you always have firm and Wrap your fingers and thumbs around secure footing. the handles. Right hand on the control handle. Left handers should follow these instructions too. BT 121...
- Page 8 (no leaks) and the safety devices Replace damaged or blunt augers are working properly. Do not continue immediately. operating your power tool if it is damaged. In case of doubt, have the machine checked by your servicing dealer. BT 121...
- Page 9 The period of usage is shortened by: dealer if in doubt. Check that the muffler is in perfect – Any personal tendency to suffer STIHL recommends the use of genuine working condition. from poor circulation (symptoms: STIHL spare parts. Such parts have frequently cold fingers, itching).
-
Page 10: Fuel
MotoMix is not available in all markets. formulated for use in STlHL engines and guarantees a long engine life. If STIHL two-stroke engine oil is not Mixing Fuel available, use only quality two-stroke oil Unsuitable fuels or lubricants or mix designed for use in air cooled engines. -
Page 11: Fueling
Use a canister approved for storing fuel. Pour oil into the canister first, Take care not to spill fuel while fueling then add gasoline and mix and do not overfill the tank. STIHL thoroughly. recommends the STIHL filler nozzle (special accessory). -
Page 12: Auger Brake
Push the new pickup body into the hole (e.g. roots or stones) the earth hose. auger will rotate counterclockwise – the Place the pickup body in the tank. activating lever is pressed against the operator's thigh and thus engages the auger brake. BT 121... -
Page 13: Fitting The Auger
Pull retaining pin (1) out of the position A. auger's shank. Push the auger (2) onto the drilling spindle so that the holes (3) line up. Push retaining pin into the hole. Spring clip on retaining pin must fit snugly around auger's shank. BT 121... - Page 14 This is the Do not let the starter grip snap back starting throttle position. – guide it back into the housing so that the starter rope can rewind properly. Continue cranking until the engine runs. BT 121...
- Page 15 Since the auger brake is still If the engine still does not start: engaged, the engine must be returned to idle speed immediately Push the slide control in direction of – or the clutch might otherwise be c to $ damaged. BT 121...
-
Page 16: Operating Instructions
Wait for engine to cool down. Store the machine with a full fuel tank in a dry place well away from sources of ignition until you need it again. Storing for a long period: see chapter "Storing the Machine". BT 121... -
Page 17: Releasing A Trapped Auger
Inspection by a Specialist If the machine is used commercially, it must be inspected at least once a year by a specialist, e.g. STIHL dealer, to ensure it is in good and safe working order. If the auger jams in the drill hole, shut off If there is a noticeable loss of the engine immediately. -
Page 18: Maintenance Chart
Carburetor Readjust idle Readjust electrode gap Spark plug Replace after 100 hours of operation Spark arresting screen in muffler Have checked by STIHL dealer All accessible screws and nuts (not Retighten adjusting screws) Check Antivibration elements Have replaced by dealer... -
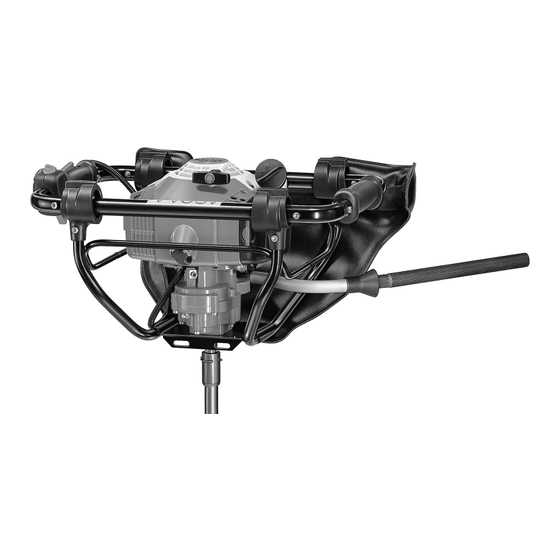
Page 19: Main Parts And Controls
5 Muffler (with spark arresting screen) 6 Slide control 7 Throttle trigger interlock 8 Throttle trigger 9 Spark plug boot 10 Screw plug 11 Drilling spindle 12 Fuel pump 13 Choke knob 14 Auger brake lever 15 Padding BT 121... -
Page 20: Specifications
English Specifications Engine Ignition System Drilling Gear STIHL single cylinder two-stroke engine Type Type Electronic magneto ignition with Two-stage spur gear drive Displacement: 30.8 cm electronic speed governor Gear ratio Bore: 35 mm Spark plug (suppressed) 47.5 : 1 Stroke:...
Need help?
Do you have a question about the BT 121 and is the answer not in the manual?
Questions and answers