Table of Contents
Advertisement
Quick Links
Shenzhen Atess Power Technology Co.,Ltd
GROWATT-ATESS Industrial Park, No.23 Zhulongtian Road, Shuitian Community,
Shiyan Street, Baoan District, Shenzhen
T
+ 86 755 2998 8492
info@atesspower.com
E
www.atesspower.com
W
revised date: 2023-07-05
ATESS NOVO EVA-11/22S-S/P
3-phase AC charger Quick installation guide
Advertisement
Table of Contents

Related Manuals for ATESS NOVO EVA-11S-S


Summary of Contents for ATESS NOVO EVA-11S-S
- Page 1 ATESS NOVO EVA-11/22S-S/P Shenzhen Atess Power Technology Co.,Ltd GROWATT-ATESS Industrial Park, No.23 Zhulongtian Road, Shuitian Community, 3-phase AC charger Quick installation guide Shiyan Street, Baoan District, Shenzhen + 86 755 2998 8492 info@atesspower.com www.atesspower.com revised date: 2023-07-05...
-
Page 2: Table Of Contents
II. Packaging list ·································································· All rights reserved. ATESS has the final right to interpret this user manual. The information III. Installation and wiring ······················································· in this manual is subject to change without notice. IV. Parameter setting ·····························································... -
Page 3: Product Description
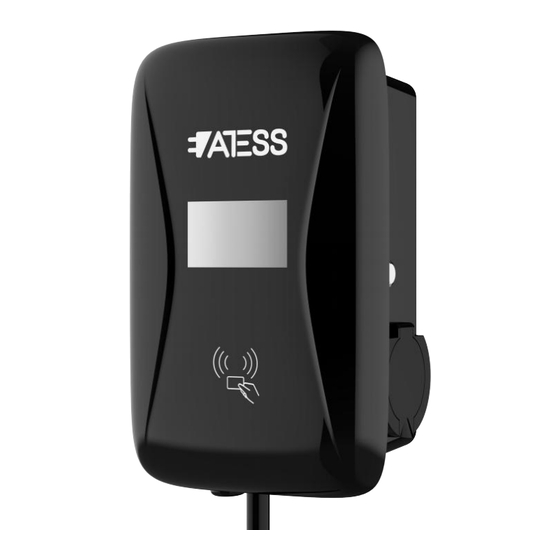
Product description Wiring definition in the side window Ic+/Ic- 485A/B la+/la- lb+/lb- 1.LOGO and status indicator 2.LCD display 3.RFID ready 4.Start or stop button 1. Terminal block for CT/meter wiring. The terminal 5.Socket outlet(plug holder for cabled version) definition is: 6.Mounting bracket 485A/485B is RS485 terminal for meter connection;... -
Page 4: Packaging List
III. Packaging list Installation and wiring 3.1 Mount on a wall Name Remark 3.1.1 Open the packaging, you’ll see a charge point, a mounting bracket, a user manual Charger and a bag of mounting accessories. There is also an RFID card if the charge point is RFID version. - Page 5 3.2 Mount on a pole 3.1.3 Put the charge point onto the bracket, and fix it with the 2 screws at the bottom of the charge point. The installation is done. 3.2.1 Open the packaging of the pole, take out the pole and mounting accessories. 3.2.2 The pole must be installed on a hard surface, concrete surface is recommended, it can also be mounted on a solid ground.
-
Page 6: Parameter Setting
Parameter setting 3.2.4 Fix the mounting bracket onto the pole. 3.2.5 Position the charge point onto the bracket and secure it on the bracket with the 2 screws. After the installation and wiring is done, connect the Charger to a computer and configure parameters via the web browser of the computer, then the Charger can be ready for use. - Page 7 5. Select "Use the following IP address" and enter the IP address, Subnet Mask, 3. Right-click on Local Area Connection and click on Properties. Default Gateway. Click OK and close the Local Area Connection properties window. 4. Select Internet Protocol Version 4 (TCP/IPv4) and click on Properties. 4.2 Configure parameters Connect the charger to a computer via a network cable.
- Page 8 Fig.1 (2) Charger ID, this is the unique identification of the Charger. If the charger is to be connected to ATESS back-office server, this ID must be set as the serial number on the Fig.4 nameplate of the Charger. Otherwise the Charger cannot be registered on the server.
- Page 9 (12) Over temperature protection value, not suggested to change. (9)Server URL is to set the domain name or IP address of the back office server to be connected. The domain name of ATESS server is “ws://ess-charge.atesspower.com:80/ocpp/ws”; IP address is “ws://ess-charge.atesspower.com:80/ocpp/ws”. Fig.12 Heartbeat Interval is used for testing.
- Page 10 (15) DC residual current sampling value calibration. Enter 0 and press “Set and Reboot ” (18) Relieve the power grid pressure, authorized charging, after the set time to start. to calibrate the DC RCD ring. Display real-time detection value of DC residual current.keep the default RCD level.
- Page 11 (22)Set the load balancing or Solar function, sampling instrument type and address. (27) PIN of the charger, used to verify the PIN of user card. To use a RFID card with the charger, their PIN must be consistent. If the user card has a different PIN, then it cannot be used on this charger.
-
Page 12: Operation Instruction And Lcd Description
Fig.33 (34) Upgrade the firmware of the charger. After clicking upload, the charger will restart. APP/RFID mode operation process flow If you are using the ATESS APP, Charging can be started/stopped by pressing the Fig.34 ON/OFF button on the APP. - Page 13 5.2 LCD interface introduction RFID mode: Charging can only be initiated or ceased by swiping RFID card. Interface of standby status. Charging mode is displayed at the bottom centre of the screen. Interface of user card information RFID mode operation process flow Displayed for user to check card ID and balance when swiping RFID card while EV is not connected...
-
Page 14: Firmware Update
Firmware update There are 2 ways to update firmware for EV charger Interface of fault status. 1. Update by SD card Displayed with fault code and fault 2. Update on parameter setting page description when fault occurs. 6.1 Update by SD card The firmware file must be named as “App.bin”. - Page 15 3. Open the txt file, write “state=1” in it and save the file. 4. Insert the SD card into the charger, turn off and back on the charger, the update will start automatically. The indicator will first flash red and then flash green with a long beep as the end of the update(sometimes the beep sound may not be clearly heard).
-
Page 16: Troubleshooting
VII. 3. Click the ”Browse” button and select the firmware file. Click “Upload”, then update will Troubleshooting start automatically. 7.1 Troubleshoot by LED behavior or LCD display If fault occurs, users can check the fault information on the LCD or by the number of During the update, the LED indicator will behave as below, blinks of the LED indicator light. - Page 17 7.2 Firmware update fails b. Please check and input the correct WiFi SSID and password to retry; 7.2.1 Firmware update failure with SD card: a. Check if the capacity is over 4G bytes,please use a SD card of less than 4G to retry; b.
- Page 18 e. Check if the charger is still connected to the computer. Please unplug it from computer otherwise the charger won’t connect to the back-office server. f. Check if server address is correct in the“Server URL” field. The correct setting is : ws://ess-charge.atesspower.com:80/ocpp/ws d.
- Page 19 (3). Right-click on Local Area Connection and click on Properties. c. Check what web browser is being used, it’s suggested to use Firefox or IE, Chrome cannot be used to update firmware. d. Check if you have input the complete content, which is http://192.168.1.5:8080, in the address field, do not leave out the http:// or the“:8080”.
-
Page 20: Use Excess Solar Power To Charge Your Car
VIII. Use excess solar power to charge your car 7.5 Charging issue If charging cannot start after the car is plugged in, The charge point can work with grid-tied solar system, to detect and use the residual solar a. Check if the red emergency stop button is pressed. power to charge your car that otherwise would be fed back to grid. - Page 21 8.4 Parameter configuration for this function (1) Connect the charge point to a laptop with a network cable, access the parameter setting page on the web browser of the laptop. (2) Scroll down to find the following parameters: Solar Mode, FAST, ECO or ECO+. Black White Black...
-
Page 22: Intelligent Power Modulation
Intelligent power modulation 9.2 If a meter is used, the wiring will be as the following Introduction The charge point can monitor the total power consumption of the household during charging. If the power consumption approaches the preset max value, the charge point will reduce charge power to avoid the situation of main breaker trip due to overload. -
Page 23: Specification
Specification (3) Select power sampling device in the field of the parameter: External Power Sampling Wiring(0: Inner CT 1: PowerMeter). 0 means CT while 1 stands for meter. NOVO EVA-11/22S-S/P Model 246/182/162mm Dimension(mm) <3.5/6.5 Weight(kg) Display Stainless steel& Engineering plastics& Tacrylic Casing Material Input (4) Set the maximum power import value in the field of External Maxlimit Power(kW). -
Page 24: Annex I
10.2.2 Registration and login Annex When the user first visits, the user registration is performed by the following steps: Click the desktop icon Login page Register. 10.1. APP Introduction When the user has an account, you can directly enter the user name and password to log 10.1.1 Description in. - Page 25 10.2.5 Start and stop control of charger Press “Charge”to turn on/off. Note: when charger status is Preparing , you can press”Charge” to start charging. 10.2.4 Charger switch and delete When you have multiple chargers, you can enter the setting charging interface by clicking 10.2.6 Cable locked on the charger.
- Page 26 10.2.7 Charging record There are three Pre-set charging schemes: Duration, Cost and Energy. Users can choose one of these options.The scheme can be canceled before the start charging time is Press “Record” to view past charge records, including changer ID, gun number, time, reached.
- Page 27 ●Charger Settings Method of Control : Three modes control the charging of the charger,APP,RFID and plug and charge. Currency: Select the currency in which the charge is settled and the charge report displays the bill with currency. Charging rates: The charge tariff is used to calculate the cost of electricity consumed. The charge report shows the total cost.
- Page 28 ●User Authrization To manage authorized users, you can view the authorization time, account name, and delete user in the authorization management interface. Users can authorize other users to use charging stubs through authorization management. Enter the user name to authorize other users to use the chargepoint. If the person you want to authorize does not have an account, you can register for the new user by registering the new user in the upper right corner.
- Page 29 10.2.10 Account Management Users can manage their accounts, set their avatars, change their passwords, and bind their mobile phone numbers and mailboxes. ●IOnly when the charger is in AP mode can you use the phone to connect to the charger. Change password: You need to verify the original password, then enter and confirm the The charger ID is displayed in AP mode and the pile parameters can be set.
- Page 30 Annex 11.1 Electrical diagram Fig11-1. Main circuit diagram 11.2 Contact Company Name:Shenzhen Atess Power Technology Co.,Ltd Address: GROWATT-ATESS Industrial Park, No.23 Zhulongtian Road, Shuitian Community, Shiyan Street, Baoan District, Shenzhen Website: www.atesspower.com Service line: +8675529988492 E-mail: info@atesspower.com...
Need help?
Do you have a question about the NOVO EVA-11S-S and is the answer not in the manual?
Questions and answers