
Related Manuals for AZENTA IntelliXcap


Summary of Contents for AZENTA IntelliXcap
- Page 1 IntelliXcap™ Automated Screw Cap Decapper/Recapper Acoustic 96-format User Manual 347778 Revision D...
-
Page 2: Cover
© 2024 Azenta, Inc. All rights reserved. The information included in this manual is proprietary information of Azenta, Inc. and is provided for the use of Azenta, Inc. customers only and cannot be used for distribution, reproduction, or sale without the express written permission of Azenta, Inc. - Page 3 64347 Griesheim, Germany For Customer Service/Sales Inquiries: Location Contact Number Website North America +1-888-2AZENTA (+1-888-229-3682) Europe +44-161-777-2000 www.azenta.com Japan +81-3-6628-2950 For Technical Support: Location Contact Number Website North America +1-800-379-7221 Europe +41-31-770-7373 / +44-161-777-2107 www.azenta.com Japan +81-3-6628-2950 Copyright © 2024, Azenta, Inc.
-
Page 4: Table Of Contents
Space Requirements Environmental Requirements Electrical Requirements 4. Installation Package Contents Unpacking Safety Requirements Preparation Procedure Setting Up IntelliXcap Acoustic LED Indicators Procedure Installing the Azenta Decoding Software 5. Operation Overview Starting the Product Validating the Decapping Process Cap Detect Drop Detect... - Page 5 Waste Disposal System Test 7. Troubleshooting Error Messages Error Recovery Manual Recovery 8. Appendices Appendix A: Integrating the IntelliXcap Acoustic Appendix B: Controlling Azenta Decoding Software Remotely Appendix C: Repacking Appendix D: WEEE Statement (European Union) Copyright © 2024, Azenta, Inc.
-
Page 6: Safety
This product is intended for use by industrial customers and should be serviced only by Azenta or Azenta trained representatives. The service manuals and related materials are provided in English at no charge and are intended for use by experienced technicians. -
Page 7: Explanation Of Hazards And Alerts
Indicates a situation or unsafe practice which, if not avoided, may result in equipment damage. Notice signal word is white on blue background with no icon. Copyright © 2024, Azenta, Inc. -
Page 8: Alert Example
The following is an example of a Warning hazard alert. Figure 1-1: Components of a Safety Alert Number Description How to Avoid the Hazard Source of Hazard and Severity General Alert Icon Signal Word Type of Hazard Hazard Symbol(s) Copyright © 2024, Azenta, Inc. -
Page 9: Regulatory Compliance And Declaration Of Conformity
European Union’s Machinery Directive 2006/42/EC and 2014/30/EU as a completed machine. In accordance with the Directive, Azenta Life Sciences has issued a Declaration of Conformity and the IntelliXcap Automated Screw Cap Decapper/Recapper Acoustic 96-format has a CE mark affixed. - Page 10 1. Safety IntelliXcap Acoustic Regulatory Compliance and Declaration of Part Number: 347778 Rev. D Conformity Copyright © 2024, Azenta, Inc.
-
Page 11: General Safety Considerations
Chemical Hazard The IntelliXcap Acoustic may be used to de-/recap samples that expose users to chemical hazards which, if not properly handled, may result in death or serious injury. Read and understand the safety information for the equipment where the IntelliXcap Acoustic is used. - Page 12 The IntelliXcap Acoustic can only be used with tubes and cartridges that have been configured and tested. Do not use alternative tubes and cartridges that have not been configured and tested. Copyright © 2024, Azenta, Inc.
-
Page 13: Safety Functions
The emergency stop button is a safety device designed for use as a complementary protective measure. As an example, the operator can press the emergency stop function to cease all mechanical movement of the IntelliXcap Acoustic if a hazardous situation arises that could cause personal injury, or damage to the machine or equipment. - Page 14 When activating the emergency stop button, the status will appear on the operator monitor: Error 238 – Emergency stop Test the emergency stop function before commissioning the IntelliXcap Acoustic for use and after each installation or re-installation. At minimum, the function must be visually checked and activated at least every six months.
-
Page 15: Safety Door
There is a safety switch installed on the access door that prevents the unit from running if the door is not completely closed. This function protects operators against hazardous moving parts accessible through the front of the IntelliXcap Acoustic. Copyright © 2024, Azenta, Inc. - Page 16 The access door can be disabled by navigating to Settings > Safety Door, if the user makes sure that another safety measure takes over. For example, when the IntelliXcap Acoustic is integrated into a robotic cell with its own safety system. Appendix A: "Integrating the IntelliXcap Acoustic" on page 80 for further information on using the IntelliXcap Acoustic in an integrated system.
-
Page 17: Overview
This manual describes the proper use of the machine. With an automated glide rail for integration and Verification Camera module for decapping validation, IntelliXcap Acoustic is the only decapper system fully compatible with Acoustic Sample Tube - Echo® Qualified Consumables. -
Page 18: Concepts And Terminology
This manual contains information on safety, specifications, and operation as well as troubleshooting and maintenance of the IntelliXcap Acoustic. If there are any questions regarding this manual or use of this system or to order additional copies of this publication, contact Azenta Life Sciences Service. See... - Page 19 IntelliXcap Various Intellixcap variants (i.e. 96, 48 or 24 tube). 96/48/24 480 x 272-pixel touch screen display on the IntelliXcap front panel. It communicates with the LCD Display controller board via modbus. Light curtain System for detecting the height of the tube rack on the stage.
-
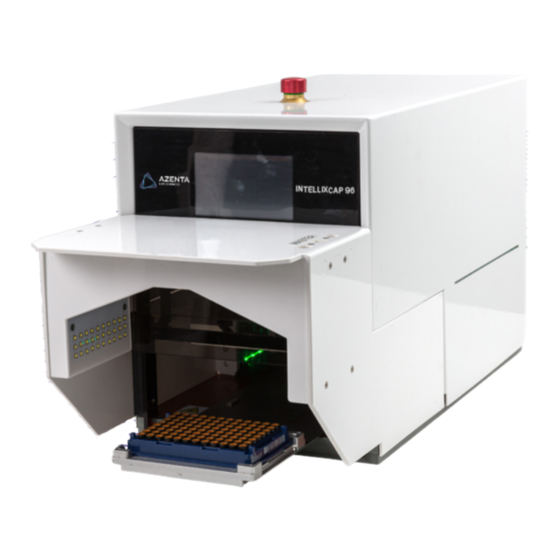
Page 20: Product Illustration
Waste Mode of operation where caps are not refitted but dropped off into a carrier. Working profile See 'Loaded profile'. Product Illustration Description IntelliXcap 96 Verification Camera (IntelliXcheck module) Azenta IntelliXcap Acoustic Tubes and Rack Copyright © 2024, Azenta, Inc. -
Page 21: Specifications And Site Requirements
3. Specifications and Site Requirements Specifications Unit Software and Firmware Table 3-1: Software and Firmware Software/Firmware Version Controller 50.03 Display 23.02 Light curtain 20.1 Part Number: 347778 Rev. D... -
Page 22: Site Requirements
Site Requirements Space Requirements The machine has a rectangular footprint and is regarded as highly stable. Place the IntelliXcap in a well- ventilated area on top of an even surface that is solid enough to carry its weight. The surface must comply with 1.3.1 of Annex I of 2006/42/EC. - Page 23 Specification System Height 316 mm System Width 256 mm System Depth 634 mm Stage Height 31 mm Standard Stage Distance (when ejected) 121 mm Extended Stage Distance (when ejected) 207 mm System Weight 27 kg Copyright © 2024, Azenta, Inc.
-
Page 24: Environmental Requirements
Part Number: 347778 Rev. D Environmental Requirements The IntelliXcap Acoustic shall be used within the rule set of the Good Laboratory Practices, GLP. The machine must be operated indoors and under the following environmental specifications only: Table 3-3: Environmental Requirements... -
Page 25: Electrical Requirements
The machine operates below the noise emissions level: < 70 dB(A) Two fuses: Fuses 250 V, 5A (5x20 mm) IEC 60127 fuse only Not less than 1MΩ at 1,000V Insulation Resistance Phase 1 = 50GΩ Neutral = 50GΩ UI Connection RS 232 cable Copyright © 2024, Azenta, Inc. -
Page 26: Installation
4. Installation Read the Safety Chapter Failure to review the Safety chapter and follow the safety warnings can result in death or serious injury. All personnel involved with the operation or maintenance of this product must read and understand the information in this safety chapter. Follow all applicable safety codes of the facility as well as national and international safety codes. -
Page 27: Package Contents
(ASSY,CARTRIDGE,INTELLIXCAP,FX,ACOUSTIC TUBE) CABLE,POWER EXTENSION,C14 TO 2 X C13, 316093 2.5M,250V,10A 316094 CABLE,ASSY,2COND,18AWG,2X RTANG DC PLUG,BLK,1FT POWER SUPPLY,AC-DC,12V,5.41A,IEC,2.5MM BARREL 316095 PLUG 351374 CABLE ASSY,USB 2.0,A TO B M/M,BLK,PVC,2.0M UPGRADE,INTELLIXCAP 96,E-STOP 20-4012 includes part 315935 and part 315939 Copyright © 2024, Azenta, Inc. - Page 28 POWER CORD,C13 TO UK PLUG,2M,250V,10A 323305 CABLE ASSY,POWER,RIGHT ANGLE,C13,3 POLE,US 323306 CABLE ASSY,POWER,RIGHT ANGLE,C13,3 POLE,EU 323307 CABLE ASSY,USB 2.0 A TO A,M/M,1M 323308 CABLE ASSY,EXTENSION,DB9,M/F,BLK,1M 322663 CUSTOMER FAT,INTELLIXCAP,ALL MODELS 354817 FORM,FACTORY ACCEPTANCE TEST,INTELLIXCAP 96 347778 USER MANUAL,INTELLIXCAP Acoustic Copyright © 2024, Azenta, Inc.
-
Page 29: Unpacking
This product weighs up to 28 kg (61.7 lbs). Improper lifting may result in personal injury. Do not attempt to lift this product alone. Always use 2-person lift techniques or a lift aid to unpack and install the equipment. Use the provided straps installed around the unit when removing the IntelliXcap from the packaging. Preparation... -
Page 30: Procedure
Ensure that all parts are included as described in "Package Contents" on page With two people, carefully lift the IntelliXcap Acoustic system out of the inner cardboard box by the blue straps and place it on a flat surface that can hold 30 kg. - Page 31 Part Number: 347778 Rev. D Unpacking Step Action Loosen and remove the blue straps, then set them aside as they are required for Step 14. Remove the plastic electrostatic covering and set it aside as it is required for Step 14. Copyright © 2024, Azenta, Inc.
- Page 32 Step Action Remove the tape from the device's sliding doors and set it aside as it is required for Step 14. Insert the E-Stop cable into the IntelliXcap Acoustic and twist the metal screw until tight. Copyright © 2024, Azenta, Inc.
- Page 33 E-stop button. Connect the power cable from the instrument back to the electrical power socket (100/240VAC). NOTE: Ensure that the door is free from obstructions, and that there is nothing in front of the instrument. Copyright © 2024, Azenta, Inc.
- Page 34 4. Installation IntelliXcap Acoustic Unpacking Part Number: 347778 Rev. D Step Action Turn the IntelliXcap Acoustic on, using the switch at the rear of the system. The system initializes and the tray extends. Copyright © 2024, Azenta, Inc.
- Page 35 Part Number: 347778 Rev. D Unpacking Step Action Remove the foam block used to secure the IntelliXcap Acoustic stage in place and set it aside as it is required for Step 14. The device is now ready for use. Copyright © 2024, Azenta, Inc.
- Page 36 Place the straps, foam block and shipping tape inside the anti-static bag and save them. They will be needed if shipping the system. Keep the original packing material in a dry/low humidity location in case the IntelliXcap Acoustic needs to be transported for service or repair.
-
Page 37: Setting Up Intellixcap Acoustic
Azenta Life Sciences 4. Installation Part Number: 347778 Rev. D Setting Up IntelliXcap Acoustic Setting Up IntelliXcap Acoustic Inappropriate Use Use of this product in a manner or for purposes other than for what it is intended may cause equipment damage or personal injury. -
Page 38: Procedure
Connect the provided power cable extension (PN: 316093) to the power transformer. This splits power between the IntelliXcap unit and Verification Camera module. b. Connect one end to IntelliXcap unit to power the decapper and the other end to the power supply module of Verification Camera (PN: 316095). -
Page 39: Installing The Azenta Decoding Software
4. Installation Part Number: 347778 Rev. D Installing the Azenta Decoding Software Installing the Azenta Decoding Software Ensure to refer to the Azenta Decoding Software Installation Procedure (382851) for the latest version of this procedure. Step Action Power ON your PC and connect the provided USB stick to your PC. - Page 40 4. Installation IntelliXcap Acoustic Installing the Azenta Decoding Software Part Number: 347778 Rev. D Step Action Ensure the IntelliCode Application and Perception check boxes are selected and then click Next. Select a shortcut location and then press Next. Copyright © 2024, Azenta, Inc.
- Page 41 To finish the installation, select the Yes, restart the computer now option, and then click Finish. Confirm the Azenta Decoding Software is successfully installed on the PC. Power on and plug the IntelliXcap Acoustic device into an available port on the PC using the provided cable and wait for the device to be recognized.
-
Page 42: Operation
This chapter provides complete operation directions for the IntelliXcap Acoustic. The operation of the IntelliXcap is covered for both normal operating conditions and emergency conditions. The IntelliXcap Acoustic has been designed and constructed to allow safe access to all areas where intervention could be necessary during operation. -
Page 43: Starting The Product
Always operate this product with the covers in place. Do not change settings. It is the responsibility of each person working on this product to know the applicable regulatory safety codes as well as the facility safety procedures, safety equipment, and contact information. Copyright © 2024, Azenta, Inc. - Page 44 Action Connect the power cable into the electrical power socket (100/240VAC) on the back of the device. Ensure that the door is free from obstructions, and that there is nothing in front of the instrument. Copyright © 2024, Azenta, Inc.
- Page 45 Step Action Turn the IntelliXcap Acoustic on, using the switch at the rear of the system. The IntelliXcap Acoustic starts up and begins the Initialization process. NOTE: During this process, the door opens and the stage moves into its extended position.
-
Page 46: Validating The Decapping Process
Navigate to Instrument > Select Instrument. The Instrument Selector window opens. Select IntelliXcheck, then click Select. NOTE: If only Virtual Instrument is listed, it means that the IntelliXcap Acoustic is disconnected from the PC or from power (system not detected). Copyright © 2024, Azenta, Inc. - Page 47 If using Cap2™ 0.2ml Dual-Cap Sample Collection PCR Tube. select Drop Detect, Peregrine48 Cap or Peregrine48 Code. Place the rack on the decapper stage. Two different types of labware can be used with the Verification Camera and the Azenta Decoding Software: FluidX™ Acoustic Sample Tube - Echo® Qualified Consumable Cap2™...
-
Page 48: Cap Detect
The system automatically detects all tubes that have a cap and registers their position on the rack. The results are automatically exported. Drop Detect If you have selected Drop Detect to detect any orange caps dropped onto the rack, click GO, and a screen similar to the following is displayed. Copyright © 2024, Azenta, Inc. -
Page 49: Peregrine48 Cap
If you have selected Peregrine48 Cap to detect Cap2™ 0.2ml Dual-Cap Sample Collection PCR caps, click GO, and the following screen is displayed. The system automatically detects all tubes that have a cap and registers their position on the rack. Copyright © 2024, Azenta, Inc. - Page 50 The system will provide both the successful reads and the failed ones: Green area means cap detected Red area means no cap detected In the following example, there are 47 caps detected and 1 empty well (no cap detected). The results are automatically exported. Copyright © 2024, Azenta, Inc.
-
Page 51: Peregrine48 Code
If you have selected Peregrine48 Code to decode the codes on Cap2™ 0.2ml Dual-Cap Sample Collection PCR caps, click GO, and the following screen is displayed. The system automatically detects and decodes all codes on the caps and registers their code and position on the rack. Copyright © 2024, Azenta, Inc. -
Page 52: Starting The Decapping And Recapping Process
The basic flow of the decapping and recapping proceeds as follows: 1. The operator places a rack fully or partially filled with capped IntelliXcap Acoustic tubes on the instrument's stage. 2. The Azenta Decoding Software detects if all caps are properly placed on the tubes. - Page 53 Step Action Once the decapping process has finished, the IntelliXcap Acoustic is ready to start the recapping process. When ready, place a rack of uncapped tubes, and press START. The instrument scans and detects the correct height of the tubes and begins the recapping process.
-
Page 54: Manage The Cartridges
Part Number: 347778 Rev. D Manage the Cartridges The IntelliXcap Acoustic can work with a range of tube types - a specific cartridge is required or each different cap design. See below for a list of available cartridges. Additional cartridges are released occasionally. To check the current list or to request a cartridge for... -
Page 55: Change Cartridge
The cartridge ID is always 16. The actual number must be 16–96 16–96 entered by the user. If a cartridge must be replaced, use the following procedure. Step Action Ensure there is nothing on the stage. Press the Settings button on the Home screen. Copyright © 2024, Azenta, Inc. - Page 56 5. Operation IntelliXcap Acoustic Manage the Cartridges Part Number: 347778 Rev. D Step Action Select Cartridge Change. Press Continue. The stage moves inside the unit and the cap-driver cartridge is lowered and placed onto the stage. Copyright © 2024, Azenta, Inc.
- Page 57 Part Number: 347778 Rev. D Manage the Cartridges Step Action When the homing process is complete, place the new cartridge on the stage. NOTE: Verify the cartridge fits the alignment inserts on the sides of the stage’s frame. Copyright © 2024, Azenta, Inc.
- Page 58 The head carries out a re-initialization process which needs to be completed before the first de-capping process can be carried out. Cartridge ID is 15 If the cartridge ID number is 15, the following screen is displayed. This screen allows you to do the following. Copyright © 2024, Azenta, Inc.
- Page 59 Change the Cartridge If you have inserted the wrong cartridge, press the Cartridge Change button to eject it. Load a Stored Profile Step Action Press the Load stored profile button. Enter an extended profile number (between 16–96). Copyright © 2024, Azenta, Inc.
- Page 60 Load and Use a New Profile Step Action Connect the USB. NOTE: When the USB lead is plugged in, the LCD display is disabled and a warning dialog is displayed. Load in the profile using Datalogger. Copyright © 2024, Azenta, Inc.
- Page 61 Azenta Life Sciences 5. Operation Part Number: 347778 Rev. D Manage the Cartridges Step Action Unplug the USB. Press the Use loaded profile button. A confirmation message is displayed. Press OK. Press Done. Copyright © 2024, Azenta, Inc.
-
Page 62: Manage Setpoints
Setpoints are configurable parameters which define machine operation. There are occasions when you might change setpoints under the instruction of Azenta service or engineering staff. For example, if the IntelliXcap is not behaving correctly, changing a setpoint to see what effect it has can assist in diagnostics. -
Page 63: Edit Setpoints
NOTE: Use the up and down arrows to find the relevant record, if required. Field Description Notes The setpoint ID. – M1—Main Z motor M2—Stage/Nest motor Description A description of the setpoint. M3—Cartridge motor M4—Safety Door motor Factory The factory (default) value. – Current The currently set value. – Copyright © 2024, Azenta, Inc. -
Page 64: Manage Profiles
(Def) value. Press OK. Manage Profiles You can view the details of the currently loaded profile by pressing the Manage Profiles button. The profile information is displayed. Copyright © 2024, Azenta, Inc. -
Page 65: Standby Mode
CRC > Machine the values will not match. Standby Mode You can set the IntelliXcap Acoustic to close the tray and enter a reduced-power standby mode, either manually or automatically. Manually Enter Standby Mode To enter standby mode, press the Standby (moon) button on the Home screen. -
Page 66: Configure Automatic Standby Mode Entry After Inactivity
Standby Mode Part Number: 347778 Rev. D Configure Automatic Standby Mode Entry after Inactivity Step Action Press the Settings button on the Home screen. Press the Auto Standby button. The Auto Standby screen is displayed. Copyright © 2024, Azenta, Inc. - Page 67 Press the – and + buttons to change the amount of time of inactivity before the machine enters standby mode. NOTE: You can press and hold each button to speed up the process. Press the tick button to confirm. Copyright © 2024, Azenta, Inc.
-
Page 68: Exit Standby Mode
5. Operation IntelliXcap Acoustic Standby Mode Part Number: 347778 Rev. D Exit Standby Mode To exit standby mode, press anywhere on the screen. Copyright © 2024, Azenta, Inc. -
Page 69: Preventative Maintenance
However, it is recommended that the preventative maintenance procedures and schedule provided in this section be followed to extend the operating life of the IntelliXcap Acoustic. If additional procedures are required, they will be supplied along with their maintenance schedules by Azenta Life Sciences. -
Page 70: Maintenance Schedule
Shield and/or keep the work area in a moist condition to prevent dust from flying around or smoldering. The operator, or specially trained cleaning staff, should tidy up and clean the IntelliXcap Acoustic and its surroundings daily. During this work, the same requirements for the use of tools and personal protective equipment apply as for the operational work. -
Page 71: Viewing Machine Servicing And Cartridge Replacement Intervals
Step Action Switch off the IntelliXcap Acoustic to remove any risk of personal injury. Wipe the IntelliXcap Acoustic externally with a microfiber or lint free cloth. Wipe the machine drawer for plastic dust debris from the cap driver/tubes. A new cartridge can produce minor plastic dust when first used. - Page 72 6. Preventative Maintenance IntelliXcap Acoustic Part Number: 347778 Rev. D Step Action Press the Counters button. The Counters screen is displayed. Copyright © 2024, Azenta, Inc.
-
Page 73: Waste Disposal
Resets the Last service counter to 0. This is reset as part of a service visit. The total number of cycles completed by the inserted cartridge. NOTE: If the user operates the IntelliXcap with two different kinds of cartridges, it Cartridge Total counts and records the cycles separately for each type. -
Page 74: Troubleshooting
7. Troubleshooting Unauthorized Service Personal injury or damage to equipment may result if this product is operated or serviced by unauthorized personnel. Only qualified personnel are allowed to transport, assemble, operate, or maintain the Product. Properly qualified personnel are those who have received certified training and have the proper qualifications for their jobs. - Page 75 Door open failure at end of cartridge eject sequence Door close failure at end of cartridge eject sequence M1 failed to reach waste position within S4, during auto-waste sequence. Not sure this will ever occur M1 homing error Copyright © 2024, Azenta, Inc.
- Page 76 Tube detected after decap retry (caps screwed back on) Close tray failure M3 homing error Close tray failure Open door failure M1 homing error M2 homing error M3 homing error M2 homing error Door close failure -end of sequence Copyright © 2024, Azenta, Inc.
-
Page 77: Error Recovery
Manually add a new cap to the CAP ERROR tubes and perform a new decap- If the IntelliXcap Acoustic fails on the second attempt, an ping cycle. error message is shown on the screen, and the IntelliXcap Acoustic stops. -
Page 78: Manual Recovery
NOTE: Select the Up and Down arrows to access additional options. Button Description Attempts a recap if there are caps on the pins. This is used if the IntelliXcap Acoustic has Attempt recap powered down, entered standby, or the E-stop has been pressed after decapping but before recap- ping. -
Page 79: Appendices
8. Appendices The following chapter contains the appendices for this manual. Part Number: 347778 Rev. D... -
Page 80: Appendix A: Integrating The Intellixcap Acoustic
Part Number: 347778 Rev. D Appendix A: Integrating the IntelliXcap Acoustic The IntelliXcap Acoustic can be integrated into an automated environment as well as robotic systems. A serial communication set RS 232 can fully control the entire system and eliminates the use of the touch-screen while operating. -
Page 81: Appendix B: Controlling Azenta Decoding Software Remotely
Appendix B: Controlling Azenta Decoding Software Remotely Appendix B: Controlling Azenta Decoding Software Remotely Step Action Double-click the Azenta Decoding Software icon available on your desktop. Click Preferences, then click Remote. The following window is displayed: Define your preferences, then click GO. - Page 82 When checked, Azenta Decoding Software boots and uses remote access immediately. boot CRLF, Used for backwards compatibility with xtr96. Datacount Refer to the Azenta Decoding Software User Manual (281945) for further information on remote communications with the Azenta Decoding Software. Copyright © 2024, Azenta, Inc.
-
Page 83: Appendix C: Repacking
Appendix C: Repacking Appendix C: Repacking Checklist Items Description Case The sturdy, black case used to transport and protect the IntelliXcap Acoustic. Documents Important manuals and references included with the product. Foam handle A protective layer to cover the unit. - Page 84 8. Appendices IntelliXcap Acoustic Appendix C: Repacking Part Number: 347778 Rev. D Step Action Place the protective foam covering over the rack slide. Press the green Start button on the IntelliXcap Acoustic's display screen. Copyright © 2024, Azenta, Inc.
- Page 85 Press the E-Stop button as the instrument clamps the foam. This will hold the protective foam layer in place. Flip the power switch into the OFF position. Unplug all power cords and place them in their respective white boxes. Re-tape the device's sliding doors. Copyright © 2024, Azenta, Inc.
- Page 86 Cover the unit with the plastic electrostatic covering. Slide the straps around the instrument. Place the protective cardboard pieces under the clamps to keep the straps from damaging the unit. Pull the straps tight to the unit. Copyright © 2024, Azenta, Inc.
- Page 87 Place the protective foam handle back in its original position. Place all of the IntelliXcap Acoustic's cords and contents in the correct white boxes. Ensure that all manuals and documents that arrived with the unit are included in the case.
- Page 88 8. Appendices IntelliXcap Acoustic Appendix C: Repacking Part Number: 347778 Rev. D Step Action Close and re-clip the seven pelican clips to ensure the lid is tightly closed. Copyright © 2024, Azenta, Inc.
-
Page 89: Appendix D: Weee Statement (European Union)
Such treatment is the most effective means of protecting the customer’s environment. The waste collection, reuse, recycling, and recovery programs available to Azenta Life Sciences customers vary by customer location. Please contact the responsible body (e.g., your laboratory manager) for information about local requirements.
Need help?
Do you have a question about the IntelliXcap and is the answer not in the manual?
Questions and answers