Table of Contents
Advertisement
Quick Links
Advertisement
Table of Contents
Troubleshooting

Related Manuals for AZENTA Direct Tube Marker


Summary of Contents for AZENTA Direct Tube Marker
- Page 1 Direct Tube Marker Operation Manual 383555 Revison A...
-
Page 2: Cover
© 2023 Azenta, Inc. All rights reserved. The information included in this manual is proprietary information of Azenta, Inc. and is provided for the use of Azenta, Inc. customers only and cannot be used for distribution, reproduction, or sale without the express written permission of Azenta, Inc. - Page 3 For Customer Service/Sales Inquiries: Location Contact Number Website North America +1-888-2AZENTA (+1-888-229-3682) Europe +44-161-777-2000 www.azenta.com Japan +81-3-6628-2950 For Technical Support: Location Contact Number Website North America +1-800-379-7221 Europe +41-31-770-7373 / +44-161-777-2107 www.azenta.com Japan +81-3-6628-2950 Copyright © 2023, Azenta, Inc.
-
Page 4: Table Of Contents
How to Manually Enter Data into Direct Tube Marker Spreadsheet .CSV How to Enter Data into the Direct Tube Marker Spreadsheet .CSV How to Import Data from Microsoft® Excel into Direct Tube Marker Spreadsheet .CSV How to Set the Printer Settings... - Page 5 Troubleshooting ‒ Insufficient Printing Quality 9. Appendices Appendix A: Technical Specifications Appendix B: Accessories - Ordering Information Accessories Ordering Information Appendix C: Warranty Appendix D: Shipping Instruction Appendix E: WEEE Statement (European Union) 10. Maintenance Cleaning the Printhead Copyright © 2023, Azenta, Inc.
-
Page 6: Safety Information
1. Safety Information Read the Safety Chapter Failure to review the Safety chapter and follow the safety warnings can result in death or serious injury. All personnel involved with the operation or maintenance of this product must read and understand the information in this safety chapter. ... -
Page 7: Safety Instructions
If the power supply is damaged please do not attempt to use the Direct Tube Marker. Do not position the Direct Tube Marker so that it is difficult to operate the disconnecting device (detachable plug). Copyright © 2023, Azenta, Inc. -
Page 8: Regulatory Compliance And Declaration Of Conformity
The Direct Tube Marker meets the requirements of the European Union’s Machinery Directive 2006/42/EC and 2014/30/EU as a completed machine. In accordance with the Directive, Azenta Life Sciences has issued a Declaration of Conformity and the Direct Tube Marker has a CE mark affixed. Copyright © 2023, Azenta, Inc. -
Page 9: Introduction
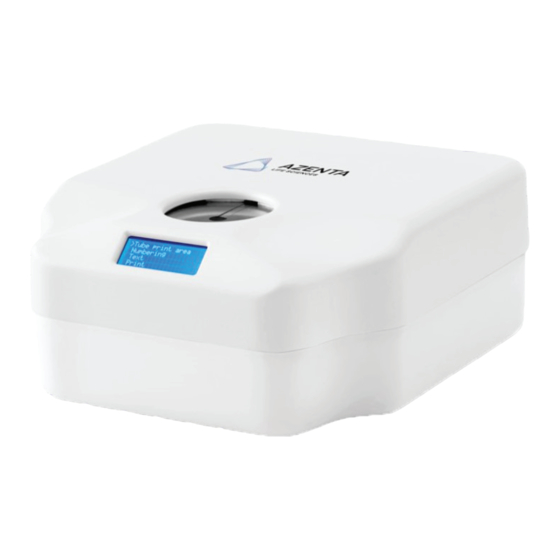
2. Introduction The following chapter details the external and internal parts of the Direct Tube Marker and includes a list of all contents within the product's package. Part Number: 383555 Rev. A... -
Page 10: The Instrument
Part Number: 383555 Rev. A The Instrument The Direct Tube Marker allows printing directly onto the surface of a wide range of tubes including centrifuge and cryogenic vials from 0.5 – 50 ml in volume, limiting need and use of sticky labels or marker pens. -
Page 11: Package Contents
Tube Adapter for 2D cluster tubes 8.5 mm 4ti-0683 Tube Adapter for cryo tubes 12.7 mm 4ti-0684 AC adapter 18W 18VDC (input 100-240VAC) 7 mm magnetic pole adapter USB A-B cable Operation manual Shipping safety instruction USB Flash Drive Copyright © 2023, Azenta, Inc. -
Page 12: Direct Tube Marker Parts
2. Introduction Direct Tube Marker Direct Tube Marker Parts Part Number: 383555 Rev. A Direct Tube Marker Parts Direct Tube Marker External Parts Direct Tube Marker Front Number Description Tube Adapter LCD Display Top Cover Direct Tube Marker Back Number... -
Page 13: Direct Tube Marker Internal Parts
Azenta Life Sciences 2. Introduction Part Number: 383555 Rev. A Direct Tube Marker Parts Direct Tube Marker Internal Parts Number Description Sled Solenoid Adjustable Pivot Point Ribbon Tensioner Un-printed Ink Ribbon Adjustable Support Base Knob Printhead Dust Collector Adapter Guide Pin... -
Page 14: Software Installation
3. Software Installation The following chapter details the installation process for the Direct Tube Marker software. Part Number: 383555 Rev. A... -
Page 15: Installing Direct Tube Marker Software
Part Number: 383555 Rev. A Installing Direct Tube Marker Software Installing Direct Tube Marker Software Supplied with the Direct Tube Marker is a USB stick containing a folder to the software installer. Within this folder are two files: Direct Tube Marker Installer (Windows Installer package .msi) ... - Page 16 3. Software Installation Direct Tube Marker Installing Direct Tube Marker Software Part Number: 383555 Rev. A Step Action Select the Install button. 3. The Install Loading window appears. Copyright © 2023, Azenta, Inc.
- Page 17 Azenta Life Sciences 3. Software Installation Part Number: 383555 Rev. A Installing Direct Tube Marker Software Step Action The FTDI CDM Drivers window opens. 4. Select the Extract button. The Welcome Device Drive Installation window opens.
- Page 18 3. Software Installation Direct Tube Marker Installing Direct Tube Marker Software Part Number: 383555 Rev. A Step Action Copyright © 2023, Azenta, Inc.
- Page 19 Azenta Life Sciences 3. Software Installation Part Number: 383555 Rev. A Installing Direct Tube Marker Software Step Action Select the Next button. 5. The License Agreement window opens. Copyright © 2023, Azenta, Inc.
- Page 20 3. Software Installation Direct Tube Marker Installing Direct Tube Marker Software Part Number: 383555 Rev. A Step Action Select the radio button next to the I accept this agreement option. 6. Copyright © 2023, Azenta, Inc.
- Page 21 Azenta Life Sciences 3. Software Installation Part Number: 383555 Rev. A Installing Direct Tube Marker Software Step Action Select the Next button. 7. The Completing Device Driver Installation window opens. Copyright © 2023, Azenta, Inc.
- Page 22 Part Number: 383555 Rev. A Step Action Select the Finish button. 8. The Installation application automatically closes. Locate your computer’s Search function. Type Direct Tube Marker into the Search function. 9. Copyright © 2023, Azenta, Inc.
- Page 23 Azenta Life Sciences 3. Software Installation Part Number: 383555 Rev. A Installing Direct Tube Marker Software Step Action Double-click the Direct Tube Marker application to open the software. 10. Copyright © 2023, Azenta, Inc.
-
Page 24: Hardware Installation
4. Hardware Installation The following chapter details how to install the Direct Tube Marker hardware. Part Number: 383555 Rev. A... -
Page 25: How To Install A Ribbon For Printing
NOTE: Where possible, gloves should be worn when installing the ribbon. This will ensure ink is not removed by the heat emitted from your fingers. Number Description Ink Ribbon, Ink Side Drive Shaft Ink Ribbon Ink Ribbon, Glossy Side Spool Locking Cap Copyright © 2023, Azenta, Inc. - Page 26 Close the top cover and proceed to "How to Connect Printer to a PC" on page 9. The Direct Tube Marker will carry out a calibration procedure at start-up. If start-up is interrupted the unit will auto-calibrate before the first print. ...
-
Page 27: How To Set-Up Tube Support
Selecting and Installing Tube Adapter The Direct Tube Marker delivery package contains tube adapters for 1.5 ml / 2 ml tubes (4ti-0681, hole diameter 11.5 mm), 0.5 ml PCR and 96 racked 2D storage tubes (4ti-0683, hole diameter 8.5 mm) and cryo tubes (4ti-0684, hole diameter 12.7 mm). - Page 28 Step Action 1. Insert the tube adapter on the sled. Check that the plate guide pin slots into the small hole in the tube adapter. 2. Number Description Tube Adapter Guide Pin Copyright © 2023, Azenta, Inc.
-
Page 29: Setting Adjustable Support Platform
How to Set-up Tube Support Setting Adjustable Support Platform Housed within the Direct Tube Marker unit is an adjustable support platform from which tubes without a lip or collar can be fully supported. Integrated within the support platform is a magnet which attracts and stabilizes the magnetic pole attachment used to support tubes of less than 65 mm in length and do not have a collar or lip. -
Page 30: Using Magnetic Pole Adapter
Ensure there is no pressure coming from the sled when making these adjustments. In other instances where the tubes are larger and more susceptible to falling over, Azenta recommends the use of an adapter plate to align the tube against the printhead and sled. - Page 31 If the tube is over 65 mm in length, there is no need for the pole attachment. 7. NOTE: Switch tube lift OFF in the Direct Tube Marker printer settings tab for adapters without a lift design or for tubes without a cap or collar. Copyright © 2023, Azenta, Inc.
-
Page 32: Setting The Sled Pivot Point
Take the 2.5 mm hex key provided and adjust the height of the pivot point. 2. NOTE: To lower the pivot point turn the hex key clockwise; turning anti-clockwise will raise the pivot point. Copyright © 2023, Azenta, Inc. - Page 33 Once the pivot point is in position, replace the adapter suitable for the tube(s) you wish to print onto and 4. close the top cover. Make a note of the pivot point position by referencing the sled ruler. Copyright © 2023, Azenta, Inc.
- Page 34 The print quality has drastically improved and important label data hasn’t been lost as a result of the lowered pivot point. Pivot point default: Pivot point 10 mm lower: Copyright © 2023, Azenta, Inc.
-
Page 35: How To Connect Printer To A Pc
"Direct Tube Marker External Parts" on page The Direct Tube Marker will carry out a calibration procedure at start-up. Wait for calibration to finish before proceeding. If calibration is interrupted it will auto-calibrate once the first print is triggered. Alternatively, you can restart the Direct Tube Marker by disconnecting and reconnecting the power supply. -
Page 36: Preparation For Printing
5. Preparation for Printing The following chapter details how to prepare the Direct Tube Marker for printing. Part Number: 383555 Rev. A... -
Page 37: How To Create Label Content
11 mm 2.0 ml Microcentrifuge Tube 30 mm 11 mm 1.8 ml Cryo Tube 25 mm 12 mm 15 ml Centrifuge Tube 40 mm 16 mm 50 ml Centrifuge Tube 40 mm 28 mm Copyright © 2023, Azenta, Inc. - Page 38 NOTE: This will open the Designer tab in a separate pop-out window making placement of cells and overall label design easier to manage. To set the tube label dimensions, select the Tube tab. 4. 5. Highlight and type the Height and Diameter values in the provided text boxes. Copyright © 2023, Azenta, Inc.
- Page 39 Example - Label format for 2.0 ml Microcentrifuge Tube (4ti-0798) 7. You can create tube preset profiles and save them to a drop-down menu for easy access. To access the tube preset profiles, tick the Use Tube Preset box. 8. Copyright © 2023, Azenta, Inc.
-
Page 40: How To Create Text Cells
The following menu appears. 9. 10. Added as defaults to the Tube Preset menu are 8 compatible Azenta tubes. 11. You can add to this list by selecting the Create button. 12. You can set the Diameter and Height parameters and edit the tube profile Name. - Page 41 1. By manually typing in text via the text cell within the Layout tab. "How to Edit Cell Content Manually" on page 5. 2. By linking the cell to a specified column in the Data Spreadsheet. "How to Bind Cell Content to Data Spreadsheet .CSV" on page Copyright © 2023, Azenta, Inc.
-
Page 42: How To Create Linear Barcode Cells
125 μm to 375 μm. Step Action Within the Designer window, select the AddLbc button. This places an 8 x 8 mm cell in the top left corner of the label. 1. Copyright © 2023, Azenta, Inc. - Page 43 See "How to Edit Cell Content Manually" on page 6. 2. By linking the cell to a specified column in the Data Spreadsheet. "How to Bind Cell Content to Data Spreadsheet .CSV" on page Copyright © 2023, Azenta, Inc.
-
Page 44: How To Create Datamatrix Cells
NOTE: A visual representation of the cell size and placement is shown via the X and Y axis. 2. 3. To alter the width, length or position of the cell, "How to Edit Cell Size and Placement" on page Copyright © 2023, Azenta, Inc. - Page 45 1. By manually typing in text via the text cell within the Layout tab. "How to Edit Cell Content Manually" on page 6. 2. By linking the cell to a specified column in the Data Spreadsheet. "How to Bind Cell Content to Data Spreadsheet .CSV" on page Copyright © 2023, Azenta, Inc.
-
Page 46: How To Create Graphic Files
100 x 100 pixels is 12.5 mm in width. Re-sizing of the graphic file needs to be done in an external program. Step Action Within the Designer window, select the Add Image button. NOTE: This places an 8 x 8 mm cell in the top left corner of the label. 1. Copyright © 2023, Azenta, Inc. - Page 47 NOTE: A visual representation of the cell size and placement is shown via the X and Y axis. 2. Select the Load button under the image header, File Explorer opens. 3. Copyright © 2023, Azenta, Inc.
-
Page 48: How To Edit Cell Content Manually
To enhance the graphic process, select Threshold from the Process drop-down menu. How to Edit Cell Content Manually Step Action 1. Select the cell you would like to edit, this includes Text, Linear Barcode, and Datamatrix cells. Copyright © 2023, Azenta, Inc. - Page 49 This is the data binding box. If linked to the database it contains a data binding command. This box shows how a text cell is displayed or what a Linear or Datamatrix cell is made up of. Copyright © 2023, Azenta, Inc.
- Page 50 5. Preparation for Printing Direct Tube Marker How to Create Label Content Part Number: 383555 Rev. A Step Action Shows on the label as: 3. Copyright © 2023, Azenta, Inc.
-
Page 51: How To Bind Cell Content To Data Spreadsheet .Csv
How to Bind Cell Content to Data Spreadsheet .CSV To link cell content to the data spreadsheet you must first have it populated with information. Please "How to Enter Data into the Direct Tube Marker Spreadsheet .CSV" on page Step Action Import a .CSV file by selecting the File tab. - Page 52 Text box within the Layout tab. Shows on the label as: 5. 6. You can repeat this process for other cells that require alternative or the same information or formatting. Copyright © 2023, Azenta, Inc.
- Page 53 7. Example: If you wish to populate one Text Cell from two or more columns, you must write the data binding codes to both columns on separate lines in the same Text Cell. Copyright © 2023, Azenta, Inc.
-
Page 54: How To Edit Cell Size And Placement
Step Action To lengthen and/or widen the cell, you can click and drag on the cell corner diamonds. 1. To widen the cell, click and drag on the center diamond. 2. Copyright © 2023, Azenta, Inc. - Page 55 To delete a cell within a label, select the cell and click the Delete button. 4. Alternatively, you can clear the label contents by going to the File tab, selecting the Label button, and then 5. selecting the New button. Copyright © 2023, Azenta, Inc.
-
Page 56: How To Save And Load Labels
5. Your label is saved and ready for the next time you need to load it. Loading a Label Should your label have already been designed, you can load a previously saved file. Copyright © 2023, Azenta, Inc. -
Page 57: How To Manually Enter Data Into Direct Tube Marker Spreadsheet .Csv
5. Once located, double-click on the file to load it. How to Manually Enter Data into Direct Tube Marker Spreadsheet .CSV Data Entry NOTE: If multiple tubes need to be printed with the same information, you only need to fill one row of information. - Page 58 NOTE: The inclusion of (D/M/Y) in row 2, col 2. 1. To delete a piece of information, simply double-click on the Data cell, highlight the text and press the 2. Delete or Backspace button on your PC keyboard. Copyright © 2023, Azenta, Inc.
- Page 59 How to Create Label Content Step Action To clear the whole Data Spreadsheet .CSV, select the File tab. 3. Select the Data button. 4. Select the New button. 5. Copyright © 2023, Azenta, Inc.
-
Page 60: How To Enter Data Into The Direct Tube Marker Spreadsheet .Csv
Marker Spreadsheet .CSV How to Enter Data into the Direct Tube Marker Spreadsheet .CSV There are two ways in which the Direct Tube Marker Data Spreadsheet .CSV can be filled: manual entry or imported from a .csv file. Each row represents an individual tube and is numbered; starting from 1. -
Page 61: How To Import Data From Microsoft® Excel Into Direct Tube Marker Spreadsheet .Csv
How to Import Data from Microsoft® Excel into Direct Tube Marker Spreadsheet .CSV Direct Tube Marker software only accepts Microsoft® Excel .CSV files. You must first save any spreadsheet as a .CSV file before importing into Direct Tube Marker. Data Entry... - Page 62 8. 9. To replace this information with another .CSV file, repeat the steps above. Select the File tab. 10. Select the Data button. 11. Select the Newtab. 12. Copyright © 2023, Azenta, Inc.
-
Page 63: How To Set The Printer Settings
How to Set the Printer Settings How to Set the Printer Settings Within the Direct Tube Marker printer tab, are three sub tabs: Settings, Firmware, and Sled. These control the settings which directly affect the hardware performance. Subtle changes can be made depending on the application to enhance productivity. - Page 64 How to Set the Printer Settings Part Number: 383555 Rev. A Step Action You can choose to use the default settings, as recommended by Azenta. To do so, tick the Preset box. Select the drop-down menu to choose from 4 options: 4ti-0686 (blue), 4ti-0688 (white), 4ti-0689 (black) 2.
-
Page 65: How To Enable Tube Lift (On/Off)
1. To enable/disable the tube lift, select the Settings tab. To enable Tube Lift, tick the Tube Lift box. 2. To disable Tube Lift, un-tick the Tube Lift box. 3. Copyright © 2023, Azenta, Inc. -
Page 66: How To Control The Sled Movement
Ensure the top cover is closed. Select the Move arrows to move the sled forward or backwards. NOTE: The ↑ moves the sled back and the ↓ to move the sled forward. 3. Copyright © 2023, Azenta, Inc. -
Page 67: How To Perform A Firmware Update
To load the latest version of firmware, select the drop-down menu and select the latest version number. 4. Select Install. Open the cover and select OK. 5. Wait for the firmware to load. 6. Copyright © 2023, Azenta, Inc. - Page 68 9. 10. The Direct Tube Marker re-connects to the PC and appears on the left-hand side of the screen. Select the Firmware tab to ensure the firmware has updated properly NOTE: If the firmware updated properly it is listed as the latest version.
-
Page 69: Printing Modes
6. Printing Modes There are three printing modes to print your tube labels. If the whole spreadsheet needs to be printed onto multiple tubes where the data varies from tube to tube, go to the Print tab, and select the All button. If only selected data is needed to print onto several tubes, go to the Print tab, then click the Selected button. -
Page 70: How To Use Print Mode - All
The Print Manager window appears and provides a live and visual representation of the label data it is waiting to print. 3. Insert a blank tube, Direct Tube Marker automatically begins to print. The Print Manager confirms this. 4. ... -
Page 71: How To Use Print Mode - Selected
The Print Manager window appears and provides a live and visual representation of the label data it is 4. waiting to print. Printing starts from the lowest numbered row. Insert a blank tube, Direct Tube Marker automatically begins to print. 5. The Print Manager confirms this. -
Page 72: How To Use Print Mode - Single
The Print Manager window appears and provides a live and visual representation of the label data it is 4. waiting to print. Insert a blank tube, Direct Tube Marker automatically begins to print. 5. The Print Manager confirms this. -
Page 73: How To Adjust The Ribbon During Print Mode
Close the cover and wait for calibration to complete. 8. Wait an additional 2 seconds for the Print Manager’s job status to update to “Waiting for blank tube.” 9. Insert tube and continue printing. Copyright © 2023, Azenta, Inc. -
Page 74: How To Print Using Multiple Printers
7. How to Print using Multiple Printers The Direct Tube Marker software can control and send label data up to 16 printers. This increases throughput and productivity whilst ensuring labels are not duplicated. Part Number: 383555 Rev. A... -
Page 75: How To Connect A Printer To Software
Below you will see that the first printer (Direct Tube Marker) is loaded with the 4ti-0689-1 (universal black) ribbon, whereas, the second printer (Direct Tube Marker) is loaded with 4ti-0686 (blue) ribbon. - Page 76 To connect a printer(s) to the software that are not connected to the software already, select the 5. Enumerate button. Previously connected printers appear with the last known name and settings. New printers appear with their default names and settings. 6. Copyright © 2023, Azenta, Inc.
-
Page 77: How To Print Using Multiple Printers
Insert blank tubes, each Direct Tube Marker automatically begins to print. The Print Manager confirms this. 3. Once those tubes have been printed onto, the Direct Tube Marker printers wait to print the next labels in 4. queue. 5. ... -
Page 78: How To Disconnect A Printer From Software
Select the printer you would like to disconnect, by selecting the Applicable tab. Select Enable, to deselect the box. 2. 3. Remove the power supply. The selected printer is now disabled. Printing starts from the connected printers. 4. Copyright © 2023, Azenta, Inc. -
Page 79: Error Messages/Troubleshooting
8. Error Messages/Troubleshooting The following chapter details possible error messages and problems that require troubleshooting on the Direct Tube Marker instrument. Part Number: 383555 Rev. A... -
Page 80: Error Messages
Power supply fault NOTE: The device might be damaged if incorrect power supply is used. Some of the electric components might have a fault. Contact Azenta at Hardware error www.azenta.com/contact-us. Some of the electric components might have a fault. Contact Azenta at Memory error www.azenta.com/contact-us. -
Page 81: Troubleshooting
The Direct Tube Marker is in power save mode. Execute software if closed, this will wake the Direct Tube Marker up and connect to the PC. Power supply connected but the display is not on Enter printing mode to end the power saving mode. - Page 82 Check that the settings are optimized for the tube chosen (See "How to Create Label The Direct Tube Marker appears to be working, but no text can be Content" on page 37) and that the ink ribbon seen on the tube surface is set correctly (See "How to Install a Ribbon...
-
Page 83: Troubleshooting - Insufficient Printing Quality
Bad quality printing at top edge If necessary, correct the position of the ribbon but remember to switch unit off first. As the print head in the Direct Tube Marker is flat, it is very sensitive to surface changes. ... -
Page 84: Appendices
The following chapter contains information regarding technical specifications for the Direct Tube Marker instrument, Direct Tube Marker accessories and ordering information, the instrument's warranty, the Direct Tube Marker shipping instruction procedures, and the Waste Electrical and the Electronic Equipment statement. -
Page 85: Appendix A: Technical Specifications
6 - 40 mm Power Supply 1000mA Operating Temperature 18° to 26°C Operating Humidity 20% to 70% relative humidity, non-condensing Storage Temperature 10° to 40°C Fuses Non customer-replaceable fuses in system Computer Interface USB 2.0 Copyright © 2023, Azenta, Inc. -
Page 86: Appendix B: Accessories - Ordering Information
For details please See "Ordering Information" on page 86, refer to our web page www.azenta.com contact Azenta at www.azenta.com/contact-us. Ordering Information NOTE: These items are included with the Direct Tube Marker (Code 4ti-0680-1). Code Description Quantity Direct Tube Marker ... - Page 87 Tube Adapter for 50 ml Tubes; hole diameter 30 mm 1 adapter 4ti-0685-4 Tube Adapter for Matrix Tubes; hole diameter 8.2 mm 1 adapter 4ti-0685-5 Tube Adapter for 0.2 ml Tubes; hole diameter 6.4 mm 1 adapter Copyright © 2023, Azenta, Inc.
-
Page 88: Appendix C: Warranty
Once returned to a Azenta designated service center, the unit will be inspected and repaired accordingly and a report provided to the customer. Azenta would expect to carry out this work and return the unit within ten working days of receiving the unit. - Page 89 Azenta Life Sciences 9. Appendices Part Number: 383555 Rev. A Appendix C: Warranty NOTE: Please contact Azenta at www.azenta.com/contact-us or your local distributor for pricing details. The warranty does not cover damage caused to the unit in shipping due to unsuitable or insufficient packaging being used.
-
Page 90: Appendix D: Shipping Instruction
Appendix D: Shipping Instruction Step Action When packing the Direct Tube Marker for shipping, you must ensure that the sled is tight up against the 1. printhead. Disconnect the instrument from the power source and turn the sled screw locking nut so that it cannot be turned anymore. -
Page 91: Appendix E: Weee Statement (European Union)
Such treatment is the most effective means of protecting the customer’s environment. The waste collection, reuse, recycling, and recovery programs available to Azenta Life Sciences customers vary by customer location. Please contact the responsible body (e.g., your laboratory manager) for information about local requirements. -
Page 92: Maintenance
10. Maintenance The following chapter details how to perform maintenance on the Direct Tube Marker instrument. Part Number: 383555 Rev. A... -
Page 93: Cleaning The Printhead
Loosen the ink ribbon by twisting the right-hand side ink ribbon roll counter-clockwise until the ink ribbon is 4. loose enough to be moved a few centimeters away from the printhead. Twist the dust collector (See "Direct Tube Marker Parts" on page 12) a little until the cleaner area is located towards the ink ribbon. ...
Need help?
Do you have a question about the Direct Tube Marker and is the answer not in the manual?
Questions and answers