Table of Contents
Advertisement
Quick Links
合格证
Wechat
Official Account
神牛微信公众号
深圳市神牛摄影器材有限公司
地址 : 深圳市宝安区福海街道塘尾社区耀川工业区厂房 2 栋
电话 : 0755-29609320(8062)
传真 : 0755-25723423
GODOX Photo Equipment Co.,Ltd.
Add.: Building 2, Yaochuan Industrial Zone, Tangwei Community, Fuhai Street,
Bao'an District, Shenzhen 518103, China
Fax: +86-755-25723423
E-mail: godox@godox.com
www. godox. com
Made in China | 705-V1PRS0-00
邮箱 : godox@godox.com
Tel: +86-755-29609320(8062)
TTL 锂电圆头机顶闪光灯
TTL Li-ion Round Head Camera Flash
使用手册
Instruction Manual
Advertisement
Table of Contents

Related Manuals for Godox V1 S Pro


Summary of Contents for Godox V1 S Pro
- Page 1 神牛微信公众号 深圳市神牛摄影器材有限公司 地址 : 深圳市宝安区福海街道塘尾社区耀川工业区厂房 2 栋 电话 : 0755-29609320(8062) 传真 : 0755-25723423 邮箱 : godox@godox.com GODOX Photo Equipment Co.,Ltd. Add.: Building 2, Yaochuan Industrial Zone, Tangwei Community, Fuhai Street, Bao'an District, Shenzhen 518103, China Tel: +86-755-29609320(8062) 使用手册 Fax: +86-755-25723423 E-mail: godox@godox.com...
- Page 2 说明书安全提示 本设备整机的保修期为一年。消耗品(如电池)、适配器、电源线等配件 不在保修范围内。 重要安全提示:本产品属于专业摄影设备,需要专业人员操作使用。 私自维修将取消保修资格,需支付维修费用。 使用时必须遵守以下基本安全预防措施: 使用前必须拆除产品上的所有运输保 请收到锂电池时及时检查电池状态、电量情况,如有任何质量问题及时在 护材料和包装。 保修期内联系神牛或神牛所授权的经销商。 使用本产品前,请仔细阅读并完全理解产品说明书,严格按照说明书中的 不当操作导致故障不在保修范围。 安全提示操作。否则,可能导致死亡、严重伤害、产品损坏或其他财产损 失的安全隐患。 本产品为专业灯具,儿童禁止使用。儿童接近时,成人必须密切监督,防 前言 止儿童碰撞灯具或私自使用灯具,造成人身伤害。 本灯具并非普通灯具,不可用于普通照明,任何有过眼部损伤或眼部敏感 感谢您购买神牛产品。 的人群均应避免使用本灯具或直视本灯具。 机顶闪光灯 V1Pro S 适用于索尼相机, 兼容 TTL 自动闪光。 使用 TTL 闪光灯, 使用时必须小心,严禁接触如闪光管等高温部件,以避免烫伤。 您将获得更简单的拍摄体验,在光线变化复杂的情况下,可以自动获得准 任何情况下均禁止将闪光灯直接对准人眼(特别是婴儿眼睛),否则短时 确的闪光曝光,拍摄轻松自如。 间内可能导致视力损伤。如感到眼睛不适,应立即关闭灯具,停止使用并 及时就医。 主要特点 严禁使用损坏的设备或配件,必须等待专业维修人员检查维修并确认设备 正常后,才可继续使用。 圆头透镜设计,实现光效均匀柔和的同时,打造更多创意的光效; 使用过程中,如果产品因跌落、挤压或强力冲击导致外壳破裂,应立即停...
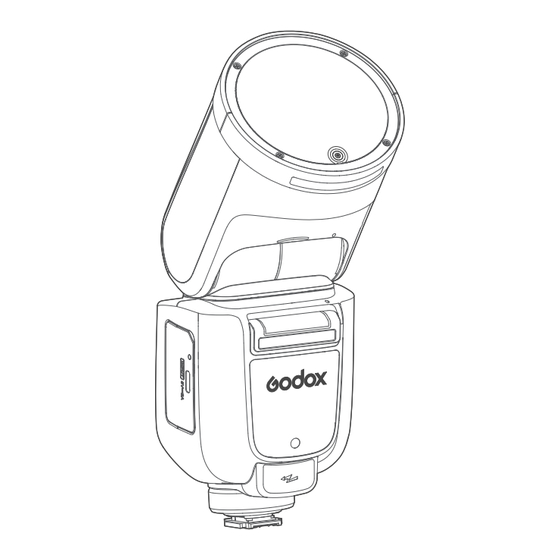
- Page 3 目录 部件名称 机身 前言 主要特点 ① 1. 闪光灯头 热靴 部件名称 2. LED 造型灯 液晶显示屏 机身 ② 3. 光控传感器 10. 热靴锁环 控制面板 4. 辅助对焦灯 11. 锂电池 分体式副闪光灯 SU-1 5. 外置闪光灯接口 12. 固定热靴扣钮 ⑤ LCD 液晶显示屏 6. 外接电源盒接口 13. USB-C 充电接口 物料清单 7.
- Page 4 分体式副闪光灯 SU-1 频闪闪光 频闪闪光 ① ① ② ① ② ② 1.MULTI: 多重(频闪)闪光 1.MULTI: 多重(频闪)闪光 1. 灯管 ③ ③ 2. 频闪闪光输出 2. 频闪闪光输出 2. 拆卸推制 ④ ④ 3. 闪光频率 3. 闪光频率 4. 闪光次数 4. 闪光次数 LCD 液晶显示屏 TTL 自动闪光 无线电传输拍摄 主控单位(2.4G 无线发射) ①...
- Page 5 可另购附件 注: 1. 离机使用时,您可以短按 MENU 按键进入菜单,将 C.Fn-STBY 设为 OFF( 关闭 )。 您可另购本公司以下摄影附件,以获得最佳的拍摄效果和使用体验。 2. 闪光灯作为从属单位时,自动关闭电源计时器出厂默认设置为 60 分钟,您 也可以短按 MENU 按键进入菜单,将 C.Fn-RX STBY 设为 30min,将自动关 闭时间改为 30 分钟。 3. 当操作按键或调节波轮时,液晶显示屏点亮。 造型灯 引闪器 X2T S 通过短按造型灯按键进入 / 退出造型灯设 置,短按设置按键打开或关闭造型灯。造 型灯打开后,旋转调节拨轮即可调节造型 灯亮度,共有 01-10 个档位。 引闪器...
- Page 6 使用分体式副闪光灯 SU-1 2. 转 动 调 节 拨 轮 设 置 闪 光 曝 光 补 偿 量。“0.3”表示 1/3 档,“0.7" 表示 2/3 与机顶闪光灯 V1S 相比,机顶闪光灯 档。要取消闪光曝光补偿,将闪光曝 V1Pro S 独特之一,增加了外接闪光灯接 光补偿量设为”0”。 口,使用分体式副闪光灯 SU-1,可以在 M 档手动闪光输出 /TTL 自动闪光输出时, 给予物体更好的补光效果,此功能常用于 人像拍摄。 3. 最后短按设置按键,确定闪光曝光 补偿值。...
- Page 7 闪光次数 ÷ 闪光频率=快门速度 2. 短按 < +/- > 按键选中闪光输出值, 接着旋转调节拨轮即可调节闪光输出 例如,如果闪光次数设为 10( 次)且闪光频率设为 5(Hz),需将快门速度设为 值,调节完毕短按设置按键完成设置。 2 秒或更长。 为防止闪光灯头过热导致损坏,请勿执行连续 10 次以上的频闪闪光。频闪闪 光 10 次后,请让闪光灯至少冷却 15 分钟。如果您执行连续 10 次以上的频闪 闪光连拍,为防止闪光灯头过热,闪光可能自动停止。如果发生了这种情况, 请让闪光灯至少冷却 15 分钟。 S1 光控单元设置 在 M 手动闪光模式下,可以使用 S1 功能,闪光灯可作为副灯使用,创造多种 照明效果, 适用于手动闪光环境。 它会与主闪光灯的第一次闪光同步触发闪光, 注:...
- Page 8 无线电传输无线设置 定位和操作范围 ( 无线闪光拍摄示例 ) 使用一个从属单元进行自动闪光拍摄 您可以切换普通闪光 / 无线闪光,使用普通闪光,请务必将无线设置设为“关”, 即界面不显示 < >。 闪光灯设置为主控单位 短按 < > 无线按键,令屏幕出现 < > 但不显示 < >。 闪光灯设置为从属单位 短按 < > 无线按键,令屏幕出现 < > 和 < >。 注: 1. 开始拍摄前请进行测试闪光和试拍。 2. 受从属单元的位置、周围环境、天气状况等影响,传输距离可能更短。 使用多个从属单元进行自动闪光拍摄 您可以将从属单元分割为两个或三个组 , 并在改变闪光光比 ( 闪光输出率 ) 的 同时进行...
- Page 9 设置 ID 3. 检查传输频道 主控单位和从属单位的无线频道需设一致,举例,主控单位频道为 01,从 为了避免信号干扰,除了改变无线通讯频道还可以通过改变无线 ID 来防止干 属单位也为 01。 扰;主控单元和从控单元设为相同的频道和无线 ID 即可。进入 C.FnID, 选择 01-99 其中任意一数无线 ID 打开,选 OFF 无线 ID 关闭。 1. 短按 MENU 按键进入菜单设置。旋 转调节拨轮至 < ID >, 短按设置按键选 中 ID 值。 4. 定位相机和闪光灯 主控单位与从属单位传输距离最大 2. 旋转调节拨轮即可调节无线 ID,范 C.Fn Ver 0.2 约...
- Page 10 2. 设置无线频闪的闪光输出、闪光次数、闪光频率 注: 1. 如果从属单元的自动关闭电源生效,按下主控单元的试闪按键可以开启从属单 短 按 < +/- > 按 键 选 中 频 闪 闪 光 输 位,请注意在相机的测光定时工作期间,无法进行测试闪光。 出,旋转调节拨轮可调节其闪光输 2. 您可以短按 MENU 按键进入 C.Fn 自定义设置,更改从属单位自动关闭电源时 间,可以将 RX STBY 调为 60min 或 30min。 出,设置完毕短按设置按键退出。 短按设置按键可选中闪光次数或闪 光频率,旋转调节拨轮可调节闪光 次数或闪光频率,设置完毕短按设 使用全自动无线闪光 置按键退出。 在主控单元上设定的闪光曝光补偿和其他设置也会在从属单元中自动设定,不...
- Page 11 神牛 2.4G 无线漏闪原因及解决办法 注: 1. 如果墙壁或天花板太远,反射闪光可能太弱并导致曝光不足。 2. 墙壁或天花板应该是平坦的、白色的,以利于高效的反射。如果反射表面不是 外部环境 2.4G 信号干扰 ( 如无线基站、2.4Gwifi 路由、蓝牙设 备等 ) 白色的,照片将出现偏色。 → 请调节引闪器的频道 CH 设置 ( 建议 +10),找到无干扰的频道来工作, 或者在工作时关闭其他 2.4G 设备。 请确认闪光灯是否已经回电或者回电速度已经跟上连拍速度 ( 闪光灯就绪 ZOOM:设置闪光覆盖范围 指示灯已经亮起 ),并且没有处于过热保护或者其他异常状态中 该闪光灯有两种变焦方式:自动变焦和手动变焦。 可以设置闪光覆盖范围以匹 →请下调闪光灯的档位,如是 TTL 模式可以尝试改为 M 模式 (TTL 模式下 配...
- Page 12 规格参数 提示: 1. 右上角“Verx.x“表示固件版本号。 2. 旋转调节拨轮可选自定义功能及其某项参数。 型号 V1Pro S 3. 短按设置按键可选自定义功能或确认某项设置。 兼容相机 索尼相机 (TTL 自动闪光 ) 4. 自定义功能设置完毕后,短按 MENU 按键返回主界面,相机可以进行拍摄。 功率 (1/1 档位 ) 76Ws 5. 进入 MENU 菜单后,长按功能按键 1<CLEAR> 直至出现“OK”,表示 C.Fn 参数 闪光覆盖范围 28 – 105 毫米 已重置完毕。 • 自动变焦 ( 自动设置适合镜头焦距和图像尺寸的 闪光覆盖范围...
- Page 13 故障排除指南 固件升级 如果遇到问题,请参阅此故障排除指南。 本产品 USB 接口为 USB-C 接口,请使用 USB-C 数据线。 产品升级固件需要 Godox G3 程序软件支持, 升级固件前请先下载安装 “Godox 闪光灯不闪光 G3 固件升级软件”再选择相应的固件文件。 闪光灯没有牢固地安装在相机上。 由于产品进行固件升级,说明书请以最新电子版为准。 →将闪光灯热靴座牢固地安装在相机上。 闪光灯和相机的电子触点变脏。 →请清洁触点。 兼容相机列表 本机可兼容以下索尼系列的相机型号: 电源自动关闭 α77II, α99, α77, DSC-RX10, α6000, α7R, α6400, α7RII, α7RIII, α7M3, α9, 当灯作为主控单元时,超过 90 秒无人操作后,自动电源关闭功能生效。...
-
Page 14: Foreword
Please check the status and power of the lithium battery upon receipt. promptly. If there are any quality issues, please contact Godox or our authorized Dot not use damaged equipment or accessories. Allow professional repair dealer within the warranty period. -
Page 15: Table Of Contents
TTL/M Mode Switch Function 16. Battery Compartment Screen Lock 17. Battery Remove Button 18. Sync Cord Jack Mode Lock 19. USB-C Upgrading Port The Reason & Solution of Not Triggering in Godox Control Panel 2.4G Wireless Other Applications Sync Triggering Modeling Flash ⑥... -
Page 16: Detachable Sub Flash
Detachable Sub Flash SU-1 Radio Transmission Shooting: Transmitter Unit (2.4G Wireless Transmitting) ② ① ⑦ ③ ① ⑧ ⑨ ④ 1. Flash Tube ② ⑩ 2. Detaching Pusher ⑤ LCD Panel ⑥ TTL Auto Flash 1. Radio Transmission Shooting 6. Group C: Receiver Unit Group C 2. -
Page 17: Power Management
Battery Then rotate it to the right until it locks Detaching battery: Installing battery: Detaching the camera flash: Press and rotate the hot shoe fixing Press and hold the battery remove Insert the battery into the battery buckle to the left until it is loosened, button, then push the battery out compartment in the direction then take off the camera flash. -
Page 18: Fec (Flash Exposure Compensation)
Flash Mode — TTL: Auto Flash 1. Press function button 2<SYNC> so that the < > icon is displayed on the In TTL mode, the camera's metering system detects the flash reflected from LCD panel. the subject and automatically adjusts the flash output so that the subject and background are evenly exposed. -
Page 19: Flash Mode - Multi: Stroboscopic Flash
Note: 1. Multi flash is most effective with a highly reflective subject against a dark Note: 1. S1 and S2 optic control triggering is only available in M manual flash mode. background. 2. Press function 3 button <S1/S2> to switch between S1/S2 optic control or turn off 2. -
Page 20: Wireless Settings
Positioning and Operation Range (Example of wireless flash Wireless Settings shooting) You can switch between normal flash and wireless flash. For normal flash shooting, be sure to set the wireless setting to “OFF”, and the < > won’t be displayed on the LCD panel. Auto Flash Shooting with One Receiver Unit Setting the Flash as A Transmitter Unit Press <... -
Page 21: Id Settings
ID Settings 2. Receiver Unit Setting Press the wireless button and the Change the wireless channels and wireless ID to avoid interference for it can <RX> is displayed on the LCD panel, only be triggered after the wireless channels and IDs of the transmitter unit then the V1Pro S wirelessly controlled and the receiver unit are set to the same. -
Page 22: M: Wireless Flash Shooting With Manual Flash
Using Automatic Wireless Flash with Multiple Receiver Units 2. Set the Flash Output of Each Flash Group Press function button <M/A/B/C > When stronger flash output or more to choose a group. Turn the select convenient lighting operation is needed, dial to set the flash output of the increase the number of receiver units group, then press the set button to... -
Page 23: Ttl/M Mode Switch Function
By pointing the flash head toward a 330° wall or ceiling, the flash will bounce off the surface before illuminating The Reason & Solution of Not Triggering in Godox the subject. This can soften shadows 2.4G Wireless behind the subject for a more natural-looking shot. -
Page 24: C.fn: Setting Custom Functions
C.Fn: Setting Custom Functions Number of flashes that will activate over-temperature protection: Press the menu button to enter C.Fn settings. Power Output Level Number of Flashes Custom Function Signs Function Options Settings & Description 1/2 (+0.1~+0.9) m/ft Distance indicator 1/4(+0.1~+0.9) Feet 1/8(+0.1~+0.9) AF-assist beam... -
Page 25: Technical Data
USB-C cable (sold separately). Recycle Time Approx. 1.3 seconds. Green LED indicator will light 2. As the firmware upgrade needs the support of Godox G3 software, please up when the flash is ready. download and install the "Godox G3 firmware upgrade software" before Number of Flashes at 1/1 Approx. - Page 26 Maximum EIRP Power: -10.82dBm 使用过程中正常的脱色,磨损和消耗,不是保修范围内的故障。 Declaration of Conformity GODOX Photo Equipment Co.,Ltd. hereby declares that this equipment are in 产品保修 compliance with the essential requirements and other relevant provisions of Directive 2014/53/EU. In accordance with Article 10(2) and Article 10(10), this 产品的保修期和服务类型按以下《产品保修信息》执行:...
- Page 27 If maintenance service is needed, you can directly contact the product distributor or authorized service institutions. You can also contact the Godox after-sale service call and we will offer you service. When applying for maintenance service, you should provide valid warranty card. If you cannot...
Need help?
Do you have a question about the V1 S Pro and is the answer not in the manual?
Questions and answers