
Related Manuals for Optimum KR-K55RCL-10dkh


Summary of Contents for Optimum KR-K55RCL-10dkh
- Page 1 K5065-109L55BC-IB-K01 Color: black and white 双铜 This page is not for printing!
- Page 2 BEDIENUNGSANLEITUNG HANDLEIDING MANUEL DÌNSTRUCTIONS INSTRUCTION MANUAL MANUALE DI ISTRUZIONI INSTRUKCJA OBSLUGI MANUAL DE INSTRUCCIONES Model NO.: KR-K55RCL-10dkh...
- Page 4 OptimumX MINI-OFEN BEDIENUNGSANLEITUNG Modell: KR-K55RCL-10dkh Bitte lesen Sie diese Bedienungsanleitung vor dem Gebrauch sorgfältig durch. NUR FÜ R DEN GEBRAUCH IM HAUSHALT...
-
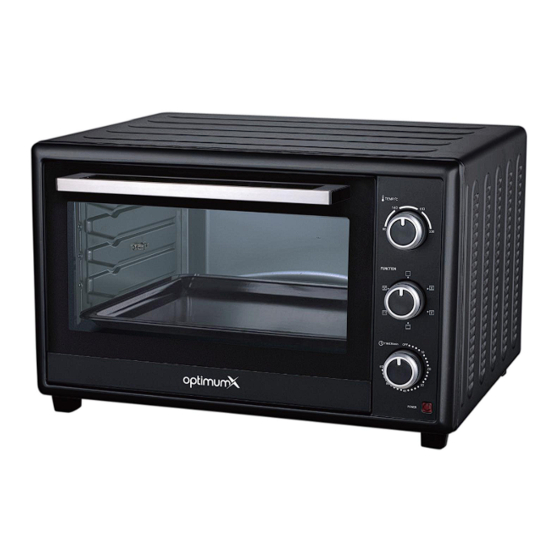
Page 5: Bezeichnung Der Teile
BEZEICHNUNG DER TEILE 1. Türgriff 9. Kontrollleuchte 2. Glastür 10. Ofenfüße 3. Heizelement 11. Gitter 4. Röhre 12. Backblech 5. Ofenkörper 13. Hebegriff 6. Hitzeregler 14. Drehspieß 7. Auswahlknopf 15. Grillspießheber 8. Zeitschalter PARAMETERDATEN MODELL-NR. KR-K55RCL-10dkh STROMVERSORGUNG 220-240V 50/60Hz LEISTUNG 2200 W... - Page 6 WARNHINWEISE Verwenden Sie immer den beiliegenden Griff, wenn Sie das Blech herausnehmen. Kontakt mit heißen Blech kann schweren Verbrennungen führen. Im heißen Zustand kein Wasser auf die Glasscheibe auftragen. Dies kann Glasbruch führen. Ziehen Sie das Stromkabel nur durch festhalten des Steckerkopfes ab.
- Page 7 Beim Zubereiten von Gerichten wie Brathä hnchen, die Ö lspritzer verursachen kö nnen, wird empfohlen, 2 Schichten Aluminiumfolie auf das Blech zu legen, um Ö lspritzer zu verringern. Legen Sie eine davon auf das Blech. So tropft das Ö l in die Lü cke zwischen den Folien.
- Page 8 Hinweis: Seien vorsichtig, wenn Flüssigkeiten entnehmen. Fachstü tzen Sie können das Blech an 4 verschiedenen Positionen einführen, je nachdem, welche Art Gerichte Sie kochen möchten. Wenn Sie zum Beispiel Makkaroni-Gratin zubereiten und es gut überbacken haben möchten, verwenden Sie die obere oder die zweite Fachstütze.
- Page 9 Drehspieß-Funktion Zur Verwendung Grill-Gabeln Grill-Gabeln installieren Mit dieser Funktion wird ein gleichmäßiges Garen ermöglicht. Drehspießgabeln können Gerichte bis 3 Kilogramm tragen. Links Rechts Grill-Gabeln installieren Grill-Gabeln entfernen Drehspieß-Griff Nehmen Sie mit dem Bringen Sie die Drehspießgriff die Grill-Gabeln an den Drehspießgabeln aus der Bitte verwenden vorgesehenen Öffnungen...
- Page 10 Funktionskontrolle TEMP/ C Stellen Sie den „Temperaturregler“ ein, indem Sie ihn im Uhrzeigersinn drehen, um die geeignete Temperatur entsprechend den Gerichten auszuwählen, die Sie zubereiten möchten. (Temperaturregelung von 90C bis 230C) Temperaturregler Um den Ofen zu STOPPEN FUNCTION (STOP / OFF) Obere und untere Heizung + Umluftfunktion Obere Heizung +...
- Page 11 1 . Stellen Sie den Zeiger auf dem „ Timer“ TIMER/min auf die entsprechende Garzeit (Minuten) der Gerichten, die Sie zubereiten möchten. 2 . Stellen Sie den „ Timer“ ein, indem Sie ihn im Uhrzeigersinn drehen. Der Ofen schaltet sich nach Ablauf der gewählten Zeit automatisch aus und ein akustischer Ton ertönt.
- Page 12 REFERENZEN FÜR ÜBLICHE GERICHTE Anzahl oder Dicke Temperatur ( ) Timer«(min.) Gericht Sandwich 2-3 St. Toast 2-4 St. Hamburger 2-3 St. Fisch 7-10 7 -12 Schinken 2 cm Würstchen 3-4 St. 200-230 8-10 20–30 Kuchen Steak 1-2 cm 10-15 Brathähnch Halbes Hühnchen 175-200 30–40...
- Page 13 Heizung- Bedienungsschalter Wählen Sie " Oben" oder " Oben und Unten" entsprechend der Gerichte, die Sie zubereiten möchten. Sie können den Betrieb der Heizungen kontrollieren, indem Sie die vordere Kontrollleuchte prüfen. 1. Stellen Sie den Pfeil auf dem ”Timer“ auf die Garzeit (Minuten) entsprechend den Gerichten, die Sie zubereiten möchten.
- Page 14 Stellen Sie während des Gebrauchs nichts auf den Ofen, da die Hitze zu Verformungen, Rissen usw. führen kann. Jegliche Lebensmittel in Flaschen oder Dosen können nicht direkt erhitzt werden, da sonst die Flasche oder Dose bersten und die Person sich verbrühen kann. Vorsicht! Vermeiden Sie während des Gebrauchs oder sofort nach dem Gebrauch Verbrennungen.
-
Page 15: Wichtige Sicherheitshinweise
WICHTIGE SICHERHEITSHINWEISE Bitte beachten nachstehenden Sicherheitshinweise: 1. Lesen Sie alle Anweisungen sorgfältig durch. Berühren keine heißen Flächen. Verwenden Sie Griffe oder Schaltknöpfe. Tauchen gegen Gefahr Stromschlägen Kabel, Stecker Hauptgerät nicht in Wasser oder eine andere Flüssigkeit. 4. Kinder nie unbeaufsichtigt lassen, wenn das Gerät in Betrieb ist. - Page 16 9 . Die Verwendung von Zubehörteilen, die vom Gerätehersteller nicht empfohlen oder verkauft werden, kann Gefahren verursachen. 1 0 . Nicht im Freien verwenden. 1 1 . Lassen Sie das Kabel nicht über den Tischrand oder einer Ablage hä ngen und vermeiden Sie dessen Kontakt mit heiß...
- Page 17 für ihre Sicherheit verantwortliche Person unterwiesen. Kinder sollten beaufsichtigt werden, um zu verhindern, dass sie mit dem Gerät spielen. 18.Das Gerät ist nicht für die Verwendung mit einem externen Timer oder separaten Fernbedienungssystem vorgesehen. 19.Dieses Gerät für privaten Haushaltsgebrauch bestimmt. 20.Keine durch den Nutzer zu wartenden Teile.
- Page 18 unterwiesen wurden daraus resultierenden Gefahren verstanden haben. Gerät darf Kindern dann gereinigt oder gewartet werden, wenn diese älter als 8 Jahre sind und beaufsichtigt werden. Dieses Gerät zugehöriges Kabel müssen außerhalb der Reichweite Kindern unter Jahren aufbewahrt werden. Warnung: Nicht in Wasser oder andere Flüssigkeiten tauchen.
- Page 19 ACHTEN SIE AUF KINDER Dieses Gerät darf nicht von Personen (einschließlich Kinder) mit eingeschränkten physischen, sensorischen oder geistigen Fähigkeiten bzw. von Personen mit fehlender Erfahrung bzw. fehlendem Wissen verwendet werden, es sei denn, diese werden beaufsichtigt oder wurden im Gebrauch des Gerätes durch eine für ihre Sicherheit verantwortliche Person unterwiesen.
- Page 20 OptimumX Mini oven HANDLEIDING Model: KR-K55RCL-10dkh Lees deze handleiding zorgvuldig door voor gebruik. ALLEEN VOOR HUISHOUDELIJK GEBRUIK...
- Page 21 2. Glazen deur 10. Ovenvoeten 3. Verwarmingselement 11. Rooster 4. Holte 12. Bakplaat 5. Huisvesting 13. Handvat van dienblad 6. Temperatuurknop 14. Rotisserievork en schacht 7. Selecteer knop 15. Hanteer de rotisserievork 8. Timerknop PARAMETERGEGEVENS KR-K55RCL-10dkh MODELNR. 220-240V 50/60Hz STROOMVOORZIENING 2200W STROOMVERBRUIK...
- Page 22 WAARSCHUWINGEN Gebruik altijd de handgreep van de bakplaat wanneer deze oven haalt. Aanraking hiervan veroorzaakt ernstige brandwonden. Raak het glas niet aan met water als het heet is. Hierdoor kan het glas breken. Houd bij het losmaken van de kabel altijd de stekker zelf met uw hand vast.
- Page 23 Bij het bereiden van oliespetterende gerechten, zoals gebraden kip, wordt aanbevolen om 2 blad aluminiumfolie op een bakplaat te leggen om oliespatten te verminderen. Leg er een op een bakplaat. Dan druppelt er olie in een opening tussen de folies. GEBRUIK INDICATIE Speciale indicatie:...
- Page 24 Rek ondersteuning U kunt de tray op 4 verschillende standen zetten, afhankelijk van de gerechten die u wilt bereiden. Als u bijvoorbeeld gegratineerde pasta maakt en wilt dat de bovenkant meest gaart, gebruikt u de bovenste of de tweede stand. Gebruik voor het braden van een kip de onderste rek.
- Page 25 Rotisserie-functie Gebruiken met Rotisserie vorken Installeer Rotisserie-vorken Met deze functie wordt zelfs bakken verzorgd. Rotisserie-vorken kunnen voedsel van minder dan 3 kilogram dragen. Links rechts Installeer Rotisserie- Rotisserie-vorken Rotisserie handvat vorken verwijderen Gebruik de handgreep van Installeer de Rotisserie- draaispit vorken in het rotisserie-gat draaispitvorken Gebruik altijd de...
- Page 26 FUNCTION De oven stoppen (STOP / UIT) Boven-/onderwarmte + Heteluchtfunctie Bovenwarmte + Heteluchtfunctie Boven-/onderwarmte Functie Controle Functie bovenwarmte + Selecteer geschikte draaispit verwarmingselement Boven-/onderwarmte + volgens de gerechten die Heteluchtfunctie + u gaat bereiden. draaispitfunctie 1 . Zet de pijl op de" Timer” naar het cijfer TIMER/min dat de bereidingstijd ( minuten) aangeeft volgens...
- Page 27 Was bij het schoonmaken de binnen- en buitenkant, de bakplaat, het rooster en de handgreep van de bakplaat met zacht katoen (of spons) met een neutraal schoonmaakmiddel. Daarna afspoelen met schoon water. Gebruik geen harde borstel of iets anders om te wassen om de binnenkant van de oven niet te beschadigen en om de bakplaat, het rooster en de handgreep van de bakplaat te beschermen.
- Page 28 Opmerking: In het begin kan er wat rook en een brandlucht ontstaan, maar dit is geen storing. Draaiknop voor temperatuurregeling Stel de temperatuurregelaar in op de gerechten die u gaat bereiden Warmte- bedrijfsschakelaar Selecteer " bovenste" of " bovenste en onderste" afhankelijk van de gerechten die u gaat koken.
- Page 29 WAARSCHUWINGEN Als de oven te dicht bij een muur staat, zal de muur worden verbrand of bevuild. Zorg ervoor dat het gordijn enz. niet in dichtbij komt met de oven. Plaats niets tussen de bodem van de oven en het oppervlak waarop deze staat;...
-
Page 30: Belangrijke Veiligheidsmaatregelen
BELANGRIJKE VEILIGHEIDSMAATREGELEN Volg de basisveiligheidsmaatregelen, waaronder: Lees alle instructies. Raak geen hete oppervlakken aan. Gebruik handgrepen of knoppen. Dompel het snoer, de stekker of de kookunit niet onder in water of een andere vloeistof om risico op elektrische schokken te voorkomen. Nauwlettend toezicht is noodzakelijk wanneer een apparaat door of in de buurt van kinderen wordt gebruikt. - Page 31 Het gebruik van hulpstukken die niet worden aanbevolen of verkocht door de fabrikant van het apparaat, gevaar opleveren. Niet buitenshuis gebruiken. Laat het snoer niet over de rand van een tafel of aanrecht hangen of in aanraking komen met hete oppervlakken. Niet op of in de buurt van een hete gas- of elektrische brander plaatsen, of in een verwarmde oven.
- Page 32 Dit apparaat is niet bedoeld om te worden bediend door middel van een externe timer of een afzonderlijk afstandsbedieningssysteem. apparaat alleen voor huishoudelijk gebruik. Geen onderdelen die door de gebruiker kunnen worden onderhouden. Laat onderhoud over aan gekwalificeerd onderhoudspersoneel. Er wordt een kort stroomsnoer meegeleverd om de gevaren van verstrikking of struikelen over een lang snoer te verminderen.
- Page 33 LET OP VOOR KINDEREN Dit apparaat is niet bedoeld voor gebruik door personen ( inclusief kinderen) met verminderde lichamelijke, zintuiglijke of geestelijke vermogens, of gebrek aan ervaring en kennis, tenzij ze onder toezicht staan of instructies hebben gekregen over het gebruik van het apparaat door een persoon die verantwoordelijk is voor hun veiligheid.
-
Page 34: Manuel D'instructions
OptimumX MINI FOUR MANUEL D'INSTRUCTIONS Mod le : KR-K55RCL-10dkh Veuillez lire attentivement ce manuel avant de l'utiliser. USAGE DOMESTIQUE UNIQUEMENT... -
Page 35: Identification Des Pièces
13. Poignée du plateau 14. Fourche et arbre de la 6. Bouton du thermostat rôtissoire 15. Manipuler la fourchette de 7. Bouton de sélection la rôtissoire 8. Bouton de temps PARAMÈTRE DONNÉES MODÈLE NO. KR-K55RCL-10dkh ALIMENTATION ÉLECTRIQUE 220-240V 50/60Hz CONSOMMATION D'ÉNERGIE 2200W... - Page 36 PRÉCAUTIONS Utilisez toujours la poignée du plateau lorsque vous insérez ou retirez le plateau. Leur contact peut provoquer de graves brûlures. Lorsqu' il fait chaud, n'appliquez pas d'eau sur la vitre. Le verre risque de se briser. Lorsque vous débranchez le cordon, tenez toujours la fiche elle- même.
- Page 37 Lors de la cuisson de plats à éclaboussures d'huile tels que le poulet rôti, il est recommandé de placer deux feuilles d' aluminium sur un plateau afin de réduire les éclaboussures d' huile. Mettez- en un sur un plateau. L' huile s' égoutte alors dans un espace entre les feuilles.
- Page 38 Remarque: Soyez prudent lorsque vous retirez du pudding ou d' autres liquides chauds. Support de rack Vous pouvez régler le plateau sur 4 positions différentes en fonction des plats que vous souhaitez cuisiner. exemple, lorsque vous préparez un gratin de macaronis et que vous souhaitez que la partie supérieure soit la plus cuite, utilisez le support de la grille...
- Page 39 Fonction rôtisserie A utiliser avec les fourchettes de rôtisserie Installation des fourches de rôtisserie Cette fonction permet d'obtenir une cuisson Gauche Droite homogène. Les fourches à rôtisserie peuvent transporter des aliments de moins de 3 kilogrammes. Installation des fourches Retirer les fourches de la Poignée de de rôtisserie rôtisserie...
- Page 40 Contrô le fonctionnel Réglez la "Commande de température" en tournant dans le sens des aiguilles d'une montre pour sélectionner la température appropriée en fonction des plats vous allez cuisiner. (Commande de température allant de 9 0 ° C à 2 3 0 ° C) . Contrôle de la température FUNCTION Arrêt du four (STOP / ARRÊT)
-
Page 41: Méthode De Nettoyage
four est allumé ou non en de 6 minutes, puis revenez à la durée observant le voyant avant. sélectionnée. 3. Le four peut être éteint manuellement pendant la cuisson en tournant la "minuterie" dans le sens inverse des aiguilles d'une montre jusqu'à la position "ARRÊT". -
Page 42: Instructions D'utilisation
INSTRUCTIONS D'UTILISATION Avant d'utiliser l'appareil pour la première fois : Chauffer le four vide. ( 1 ) Insérer la plaque de cuisson et la grille. ( 2 ) Placez commutateur fonctionnement chauffage " HAUT ET BAS" , ré glez le cadran de contrô le de la tempé... - Page 43 3. Le four peut être éteint manuellement pendant la cuisson en tournant la minuterie dans le sens inverse des aiguilles d'une montre jusqu'à la position "ARRÊT". Remarque : Si l'intérieur du four est sale, la cuisson peut prendre un peu plus de temps que d'habitude.
- Page 44 L'alimentation en courant alternatif doit provenir d'une prise de courant correctement câblée. Insérer complètement la fiche dans la prise. Si ce n'est pas le cas, il risque de devenir anormalement chaud. Ne pas utiliser de prise de courant. Ne jamais brancher plusieurs fiches sur la même prise. AVERTISSEMENT : Si le cordon d'alimentation est endommagé, il doit être remplacé...
- Page 45 Débranchez l'appareil lorsqu'il n'est pas utilisé et avant de le nettoyer. Laissez refroidir avant de mettre ou de retirer des pièces et avant de nettoyer l' appareil. Ne pas faire fonctionner un appareil dont le cordon ou la fiche est endommagé(e) ou après un dysfonctionnement de l'appareil, une chute ou un dommage quelconque.
- Page 46 Cet appareil n'est pas destiné à être utilisé par des personnes (y compris des enfants) dont les capacités physiques, sensorielles ou mentales sont réduites, ou qui manquent d' expérience et de connaissances, à moins qu'elles n'aient bénéficier d'une surveillance d'instructions concernant l'utilisation de l'appareil de la part d'une personne responsable de leur sécurité.
- Page 47 surveillance instructions concernant l'utilisation de l' appareil en toute sécurité et qu' elles comprennent les risques encourus. Le nettoyage et l' entretien par l' utilisateur ne doivent pas être effectués par des enfants, sauf s'ils ont plus de 8 ans et sont supervisés. Cet appareil et son cordon doivent être tenus hors de portée des enfants de moins de 8 ans.
- Page 48 PRUDENCE POUR LES ENFANTS Cet appareil n'est pas destiné à être utilisé par des personnes (y compris des enfants) dont les capacités physiques, sensorielles ou mentales sont réduites, ou qui manquent d'expérience et de connaissances, à moins qu'elles n'aient pu bénéficier d'une surveillance ou d'instructions concernant l'utilisation de l'appareil de la part d'une personne responsable de leur sé...
- Page 49 OptimumX MINI OVEN INSTRUCTION MANUAL Model: KR-K55RCL-10dkh Please read this manual carefully before use. HOUSEHOLD USE ONLY...
-
Page 50: Parts Identification
4. Cavity 12. Bake tray 5. Housing 13. Tray handle 6. Thermostat knob 14. Rotisserie fork & shaft 7. Select knob 15. Handle rotisserie fork 8. Time knob PARAMETER DATA KR-K55RCL-10dkh MODEL NO. 220-240V 50/60Hz POWER SUPPLY POWER CONSUME 2200W... - Page 51 CAUTIONS Always use the tray handle when inserting removing the tray. Touching these will cause severe burns. When hot, do not apply water to the glass window. It may cause the glass to break. When unplugging the cord, always take hold of the plug itself.
-
Page 52: Use Indication
When cooking oil-splashing dishes such as roast chicken, it is recommended to put 2 sheets of aluminum foils on a tray in order to diminish oil splashing. Put one on a tray. Then oil will drip to a gap between foils. USE INDICATION Special indication: the parts and accessory varies from different models. - Page 53 Rack Support You can adjust the Tray at 4 different positions according to the dishes you want to cook. For instance, when making macaroni gratin and you want to have the top part cooked the most, use the top or the second rack support.
- Page 54 Rotisserie Function Use with Rotisserie Forks Install Rotisserie Forks With this function, even baking will be provided. Left Right Rotisserie forks can carry food under 3 kilograms. Install Rotisserie Forks Remove Rotisserie Forks Rotisserie Handle Use Rotisserie Handle to Install the Rotisserie Forks take out the Rotisserie to the rotisserie hole, and Forks from the rotisserie...
-
Page 55: Method Of Cleaning
FUNCTION To stop the oven (STOP / OFF) Upper & Lower Heating + Convection Function Upper Heating + Convection Function Upper & Lower Heating Function Control Upper Heating + Rotisserie Select the suitable heating Function element according to the Upper & Lower Heating + dishes you are going to Convection Function + cook... -
Page 56: Baking Reference Of Common Food
When cleaning, wash the interior and exterior surface, bake tray, wire rack and tray handle with soft cotton (or sponge) with neutral cleaner. Then wash with clean water. Do not use hard brush or any others to wash, so as not to scrape the interior surface of the oven, and to protector of the bake tray, the wire rack and the tray handle. - Page 57 Note: There may be some smoke and a burning smell at first, but this is not a malfunction. Temperature control dial Set the Temperature Control Dial for the dishes which you are going to cook. Heat Operating Switch Select “upper” or "Upper and Lower" according to the dishes you are going to cook.
- Page 58 CAUTIONS If the oven is positioned to close to a wall, the wall will be burned or stained. Be sure the curtain, etc. are not in contact with the body. Do not put anything between the bottom of the body and the surface on which it is set, an object so placed could be burned.
-
Page 59: Important Safeguards
IMPORTANT SAFEGUARDS Follow basic safety precautions, including: Read all instructions. Do not touch hot surfaces. Use handles or knobs. To protect against risk of electrical shock, do not immerse cord, plugs or cooking unit in water or other liquid. Close supervision necessary when... - Page 60 Extreme caution must be used when moving an appliance containing other substances. To disconnect, remove plug from wall outlet. appliance other than intended use. If the external flexible cable or cord of this appliance is damaged, it shall be exclusively replaced by the manufacture or his service agent or a similar qualified person in order to avoid a hazard.
- Page 61 allowed to drape over the counter or tabletop where it can be pulled by children or tripped over. 21. This appliance can be used by children aged from 8 year and above and persons with reduced physical, sensory, or mental capabilities or lack of experience and knowledge if they...
-
Page 62: Special Warning
CAUTION FOR CHILDREN This appliance is not intended for use by persons (including children) with reduced physical, sensory or mental capabilities, or lack of experience and knowledge, unless they have been given supervision or instruction concerning use of the appliance by a person responsible for their safety. -
Page 63: Manuale Di Istruzioni
FORNO A LEGNA MANUALE DI ISTRUZIONI Modello: KR-K55RCL-10dkh Leggere attentamente questo manuale prima dell'uso. SOLO PER USO DOMESTICO... -
Page 64: Identificazione Delle Parti
14. Forcella e albero del girarrosto 15. Forchetta per girarrosto con 7. Manopola di selezione impugnatura 8. Manopola del tempo DATI PARAMETRI MODELLO N. KR-K55RCL-10dkh 2 2 0 - 2 4 0 V 5 0 / 6 0 H z ALIMENTAZIONE CONSUMO DI ENERGIA 2200W... - Page 65 ATTENZIONE Per inserire e rimuovere il vassoio, utilizzare sempre la maniglia del vassoio. Il loro contatto può causare gravi ustioni. Quando è caldo, non applicare acqua al vetro della finestra. Il vetro potrebbe rompersi. Quando si scollega il cavo, afferrare sempre la spina stessa.
- Page 66 Quando si cucinano piatti che spruzzano olio, come il pollo arrosto, si consiglia di mettere 2 fogli di alluminio su un vassoio per diminuire gli schizzi d' olio. Mettetene uno su un vassoio. In questo modo l'olio coler à fessura fogli.
- Page 67 Supporto per rack È possibile regolare il vassoio in 4 posizioni diverse a seconda delle pietanze che si desidera cucinare. Ad esempio, quando preparano maccheroni gratinati e si desidera che la parte superiore sia pi ù cotta, utilizzare il supporto superiore o il secondo.
- Page 68 Installare le forchette del Rimuovere le forchette del Maniglia del girarrosto girarrosto girarrosto Utilizzare la maniglia del Utilizzare sempre Installare le forchette del girarrosto per estrarre le girarrosto foro la maniglia del forchette del girarrosto dal girarrosto, quindi girarrosto vassoio girarrosto, posizionarle sul vassoio estrarre...
- Page 69 Per arrestare il forno (STOP / FUNCTION OFF) Riscaldamento superiore e inferiore + funzione di convezione Riscaldamento superiore + funzione di convezione Riscaldamento superiore e inferiore Controllo della funzione Riscaldamento superiore + Selezionare l'elemento funzione girarrosto riscaldante adatto in base alle Riscaldamento superiore e pietanze intende...
- Page 70 Per la pulizia, lavare la superficie interna ed esterna, la teglia, la griglia e il manico della teglia con un cotone morbido (o una spugna) e un detergente neutro. Quindi lavare con acqua pulita. Non utilizzare spazzole dure o altro per lavare, in modo da non graffiare la superficie interna del forno e la protezione della teglia, della griglia e del manico della teglia.
- Page 71 Nota: All' inizio possono verificarsi fumo e odore di bruciato, ma non si tratta di un malfunzionamento. Quadrante di controllo della temperatura Impostare la manopola di regolazione della temperatura in base alle pietanze che si intende cucinare. Interruttore di funzionamento del calore Selezionare "...
- Page 72 ATTENZIONE: Se il forno è posizionato troppo vicino a una parete, quest' ultima si brucia o si macchia. Assicurarsi che le tende, ecc. non siano a contatto con il corpo. Non mettere nulla tra la parte inferiore del corpo e la superficie su cui è...
- Page 73 IMPORTANTI SALVAGUARDIE Seguire le precauzioni di sicurezza di base, tra cui: Leggere tutte le istruzioni. toccare superfici calde. Utilizzare maniglie o manopole. Per evitare il rischio di scosse elettriche, non immergere il cavo, le spine o l' unità di cottura in acqua o altri liquidi.
- Page 74 Non lasciare che il cavo penda oltre il bordo di un tavolo o di un bancone e non toccare superfici calde. Non collocare su o vicino a un bruciatore a gas o elettrico caldo o in un forno riscaldato. Quando si sposta un apparecchio contenente olio caldo altre...
- Page 75 All'interno non ci sono parti riparabili dall'utente. Rivolgersi a personale di assistenza qualificato. Il cavo di alimentazione è corto per ridurre i rischi di impigliamento o di inciampo in un cavo lungo. È possibile utilizzare una prolunga con cautela, ma la potenza elettrica indicata deve essere almeno pari a quella dell' apparecchio.
- Page 76 ATTENZIONE PER I BAMBINI Questo apparecchio non è destinato all'uso da parte di persone (compresi i bambini) con ridotte capacit à fisiche, sensoriali o mentali, o con mancanza di esperienza e conoscenza, a meno che abbiano ricevuto supervisione istruzioni sull'uso dell'apparecchio da parte di una persona responsabile della loro sicurezza.
-
Page 77: Instrukcja Obsługi
KUCHENKA MIKROFALOWA INSTRUKCJA OBSŁUGI Model: KR-K55RCL-10dkh Przed uzyciem nalezy dokł adnie przeczytac niniejsz? instrukcje TYLKO DO UŻ YTKU DOMOWEGO... - Page 78 12. Stojak z drutu 5. Mieszkanie 13. Blacha do pieczenia 6. Pokrętło termostatu 14. Widełki i wałek rożna 7. Pokrętło wyboru 15. Ręczny widelec do rożna 8. Pokrętło czasu DANE PARAMETRU KR-K55RCL-10dkh WZÓ R NR. 220-240V 50/60Hz ZASILANIE ZUŻYCIE ENERGII 2200W...
- Page 79 UWAGI Podczas wkładania i wyjmowania tacy należy zawsze używać uchwytu tacki. Dotknięcie ich spowoduje poważne poparzenia. Gdy jest gorąco, nie należy przykładać wody do szklanej szyby. Może to spowodować pęknięcie szyby. Podczas odłączania przewodu należy zawsze chwytać za samą wtyczkę. Nigdy nie należy ciągnąć...
- Page 80 Podczas gotowania potraw pryskaj ą cych olejem, takich jak pieczony kurczak, zaleca si ę umieszczenie 2 arkuszy folii aluminiowej na tacy, aby zmniejszyć rozpryskiwanie oleju. Połóż jedną na tacy. Wtedy olej będzie ściekał do szczeliny między foliami. OZNACZENIE ZASTOSOWANIA Specjalna wskazówka: części i akcesoria różnią się od różnych modeli.
- Page 81 Wsparcie dla stojaków Możesz ustawić tacę w 4 różnych pozycjach w zależności od potraw, kt óre chcesz ugotować. Na przykład, gdy przygotowujesz macaroni gratin i chcesz, aby g ó rna cz ę ś ć by ł a najbardziej ugotowana, użyj górnej lub drugiej podp ó...
- Page 82 Funkcja rożna Stosować z widelcami do rożna Zainstaluj widły rożna Dzi ę ki tej funkcji zapewnione b ę dzie równomierne pieczenie. Z lewej strony Widelce do rożna mogą przenosić Prawo ż ywno ś ć o wadze poni ż ej 3 kilogramów.
- Page 83 Aby zatrzymać piekarnik FUNCTION (STOP / OFF) Górne i dolne ogrzewanie + funkcja konwekcji Ogrzewanie g rne + funkcja ó konwekcji G rne i dolne ogrzewanie ó Kontrola funkcji G rne ogrzewanie + funkcja roż ó Wybierz odpowiedni element grzewczy w zależ G rne i dolne ogrzewanie + no ś...
- Page 84 Podczas czyszczenia należy umyć wewnętrzną i zewn ę trzn ą powierzchni ę , blach ę do pieczenia, druciany stojak i uchwyt tacy miękką bawełną (lub g ąbką) z neutralnym środkiem czyszczącym. Nastę pnie spłukać czystą wodą. Nie używać twardej szczotki ani żadnych innych środków do mycia, aby nie zarysować...
- Page 85 Uwaga: Na początku może pojawić się trochę dymu i zapach spalenizny, ale nie jest to usterka. Pokrętło regulacji temperatury Ustawić pokrętło regulacji temperatury dla potraw, które mają być Gotowane Przełącznik ogrzewania Wybrać "UPPER" lub "UPPER & LOWER" w zależności od potraw, które zamierzają...
- Page 86 UWAGI Je ś li piekarnik zostanie ustawiony zbyt blisko ściany, ściana zostanie spalona lub poplamiona. Upewnij się, że zasłona itp. nie styka si ę z korpusem. Nie umieszczaj niczego pomi ę dzy spodem korpusu a powierzchni ą , na kt ó rej jest ustawiony, przedmiot umieszczony w ten sposób może ulec spaleniu Nie kładź...
- Page 87 OSTRZEŻENIE: Je ś li przewó d zasilaj ą cy jest uszkodzony, producent lub jego przedstawiciel serwisowy lub podobnie wykwalifikowana osoba w celu uniknięcia zagrożenia musi go wymienić. WAŻNE ZABEZPIECZENIA Przestrzegaj podstawowych środków ostrożności, w tym: Przeczytaj wszystkie instrukcje. Nie należy dotykać gorących powierzchni. Używaj uchwytów lub gałek.
- Page 88 Nie wolno dopuścić, aby przewód zwisał nad krawędzią stołu lub lady, ani dotykał gorących powierzchni. Nie umieszczać na lub w pobliżu gorących palników gazowych elektrycznych, nagrzanym piekarniku. Podczas przenoszenia urządzenia zawierającego gorący olej lub inne gorące substancje należy zachować szczególną ostrożnoś ć. Aby odłączyć, należy wyjąć...
- Page 89 To urz ą dzenie jest przeznaczone wy ł ą cznie do u ż ytku domowego. Wewnątrz nie ma części nadających się do naprawy przez uż ytkownika. Serwisowanie należy powierzyć wykwalifikowanym pracownikom serwisu. Krótki przewód zasilający jest dostarczany w celu zmniejszenia zagrożeń wynikających z zaplątania się lub potknięcia o długi przewód.
- Page 90 OSTROŻNOŚĆ DLA DZIECI Urządzenie nie jest przeznaczone do użytku przez osoby (w tym dzieci) o ograniczonych możliwościach fizycznych, sensorycznych lub umysłowych, lub osoby nieposiadające doświadczenia i wiedzy, chyba że osoby te otrzymały nadzór lub instrukcje dotyczące uż ytkowania urządzenia od osoby odpowiedzialnej za ich bezpieczeń stwo.
- Page 91 HORNO TOSTADOR MANUAL DE INSTRUCCIONES Modelo: KR-K55RCL-10dkh Lea atentamente este manual antes de utilizarlo SÓLO PARA USO DOMÉSTICO...
-
Page 92: Identificación De Piezas
14. Horquilla y eje del asador 7. Botón de selección 15. Mango horquilla asador 8. Botón del tiempo DATOS DE PARÁMETROS KR-K55RCL-10dkh MODELO NO. 2 2 0 - 2 4 0 V 5 0 / 6 0 H z FUENTE DE ALIMENTACIÓN 2200W... - Page 93 PRECAUCIONES Utilice siempre el asa de la bandeja al introducirla y extraerla. Tocarlas provocar á quemaduras graves. Cuando esté caliente, no aplique agua al cristal. Podrí a romper el cristal. Al desenchufar el cable, sujete siempre el propio enchufe. Nunca tire del cable. Podr í a romper los alambres del interior del cable No coloque la unidad cerca de un quemador de gas u otra fuente de alta temperatura ni dirija un...
-
Page 94: Indicación De Uso
Cuando cocine platos que salpiquen aceite, como pollo asado, se recomienda poner 2 hojas de papel de aluminio en una bandeja para disminuir las salpicaduras de aceite. Ponga una en la bandeja. Así , el aceite goteará a un hueco entre las láminas. INDICACIÓN DE USO Indicación especial: las piezas y accesorios varí... - Page 95 Soporte para estanterí as Puede ajustar la bandeja en 4 posiciones diferentes según los platos que desee cocinar. Por ejemplo, cuando haga macarrones gratinados y quiera que la parte superior esté más cocida, utilice el soporte de la rejilla superior o el segundo. Para asar un pollo, utilice el soporte inferior.
- Page 96 Función asador Uso con horquillas para asador Instalar horquillas de asador Con esta función, el horneado será uniforme. Izquierda Derecha Las horquillas para asar pueden transportar alimentos de menos de 3 kg. Instalar horquillas de Retirar las horquillas del Asa del asador asador asador Utilice el asa del rostizador...
- Page 97 Para parar el horno (STOP / FUNCTION OFF) Calentamiento superior e inferior + Función de convección Calentamiento superior + Funció n de convección Calefacción superior e inferior Calentamiento superior + Funció Control de funciones Seleccione resistencia n de asador adecuada en función de Calentamiento superior e inferior los platos que vaya a + Función de convección + Funci...
-
Page 98: Método De Limpieza
MÉTODO DE LIMPIEZA Quita el tapón y enfrí alo antes de limpiarlo. Al limpiar, lave la superficie interior y exterior, la bandeja de horno, la rejilla de alambre y el asa de la bandeja con un algod ó n suave (o esponja) con limpiador neutro. - Page 99 INSTRUCCIONES DE USO Antes de utilizar el aparato por primera vez: Calentar el horno vací o. (1) Colocar la bandeja de horno y la rejilla. (2)Coloque el interruptor de funcionamiento del calentador en "UPPER & LOWER", ajuste el dial de control de temperatura en "230C"...
- Page 100 Nota: Si el interior del horno está sucio, la cocción puede tardar un poco m ás de lo normal. PRECAUCIONES Si el horno se coloca demasiado cerca de una pared, ésta se quemará o manchará . Asegúrese de que la cortina, etc. no estén en contacto con la carrocerí...
-
Page 101: Salvaguardias Importantes
utilice una toma de luz eléctrica. Nunca conecte varios enchufes a la misma toma ADVERTENCIA: Si el cable de alimentació n está dañado, el fabricante o su servicio t écnico, o una persona con cualificación similar, deberá sustituirlo para evitar riesgos. SALVAGUARDIAS IMPORTANTES Siga precauciones... - Page 102 9. El uso de accesorios no recomendados o vendidos por el fabricante del aparato puede ocasionar riesgos. 10. No utilizar al aire libre. 11. No deje que el cable cuelgue del borde de una mesa o encimera, ni que toque superficies calientes. 12.
- Page 103 21. Se suministra un cable de alimentación corto para reducir los riesgos de enredarse o tropezar con un cable largo. Se puede utilizar un cable alargador con cuidado; embargo, capacidad eléctrica marcada debe ser al menos tan grande como la capacidad eléctrica de este aparato.
- Page 104 PRECAUCIÓN PARA LOS NIÑOS Este aparato no est á destinado a ser utilizado por personas (incluidos niños) con capacidades fí sicas, sensoriales o mentales reducidas, o con falta de experiencia y conocimientos, a menos que hayan sido supervisadas o instruidas acerca del uso del aparato por una persona responsable de su seguridad.
Need help?
Do you have a question about the KR-K55RCL-10dkh and is the answer not in the manual?
Questions and answers