
Related Manuals for SWELLPRO Fisherman Max FD2


Summary of Contents for SWELLPRO Fisherman Max FD2
- Page 1 Fisherman User Manual Visit support.swellpro.com for the latest version of manuals and firmware. v1.0.6 – 2023.11...
-
Page 2: Thank You
The user manual is the best companion while using the product. For the specific problem using the product, the FAQ can be another great resource for you to look at. Go to the SwellPro website, look for support >product support > the product > FAQ to find the FAQ page. -
Page 3: Swellpro Community
SwellPro products with other users like you. https://support.swellpro.com/hc/en-us/community/topics Social Media Join our Facebook page to meet other people who share their adventures with SwellPro. www.facebook.com/SwellPro/ Register Product Warranty Please register your product on the SwellPro website as soon as possible to ensure warranty coverage. -
Page 4: Firmware Update
Firmware Update SwellPro products are constantly improving. We recommend you visit support.swellpro.com to check and update the latest firmware for your product. Basic and Advanced Version Fisherman Max has two versions: Basic and advanced version VERSION CAMERA REMOTE CONTROLLER BASIC VERSION... -
Page 5: Table Of Contents
Aircraft Aircraft Diagram Aircraft Status Lights Install Fold/Unfold Arm Install Propeller Install Antenna Install /Remove Flight Battery Install Floating Device Install Emergency Buoy Power ON/OFF Flight Battery WARNING Charging Battery Check Battery Repair Copyright © 2023 SwellPro All Rights Reserved... - Page 6 Pairing Control Sticks Calibration Optimal Signal Transmission Remote Controller Antenna Orientation Aircraft Antenna Blind Spot Reset Wi-Fi Password Flight Flight Safety and Environment Flight Restrictions Pre-Flight Checklist Basic Flight Steps Control the Aircraft Copyright © 2023 SwellPro All Rights Reserved...
- Page 7 Low Battery Payload Release Low Battery Landing Water Takeoff and Landing Boat Takeoff and Landing PowerFlip Gimbal Camera Control Camera Control Gimbal Control Camera Settings Photos Setting Videos Setting Gallery Camera Setting Camera Status Lights Copyright © 2023 SwellPro All Rights Reserved...
- Page 8 Download the App Connect Home Interface Main Interface Appendix Specification Warranty Information Battery Care and Maintenance Precautions for low-temperature use Battery Charging Battery Storage and Transportation Battery Disposal Maintenance Disclaimer and Warning Version Information Copyright © 2023 SwellPro All Rights Reserved...
-
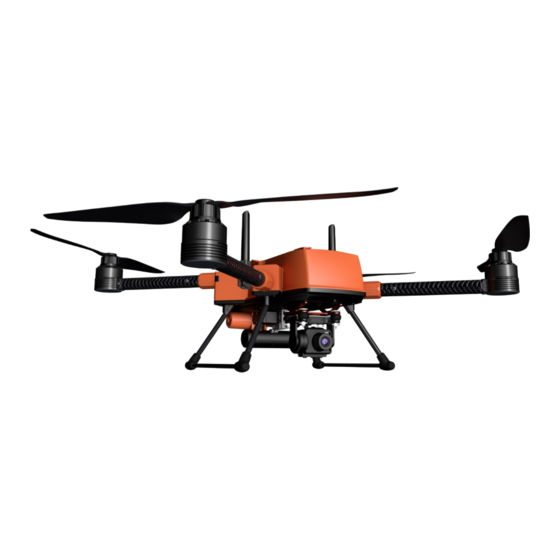
Page 9: Aircraft
Aircraft Aircraft Diagram Copyright © 2023 SwellPro All Rights Reserved... -
Page 10: Aircraft Status Lights
Aircraft Status Lights Copyright © 2023 SwellPro All Rights Reserved... -
Page 11: Install
. Tighten the mount on each arm. ⚠ Ensure all 4 mounts are tightened before each flight. Fold Loosen the mount on each arm. Fold the rear arms , then the front arms Copyright © 2023 SwellPro All Rights Reserved... -
Page 12: Install Propeller
⚠ Before each flight, please check that the propellers are smooth all over and are correctly installed and securely fastened. Spin each propeller by hand to check that the motors are free of sand or salt and spin freely. Copyright © 2023 SwellPro All Rights Reserved... -
Page 13: Install Antenna
1. Unlock the four latches from 4 to 1 (shown in the picture). 2. Press two thumbs on the aircraft’s arms and use your two index fingers to lift up and remove the battery. Copyright © 2023 SwellPro All Rights Reserved... -
Page 14: Install Floating Device
WHEN IT COMES INTO CONTACT WITH WATER. ⚠ Flying Fisherman Max with the floating device equipped will diminish the flight performance, including decreased flight time, a lower wind resistance rating, etc. Please fly with caution. Copyright © 2023 SwellPro All Rights Reserved... -
Page 15: Install Emergency Buoy
Place the foam under the aircraft’s arm. Lock the latches. Do it for each of the 4 arms. Install Emergency Buoy 1. Gas Cylinder 2. Airbag Compartment 3. Tablet 4. Protective Cover Copyright © 2023 SwellPro All Rights Reserved... - Page 16 (As shown in figure ① below). When installing the gas cylinder, please check whether the thimble is triggered (As shown in figure ②). If the thimble is triggered, please replace the tablet before installing the gas cylinder. Copyright © 2023 SwellPro All Rights Reserved...
- Page 17 After safety verification, be sure to replace the tablet and gas cylinder,please install the emergency buoy as follows: Turn over the aircraft, then install the emergency buoy with 2 screws (included in the box). Copyright © 2023 SwellPro All Rights Reserved...
-
Page 18: Power On/Off
Short press the power button once, then long press for 2 seconds. Flight Battery Ensure to charge the battery right after you receive the product to prevent the possible battery over-discharge during shipping. Copyright © 2023 SwellPro All Rights Reserved... -
Page 19: Warning
(black and red) into the balance charger. Then connect the charging pad to the battery slot. 2. Turn on the power switch on the back of the charger. 3. Press to enter. 4. Press again to charge the battery. To stop charging: Press Copyright © 2023 SwellPro All Rights Reserved... -
Page 20: Battery Check
. The charging current can be set between 0.5 A to 8 A. Lower the charging current to extend battery health. Increase the charging current to increase the charging speed. Battery Check Check the battery status by switching to the battery check function. Copyright © 2023 SwellPro All Rights Reserved... -
Page 21: Battery Repair
• The cell voltage difference is higher than 60mV. To repair the battery: 1. Connect the charger and battery, and turn on the charger. 2. Press to switch to the repair function. 3. Press to enter. Copyright © 2023 SwellPro All Rights Reserved... -
Page 22: Battery Storage
1. Connect the charger and battery, and turn on the charger. 2. Press to switch to the storage function. 3. Press to enter. 4. Press again to start. To stop: Press When completed, the charger would beep and stop. Copyright © 2023 SwellPro All Rights Reserved... -
Page 23: Barometric Membrane
Barometric Membrane The waterproof barometric membrane is SwellPro's featured technology. It allows air to pass through the internal chamber of the aircraft to ensure the barometer's proper functioning yet keeps the water from getting in to ensure the Fisherman Max's all- waterproof design. - Page 24 Ensure the barometric membrane is tightly sealed when applying. Ensure the foam is attached to the barometric membrane module. 4. Place and screw the cover back. Copyright © 2023 SwellPro All Rights Reserved...
-
Page 25: Remote Controller
Remote Controller Remote Controller Diagram 1. 2.4G Antenna 7. Return-to-Home Switch 13. Function Button 2. 5.8G Antenna 8. Flight Mode Switch 14. Phone Mount/ Copyright © 2023 SwellPro All Rights Reserved... -
Page 26: Remote Controller Screen
If the outdoor environment is too bright to view the remote controller screen, you can also install a shading cover (sold separately) on the remote controller. Copyright © 2023 SwellPro All Rights Reserved... -
Page 27: Advanced Version
Advanced Version Flight Mode: G – GPS Mode; C – Cruise Mode; A – ATTI Mode Copyright © 2023 SwellPro All Rights Reserved... -
Page 28: Basic Version
【3】Flight Mode 【4】GPS Signal Status 【5】Aircraft Battery Voltage 【6】Prompt Message Windows 【7】Distance 【8】Height 【9】Horizontal Speed 【10】Vertical Speed 【11】Pan Angle 【12】Roll Angle 【13】Latitude 【14】Longitude 【15】Remote Controller Firmware Version Number 【16】Aircraft Firmware Version Number 【17】Pitch Angle Copyright © 2023 SwellPro All Rights Reserved... - Page 29 Use [23] and [24] to check if the control sticks are in the center position when rested in the middle, and check whether it needs to perform control stick calibration. Flight Mode: G – GPS Mode; C – Cruise Mode; A – ATTI Mode Copyright © 2023 SwellPro All Rights Reserved...
-
Page 30: Remote Controller Status Lights
This section is only for the advanced version remote controller. There are buttons on each side of the display to adjust the settings of the display. Turn ON/OFF Press for 2 seconds to turn ON/OFF the display. Copyright © 2023 SwellPro All Rights Reserved... -
Page 31: Adjust Settings Menu
Adjust Settings Menu Adjust the display brightness, contrast, saturation, system language, and reset by accessing the settings menu. Enter settings menu / Switch setting Adjust setting (+) Adjust setting (-) Copyright © 2023 SwellPro All Rights Reserved... -
Page 32: Phone Mount
(As above pictures) Lose the knob at the back of the mount, place your phone on the mount, then retighten the knob. Image Transmission Settings This section is only for the advanced version remote controller. Copyright © 2023 SwellPro All Rights Reserved... -
Page 33: Power On/Off
If the remote controller prompts “Control Stick Error”, simply toggle up Payload Release, the RTH, and Flight Mode switches to dismiss the prompt. (Payload Release – OFF; RTH – Normal; Flight Mode – GPS) Copyright © 2023 SwellPro All Rights Reserved... -
Page 34: Charging
1. Power on the remote controller while keeping the aircraft off. 2. Press and hold the function button (Fn) and the power button for 3 seconds. The remote controller will start to beep. 3. Power on the aircraft. Copyright © 2023 SwellPro All Rights Reserved... -
Page 35: Control Sticks Calibration
⚠If the calibration is not successful, the remote controller will keep beeping. Please repeat step ⚠ While calibrating, move the control sticks gently. Avoid moving abruptly. Copyright © 2023 SwellPro All Rights Reserved... -
Page 36: Optimal Signal Transmission
When positioned under the blind spot area, the remote controller will experience signal loss. If you encounter a signal loss issue when you are near the aircraft, you might be in the blind spot area. Copyright © 2023 SwellPro All Rights Reserved... - Page 37 If you want to estimate the safe distance, use this equation ������(����°) �� ������������ to calculate. (Height is the height of the aircraft, which can be obtained from the remote controller or the App) Copyright © 2023 SwellPro All Rights Reserved...
-
Page 38: Reset Wi-Fi Password
If you forget the Wi-Fi password of your remote controller, you can reset the Wi-Fi password back to the default password “12345678”. Reset Wi-Fi Password: Press and hold the power button and the gimbal up button for 5 seconds. Copyright © 2023 SwellPro All Rights Reserved... -
Page 39: Flight
• If this is your first time flying an aircraft, please read this manual thoroughly and watch the tutorial videos on our website support.swellpro.com, or our YouTube channels. • We recommend taking professional training and guidance. When flying, choose an Appropriate environment according to your skills. -
Page 40: Flight Restrictions
Fisherman Max is configured to not exceed an altitude of 120m from the Home Point altitude. Pre-Flight Checklist • Flight batteries, the remote controller, and your mobile devices are fully charged. • Check all propellers are in good condition and correctly installed. Copyright © 2023 SwellPro All Rights Reserved... -
Page 41: Basic Flight Steps
14. Stop video recording before shutting down the aircraft, otherwise, the video file may be damaged. Copyright © 2023 SwellPro All Rights Reserved... -
Page 42: Control The Aircraft
Starting and Stopping the Motors (Arming) Starting (Arming) Motors Pull both the left and right control sticks simultaneously down and inwards and maintain this position for 3 seconds. The motors will be unlocked and start rotating. Copyright © 2023 SwellPro All Rights Reserved... -
Page 43: Stopping Motors
Release the throttle when the aircraft is approximately 1.5 m high. Allow the aircraft to hover for a moment to ensure flight stability. Or use the auto takeoff function on the App. Copyright © 2023 SwellPro All Rights Reserved... -
Page 44: Landing
Failure to do so may result in the excess movement of the payload and the attachment wire causing the aircraft to crash. SwellPro is not responsible for the incident if users not following the proper instructions. -
Page 45: Low Battery Warnings
⚠ DO NOT continue to fly the aircraft after reaching Level 2 Low Battery Warnings. This would cause damage to the battery and the aircraft to crash. Return to Home Copyright © 2023 SwellPro All Rights Reserved... - Page 46 ⚠ During Low Battery RTH, controlling the control stick will stop the aircraft return-to- home process. The remote controller will prompt “Aircraft Low Battery - Please return- to-home” if it happens. Please switch the RTH toggle to “Return Home” to return the aircraft. Copyright © 2023 SwellPro All Rights Reserved...
-
Page 47: Rth Height
⚠ During auto landing, you can regain control of the aircraft by controlling the control sticks to avoid obstacle while landing. However, flying the aircraft below 21.6 V is highly Copyright © 2023 SwellPro All Rights Reserved... -
Page 48: Water Takeoff And Landing
• For your safety, it is not recommended to launch or land the Fisherman Max on your hands. • After initiating return-to-home on the boat, always regain control and land manually when the aircraft is approaching the boat. Copyright © 2023 SwellPro All Rights Reserved... -
Page 49: Powerflip
When operating the flip function on the water, the remote controller will prompt "Start flip",after the aircraft flips, the remote controller will prompt "Flip successful". At this time, unlock the motor again to control the aircraft to take off from the water surface. Copyright © 2023 SwellPro All Rights Reserved... -
Page 50: Gimbal Camera
Gimbal Control Tilt Up ①: Press and hold the gimbal up button to turn the camera up. Tilt Down ②: Press and hold the gimbal down button to turn the camera down. Copyright © 2023 SwellPro All Rights Reserved... -
Page 51: Camera Settings
Enter settings menu / Go back / Restart: In preview mode, press once to enter the settings menu; In settings mode, press once to go back; Press for 2 secs to restart. Press to enter the settings menu. Copyright © 2023 SwellPro All Rights Reserved... -
Page 52: Photos Setting
Set the photo size, format, burst, and time-lapse here. Videos Setting Set the video resolution, EIS, format standard, and format here. Gallery Select “PHOTOS” to view the photo gallery. Select “VIDEOS” to view the video gallery. Copyright © 2023 SwellPro All Rights Reserved... -
Page 53: Camera Setting
Camera Setting Set camera white balance, EV, metering, ISO, anti-flicker, and language; check the camera firmware version number; format or factory reset here. Copyright © 2023 SwellPro All Rights Reserved... -
Page 54: Camera Status Lights
Camera Status Lights Copyright © 2023 SwellPro All Rights Reserved... -
Page 55: Microsd Card
• Once you are done recording, stop recording and save the file. If you turn off the power directly before saving the files, the recording file might be damaged. Copyright © 2023 SwellPro All Rights Reserved... -
Page 56: Payload Release
Payload Release You can control the payload through the payload switch of the remote controller, perform A and B two releases in sequence. Copyright © 2023 SwellPro All Rights Reserved... -
Page 57: App
Download the App Get the most from your Fisherman Max by flying with the FDFly App. Download the App on the App Store/Google Play, or directly from the SwellPro website: support.swellpro.com Connect After successfully installing the App, turn on the remote controller and then the aircraft. -
Page 58: Home Interface
Home Interface 1. Connection Status: Tap to enter the main interface. 2. Guide: A collection of user manuals and tutorial videos to help you better use the product. Copyright © 2023 SwellPro All Rights Reserved... -
Page 59: Main Interface
9. Remote Controller Signal Status: The signal quality between the remote controller and the aircraft. 10. Remote Controller Battery Level: Real-time display of the remote controller battery level. 11. Flight Settings: Set the aircraft flight settings and configure flight parameters. Copyright © 2023 SwellPro All Rights Reserved... - Page 60 • Waypoints: Select several waypoints on the map, and the aircraft will fly in a route through the series of waypoints. 16. Hide: Tap to hide icons 12-15 to have a cleaner view of the map. Copyright © 2023 SwellPro All Rights Reserved...
-
Page 61: Appendix
Satellite Positioning Systems: Remote Controller(Advanced Version) Waterproof Rating: IP54 Size: 276*190*74 mm Weight: 709.5 g Measured in an open environment, without interference. It does not reflect the actual distance. Use as reference during the flight. Copyright © 2023 SwellPro All Rights Reserved... - Page 62 System Language: English, Chinese Flight Battery 4500 mAh Nominal Capacity: 22.2V Voltage: 6S LiPo Type: 219*119*65 mm Size: 1255 g Weight: 0° - 40° Working Temperature: Charging Time: 80 mins Max Charging Current: Copyright © 2023 SwellPro All Rights Reserved...
- Page 63 128GB, write speed ≥ 60 MB/s, recommend using Class 10 or above & UHS-1 rating -10° - 40°C Working Temperature: Dual Payload Release Waterproof Rating: IP67 Max Payload Capacity: 3.5 kg Size: 75*50*37.5 mm Weight: 100 g Floating Device Copyright © 2023 SwellPro All Rights Reserved...
-
Page 64: Warranty Information
• Never use or charge swollen, leaky, or damaged batteries. If your batteries are abnormal, please contact SwellPro or a SwellPro authorized dealer for further assistance. • The battery can be used in temperatures ranging from -10°C to 40°C. Using the battery in environments above 60°C can lead to a fire or explosion. -
Page 65: Precautions For Low-Temperature Use
1 to 2 minutes, and take off after the battery is fully warmed up. Battery Charging • Always use a SwellPro Approved charger to charge the battery of the aircraft. SwellPro takes no responsibility if the battery is charged using a non-SwellPro charger. -
Page 66: Battery Disposal
Failure to do so may cause property damage, accidents, and personal injury. Once this product is used, it is deemed that you have understood, recognized, and accepted all the terms and conditions of this statement. Copyright © 2023 SwellPro All Rights Reserved... - Page 67 SwellPro is exempt from the user's liabilities for damage(s) to person/s or property, or injuries incurred directly or indirectly from the use of this product in the following conditions: •...
-
Page 68: Version Information
• The user is not able or unwilling to provide the flight log to SwellPro for diagnosis and examination. • Any attempt to modify flight log data noticed by SwellPro. • Other Damage(s) or injuries that are not SwellPro's liability.
Need help?
Do you have a question about the Fisherman Max FD2 and is the answer not in the manual?
Questions and answers