SWELLPRO Splash Drone 3 User Manual
Hide thumbs
Also See for Splash Drone 3:
- User manual (51 pages) ,
- Tuning manual (17 pages) ,
- Operation manuallines (12 pages)
Table of Contents
Advertisement
Quick Links
Advertisement
Table of Contents

Related Manuals for SWELLPRO Splash Drone 3


Summary of Contents for SWELLPRO Splash Drone 3
- Page 1 User Manual 2018.08 well www.swellpro.com www.facebook.com/swellpro/...
-
Page 2: Reading Note
Thank you for purchasing this SwellPro Splash Drone. We have designed and manufactured the Splash Drone to the highest quality standards, to provide you a safe and reliable product for many years. Please read the entire contents of this manual thoroughly, to comprehensively familiarize yourself with the product before using it. -
Page 3: Table Of Contents
Content Reading Note Icon Definitions Recommended Where to find the tutorial videos Product Overview Brief Introduction Highlighted Functions Drone Assembly and Set up Drone Illustrations Remote Control Illustration About the Drone Drone Overview Flight Modes Indication Lights Auto Return-Home Function Propellers Battery Remote Control Remote Control Overview Battery Installation Remote Control Operation Remote Control Indication Lights... - Page 4 Flight Flight Environmental impacts on your flight Flight Restrictions Pre Flight Inspection Accelerometer Calibration Compass Calibration Starting/Stopping Motors Basic Flight Frequently Used Parts Video Transmitter Settings Payload Release APP Control How to use Fight path setting Follow Me Point-to-Fly Appendix Specifications...
-
Page 5: Product Overview
Product Overview This section introduces the various drone functions, how to assemble the drone, the various part names of the drone, and it’s remote control. -
Page 6: Brief Introduction
5” FPV screen, so you can see the live video and OSD data without any additional equipment. The splash drone 3 allows you to operate in rainy conditions, in tough environments whether its over land or over sea. -
Page 7: Highlighted Functions
2. The water resistant (1) payload release can be used to deliver up to 1kg loads, including but not limited to life-saver, lines, fishing bait etc. 3. Swellpro’s 3rd generation water resistant (1) gimbal integrated with a 4k camera, quick release design. -
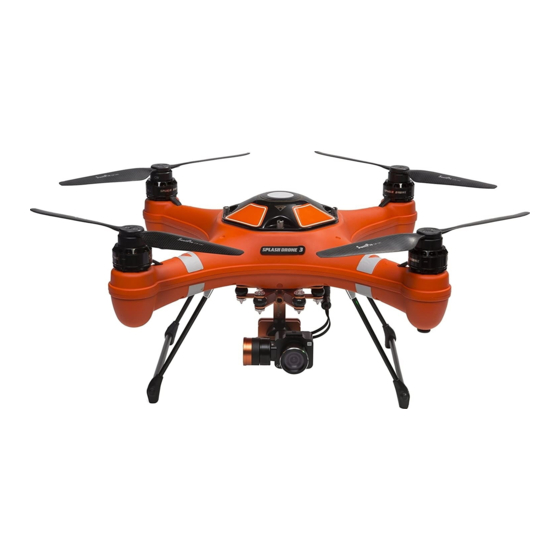
Page 8: Drone Assembly And Set Up
Drone Assembly and Set Up Preparation of the drone Installation of the landing gear Installation Diagram Detailed Description Gimbal Installation Attention: Please install the camera gimbal after completing the calibrations on Splash Drone, to avoid unnecessary rotation & tremble. (Refer to the accelerometer calibration and compass calibration on pg 29 & 30 for mor e details) Detailed Description Installation Diagram Loosen the screw on the underside of the drone. -
Page 9: Drone Illustrations
Drone Illustration Note: When opening the top cover, be careful of the GPS cable, When closing the top cover, please make sure to place the hatch such that the arrow faces the front of the drone. Nose Direction Before closing the GPS Top cover, please make sure that the gasket gasket and the sealing surfaces on the drone are in good condition and are free of dirt, sand or any other contamination. -
Page 10: Remote Control Illustration
Remote controller illustration Band / Increase (+) Manual band Selection / Increase value Power Button Menu / Menu Selection Auto powers on the FPV screen, Enter into the menu / Shift among of but can be manually powered off. various menus Auto search/Menu Select Channel / Decrease (-) Use the auto search function to select Manual channel Selection /... -
Page 11: About The Drone
About the drone This section introduces the drone, and it’s functions. -
Page 12: Drone Overview
-Positioning system, -Power system including the battery, ESC, motors and propellers. Flight Modes The Splash Drone 3 utilizes a brand new flight control system, incorporating 3 of the best flight modes. GPS mode: This uses the GPS modules to achieve accurate and stabilized hovering, intelligent flight, intelligent return and other intelligent flight mode functions. -
Page 13: Indication Lights
Nose indication Lights Drone Status Indicator Lights The nose LED indicator lights are used to indicate the direction of the nose of the drone. The rear aircraft status indicator lights indicate the status of the current flight control system. Please refer to the following table for the different flash modes for the flight control system. Drone status indicator Flight Mode One Green Flash... -
Page 14: Auto Return-Home Function
Unlock Failure Return HOME Splash Drone 3 has an auto return home function. If the GPS successfully recorded the return point before takeoff, and, if the remote controller and the aircraft loose communication with each other, the drone will automatically return to the landing point, and land. Splash Drone 3 provides two auto return home modes, they are: one key return and failsafe return. -
Page 15: Propellers
Note: During the return process, only the (right) steering stick can be controlled. When the drone returns to the point of departure, and commences its descent, the left joystick will only control the direction (Heading) of the drone, the right joystick controls the forward/back and sideways functions, in order to select and land at the chosen landing point. -
Page 16: Battery
If a propeller becomes damaged, or broken, please replace it, they can be purchased separately. Please do not get too close to the rotating propellers and motors, to avoid cuts or injury. Please use the propellers provided by Swellpro, they cannot can be mixed with different types of propeller Battery Before use, please fully charge the drone battery, and the remote battery. - Page 17 3. Indication lights: One LED on indicates a charge level of 25% , two LEDs on indicate a charge level of 50%, three LEDs on indicate a charge level of 75%, four LEDs indicate that the battery is fully charged. Before charging, please ensure that you are using the correct battery type.
-
Page 18: Remote Control
Remote Control This section introduces the remote control functions. Including the drone operation, and the camera operation. -
Page 19: Remote Control Overview
Remote Control Overview The Splash Drone3 remote control operates using two frequency bands, 2.4GHz and 5.8GHz. 2.4GHz is for the drone control, and 5.8GHz is for the FPV video signal. The remote controller is integrated with the camera and gimbal controls, which is convenient for the user to easily maintain comprehensive control during flight, and can easily shoot wonderful videos or pictures. - Page 20 Camera Control Remote Control Operation Description Photo:Take Picture Preview: Photo Preview Video:Shoot Video Preview Video Flight Mode Remote Control Operation Description GPS:GPS mode Smart Cruise:Smart Cruise Mode Smart Cruise ATTI:ATTI mode ATTI One Key Return Home Remote Control Operation Description Normal:Return Home is disabled Normal Return-Home:Activate Return Home Return Home Gimbal Control Remote Control Operation Description Tilt Control Thumbwheel:Controls the gimbal tilt axis Tilt Control...
-
Page 21: Remote Control Indication Lights
Left Stick Right Stick Remote Control LED Indicators Working Power Status Warning Tone Indicator Indicator RED Light ON Remote Control battery low Remote Control battery is RED Light dangerously low slow flash Light Stays ON Status is good Remote control and receiver Slow Flash Light Stays ON disconnected Fast Flash Success tone... -
Page 22: Fpv Screen
FPV screen The Splash Drone 3 uses 5.8G video transmission technology, reducing the delay to a minimum. Please note that the 5.8G Video FPV transmission range is generally under under 300m. 40 channels are available to select from Display Interface [15] [14] [13]... -
Page 23: Water Resistant (1) Camera & Gimbal
Gimbal & Camera This section introduces the camera and the gimbal, and how to use them. -
Page 24: Camera
Camera working indicator Gimbal firmware upgrade USB port Splash Drone 3 supports Micro SD card upto 32GB. Because the camera requires fast reading and writing capability for high stream video data, please use a card with a minimum of Class 10 or UHS-1, or better. - Page 25 1. APP installation: iOS systems, for apple devices, please find the SwellCam APP in the apple store, and install the APP. Android systems can download the APK installation on the www.swellpro.com site 2. Camera WIFI connection: Please Note, the WiFi is used for preflight setup purposes only, and must be disabled prior to take off.
- Page 26 Record Setting Resolution APP control: 1920*1080 P30 1920*60 1280*720 P30 1280*720 P60 Remote Control: 2880*2160 P24 2560*1440 P30 1920*1080 P30 1920*1080 P60 1280*720 P30 1280*720 P60 Video Format MOV MP4 Time Stamp OFF ON Note: APP and remote control camera recording video resolution is different, please select the best resolution according to your specific needs Language Syn with smartphone language.
-
Page 27: Gimbal
Gimbal High precision two axis water resistant (1) pan tilt angle jitter of + 0.02 degrees, even in the event of a large action flight, it can record a smooth video. The pitch angle has controllable operating range of -90 degrees to 0 degrees. -
Page 28: Flight
Flight This section introduces and discusses flying hazards, flight restrictions, and drone care and attention. -
Page 29: Flight
Safety fence: has a maximum flight radius of 500 meters, and a maximum flight altitude of 200 meters. If, for any reason, you need to remove this safety fence, please refer to the Swellpro Assistant 3 reference method. Maximum flight altitude: 200meter... -
Page 30: Pre Flight Inspection
Pre-Flight Inspection and checks 1. Please ensure there is a FULL CHARGE in both the drone and the controller batteries. 2. Please check that the propellers are correctly installed. 3. Make sure the Micro SD card is properly inserted into camera (4k PRO Model only), and the sealing hatch is securely fastened. -
Page 31: Compass Calibration
Compass Calibration Please refer to the status indicator light for compass calibration. Calibration notes are as follows: Please Note: It is recommended to calibrate the compass at the proposed flying area before flying. Flying anywhere close to any magnetic interference is HIGHLY DISCOURAGED. - Page 32 Six Surface Calibration, PLEASE SEE JCMATTHEW YOUTUBE CHANNEL FOR DETAILS: Operation Illustration Description 1. Place the drone on a horizontal surface, power on the controller, and then power on the drone. Wait for the self-check sequence to finish (red/green fast flash). After “DI” sounds, flick the return Return Home home switch to Return Home. 2.
-
Page 33: Starting/Stopping Motors
8. Finally, whilst vertical, turn the drone such that it’s nose is pointing to the right (9 o’clock) and perform a counter clockwise rotation of your body for 360 degrees making sure the drone remains on a flat plane. Now, place the drone on a horizontal surface for about 90 seconds, the Lights will change back to the normal Slow Flashing GREEN (or GREEN/RED) meaning the calibration is completed. -
Page 34: Basic Flight
Stopping (locking) the Motors To lock the motors: Pull both the left and the right joysticks outwards to the lower sides at an angle of 45 degrees to stop , and lock the motors. Take Note: The motors can be stopped for any emergency. Stopping the motors whilst airborne may cause the drone to crash, and should only be carried out in emergencies (for example: there is a risk that the drone may hit people, or crowds), and stopping the motors will minimize any potential damage. -
Page 35: Frequently Used Parts
Frequently Used Parts This section introduces the more frequently used parts. -
Page 36: Video Transmitter Settings
Video Transmitter Channel Selection Selecting the channel (there are a total of 32 channels) Band:A b C d E Channel:1 2 3 4 5 6 7 8 Power: Led flashing sequences: 1 time represents 25mW, 2 times represents 400mW, 3 times represents 600mW Power indication:1(25mW)、2(400mW)、3(600mW) Channel Selection After powering on the transmitter, it will initially display the currently selected frequency band, followed by the current channel, and, in the lower right corner, a red dot flashing indicating the currently selected transmission power level as described above. - Page 37 Power Selection 1. To enter the power-switching mode, long press the button for 5 seconds; the system will then display the currently selected power level, corresponding to the number of slow flashes. If you need to change the power level, press the button to select the desired transmission power level.
-
Page 38: Payload Release
The patented payload release device is a powerful and versatile accessory to expand the use and applications of the Splash Drone 3. With the help of the payload release, Splash Drone 3 can help fishermen to put the fishing bait far away from the shore. Rescuers use Splash Drone 3 to search for stranded personnel, and deliver vital rescue equipment to them in advance. -
Page 39: App Control
APP Control... -
Page 40: How To Use
Bluetooth datalink module will stop blinking). 3. Run the “Swellpro Fly” APP, click the Bluetooth icon to link the device (UAV..). When it links, you will see the drone parameters on the screen, e.g battery voltage, GPS coordinates, height, distance, GPS signal etc. -
Page 41: Fight Path Setting
4. Once you have a minimum of 9 GPS satellites, you can unlock the drone and start flying with controller, or use the APP to unlock the motors and start flying. 5. The APP allows you to start flying the drone, land, ascend, hover, return home, flight path setting, follow me and point to fly. -
Page 42: Follow Me
b). Click below the flight point, you can choose the height, hovering time and other options. Save and click “Run”, the drone will start flying according to the set path. 7. Follow Me: The target (to be followed) should carry the Bluetooth Datalink and the (connected) smart phone, the drone recognizes the GPS coordinates of the smartphone. -
Page 43: Point-To-Fly
8. Point-to-Fly: Click the“Point-to-Fly” button, and then click the target point on the map, the drone will start flying to the point and hover there. Note: 1. The APP control needs to have a good wireless communication environment, if you see the drone does not respond to your order, it might be subjected to interference, please try again. 2. If the drone continually fails to respond to your APP commands, please use the controller to operate the drone. Just switch the flight mode switch for one single operation; the controller will take over the control of the drone. -
Page 44: Appendix
Appendix... -
Page 45: Specifications
Hovering Precision ±0.02meter Max Flight Time 16minutes Max Flight Weight Upto 3KG Positioning Satellite GPS/GLONSS dual Flight Control Swellpro S3 Motor Water resistant (1) Brushless Motor #3510/620KV 40A Gimbal Water resistant 2axis: Pan, Tilt (1) Level Stabilization System Tilt -90°to 0... - Page 46 Max Video Stream Picture Format Video Format Support Memory Card25000Mbps JPEG MOV MP4 Class 10 or UHS-1 and above specifications Micro SD card, maximum support 64GB Battery Battery Type 4S lipo battery for drone, 2S lipo battery for remote control 14.8V 5200mAh(Drone)/7.4V 1800mAh(Control)...
- Page 47 (1) Drone Water Resistance Information Please be aware that The Splash drone 3 PLUS & Splashdrone 3 4K PRO models are water resistant – which means they will resist the entry of water to an IPX4 level, but Splashdrone is designed to be NOT completely waterproof or sealed for technical reasons & therefore is not meant to be submerged under water or landed is surf conditions. If the Splashdrone comes in contact with saltwater, the user is advised to wash any saltwater off with fresh water. Also It is always important to remove any excess moisture from inside the drone immediately following a flight OR a water-crash. Warranty Information Please be aware that any attempt by any non-authorised repairer to either open the drone, or service the drone (including attempted self service or fitting of parts (either original or third-party parts)) WILL INSTANTLY VOID THE PRODUCT WARRANTY. Warranty does not cover any mis-use of the product, or where the product has not been used in the accordance with the instructions found either in this User Manual OR the Support Document, that came with this drone.
Need help?
Do you have a question about the Splash Drone 3 and is the answer not in the manual?
Questions and answers