Table of Contents
Advertisement
Available languages
Available languages
Quick Links
CTS1801-254LAK
FR SCIE DE TABLE
TRADUCTION DES INSTRUCTIONS D'ORIGINE
NL TAFELCIRKELZAAG
VERTALING VAN DE ORIGINELE INSTRUCTIES
GB TABLE SAW
ORIGINAL INSTRUCTIONS
Y2021
Sous réserve de modifications / Technische wijzigingen voorbehouden
Subject to technical modifications / Technische Änderungen vorbehalten
1
Advertisement
Table of Contents

Related Manuals for Constructor CTS1801-254LAK


Summary of Contents for Constructor CTS1801-254LAK
- Page 1 CTS1801-254LAK FR SCIE DE TABLE TRADUCTION DES INSTRUCTIONS D’ORIGINE NL TAFELCIRKELZAAG VERTALING VAN DE ORIGINELE INSTRUCTIES GB TABLE SAW ORIGINAL INSTRUCTIONS Y2021 Sous réserve de modifications / Technische wijzigingen voorbehouden Subject to technical modifications / Technische Änderungen vorbehalten...
- Page 5 • La légende des points numérotés est disponible en page 13 dans la version en Français. • De legenda van de genummerde punten is beschikbaar op pagina 28 in de Nederlandse versie. • The legend of the numbered points is available on page 42 in the English version.
- Page 6 LIVRE AVEC 2 LAMES GELEVERD MET 2 MESSEN DELIVERED WITH 2 BLADES Lame qui permet de couper uniquement le bois. Mes waarmee u alleen hout kunt zagen. Blade that allows you to cut only wood. LIVRE AVEC PILES POUR LE LASER GELEVERD MET BATTERIJEN VOOR DE LASER DELIVERED WITH BATTERIES FOR THE LASER 2x AAA...
- Page 7 SCIE DE TABLE • Contact avec la lame de scie dans la zone UTILISATION de sciage non protégée. • Contact avec la lame de scie en cours de La scie circulaire de table sert à couper tous types fonction-nement (blessure par coupure) de bois tant dans le sens longitudinal que transver- •...
- Page 8 modifiées et des prises adaptées réduisent le risque Si des dispositifs d'aspiration et de réception de la de décharge électrique. poussière sont montés, assurez-vous que ceux-ci Evitez tout contact corporel avec des surfaces sont raccordés et correctement employés. mises à la terre telles que robinets, chauffages, L'utilisation de ces dispositifs réduit les risques cuisinières électriques et réfrigérateurs.
- Page 9 f) Afin que la fonction du couteau diviseur soit AVERTISSEMENT effective, il doit être au contact de la pièce. Pendant son fonctionnement, cet outil électrique génère un Lors des coupes de pièces qui sont trop courtes pour que le couteau diviseur y pénètre, il est inef- champ électromagnétique.
- Page 10 g) Ne travaillez jamais à « main levée ». Utilisez a) Ne vous placez pas en face de la lame de toujours le guide parallèle ou le guide d’angle scie. Tenez-vous toujours de côté par rapport à pour positionner la pièce et la guider. Travail- la lame de scie, là...
- Page 11 j) Lorsque vous voulez redémarrer une scie cir- g) Utilisez toujours des lames de la bonne culaire dont la lame est déjà dans la pièce à dimension disposant du bon alésage (par scier, centrez la lame dans le trait de scie de exemple cranté...
-
Page 12: Risques Residuels
13. Utilisez la lame de scie adaptée au • Avant d‘entreprendre une opération de réglage matériau à traiter. ou d’entretien, relâchez la touche de la poignée et 14. Utilisez uniquement une lame de scie débranchez la machine. présentant un diamètre correspondant aux indications figurant sur la scie. -
Page 13: Description De La Machine
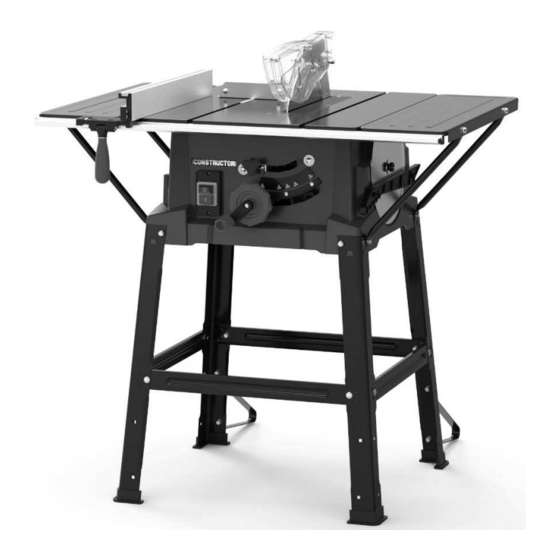
SYMBOLES DESCRIPTION DE LA MACHINE Table de scie Risque de lésion Protection de la lame de scie corporelle ou de Cale de fendage (non visible) dégâts matériel. Lame de scie (non visible) Plateau de table Lisez le manuel Extension de table avant toute Poignée de blocage utilisation. -
Page 14: Avant La Mise En Service
AVANT LA MISE EN SERVICE pas être installée correctement et de manière stable. • Ouvrez l‘emballage et sortez-en la machine Monter le bâti et l’extension de table (fig. 4-10) soigneusement. Faites tourner la scie circulaire de table et • Retirez les matériaux d‘emballage ainsi que posez-la au sol. - Page 15 gauche jusqu’à ce que la butée parallèle s’arrête COMMANDE sur le côté extérieur droit de la lame de scie. Serrez ensuite les écrous à bride (e) pour fixer Interrupteur On/Off (fig. 3) ce réglage. • L’actionnement de la touche verte I permet Mettez à...
- Page 16 (14) se trouvent 2 graduations indiquant la dis- ATTENTION tance qui sépare la butée parallèle (14) de la Ne poussez pas le guide trop lame de scie (4). loin en direction de la lame de Selon que le rail de butée (30) est tourné en scie.
- Page 17 jusqu’à ce que la lame de la scie (4) soit totale- Exécuter des coupes en biseau (fig. 26) ment arrêtée. La coupe en biseau est principalement effectuée en Supportez les pièces longues pour les utilisant le guide parallèle (14). Par principe, la empêcher de basculer à...
-
Page 18: Maintenance
Retirer du matériau coincé Arrimez la scie afin qu’elle ne se renverse pas et ne glisse pas. Ne jamais utiliser les dispositifs de AVERTISSEMENT protection pour manipuler ou transporter la Risque de blessures ! machine. MAINTENANCE En cas de manipulation incorrecte de la scie circu- laire de table, il existe un risque de blessures graves. -
Page 19: Spécifications Techniques
Conserver la notice d’utilisation à proximité de l’outil L‘inscription du type sur le câble de raccordement électrique. est obligatoire. RACCORD ELECTRIQUE S’il est nécessaire de remplacer le câble de raccor- dement, le fabricant ou son représentant doit s’en charger afin d’éviter les risques pour la Le moteur électrique installé... -
Page 20: Service Après-Vente Et Assistance
également sous selon le type de pièce usinée : www.eco-repa.com. Les conseillers techniques et traitée. Prenez des me- assistants CONSTRUCTOR sont à votre disposition sures de protection contre les pour répondre à vos questions concernant nos nuisances sonores. Tenez produits et leurs accessoires : sav@eco-repa.com... -
Page 21: Depannage
DEPANNAGE PROBLEME CAUSE POSSIBLE SOLUTION La lame de scie se Vis de serrage insuffisamment détache après l’arrêt Resserrez la vis , pas à droite serrée du moteur Fusible du réseau défectueux Vérifiez le fusible Rallonge électrique défectueuse Remplacez la rallonge électrique Le moteur ne Raccordements au moteur ou à... - Page 22 NL TAFELCIRKELZAAG De fabrikant is niet aansprakelijk voor wijzigingen GEBRUIK die aan de machine worden aangebracht en de hieruit voortvloeiende schade. De tafelcirkelzaag dient voor het in de lengte zagen Ondanks beoogd gebruik kunnen bepaalde restrisi- en afschuinen (alleen met dwarsaanslag) van cofactoren niet volledig worden vermeden.
- Page 23 De stekker van het apparaat moet in het delen. Losse kleren, sieraden en lange haren stopcontact passen. De stekker mag op geen kunnen door bewegende delen worden gegrepen. enkele wijze worden gewijzigd. Gebruik geen Als er stofafzuig- en stofopvanginrichtingen adapterstekkers in combinatie met geaarde kunnen worden gemonteerd, moet u ervoor zorgen apparaten.
- Page 24 f) Opdat de splijtwig kan functioneren, moet WAARSCHUWING deze op het werkstuk inwerken. Bij snedes in Dit elektrisch apparaat werkstukken die te kort zijn, om de splijtwig te la- genereert een elektromagne- tisch veld als het is ten functioneren, is de splijtwig niet actief. Onder deze voorwaarden kan een terugslag niet door de ingeschakeld.
- Page 25 g) Werk niet “zonder handbescherming”. Ge- Dit kan door passende voorzorgsmaatregelen bruik altijd de parallelaanslag of de verste- worden voorkomen, zoals hieronder be- kaanslag om het werkstuk aan te leggen en schreven. te geleiden. “Zonder handbescherming” be- tekent dat het werkstuk in plaats van met de a) Sta nooit direct in lijn met het zaagblad.
- Page 26 j) Als u een zaag, die in het werkstuk g) Gebruik altijd zaagbladen van het juiste steekt, weer wilt starten, centreert u het formaat en met passende opnameboring zaagblad in de zaagsnede dusdanig dat de (bijv. ruitvormig of rond). zaagtanden niet in het werkstuk vastzitten. Zaagbladen, die niet bij de montagedelen van de Als het zaagblad vastklemt, kan deze het werkstuk zaag passen, lopen niet rond en leiden tot verlies...
- Page 27 14. Gebruik alleen een zaagblad met een AANVULLENDE diameter die op de zaag staat aangegeven. VEILIGHEIDSINSTRUCTIES VOOR 15. Gebruik alleen zaagbladen, die met een LASERS gelijk of hoger toerental dan op het elektrisch gereedschap gemarkeerd zijn. 16. Gebruik alleen door de fabrikant Waarschuwing: De laserstraal kan oogletsel aanbevolen zaagbladen, die, indien deze voor het veroorzaken.
-
Page 28: Beschrijving Van Het Apparaat
SYMBOLEN BESCHRIJVING VAN HET APPARAAT WAARSCHUWING: Bij het niet in acht nemen, Zaagtafel bestaat levensgevaar, Zaagbladbescherming gevaar voor letsel of Splijtwig (niet zichtbaar) beschadiging aan het Zaagblad (niet zichtbaar) werktuig! Tafelinzetstuk Lees voorafgaand aan Tafelverbreding de inbedrijfstelling de Vergrendelgreep gebruikshandleiding en Schaalverdeling de veiligheidsvoor- Handwiel... -
Page 29: Voor De Ingebruikname
• Vorksleutel SW 10 (g) alleen handvast worden aangehaald, zodat deze • Inbussleutel HX 6 (h) niet kunnen uitvallen. Als u de moeren en • Zeskantbouten (k) schroeven als voor de eindmontage aanhaalt, kan de tafelcirkelzaag niet correct en stabiel worden opgesteld. - Page 30 drukken. BEDIENING Verschuif de verbonden geleiderails zo ver naar links, tot de parallelaanslag tegen de rechter bui- Aan/uit-schakelaar (afb. 3) tenzijde van het zaagblad aanstaat. • Door op de groene toets “I” te drukken, kan de Vervolgens haalt u de flensmoeren (e) aan zaag worden ingeschakeld.
- Page 31 Zaagbreedte instellen (afb. 18+19) aanslagrail, zoals in afb. 22 getoond, worden ge- Bij het in de lengte zagen van houten delen moet de monteerd, hiertoe de kartelmoeren (i) gebruiken. parallelaanslag (14) worden gebruikt. De parallelaanslag (14) van boven op de LET OP geleiderail (15) voor de parallelaanslag (14) zetten.
- Page 32 parallelaanslag) uitsluitend tot aan de voorkant van drukken en het werkstuk met de schuifstok (17) tot de zaagbladbescherming (2). aan het einde van de splijtwig (3) doorschuiven. Schuif het werkstuk altijd door tot aan het einde van de splijtwig (3). Versteksneden uitvoeren (afb.
- Page 33 Vastgelopen materiaal verwijderen TRANSPORT (afb. 28) Schakel het elektrisch apparaat altijd uit WAARSCHUWING! voor transport en koppel het los van de voeding. Gevaar voor letsel! Laat het zaagblad zo ver mogelijk zakken. Rol het netsnoer op. Bij ondeskundig gebruik van de tafelcirkelzaag Draag het elektrisch apparaat minimaal met zijn bestaat er gevaar op ernstige verwondingen.
-
Page 34: Elektrische Aansluiting
Koolborstels Dergelijke defecte elektrische aansluitkabels mogen Bij overmatige vonkvorming moet u de koolborstels niet worden gebruikt en zijn levensgevaarlijk als de door een elektricien laten controleren. Let op! isolatie is beschadigd. De koolborstels mogen alleen door een elektricien Controleer de elektrische aansluitkabels worden vervangen. - Page 35 Neem maatregelen om :www.eco-repa.com uzelf tegen geluids- Het CONSTRUCTOR-team voor gebruiksadviezen hinder te beschermen. Houd helpt u graag bij vragen over onze producten en daarbij rekening met toebehoren : sav@eco-repa.com...
-
Page 36: Verhelpen Van Storingen
VERHELPEN VAN STORINGEN STORING MOGELIJKE OORZAAK OPLOSSING Zaagblad laat los na Bevestigingsmoer te licht het uitschakelen van Resserrez la vis , pas à droite aangehaald de motor Uitval netzekering Vérifiez le fusible Verlengsnoer defect Remplacez la rallonge électrique Motor start niet Aansluitingen op de motor of Faites vérifier par un électricien schakelaar niet in orde... -
Page 37: General Power Tool Safety Warnings
TABLE SAW • Ejection of faulty hard metal parts of the saw Intended use blade. • Hearing damage if the necessary hearing protec- The table circular saw is used for cutting all types of tion is not used. wood lengthwise and crosswise (only with the trans- •... -
Page 38: Safety Instructions For Table Saws
cord suitable for outdoor use reduces the risk of an Keep cutting tools sharp and clean. Properly electric shock. maintained cutting tools with sharp cutting edges If operating a power tool in a damp location is are less likely to jam and are easier to control. unavoidable, use a power supply protected by a Use the power tool, accessories and cutting tools, residual current device (RCD). - Page 39 d) Make sure the saw blade is not contacting f) Never use a damaged or partially sawn push the guard, riving knife or the workpiece before rod. A damaged push rod may break and lead to the switch is turned on. your hand running into the saw blade.
- Page 40 a) Never stand directly in line with the saw SAFETY INSTRUCTIONS FOR THE blade. Always stand at the side of the saw blade OPERATION OF CIRCULAR TABLE SAWS on which the stop rail is located. With kickback, the workpiece may be thrust at high a) Switch off the circular table saw and discon- speed towards those persons who stand in front nect it from the power supply before removing...
-
Page 41: Residual Risks
Make sure that the saw blade is mounted in RESIDUAL RISKS the correct direction of rotation. Do not use grinding discs or wire brushes with the circular This power tool has been table saw. Incorrect assembly of the saw blade constructed in accord- or the use of accessories that have not been ance with the latest technology... -
Page 42: Device Description
The laser on this machine is Warning ! equiped with 2 AAA batteries. For all work on the saw blade, wear safety gloves WARNING Packing materials are no toys! Children must not play Warning ! with plastic The supplied blade does bags! Danger of suffocation! not cut metal! SYMBOLS... -
Page 43: Before Putting Into Operation
• Table supports (4x) screw. The spring washer always lies directly on the • Manual (inner) hexagon screw or nut. • Hexagon head screw with cross slot with mounted U-washer / spring washer 16 units (a) Hexagon screws must each be inserted from •... -
Page 44: Operation
lever (13) down completely. OPERATION Slide the connected guide rails to the left until the rip fence is at the outer right side of the saw Switchin on and off (Fig. 3) blade. • The saw can be switched on by pressing the Then tighten the flange nuts (e) to fix this green setting. - Page 45 3. Select the suitable scale according to whether Adjusting the scale of the parallel stop (Fig. 23) the stop rail (30) has been turned around for Check whether the display on the sight glass (32) of working with thick or thin material. the parallel stop (14) shows the correct values with High stop rail: thick material respect to the cutting line.
- Page 46 Performing transverse cuts (Fig. 27) ATTENTION 1. Push the transverse stop (31) into one of the The parallel stop must be set parallel with the saw blade. two grooves (28a/b) of the saw table. Adjust to the desired angle. The left groove (28a) is to be used if Check the alignment and firm the saw blade (4) also has to be positioned at an seating of the rip fence (14),...
-
Page 47: Electrical Connection
Fitting/replacing the saw blade (Fig. 13+16) solvents; these might attack the plastic parts of the device. Make sure that no water can get into the interior of the device. WARNING • Oil the moving parts once a month in order to ex- Pull out the mains plug and tend the tool life. -
Page 48: Technical Data
Important Instructions Weight ca. 21/22 kg If the motor is overloaded, it switches itself off auto- matically. After cooling down (times vary), the motor * Operating mode S6 40%: Continuous operation can be switched on again. with intermittent load (cycle time 10 min). In order not to heat the motor more than permitted, the Faulty electrical connection cable motor may only be operated for 40% of the cycle... -
Page 49: Service Department
Exploded views and information on spare parts can also be found under:www.eco-repa.com CONSTRUCTOR application service team will gladly answer questions concerning our products and their accessories : sav@eco-repa.com... -
Page 50: Troubleshooting
TROUBLESHOOTING FAULT POSSIBLE CAUSE REMEDY Blade dissolves after To slightly tightened fastening Tighten the right hand thread switching off the engine Failure mains fuse Check mains fuse Defective extension cable Replace extension cord Engine will not start Connections on motor or switch Repair by electrical specialist not in order Motor or switch faulty... - Page 52 Belgique 10/2021 Mr Joostens Pierre Mr Joostens Pierre Président-Directeur Général Directeur CONSTRUCTOR , rue de Gozée 81, 6110 Montigny-le-Tilleul, Belgique CONSTRUCTOR , rue de Gozée 81, 6110 Montigny-le-Tilleul, Belgique EC declaration of conformity EG-Konformitätserklärung CONSTRUCTOR declares that the machines: CONSTRUCTOR erklärt hiermit, daß der TABLE SAW CTS1801-254LAK TISCHKREISSÄGE CTS1801-254LAK...
- Page 53 2006/42/EC(MD) - 2014/30/EU(EMC) 2006/42/EC(MD) - 2014/30/EU(EMC) 2015/863/EU(ROHS) 2015/863/EU(ROHS) Belgio 10/2021 Bélgica 10/2021 Mr Joostens Pierre, Mr Joostens Pierre Direttore Director CONSTRUCTOR , rue de Gozée 81, 6110 Montigny-le-Tilleul, Belgique CONSTRUCTOR , rue de Gozée 81, 6110 Montigny-le-Tilleul, Belgique...
- Page 54 81, rue de Gozée 6110 Montigny-le-Tilleul Belgique Tél : 0032 71 29 70 70 Fax : 0032 71 29 70 86 Made in China S.A.V sav@eco-repa.com Service Parts separated 32 / 71 / 29 . 70 . 83 32 / 71 / 29 . 70 . 86 Fabriqué...
Need help?
Do you have a question about the CTS1801-254LAK and is the answer not in the manual?
Questions and answers