
Related Manuals for A.R.C. Laser C-Pro


Summary of Contents for A.R.C. Laser C-Pro
- Page 1 User Manual C-Pro Micromanipulator Medical Device A.R.C. LASER GmbH Bessemerstr. 14 phone +49 911 21779-0 90411 Nürnberg fax +49 911 21779-99 Germany info@arclaser.de...
- Page 2 In case service is required please contact: A.R.C. LASER GmbH Bessemerstr. 14 D-90411 Nürnberg/Germany TEL +49 911 21779-0 FAX +49 911 21779-99 Revision: Date Nov. 22 2017 File Manual_C-PRO_10600nm_rev3.docx Revisions-Date 12.10.2020 Author Christin Bartlog, Markus Graf Revised Dr. R. Walker...
-
Page 3: Table Of Contents
4.2.3 Reflecting surfaces ......................... 11 Inspection of C-Pro ........................12 4.3.1 Inspection of deflection mirror ....................12 Connecting the C-Pro to the Surgical Microscope ..............12 4.4.1 Microscope compatibility ......................12 4.4.2 Connecting the C-Pro ......................13 Connecting the Micromanipulator to the Laser ..............14 4.5.1... - Page 4 Defocusing of aiming / laser beam ..................28 Controlling the laser beam ....................... 29 Dismantling ..........................29 Quick guide ..........................30 C-Pro performance test after installation ................30 TECHNICAL DATA ....................31 Dimensions..........................31 General ............................31 SERVICE ........................32 Introduction ..........................
-
Page 5: Introduction
Manual C-PRO 1 Introduction We are pleased to see that you have chosen our C-Pro and wish you every success in your handling and application. The mirror-based C-Pro micromanipulator made by A.R.C Laser GmbH is a high-precision optical assembly, which perfectly meets the high requirements of microscopic laser surgery. -
Page 6: Intended Use
The micromanipulator allows to couple lasers (for example, CO C-Las laser, A.R.C. Laser GmbH) to common surgical microscopes. The C-Pro is used to precisely position and focus the laser beam. The main fields of application are indications in the field of ENT and gynecology. -
Page 7: Theory And Technical Background Of A Micromanipulator
In simple terms, this means that in the case of the C-Pro, the focus point of the target beam and the effect beam lie in one plane. In the case of lens-based systems, the focus points... - Page 8 Since the A.R.C. Laser GmbH attaches great importance to surgical precision, mirrors are installed in the C-Pro instead of lenses - as is common with many other manufacturers. If the operating field is very weakly illuminated, two target beams may be seen due to the light refraction at the deflecting mirror.
-
Page 9: Transport And Storage
In the case there is a foam insert with recesses for any accessory required for the connection and the application of the micromanipulator (see figure 4). Note: The C-Pro and all accessories should always be stowed in the appropriate recesses in the case after use. -
Page 10: Storage Conditions
3.3 Storage Conditions Transport and storage conditions Temperature -10°C to +60°C Relative humidity 5%-85% The C-Pro should be transported and stored only in its original carrying case to avoid damage. The C-Pro should be protected against water and moisture! -
Page 11: Installation
Windows need to be covered with suitable masking or shielding to prevent laser radiation leakage. For any question or in case of any doubt, please contact your local A.R.C. Laser authorized dealer, or contact directly to A.R.C. Laser GmbH at any time. -
Page 12: Inspection Of C-Pro
5. If cleaning is necessary, please find the cleaning instructions in chapter 9.3. 4.4 Connecting the C-Pro to the Surgical Microscope 4.4.1 Microscope compatibility The C-Pro can be adapted to the following microscopes. The following table contains the adapters for the common microscope types, including the article number. Microscope... -
Page 13: Connecting The C-Pro
As a rule, lens and housing diameters are the same. 4. Tighten the thumbscrew of the adapter plate. The C-Pro is now fixed (see figure 6). Fig. 6: C-Pro fixed to the surgical microscope; lense of the microscope has to be centered with the housing of the mirror... -
Page 14: Connecting The Micromanipulator To The Laser
3. Inspect the thread of the articulated arm. It must be clean and undamaged. 4. Screw the articulated arm to the C-Pro with the thread adapter. Make sure the articulated arm is in the correct position. (see figure 7-8). The articulated arm is taken out of the holder by means of slight pressure of the two fingers, so that the connecting joint between the two legs assumes the position as shown here. -
Page 15: Orientation Of The Laser
Manual C-PRO 4.6 Orientation of the laser 4.6.1 Operating area Fig. 10: The laser must be placed in the operating theater in such a way that the articulated arm moves in the illustrated operating area. The laser must be positioned in such a way that the articulated arm is within the operating range shown in figure 10. - Page 16 After the laser has been placed in the positions described in 4.5.1 and 4.5.2, the laser and the operating microscope can be switched on. Both the micromanipulator and the laser may only be operated by trained personnel. Fig. 12: Complete installation of C-Pro on micromanipulator and C-Las...
-
Page 17: Safety Information And Technical Acceptance
The C-Pro is to be used only by persons who have been trained in the use of laser systems. - Page 18 Manual C-PRO Plastic objects, such as specula and goggles, might melt under the influence of the laser beam, which could lead to fire-causing chemical reactions. When the laser is used in laryngologic indications, please take care that materials used in the operation, e.g. laser tubes, endotracheal tubes, adhesive tapes, ointments and medical solutions are protected from catching fire.
-
Page 19: Eyewear Protection
OD 8+ for 10600 nm may be used. Protective goggles - according to approval - are available from A.R.C. Laser GmbH. Please address reorders to A.R.C. Laser GmbH, indicating the wavelength or the item number of the goggle. Should you require any additional information on protective goggles, please contact your local A.R.C. -
Page 20: Explosion And Fire Hazard
Manual C-PRO 5.4 Explosion and Fire Hazard A T T E N T I O N ! Never work with the laser in the vicinity of easily flammable anesthetics such as oxygen and oxygen-enriched atmosphere (special mechanical ventilation!) easily flammable solutions or material. -
Page 21: Ce Regulations
European directive 93/42 for medical equipment. Therefore, the device is labeled with the CE mark. The device was tested for mechanical safety. All parts used by A.R.C. Laser for the WOLF Laser comply with CE regulations. Any additional equipment that needs to be attached to the device must require the official approval of the local inspection authority. -
Page 22: Operating Conditions
Manual C-PRO 5.10 Operating Conditions: The Micromanipulator C-Pro is not suitable for use with combustible gas mixtures of all kind. The device has not been tested for operation in heights exceeding 2,000 m above sea level. The following ambient conditions must be met:... -
Page 23: User Information And System Introduction
The operating instructions should be read carefully before initial start-up. 6.1 Technical Introduction Training Upon installation, a staff member from A.R.C. Laser or the local authorized dealer will provide introductory training for the Laser system. The introductory training will cover the device technical abilities as well as overall safety associated with the installation and use of lasers in general and the WOLF Laser in particular. -
Page 24: Medical Device Parts And Accessories
6.3 Medical Device Parts and Accessories ATTENTION ! Only use the accessories approved by A.R.C. Laser GmbH for this purpose with the C-Pro. Unauthorized accessories may significantly affect the safety and reliability of the device - A.R.C. Laser GmbH will assume no liability in this case. -
Page 25: Accessories
Manual C-PRO 6.3.2 Accessories The C-Pro comes with at least the following parts, which can be ordered at any time: Table 1: C-Pro delivery scope Micromanipulator C-Pro (ZU12000) Inclusive: 1 x ZU02004 dovetail ZEISS OPMI Sensera, Movena, Vario 1 x ME02157 thread adapter for articulated arm... -
Page 26: Spot Diameters And Energy Densities
Manual C-PRO 6.4 Spot Diameters and Energy Densities The following table contains a list of the diameters of the focused laser beam as a function of the operating distance Table 3: Spot diameter depending on operating distance Operating distance Spot diameter focused Spot diameter defocused 2.0 mm... -
Page 27: Operation
7.1 Working Distance The following steps explain how to adjust the working distance of the Micromanipulator. The C-Pro covers a working distance of 200 – 500 mm. 1. Set up the surgical microscope so that the target object is focused. -
Page 28: Defocusing Of Aiming / Laser Beam
Manual C-PRO 5. For fine adjustment look through the microscope and slightly rotate the positioning ring until the target beam has reached the smallest possible diameter (target beam is maximally focused) and can be seen intensively on the tissue. Caution: The target beam must always be focused under microscope. The indication of the operating distance on the adjusting ring merely serves as an orientation. -
Page 29: Controlling The Laser Beam
The resistance of the joystick can be adjusted by turning the cap. Fig. 17: C-Pro from the surgeon’s perspective: left focus defocus, center - joystick, right - hand rest The size of the operating area depends on the operating distance:... -
Page 30: Quick Guide
5. The magnification of the microscope can now be adjusted as required. 7.6 C-Pro performance test after installation To ensure that the C-Pro is working well, please perform the following test routine after installation. 1. Put a wooden spatula in focus of operation microscope 2. -
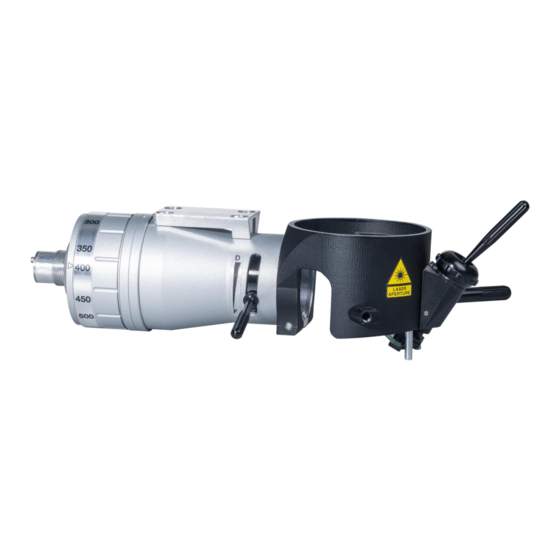
Page 31: Technical Data
Manual C-PRO 8 Technical Data 8.1 Dimensions Fig. 18: Dimension of the C-Pro Dimensions: 260 mm x105 mm x 65 mm (length x width x height) Weight: 570 g 8.2 General Designation Micromanipulator Type C-Pro Transmission 70 % ± 5 %... -
Page 32: Service
Do not attempt to perform any type of service or maintenance work to the device. Any calibrations or adjustments that require to open the protective housing, should only be carried out by a service technician trained by A.R.C. Laser GmbH. This includes also any type of optics cleaning within the laser system. - Page 33 Fig. 19: Cleaning supplies - methanol pipette bottles, tweezers, gloves, lens cleaning tissues, lint-free cloth Pre-cleaning: For cleaning the mirror, please turn the micromanipulator over so that the underside of the deflecting mirror points upwards. Fig. 20: Position of the C-Pro at the beginning of cleaning, the underside of the deflection mirror points upwards.
- Page 34 Do not use soap or water. Note: Under no circumstances must methanol enter the C-Pro body Wipe clean: The final cleaning is carried out as follows: 1.
- Page 35 Manual C-PRO Fig. 22: Moisten the lens cleaning tissue with a few drops of methanol Note: The lens cleaning tissue may only be used once; a fresh tissue should be used for each additional cleaning operation. The steps described should be repeated as often as necessary until the mirror surface is clean.
-
Page 36: Error Detection And Troubleshooting
Never dispose of the appliance with household waste. A.R.C. Laser will gladly assist you in disposing of your laser; costs and responsibility for the appropriate return of the laser to A.R.C. Laser shall be borne by the buyer. Please contact our customer service. -
Page 37: Customer Service
A warranty claim for defective parts, malfunction or damage of the housing of the device shall be passed on to A.R.C. Laser GmbH within 24 hours. Parts returned during the warranty period (upon the explicit request of A.R.C. Laser GmbH), are subject to the written confirmation by A.R.C. - Page 38 Manual C-PRO Notes...
- Page 39 Manual C-PRO Notes...
- Page 40 Manual C-PRO...
Need help?
Do you have a question about the C-Pro and is the answer not in the manual?
Questions and answers