Advertisement
Quick Links
Advertisement

Related Manuals for URC Complete Control MX-4000


Summary of Contents for URC Complete Control MX-4000
- Page 1 MX-4000 Complete Control Owner’s Manual MX-4000 Owner’s Manual...
- Page 2 MX-4000 Complete Control Owner’s Manual Introducing the MX-4000 Table of Contents Thank you for purchasing URC’s MX-4000 touchscreen remote Features & Benefits................1 control. Its easy and intuitive use will help simplify your life while Parts ....................... 2 adding control of more things than you thought are possible.
- Page 3 MX-4000 Complete Control Owner’s Manual Features & Benefits • IR/RF Device Control: The MX-4000 can directly control every IR device in your home. You can also use RF to control devices located in different rooms by integrating an MRF base station. •...
- Page 4 MX-4000 Complete Control Owner’s Manual Parts • MX-4000 Wi-Fi Remote Control MX-4000 Charging Cradle • Li-ion Rechargeable Battery • Charging Cradle • Power Adapter • USB Type C-Cable Power Adapter Rechargeable Battery USB Type C Cable Table of Contents...
- Page 5 MX-4000 Complete Control Owner’s Manual Connecting the Battery Pack A battery is included in the box when shipped from the factory. Press the spring lock down to unlock and remove the cover. Place the battery into the battery compartment, making sure to align the contacts on the battery with the contacts within the MX-4000’s battery compartment.
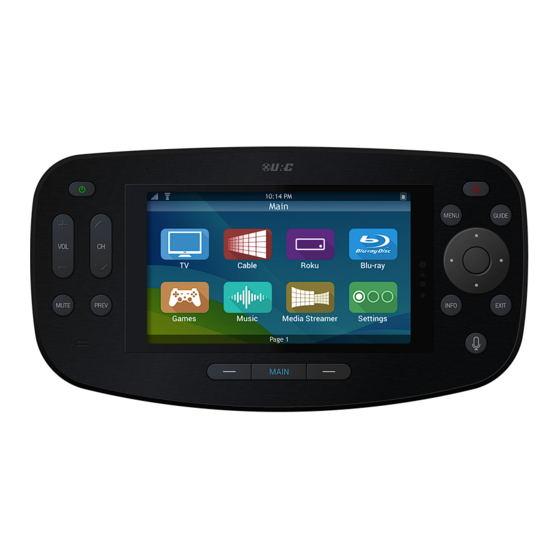
- Page 6 MX-4000 Complete Control Owner’s Manual Using the MX-4000 The Main Menu pages display activities and/or devices. Press the Main Button to access the Main Menu. Larger systems may have more than one (1) page. Press the Page buttons on either side of the Main button to view additional Main Menu pages.
- Page 7 MX-4000 Complete Control Owner’s Manual Using the MX-4000 (cont’d) H. Navigation Keys: Comprised of up, down, left, and right. These buttons are used to navigate through the menus and/or device screens. I. Select: Center button of navigation keys, used to confirm selections displayed on a viewing device.
- Page 8 MX-4000 Complete Control Owner’s Manual Using Voice Control The MX-4000 has the capability of using Amazon Alexa Voice Assistant to control activities and devices programmed within the Alexa system. For instructions on how to enable the Alexa Voice service, refer to page The MX-4000 preserves your privacy with a push-to-talk button on the remote control.
- Page 9 MX-4000 Complete Control Owner’s Manual Displaying the Setup Menu The Setup Menu allows users to configure or change certain behaviors and features of the MX-4000. Enter the Setup Menu by pressing and holding the Main and Select (see image at the right) buttons for greater than five (5) seconds. The Setup Menu times out after sixty (60) seconds and returns the MX-4000 to the...
- Page 10 MX-4000 Complete Control Owner’s Manual WiFi Settings Menu The Wi-Fi Settings menu is used to connect the MX-4000 to the user’s preferred local area network settings once connected. Follow these instructions to configure the Wi-Fi for the MX-4000: 1. From the Setup Menu, select Wi-Fi. 2.
- Page 11 MX-4000 Complete Control Owner’s Manual WiFi Settings Menu (cont’d) Wi-Fi Search The Wi-Fi Search opens the Searching of Networks notification and then lists the available network connections: 1. Select Wi-Fi Search from the Wi-fi menu. 2. The Wi-Fi Search notification will pop-up while the MX-400 searches for available networks.
- Page 12 MX-4000 Complete Control Owner’s Manual WiFi Settings Menu (cont’d) Wi-Fi Search (cont’d) 3. A completed Wi-Fi search will display: A. The name, signal strength and Wi-Fi channel number of each discovered Wi-Fi network signal. Shows the signal strength, a lock indicating that the network requires a password and a green check indicating that it is the assigned network.
- Page 13 MX-4000 Complete Control Owner’s Manual WiFi Settings Menu (cont’d) Wi-Fi Search (cont’d) 5. Select Password. 6. Key in the password using the onscreen keyboard and select Enter. 7. Select to accept the password that was entered. Table of Contents...
- Page 14 MX-4000 Complete Control Owner’s Manual WiFi Settings Menu (cont’d) My Networks The My Networks menu displays a list of SSID’s that have been added to the MX-4000 using the Wireless Search or the Add Other methods. To select an available SSID added to the MX-4000: 1.
- Page 15 MX-4000 Complete Control Owner’s Manual WiFi Settings Menu (cont’d) Advanced Settings The Advanced Settings shows the MX-4000's current network settings. To view the MX-4000's current network settings: 1. Select Advanced Setting from the Wi-fi menu. 2. The network setting are now displayed, select on Change Settings to make changes.
- Page 16 MX-4000 Complete Control Owner’s Manual Voice Assistant Setup This option allows you to integrate your Amazon Alexa Voice Assistant and Comcast Xfinity voice module with the MX-4000. Amazon Alexa Voice Assistant setup Follow these instructions to enable the Alexa Voice Assistant service. Once enabled, use the push-to-talk button to issue vocal commands to the Alexa system: 1.
- Page 17 MX-4000 Complete Control Owner’s Manual Voice Assistant Setup (cont’d) Amazon Alexa Voice Assistant setup (cont’d) Voice Assistant Settings After setup, the Voice Assistant menu offers a few features to customize how the remote interacts with Alexa. • Login: Selecting Login will begin the Alexa login and authentication sequence.
- Page 18 MX-4000 Complete Control Owner’s Manual Voice Assistant Setup (cont’d) Amazon Alexa Voice Assistant setup (cont’d) Voice Assistant Settings After setup, the Voice Assistant menu offers a few features to customize how the remote interacts with Alexa. Login 1. Selecting Login will begin the Alexa login and authentication sequence.
- Page 19 MX-4000 Complete Control Owner’s Manual Voice Assistant Setup (cont’d) Amazon Alexa Voice Assistant setup (cont’d) 3. You will now be prompted with a code to enter on your smartphone, computer or tablet at amazon.com/code. 4. Select Next when you are asked if you are ready to use Alexa and to try some things.
- Page 20 MX-4000 Complete Control Owner’s Manual Voice Assistant Setup (cont’d) Amazon Alexa Voice Assistant setup (cont’d) 5. Follow the on screen instructions and select Next when done. 6. Select Done to complete the login and authentication process. Table of Contents...
- Page 21 MX-4000 Complete Control Owner’s Manual Voice Assistant Setup (cont’d) Amazon Alexa Voice Assistant setup (cont’d) Voice Assistant Settings After setup, the Voice Assistant menu offers a few features to customize how the remote interacts with Alexa. Logout 1. Selecting Logout removes Alexa integration from the remote. The Mic button no longer functions with Alexa until it has been configured again.
- Page 22 Amazon Alexa notifications through the URC system. • Audio Cue: Using the Audio Cue option enables the Alexa audio tone that occurs when the microphone button is pressed on the URC client device. Table of Contents...
- Page 23 MX-4000 Complete Control Owner’s Manual Voice Assistant Setup (cont’d) Amazon Alexa Voice Assistant setup (cont’d) Audio Settings (cont’d) 1. Selecting Alexa Voice Volume allows the user to set the the volume level of the Alexa voice output. 2. Use the Minus and Plus signs to decrease or increase the Alexa Voice Volume.
- Page 24 Amazon Alexa Voice Assistant setup (cont’d) Audio Settings (cont’d) 1. Selecting Notification Volume allows the user to set the volume level for Amazon Alexa notifications through the URC system. 2. Use the Minus and Plus signs to decrease or increase the Notification Volume.
- Page 25 Audio Settings (cont’d) 1. Selecting the Audio Cue option enables the Alexa audio tone that occurs when the microphone button is pressed on the URC client device. Ã 2. Use the Toggle to turn the option OFF or ON to be prompted with an audio cue when Alexa is listening.
- Page 26 MX-4000 Complete Control Owner’s Manual Voice Assistant Setup (cont’d) Amazon Alexa Voice Assistant setup (cont’d) Alexa’s Language 1. Selecting Alexa's Language will give you a list of the available languages which can be used with Alexa. 2. Use the radio buttons to choose your desired Alexa Language.
- Page 27 MX-4000 Complete Control Owner’s Manual Voice Assistant Setup (cont’d) This option allows you to integrate your Amazon Alexa Voice Assistant and Comcast Xfinity voice module with the MX-4000. Comcast Xfinity setup Follow these instructions to enable the Comcast Xfinity voice module.
- Page 28 MX-4000 Complete Control Owner’s Manual Voice Assistant Setup (cont’d) Comcast Xfinity setup Voice Module After setup, the voice module menu offers a few features to customize how the remote interacts with Comcast Xfinity. • Enter IP Address to Connect: Selecting this item will open the Comcast Enter IP Notification screen.
- Page 29 MX-4000 Complete Control Owner’s Manual Voice Assistant Setup (cont’d) Comcast Xfinity setup 1. Select Enter IP Address to Connect to open the Comcast Enter IP Notification screen. 2. You will prompted that a Comcast box must be enabled for IP control in order for the Xfinity voice feature to work.
- Page 30 MX-4000 Complete Control Owner’s Manual Voice Assistant Setup (cont’d) Comcast Xfinity setup (cont’d) 3. Use the numerical keypad to enter the IP Address of the Comcast Xfinity cable box and then select Enter. Table of Contents...
- Page 31 MX-4000 Complete Control Owner’s Manual Voice Assistant Setup (cont’d) Comcast Xfinity setup (cont’d) 1. Select Disconnect to disconnect the usage of this device from using the Xfinity Voice module. 2. On the Disconnect screen, you will be asked if Are you sure you want disconnect the Xfinity voice service? Select Yes or No to disconnect or stay connected.
- Page 32 MX-4000 Complete Control Owner’s Manual Voice Assistant Setup (cont’d) Comcast Xfinity setup (cont’d) 1. Select Choose Devices to pick the devices on your remote that you want Xfinity voice to activate when pressing the mic button. 2. Select Next to view a list of devices. Table of Contents...
- Page 33 MX-4000 Complete Control Owner’s Manual Voice Assistant Setup (cont’d) Comcast Xfinity setup (cont’d) 3. Use the check boxes to add or remove devices for Xfinity voice control. Using the up and down arrows and scroll bar gives the ability to scroll through the list of devices. More than 1 device can be selected on this list Once the devices have been chosen, press the Save button Pressing Cancel...
- Page 34 MX-4000 Complete Control Owner’s Manual Sleep Timers The Sleep Timers settings are used to manage when the LCD screen will turn off while the MX-4000 is running on battery power and is charging on the cradle. 1. From the Setup Menu, select Sleep Timers. 2.
- Page 35 MX-4000 Complete Control Owner’s Manual Event Timer The Event Timer settings are used to enable and disable Event Timers programmed within the Complete Control system 1. From the Setup Menu, select Event Timer. 2. Use the check boxes to enable or disable the Event Timers.
- Page 36 If the advanced system controller is reset, it defaults to the program’s default location using the Internet. If Internet is not present, the date and time must be entered manually from a URC interface such as the MX-4000. 1. From the Setup Menu, select Date & Time.
- Page 37 MX-4000 Complete Control Owner’s Manual Power Displays the remote’s remaining battery level. Adjust when the “Low Battery” warning screen appears. 1. From the Setup Menu, select Power. 2. View the amount of Batter Power Remaining and adjust the Low Battery Warning level to 10%, 20%, 30%, 40% or 50%. Once the power has been adjusted, press the Save button Pressing Cancel reverts the device to the last saved setting.
- Page 38 MX-4000 Complete Control Owner’s Manual Brightness Adjust the screen and button brightness by pressing Plus and Minus symbols to increase or decrease the brightness level. 1. From the Setup Menu, select Brightness. 2. Use the Minus and Plus signs to decrease or increase the Screen and/or Button Lights.
- Page 39 MX-4000 Complete Control Owner’s Manual Sound (Button Beep) Adjust the button “beep” of the remote. Press the Plus and Minus symbols to increase or decrease the volume level. 1. From the Setup Menu, select Sound. 2. Use the Minus and Plus signs to decrease or increase the Beep Level Volume.
- Page 40 MX-4000 Complete Control Owner’s Manual Pickup Turn on or off the remote’s pickup sensor. When enabled, the MX-4000 turns on when the remote is picked up. Select Yes (turn on) or No (turn off). 1. From the Setup Menu, select Pickup. Ã...
- Page 41 MX-4000 Complete Control Owner’s Manual System Displays information about the remote’s operating system, memory, etc. Pressing the Exit button exits to the remote’s System Menu. 1. From the Setup Menu, select System. 2. Pressing the Exit button exits to the device’s System Menu. Table of Contents...
- Page 42 Resets the memory of the MX-4000 to the factory settings. All existing programming is erased. The device requires reconfiguration by your certified URC integrator. WARNING! Only use this button when instructed by URC’s Technical Support team. 1. From the Setup Menu, select Factory Default ( For 5 Seconds 2.
- Page 43 LCD: 5.0” TFT-LCD (720 x 1280), 16.7M colors Limited Warranty Statement Touch Window: Capacitive Touch https://www.urc-automation.com/legal/warranty-statement/ Sound: Mono 1.5W End User Agreement The terms and conditions of the End User Agreement available at Sensors: Pickup sensor https://www.urc-automation.com/legal/end-user-agreement/...
- Page 44 MX-4000 Complete Control Owner’s Manual Regulatory Information to the User • CE conformity Notice Products with “CE” marking comply EMC Directive 2014/30/EU issued by the commission of the European Community. 1. EMC Directive • Emission • Immunity • Power • Declaration of Conformity “Hereby, Universal Remote Control Inc.
Need help?
Do you have a question about the Complete Control MX-4000 and is the answer not in the manual?
Questions and answers