
Subscribe to Our Youtube Channel
Related Manuals for Seeley Braemar Invertair SACV10D1S


Summary of Contents for Seeley Braemar Invertair SACV10D1S
- Page 1 INSTALLATION MANUAL Braemar Invertair - True Inverter Add-On Cooling Unit ™ SACV10D1S / SCHV10D1S SACV12D1S / SCHV12D1S SACV14D1S / SCHV14D1S (English) (Invertair SACV16D1S / SCHV16D1S Original English Instructions...
- Page 2 CHECKING RECEIVED PRODUCT Upon receiving the appliance, please inspect for damage. Claims for damage should be reported immediately with the transportation company. Check the model number of the appliance and ensure it matches the order. In the event an incorrect appliance or a damaged appliance is delivered, it must be returned to the supplier and must NOT be installed.
-
Page 3: Table Of Contents
WARNING! Failure to install and commission the product in compliance with these instructions, or failure to do the job properly and compe- tently, may void the customer’s warranty. Further, it could expose the Installer and/or the Retailer to serious liability. SEELEY INTERNATIONAL - INSTALLATION MANUAL |... -
Page 4: Before You Start
BEFORE YOU START Installation training is available from Seeley International for RISK ASSESSMENT qualified and licensed installers; please contact your local office A risk assessment of all hazardous tasks is required before for training dates. commencing any work, and may be required under legislation. -
Page 5: Most Common Causes Of Poor Cooling Performance
Ensure correct cable and circuit breaker are used. Power Electrical cable sizes are recommended only; AS/NZS 3000 and all 16 - 18 local, state and national codes must be adhered to. Commissioning Complete the commissioning data checklist. SEELEY INTERNATIONAL - INSTALLATION MANUAL |... -
Page 6: Troubleshooting
TROUBLESHOOTING Symptom Cause Action Power failure. Wait for power to resume. Fuse blown or circuit breaker open. Replace the fuse or reset the breaker. Voltage is too low. Find the cause and fix it. The air conditioner does not Electrical connections loose. Retighten the connection. -
Page 7: Typical Installation / Diagram Of Key Components
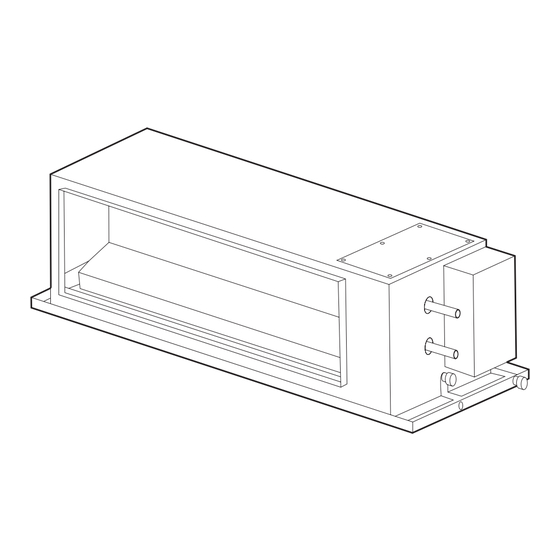
Indoor Unit Outdoor Unit 18°C - 30°C -15°C - 48°C Indoor and Outdoor unit operating temperature range: Dimension (mm) Supply Air Return Air Model SACV10D1S 1280 SACV12D1S 1280 SACV14D1S 1280 SACV16D1S 1110 1110 1442 SEELEY INTERNATIONAL - INSTALLATION MANUAL |... - Page 8 Return air connection is NOT permitted on the motor side of the fan assembly! SUPPLY Air Duct It is a requirement that Seeley Cooling Coil supplied duct transitions must be used! (To ensure good even air ow across the coil.)
-
Page 9: Thermistor Installation
3 - Attach heater transition assemblies (C) to heater. Return must be connected to non-motor side of the fan as shown. 4 - Square sides of transitions and secure with self drilling screws supplied in kit. SEELEY INTERNATIONAL - INSTALLATION MANUAL |... -
Page 10: Flexible Ductwork Connections
INDOOR COOLING COIL UNIT DIMENSIONS cont. Recommended Duct Sizes Refrigerated Cooling and Gas Ducted Heating Only Main Branch &/or Return Duct Description Final Duct Duct Duct Note! As per Ducted Gas Heater Installation Manual Max. Velocity (m/s) • If duct run exceeds 6m, increase the full length by 50mm Flexible Duct Size Duct Capacity (L/S) (mm) -
Page 11: Outdoor Unit Installation
Hd>1/2H Prohibited Air deflectors allow a reduction in the clearance "d" and they can be purchased from Seeley International, refer to the Technical Specification table on page 26. Please contact Seeley International for further advice. SEELEY INTERNATIONAL - INSTALLATION MANUAL |... -
Page 12: Outdoor Dimensions
OUTDOOR UNIT INSTALLATION cont. OUTDOOR DIMENSIONS ILL1995-A Outdoor Model SCHV10D1S 1107 1100 SCHV12D1S SCHV14D1S 1085 1365 SCHV16D1S Location considerations: • Most importantly, do not install the Outdoor unit where there is a possibility it will cause a noise complaint from neighbours. Be mindful of the environment. -
Page 13: Refrigerant Pipe-Work
SCHV10D1S / SCHV10DS 3.0 - 7.0 - 50.0 SCHV12D1S / SCHV12DS 9.53 ( ) / 15.88 ( SCHV14D1S / SCHV14DS 3.0 - 9.5 - 50.0 SCHV16D1S / SCHV16DS 9.53 ( ) / 19.05 ( SEELEY INTERNATIONAL - INSTALLATION MANUAL |... -
Page 14: Connection Between Indoor Unit And Outdoor Unit
REFRIGERANT PIPE-WORK cont. • Always uncoil piping by unwinding from the coil - never pull the coil apart. û ü ILL2008-A • Do not repeatedly bend or stretch the pipe more than 3 times. Excessive bending will break the pipe. •... -
Page 15: Condensate Drain Pipe
Clean Out 50mm Floor (TYP.) 100mm Floor Clean Out 50mm Where a drain exceeds 5m horizontally, a vent may (TYP.) be required, this will ensure smooth flow of water to Floor the discharge point. SEELEY INTERNATIONAL - INSTALLATION MANUAL |... -
Page 16: Electrical Wiring
ELECTRICAL WIRING MAINS & CONTROL WIRING WARNING! Only licensed trades persons must carry out all the wiring work. Check AS/NZS WIRING RULES for PROTECTION sizing and cable sizes. Always refer to the relevant wiring standard for the electrical installation, and ensure the appliance is installed in accordance with local, state and national wiring regulations. -
Page 17: Wiring Precautions
1&2 supplied by installer RJ45 DRED CONNECTOR H1 & H2 are for installer testing purposes, or non-Seeley controller connection NOTE: Do not apply 240V to terminals 1, 2, H1, H2 ILL2002-B SEELEY INTERNATIONAL - INSTALLATION MANUAL |... -
Page 18: Wiring Indoor Unit Side
ELECTRICAL WIRING cont. WIRING INDOOR UNIT SIDE Remove the electric box cover to access the connection panel. CN11 Modbus communication cable to “Cooler” connection port on heater ICS board 1 & 2 connects to 1 & 2 at matching inverter outdoor unit ILL2003-B WIRING OUTDOOR UNIT SIDE... -
Page 19: Magiqtouch Controller Set Up
For Zoned installations the Invertair™ inverter is required to be connected to the MAGIQTOUCH Zone Control module. The RJ 6 way connector must be secured to the MAGIQTOUCH Zone Control module and the JST connector to the Invertair™ inverter. ILL1802-D SEELEY INTERNATIONAL - INSTALLATION MANUAL |... -
Page 20: Magiqtouch Controller Configuration
MAGIQTOUCH CONTROLLER CONFIGURATION ADDING INVERTAIR INVERTER TO NEW SYSTEM For a new installation refer to the MAGIQTOUCH Controller installation manual for “System Installation Wizard”, this will step you through the complete process. ADDING INVERTAIR™ INVERTER TO AN EXISTING MAGIQTOUCH INSTALLATION The MAGIQTOUCH Controller keeps a list of all the installed components and regularly checks that all components are responding. - Page 21 Setting Zone fan speed ILL2014-A 1. To adjust ZONE FAN SPEEDS go to the COOLER settings menu. ILL2015-A 2. Select zones to modify fan speeds. ILL2016-A 3. Adjust fan speed accordingly from 6 – 10. SEELEY INTERNATIONAL - INSTALLATION MANUAL |...
- Page 22 01:29 COOLER COOLER 01:29 THU 19 MAR 2022 MIN / MAX SET TEMPERATURE 18-28°C MIN / MAX SET TEMPERATURE ROOM FAN RUN-ON TIME ROOM FAN RUN-ON TIME 18-28°C Select “continuous if you want to keep the Room Fan running Select “continuous if you want to keep the Room Fan running ROOM FAN RUN-ON TIME Continuous Continuous...
-
Page 23: Start & Commissioning
Note! Where the difference in elevation between the Indoor unit and the Outdoor unit is greater than 6m, install an oil trap every 6m, in the vertical pipe section. CAUTION! Remove the service gauge set from the lines carefully. Escaping liquid refrigerant can cause burns. SEELEY INTERNATIONAL - INSTALLATION MANUAL |... -
Page 24: Error Codes
ERROR CODES Error codes and their meanings are shown below: Error Number Error Description Number Error Code Error Description Code ODU jumper malfunction Compressor start up failure Capacity code error Compressor phase sequence protection Pump error Indoor and outdoor mismatch Compressor high pressure protection Compressor stall Indoor anti-freeze protection... -
Page 25: Braemar Refrigerated Air Conditioning - Commissioning Sheet
Both systems checked, tested and working correctly on Heating and Cooling? Airflow from all outlets checked and meet airflow requirements for the conditioning area? Zone motors (if applicable) checked and open and close correctly? SEELEY INTERNATIONAL - INSTALLATION MANUAL |... -
Page 26: Technical Specification
COMMISSIONING CHECKLIST - cont. Customer assistance □ Explained to the home owner/user the general operation of the Braemar Invertair™ - True Inverter Add-On Cooling unit, and how to achieve best performance. □ Explained to the home owner/user the importance of regular maintenance and service (ie to ensure good performance, prolong the life of the unit, and because it is a condition of Warranty cover). -
Page 27: Removal And Disposal
For complete warranty terms and conditions, refer to separate Warranty Booklet and/or www.braemar.net.au Warranty conditions are subject to property access and industry Safety Standards. Seeley International strives for continuous product improvements, therefore specifications are subject to change without notice. Unit colour may vary slightly from that depicted in this booklet. - Page 28 For access to Technical/Installation/Service Information register online seeleyinternational.com/service Spare Parts Information To identify and order spare parts for Seeley International products online go to: seeleyinternational.com/get-support/spare-parts It is the policy of Seeley International to introduce continuous product improvement. Accordingly, specifications are subject to change without notice.
Need help?
Do you have a question about the Braemar Invertair SACV10D1S and is the answer not in the manual?
Questions and answers