BST ekr 500 digital Operating Manual
Unit touch
Hide thumbs
Also See for ekr 500 digital:
- Installation and operating manual (204 pages) ,
- Installation and commissioning manual (162 pages) ,
- Operating manual (101 pages)

Related Manuals for BST ekr 500 digital


Summary of Contents for BST ekr 500 digital
- Page 1 Web Guiding System Operating Manual ekr 500 digital Unit Touch MD.492.EN.07 Translation of the Original Manual...
- Page 2 BST GmbH Remusweg 1 D-33729 Bielefeld Tel.: +49 (0) 521 400 70 0 Fax: +49 (0) 5206 999 999 E-Mail: info@bst.group Internet: www.bst.group This documentation is protected by copyright. The translation as well as reproduction and distribution in any form is forbidden without the approval...
-
Page 3: Table Of Contents
Keys.......................... 25 Designation of the Sensors .................. 26 3.7.1 Edge Sensors (Sensor 1/2) .................. 26 3.7.2 Line, Contrast and Object Sensor (Sensor 3)............... 27 3.7.3 CCD Cameras (Sensor 1/2) .................. 28 Nameplates ......................... 29 ekr 500 digital Unit Touch – Operating Manual... - Page 4 5.13.9 Line Width Measurement .................. 108 5.14 Sensor Positioner ...................... 110 5.14.1 Utilization........................ 110 5.14.2 Operation Display ..................... 111 5.14.3 Operation........................ 112 5.15 Positioning Unit...................... 115 5.15.1 Utilization........................ 115 5.15.2 Requirements...................... 116 ekr 500 digital Unit Touch – Operating Manual...
- Page 5 Cleaning the Housing of the CCD Camera.............. 150 6.3.7 Cleaning the Electric Motor Powered Actuator Housing .......... 150 6.3.8 Cleaning the Sensor Positioner Housing .............. 151 7 Troubleshooting..................... 152 8 Customer Services.................. 158 9 Shutting Down and Disposal................ 159 Index...................... 160 ekr 500 digital Unit Touch – Operating Manual...
-
Page 6: About This Document
Here you can find how to avoid the danger. ► NOTICE Danger that may lead to damage to assets! There is no risk of injury. Here you can find how to avoid the danger. ► 6/163 ekr 500 digital Unit Touch – Operating Manual... -
Page 7: Symbols
Operations using the keys are indicated by the following symbols: Press key ①. ► Press key ① or key ②. ► Press key ① and key ② at the same time. ► ekr 500 digital Unit Touch – Operating Manual 7/163... -
Page 8: More Detailed Information
The latest version of these instructions in all available languages as well as further documents on this system can be found in the Internet on our help portal BST.Help. Simply click on the docu- ment number in the table. The link will lead you directly to the se- lected document on BST.Help. -
Page 9: About Safety
The product may only be operated with the components ■ belonging to the system. The only third-party components exempt from the above are those supplied by BST or explicitly approved for use with the system. Parts that are not in perfect condition must immediately be ■... -
Page 10: Non-Intended Use
Operation of the product near to sources of interference, e.g. ■ electro-magnetic fields (high voltage lines) or sources of heat Operation of the product under the influence of chemical, ■ electro-chemical or electrical factors 10/163 ekr 500 digital Unit Touch – Operating Manual... -
Page 11: Non-Intended Modification Of Electronic Data
Non-intended Modification of Electronic Data No virus scanners, firewalls or similar items may be installed on ■ any products of BST GmbH. Virus scanners or other scan or registration programs must not (be able to) access products via networks. Writing, deleting and editing of system data / files on BST ■... -
Page 12: Safety Instructions
Danger of cutting on sharp edges of the material web! Severe cutting injuries caused by the edges of the moving material web. Never touch the edges of moving material webs. ► 12/163 ekr 500 digital Unit Touch – Operating Manual... - Page 13 When returning electronic assembly elements, adhere to DIN ► EN 100015 (“Protection of protection of electrostatic-sensitive devices”). To transport electronic components, only use suitably marked, ► electrically conductive ESD packaging. ekr 500 digital Unit Touch – Operating Manual 13/163...
-
Page 14: Qualification Of The Personnel
Operating instructions for the entire system ■ National guidelines, laws and applicable guidelines for protecting ■ employees, general safety at workplaces and for accident pre- vention 14/163 ekr 500 digital Unit Touch – Operating Manual... -
Page 15: Duties Of The Operating Company And Personnel
Only personnel are assigned that are qualified and trained for ■ the respective task The responsibility of the personnel is determined for the task ■ to be completed and that the personnel are informed ekr 500 digital Unit Touch – Operating Manual 15/163... -
Page 16: Duties Of The Personnel
4. Initiate first aid measures. 5. Warn the emergency doctor and / or fire brigade. 6. Inform the responsible person at the operating location. 7. Clear the access route for the emergency vehicles. 16/163 ekr 500 digital Unit Touch – Operating Manual... -
Page 17: Personal Protective Equipment
The warranty terms are specified in the sales documentation. 2.8.1 Disclaimer BST GmbH is not liable for damage or defects arising from any incorrect or non-intended use of the product, see Non-intended Use, page 10. Liability for defects does also not apply if the fault originates from... -
Page 18: Exceptions To The Disclaimer
About Safety 2.8.2 Exceptions to the Disclaimer In the cases listed above BST GmbH shall also not be liable (for damages) unless: The damage results from a willful or grossly negligent breach of ■ duty on the part of BST GmbH or its legal representatives or... -
Page 19: Design And Function
In this case the connection between the controller and the control panel is completed using a cable extension that is available as an optional extra. Fig. 2: Controller with ekr commander control panel detached ekr 500 digital Unit Touch – Operating Manual 19/163... -
Page 20: Function
The actuator will move the guiding device (rotating frame guide or swivel roll guide) until the material web returns to its SETPOINT position. 20/163 ekr 500 digital Unit Touch – Operating Manual... -
Page 21: Guiding Modes
Special Guiding and Monitoring Functions For applications with special requirements on the web guiding system the ekr 500 digital Unit Touch controller offers a range of special guiding and monitoring functions. 3.4.1... -
Page 22: Overlaid Web Edge/Web Center-Line Guiding With Cls Cam 100 Object Sensor
CCD cameras. For a detailed description of this function, see chapter Master- Slave Guiding, page 86. 22/163 ekr 500 digital Unit Touch – Operating Manual... -
Page 23: Tear-Off Detection
The line width measurement enables a continuous monitoring of the width of a printed line during the production process. In doing so, the line is scanned by a BST CLS Pro 600 line and contrast sensor or a CLS CAM 100 object sensor. -
Page 24: Motorized Sensor Positioning
Design and Function Motorized Sensor Positioning 3.5.1 Sensor Positioner The ekr 500 digital Unit Touch controller has a connection for a motorized FVG POS 100 sensor positioner. The sensor positioner enables the motorized positioning of the edge sensors connected (Sensor 1, Sensor 2). -
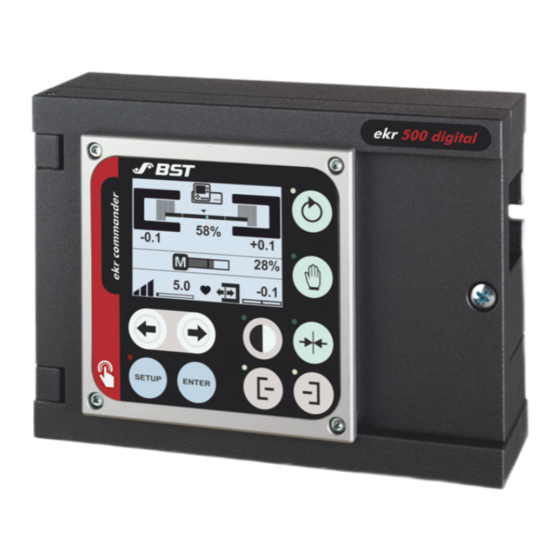
Page 25: Control And Display Elements
Move the guiding device manually, Set the guiding setpoint, Adjust the controller gain, Edit the parameter values For the meanings of the individual keys, see ekr commander Control Panel, page 31. ekr 500 digital Unit Touch – Operating Manual 25/163... -
Page 26: Designation Of The Sensors
In this manual, the sensors are designated with Sensor 1, Sensor 2 and Sensor 3. In accordance with the BST definition, the following assignment applies between the sensors and the selector keys for... -
Page 27: Line, Contrast And Object Sensor (Sensor 3)
⑥ Printed line In order to achieve optimum guiding results, the distance between the sensors and the outfeed roll ① of the guiding device must be kept as small as possible. ekr 500 digital Unit Touch – Operating Manual 27/163... -
Page 28: Ccd Cameras (Sensor 1/2)
Fig. 9: Web center-line guiding with two CCD cameras Adjustment of the CAN address of the CCD camera(s), see separate instruction manual. CCD Camera Instruction Manual (Document Number) CCDPro 30000/5000 MD.167 CCD CAM 100 MD.465 28/163 ekr 500 digital Unit Touch – Operating Manual... -
Page 29: Nameplates
Hardware version ⑦ Operating voltage Date of manufacture ⑧ (Calendar week / Year) ⑨ Protection type ⑩ Nominal current consumption Data matrix code, ⑪ Code Content = 30 digit serial number (IDC) ekr 500 digital Unit Touch – Operating Manual 29/163... -
Page 30: Technical Specifications
Technical Specifications For the technical specifications of the ekr 500 digital Unit Touch controller and the connectable web guiding components please refer to the installation and commissioning manual ekr 500 digital Unit Touch, document number MD.497. 30/163 ekr 500 digital Unit Touch – Operating Manual... -
Page 31: Operation
Signals that are located on the remote control inputs of the controller block the keys on the control panel with counter functions. You can find the function of the individual keys in the following table. ekr 500 digital Unit Touch – Operating Manual 31/163... - Page 32 In automatic operating mode: Activate the gain setting Setup mode ENTER Accept the set value (gain setting) Arrow keys Reduce / increase the parameter value of left / right the gain setting. 32/163 ekr 500 digital Unit Touch – Operating Manual...
-
Page 33: Touchscreen Operation
A numeric keypad appears that can also be operated using your fingers. After entering the desired numerical value and con- firming with the button, you return to the original menu. The numeric value entered appears in the respective input field. ekr 500 digital Unit Touch – Operating Manual 33/163... - Page 34 3. To adopt the numerical value set, press the function button again. The function button is displayed with a blue background again. The swiping function is activated. 34/163 ekr 500 digital Unit Touch – Operating Manual...
-
Page 35: Access To The Online Documentation
The operation display in the display of the control panel shows the different operating states and all relevant control parameters as graphical symbols and numeric values. You will find the meanings for the individual symbols in the following illustration. ekr 500 digital Unit Touch – Operating Manual 35/163... - Page 36 Operation display edge sensor ② (Sensor 2) Displays the setpoint of the ③ web edge Status display System OK ④ (heart beats) ⑤ Displays the controller gain ⑥ Actuator operation display 36/163 ekr 500 digital Unit Touch – Operating Manual...
- Page 37 ① line / contrast sensor (Sensor 3) Displays the setpoint of the ② web edge Status display System OK ③ (heart beats) ④ Displays the controller gain ⑤ Actuator operation display ekr 500 digital Unit Touch – Operating Manual 37/163...
- Page 38 Actuator operation display * A description of the different control modes of the CLS CAM 100 object sensor can be found in the separate installation and operat- ing manual CLS CAM 100, document number MD.577. 38/163 ekr 500 digital Unit Touch – Operating Manual...
- Page 39 Operation display CCD camera ② (right edge) Displays the setpoint of the ③ web edge Status display System OK ④ (heart beats) ⑤ Displays the controller gain ⑥ Actuator operation display ekr 500 digital Unit Touch – Operating Manual 39/163...
- Page 40 Operation display edge sensor ② (Sensor 2) Displays the setpoint of the ③ web edge Status display System OK ④ (heart beats) ⑤ Displays the controller gain ⑥ Actuator operation display 40/163 ekr 500 digital Unit Touch – Operating Manual...
- Page 41 To activate the function, see Automatic Setpoint Acceptance, page 112. Fig. 18: Operation display with activated automatic setpoint acceptance ekr 500 digital Unit Touch – Operating Manual 41/163...
-
Page 42: Edge Sensors Operation Display (Sensor 1/2)
The numeric value indicates the current web edge position. Connection via CAN bus: ② Position of the web edge in the sensor scanning area (unit [mm] or [inch]) 42/163 ekr 500 digital Unit Touch – Operating Manual... -
Page 43: Cls Pro 600 Line And Contrast Sensor Operation Display (Sensor 3)
Fig. 20: CLS Pro 600 line and contrast sensor operation display The appearance of the operation display depends on the guiding mode that is selected on the line and contrast sensor. Line guiding Contrast guiding ekr 500 digital Unit Touch – Operating Manual 43/163... - Page 44 = 50% transition = 75% The contrast transition is The contrast transition is located in the center of the located at 75% of the sensor sensor scanning area. scanning area. 44/163 ekr 500 digital Unit Touch – Operating Manual...
-
Page 45: Cls Cam 100 Object Sensor Operation Display (Sensor 3)
The light blue bar marks the current position of the line, ② contrast transition or print feature. The value specifies the position of the line, contrast transition ③ or print feature within the sensor scanning area. ekr 500 digital Unit Touch – Operating Manual 45/163... - Page 46 Position of the print feature = 0 Position of the print feature = -19.8 The print feature is located in The distance of the print feature the center of the sensor to the center of the sensor scanning area. scanning area is -19.8 mm. 46/163 ekr 500 digital Unit Touch – Operating Manual...
-
Page 47: Ccd Cameras Operation Display
CAN address camera 2 = 31 Adjustment of the CAN address of the CCD camera(s), see separate instruction manual. CCD Camera Instruction Manual (Document Number) CCDPro 30000/5000 MD.167 CCD CAM 100 MD.465 ekr 500 digital Unit Touch – Operating Manual 47/163... - Page 48 The value specifies the web edge position as a percentage or ③ absolute value (see Display of the Web Edge Position, page 49). The contrast transition (white / black) marks the actual ④ position of the web edge. 48/163 ekr 500 digital Unit Touch – Operating Manual...
- Page 49 Edge position = 0% Edge position = -46% The web edge is located in the The web edge is located at -46% center of the camera measuring of the camera measuring range. range. ekr 500 digital Unit Touch – Operating Manual 49/163...
- Page 50 Edge position = +148,3 The web edge is located in the The distance from the web edge center of the camera measuring to the center of the camera range. measuring range is 148.3 mm. 50/163 ekr 500 digital Unit Touch – Operating Manual...
-
Page 51: Actuator Operation Display
When the normalized display is active, the po- sition of the actuator is shown in the operation display as an abso- lute value in the units [mm] or [inch]. Fig. 25: Normalized display of the actuator position ekr 500 digital Unit Touch – Operating Manual 51/163... -
Page 52: Configurable Displays And Setting Menus
Operation When operating the ekr 500 digital Unit Touch controller with the CLS CAM 100 object sensor, the normalized dis- play of the actuator position must always be activated. The procedure for commissioning the normalized display is described in the installation and commissioning manual ekr 500 digital Unit Touch, document number MD.497... - Page 53 The number of circles indicates how many displays or menus are activated (five in the example). The black filled circle shows the position of the currently displayed menu within the menu sequence (in the example menu 2 of 5). ekr 500 digital Unit Touch – Operating Manual 53/163...
-
Page 54: Performing The Material Setup
■ for saving the bright / dark values of the sensors. The manual material setup should always be used if the con- ■ trast that has to be scanned is critical. 54/163 ekr 500 digital Unit Touch – Operating Manual... - Page 55 Fig. 29: Screen display with the connection of the sensor via CAN bus ① Bright / dark value (numeric display) 100.0% = scanning area is completely free 0.0% = scanning area is completely covered ② Bright / dark value (graphical display) ekr 500 digital Unit Touch – Operating Manual 55/163...
- Page 56 ① Dark value (graphical display) ② Current value (graphical display) ③ Bright value (graphical display) Each screen display for the connection of the sensor via CAN bus is shown in the following chapters. 56/163 ekr 500 digital Unit Touch – Operating Manual...
-
Page 57: Activating The Material Setup
3. Press the button for the desired setup type (automatic ① or manual ②). The material setup is active. The bright or dark value determined for the selected sensor is shown in the display under the sensor symbol. ekr 500 digital Unit Touch – Operating Manual 57/163... -
Page 58: Cancelling Material Setup
The dark value measured is displayed. 6. Press the button. The material setup for the selected sensor is completed. The bright / dark values determined are saved. ð The setup menu is displayed. 58/163 ekr 500 digital Unit Touch – Operating Manual... -
Page 59: Manual Material Setup
The dark value measured is displayed. 7. Press the button. The dark value will be saved. The material setup for the selected sensor is completed. ð The setup menu is displayed. ekr 500 digital Unit Touch – Operating Manual 59/163... -
Page 60: Selecting The Operating Mode For The Ir 2011/40 Edge Sensor
IR 2011/40 Operating Modes The desired operating mode is selected in the setup menu using a special setting menu. Fig. 32: Setting menu for selecting the IR 2011/40 edge sensor operating mode 60/163 ekr 500 digital Unit Touch – Operating Manual... -
Page 61: Ir 2011/40 Operating Modes
Scanning of material webs extremely short response times with highly dynamic web 24 mm position errors and high web (± 12 mm) Sensor measuring value follows any web ■ speeds edge position change without delay ekr 500 digital Unit Touch – Operating Manual 61/163... -
Page 62: Operating Mode Selection
The setting menu is closed. The setup menu is displayed. 7. Press the SETUP key, to return to the operation display. 8. Repeat the process for the second edge sensor if desired. 62/163 ekr 500 digital Unit Touch – Operating Manual... -
Page 63: Selecting The Guiding Mode
A CLS Pro 600 line and contrast sensor or a CLS CAM 100 object sensor is connected to the controller as Sensor 3. Press the Sensor 3 key. ► ð The LED of the key will illuminate. ekr 500 digital Unit Touch – Operating Manual 63/163... -
Page 64: Selecting The Operating Mode
To switch the position control on / off, see installation and com- missioning manual ekr 500 digital Unit Touch, document number MD.497. 64/163... -
Page 65: Automatic
Press the Center Positioning key. ► The LED of the key will illuminate. ð The guiding device moves to its central position. ekr 500 digital Unit Touch – Operating Manual 65/163... -
Page 66: Setting The Guiding Setpoint
It is displayed in the operation display. Display for edge sensors (Sensor 1, Sensor 2) Display for CLS Pro 600 line and contrast sensor (Sensor 3) 66/163 ekr 500 digital Unit Touch – Operating Manual... - Page 67 Operation Display for CLS CAM 100 object sensor (Sensor 3) Display for CCD cameras ekr 500 digital Unit Touch – Operating Manual 67/163...
- Page 68 Adjusting the guiding setpoint using the arrow keys of the ■ control panel Adjusting the guiding setpoint using a special setting menu ■ The two methods are described in the following chapters. 68/163 ekr 500 digital Unit Touch – Operating Manual...
-
Page 69: Adjusting The Guiding Setpoint With The Arrow Keys
The new guiding setpoint will have an immediate effect on the controller. If both arrow keys are pressed at the same time then the guiding setpoint is reset to 0. ekr 500 digital Unit Touch – Operating Manual 69/163... -
Page 70: Adjusting The Guiding Setpoint With The Setting Menu
(see Entering the numerical values via the input keyboard, page 33) or using the slide bar (see Editing the numerical values via the slide bar, page 34). The new setting will have an immediate effect on the guiding. 70/163 ekr 500 digital Unit Touch – Operating Manual... -
Page 71: Accepting Current Position Of A Web Edge As Guiding Setpoint
The material web is located in the desired position. Press the ENTER key. ► ð The controller accepts the current position of the web edge as the new guiding setpoint for the web guiding. ekr 500 digital Unit Touch – Operating Manual 71/163... - Page 72 ›› Function table 5 (Table 5) or 6 (Table 6) for the allocation of the digital inputs and outputs is active. For selecting the function table see installation and commissioning manual ekr 500 digital Unit Touch, document number MD.497. ››...
-
Page 73: Saving And Loading The Guiding Setpoint
Number of the parameter set loaded ① (see the following table) Symbol Meaning Note Parameter set 1 is loaded Factory setting Parameter set 2 is loaded Parameter set 3 is loaded Parameter set 4 is loaded ekr 500 digital Unit Touch – Operating Manual 73/163... - Page 74 Function table 1 (Table 1) or 4 (Table 4) for the allocation of the digital inputs and outputs is active. For selecting the function table see installation and commissioning manual ekr 500 digital Unit Touch, document number MD.497. Select desired parameter set.
-
Page 75: Entering An Offset Value For The Guiding Setpoint
A value unequal "0" (in the example "-500") is shown for the guiding setpoint in the display of the controller. ekr 500 digital Unit Touch – Operating Manual 75/163... - Page 76 If the guiding setpoint is set to the value "0", the material web runs exactly through the middle of the machine. 76/163 ekr 500 digital Unit Touch – Operating Manual...
-
Page 77: Optimizing The Controller Gain
CLS CAM 100, document number MD.577. You can set the controller gain either using the arrow keys or by entering a specific value using the touchscreen function. ekr 500 digital Unit Touch – Operating Manual 77/163... -
Page 78: Adjusting The Controller Gain With The Arrow Keys
3. Enter the desired value for the controller gain. 4. Confirm the entry with the button. ð The gain setting is complete. If control oscillations do not occur we recommend setting the maximum gain. 78/163 ekr 500 digital Unit Touch – Operating Manual... -
Page 79: Special Guiding And Monitoring Functions
Fig. 39: Correct arrangement of the capture sensor and the line / contrast / object sensor ① Capture sensor ② Line / contrast / object sensor (CLS Pro 600 in this case) ③ Capture sensor scanning area ④ Line and contrast sensor scanning area ekr 500 digital Unit Touch – Operating Manual 79/163... - Page 80 CLS CAM 100 object sensor on the printed line, contrast trans- ition or print feature. 2. Press the Sensor 3 key on the controller. The LED of the key illuminates. The line / contrast / feature guiding is activated. 80/163 ekr 500 digital Unit Touch – Operating Manual...
- Page 81 If the capture sensor takes over the guiding in event of losing the printed line, contrast transition or print feature then the LED of the respective key (Sensor 1 or Sensor 2) flashes. ekr 500 digital Unit Touch – Operating Manual 81/163...
-
Page 82: Overlaid Web Edge/Web Center-Line Guiding With Cls Cam 100 Object Sensor
One or two edge sensors for web edge or web center-line guid- ■ ing are connected to the controller. The edge sensors are arranged at the same height or behind ■ the object sensor in the web running direction. 82/163 ekr 500 digital Unit Touch – Operating Manual... - Page 83 6. Press the Sensor 3 key on the controller and keep it pressed. The LED of the key illuminates. 7. When using the web edge guiding mode, press the key of the edge sensor used (Sensor 1 or Sensor 2). ekr 500 digital Unit Touch – Operating Manual 83/163...
- Page 84 Sensor 1 and Sensor 2). Caution! Observe the order in all cases! The LEDs of the edge sensors used illuminate. ð The overlaid web edge/web center-line guiding is switched on. 84/163 ekr 500 digital Unit Touch – Operating Manual...
-
Page 85: Speed-Dependent Guiding
Determining the speed signal at Vel. mV max speed 0 … 10,000 mV Factory setting: 10,000 mV maximum machine speed To select the public parameter list (Parameter list 0), see Extended Device Settings, page 140. ekr 500 digital Unit Touch – Operating Manual 85/163... - Page 86 Sensor 1 detects the position of the Master web. ■ Sensor 2 detects the position of the Slave web. ■ A guiding device (e.g. rotating frame guide) guides the Slave web. ■ 86/163 ekr 500 digital Unit Touch – Operating Manual...
-
Page 87: Master-Slave Guiding
1. Perform the material setup for Sensor 1 and Sensor 2. 2. Activate the Master-Slave guiding (DIL switch S6.6 = ON). For adjusting the DIL switch see installation and commissioning manual ekr 500 digital Unit Touch, document number MD.497. 5.13.4.5 Switching On the Master-Slave Guiding WARNING Danger of death from actuator movements! Parts of your body could be crushed, cut or hit. - Page 88 ① Text MASTER ② Operation display Sensor 2 (mirrored) ③ Text SLAVE Operation display with CCD cameras Fig. 43: Operation display Master-Slave guiding with CCD cameras ① Text MASTER ② Text SLAVE 88/163 ekr 500 digital Unit Touch – Operating Manual...
-
Page 89: Tear-Off Detection
It is possible to deactivate the tear-off detection after the detection of a tear-off for a pre-selected period (blocking hold time). ekr 500 digital Unit Touch – Operating Manual 89/163... - Page 90 (time from detecting the end of a tear off inhibit ms Factory settings: 0 ms tear until a new tear can be detected) To select the public parameter list (parameter list 0) see Extended Device Settings, page 140. 90/163 ekr 500 digital Unit Touch – Operating Manual...
-
Page 91: Oscillation
Range of values 0.1 … 50.0 [1/min] Range of values for the oscillation frequency Range of values 1 … 500 [1/min] Speed-dependent See Switching On the Speed- oscillation Dependent Oscillation, page 98. ekr 500 digital Unit Touch – Operating Manual 91/163... - Page 92 50% and guiding setpoint = 0. In the case of a smaller or larger sensor coverage the oscillation amplitude will automatically be restricted, to ensure that the web edge does not leave the sensor scanning area during oscillation. 92/163 ekr 500 digital Unit Touch – Operating Manual...
- Page 93 In order to prevent the actuator from reaching its end position during the oscillation, the amplitude of the oscillation must be smaller than the maximum available actuating path of the actuator. ekr 500 digital Unit Touch – Operating Manual 93/163...
- Page 94 3. Switch the oscillation on or off by tapping the adjacent button. When the oscillation is switched on, the button is displayed with a blue background. 94/163 ekr 500 digital Unit Touch – Operating Manual...
- Page 95 1. Call up the Oscillation Frequency setting menu using the swiping function. The set oscillation frequency is shown in the display as a numeric value and using a ruler display with slider. ekr 500 digital Unit Touch – Operating Manual 95/163...
- Page 96 The oscillation can be initialized by switching to the Center Positioning operating mode. The symbol ① disappears and the oscillation will be restarted at the adjusted guiding setpoint (+2.5 in the example). 96/163 ekr 500 digital Unit Touch – Operating Manual...
- Page 97 Determining the speed signal osc. mV at 100% speed 0 … 10,000 mV Factory setting: 10,000 mV at maximum machine speed To select the public parameter list 2 see Extended Device Settings, page 140. ekr 500 digital Unit Touch – Operating Manual 97/163...
- Page 98 Example Speed signal at maximum machine speed 10,000 mV Set starting threshold > 2% Speed signal that the oscillation is started > 10,000 mV x 0.02 from = 200 mV 98/163 ekr 500 digital Unit Touch – Operating Manual...
- Page 99 If switched on, the button is displayed with a blue background. 4. Confirm the setting by pressing the button. The setting menu is closed. The setup menu is displayed. ekr 500 digital Unit Touch – Operating Manual 99/163...
-
Page 100: Web Width Measurement
The display of the web width is activated in the setup menu for the configurable displays and setting menus (see Switching the Configurable Displays and Setting Menus On/Off, page 123). ›› The display shows the operation display. 100/163 ekr 500 digital Unit Touch – Operating Manual... - Page 101 For specifying the warning and error limits see Specifying the Warning and Error Limits, page 102. ekr 500 digital Unit Touch – Operating Manual 101/163...
- Page 102 Web of material upper lower upper error limit error limit error limit upper lower upper warning limit warning limit warning limit Material target width Fig. 53: Definition of the warning and error limits 102/163 ekr 500 digital Unit Touch – Operating Manual...
- Page 103 The width measured is within the upper warning range (24 V⎓ at output 2, terminal 27). The web of material is much too wide. The width measured is within the upper error range (24 V⎓ at output 3, terminal 28). ekr 500 digital Unit Touch – Operating Manual 103/163...
- Page 104 The warning and error limits for the width measurement are specified using a special setting menu. For the specified limits to be effective, they need to be activated. Fig. 55: Setting menu for the warning and error limits 104/163 ekr 500 digital Unit Touch – Operating Manual...
- Page 105 Requirement: The function table 9 for the digital inputs and out- puts is selected. For selecting the function table see installation and commissioning manual ekr 500 digital Unit Touch, document number MD.497. Function table 9 Output Terminal Width Measurement Message...
- Page 106 A numeric keypad is displayed. 2. Enter the desired target width. 3. Confirm your entry with the button. The keypad is closed. The new target width (500.0 in the example) is displayed on the button. 106/163 ekr 500 digital Unit Touch – Operating Manual...
- Page 107 5. Confirm your entry with the button. The set reference width will be accepted. The calibration of the web width measurement is finished. The reference width entered is shown as web width in the dis- play. ekr 500 digital Unit Touch – Operating Manual 107/163...
-
Page 108: Line Width Measurement
The line width measurement enables a continuous monitoring of the width of a printed line during the production process. In doing so, the line is scanned by a BST CLS Pro 600 line and contrast sensor or a CLS CAM 100 object sensor (from firmware version 1.5.x.x). - Page 109 6. Confirm your entry with the button. The set reference width will be accepted. The calibration of the line width measurement is finnished. The reference width entered is shown as line width in the dis- play. ekr 500 digital Unit Touch – Operating Manual 109/163...
-
Page 110: Sensor Positioner
(Sensor 1, Sensor 2). Fig. 58: ekr 500 digital Unit Touch controller with FVG POS 100 sensor positioner If the installation position of the sensor is hard to access or the position of the sensor has to be changed frequently due to chan- ging web widths, the sensor positioner is used to position the sensor across the web running direction. -
Page 111: Operation Display
(unit [mm] or [inch]) The number of the displayed sensor slide symbols (one or two symbols) depends on the type of the sensor positioner connected. ekr 500 digital Unit Touch – Operating Manual 111/163... -
Page 112: Operation
For activating the retract mode see installation and commissioning manual ekr 500 digital Unit Touch, document number MD.497. If the sensor positioner is used in combination with a line and contrast sensor (Sensor 3), the sensor slides automatically run to their park position if the guiding mode is switched to line/contrast guiding. - Page 113 Operation For activating the Automatic setpoint acceptance function see installation and commissioning manual ekr 500 digital Unit Touch, document number MD.497. If the function is activated, in the lower left corner of the operation display, the button Automaticsetpoint acceptance is displayed.
- Page 114 2. Confirm your entry with the button. The keypad is closed. The sensor slides slowly shift the web of material to the pre- determined position. 114/163 ekr 500 digital Unit Touch – Operating Manual...
-
Page 115: Positioning Unit
Operation 5.15 Positioning Unit 5.15.1 Utilization The ekr 500 digital Unit Touch controller has connections for two positioning units. The positioning units enable the motorized positioning of sensors or tools. The main field of application of the positioning unit is the motorized positioning of a BST CLS Pro 600 line and contrast sensor (Sensor ... -
Page 116: Requirements
Sensor 3. 5.15.2 Requirements The following requirements must be fulfilled for operating the positioning unit for Sensor 3 with the ekr 500 digital Unit Touch controller: A positioning unit with a BST CLS Pro 600 line and contrast ■... - Page 117 You can select two methods to position the sensor slide: Positioning with the arrow keys of the ekr commander control ■ panel of the controller Positioning by entering a defined target position ■ ekr 500 digital Unit Touch – Operating Manual 117/163...
- Page 118 If activated, the turtle symbol is displayed with a blue back- ground. 5. Carry out fine positioning of the sensor slide using the arrow keys of the control panel. 118/163 ekr 500 digital Unit Touch – Operating Manual...
- Page 119 A numeric keypad is displayed. 3. Enter the desired target position. 4. Confirm your entry with the button. The keypad is closed. The sensor slide moves to the defined target position (+200.0 in the example). ekr 500 digital Unit Touch – Operating Manual 119/163...
-
Page 120: Calling Up The Setup Menu
The LED of the key illuminates. The controller switches to manual mode. 2. Press the SETUP key. The controller changes to setup mode. The first page of the setup menu appears in the display. 120/163 ekr 500 digital Unit Touch – Operating Manual... - Page 121 See installation and Calibrating the CCD camera commissioning manual* Carrying out the material See installation and CCD camera thickness compensation commissioning manual* See installation and Entering the position offsets commissioning manual* ekr 500 digital Unit Touch – Operating Manual 121/163...
- Page 122 C2E Coupler (CAN-To- Showing the network ing manual C2E Coupler, Ethernet coupler) settings of the C2E Coupler document number MD.420 * Installation and commissioning manual ekr 500 digital Unit Touch, document number MD.497 122/163 ekr 500 digital Unit Touch – Operating Manual...
-
Page 123: Switching The Configurable Displays And Setting Menus On/Off
The setup menu for the configurable displays and setting menus is displayed. 2. Select the desired display or setting functions that can be called up using the swiping function by tapping the corresponding button. ekr 500 digital Unit Touch – Operating Manual 123/163... -
Page 124: Service Displays
Button Service display Information displayed Description Hardware, firmware and boot loader versions of the ekr 500 digital Unit Touch See Displaying System System information controller and the ekr commander Information, page 125 control panel... -
Page 125: Displaying System Information
Operation 5.18.1 Displaying System Information This service display shows the hardware, firmware and bootloader versions installed in the ekr 500 digital Unit Touch controller and the ekr commander control panel. Fig. 64: Display of the system information (example) ① ekr 500 digital Unit Touch controller ④ Bootloader version ②... -
Page 126: Displaying System Components
Ultrasonic sensor US 2010 Edge sensor 1/2 Infrared wide array edge sensor IR SEN …, WideAr Ultrasonic wide array edge sensor US SEN … FvgPos FVG POS 100 sensor positioner CCD camera 1/2 ccd 1, ccd 2 CCDPro or CCD CAM 100 CCD camera 126/163 ekr 500 digital Unit Touch – Operating Manual... - Page 127 2. Use the scroll bar on the right side to scroll the list up or down. 3. Press the button at the end of the list to quit the service display. The setup menu is displayed. ekr 500 digital Unit Touch – Operating Manual 127/163...
-
Page 128: Displaying Switch Positions
As such, you can check the switch positions without having to open the device housing. Fig. 66: Display of the switch positions (here for the ekr 500 digital Unit Touch controller) Calling up the service display 1. Activate the System Components service display in the setup menu (see Calling up the Setup Menu, page 120). -
Page 129: Displaying A Link To The Company Website
1. Activate the Link to the Company Website service display in the setup menu (see Calling up the Setup Menu, page 120). The QR code is displayed. 2. Press the button to quit the service display. The setup menu is displayed. ekr 500 digital Unit Touch – Operating Manual 129/163... -
Page 130: Displaying Service Qr Code
Operation 5.18.5 Displaying Service QR Code This function is used to send an e-mail to BST customer services with a list of all relevant information about your web guiding sys- tem to simplify troubleshooting for the service personnel. For this... - Page 131 The generated e-mail contains a list of all relevant service in- formation. 3. To send the e-mail to BST customer services press the SEND button in the e-mail program. 4. Press the button on the controller to exit the service display.
-
Page 132: Fault Displays
If the actuator is blocked, the warning symbol Actuator blocked appears in the display. Fig. 70: Screen display with blocked actuator After driving the actuator in the opposite direction, the symbol is automatically deleted. 132/163 ekr 500 digital Unit Touch – Operating Manual... -
Page 133: Supply Voltage Outside The Permissible Range
The warning symbol Motor control timeout appears in the display. Fig. 72: Screen display during the motor control timeout After driving the actuator in the opposite direction, the symbol is automatically deleted. ekr 500 digital Unit Touch – Operating Manual 133/163... -
Page 134: Controller Interlock Active
2* Center positioning) Only for operating mode See truth table* Automatic * For activating the controller interlock see installation and com- missioning manual ekr 500 digital Unit Touch, document number MD.497. 134/163 ekr 500 digital Unit Touch – Operating Manual... -
Page 135: Keyboard Interlock Active
The keyboard interlock is activated by a 24 V⎓ signal at terminal 9 (see truth table, installation and commissioning manual ekr 500 digital Unit Touch, document number MD.497). 5.19.7 Setup Lock Active With active setup lock, the Setup lock active symbol appears in the display if the SETUP button is pressed. -
Page 136: Bus Connection Fault
If brief malfunctions occur several times in the communication between the controller and a digital edge sensor, an explanation mark appears in the respective sensor symbol. Fig. 77: Display indicator with the malfunction of a digital edge sensor 136/163 ekr 500 digital Unit Touch – Operating Manual... -
Page 137: Loss Of The Line / Contrast Transition (Sensor Cls Pro 600)
3 in the event of an interruption of the guiding criterion (line, contrast transition or print feature). Fig. 79: Screen display with the loss of the guiding criterion to be scanned ekr 500 digital Unit Touch – Operating Manual 137/163... -
Page 138: Loss Of The Web Edge (Ccd Camera)
Fig. 81: Screen display with an active fault in the external motor output stage for the EMS 23 actuator 138/163 ekr 500 digital Unit Touch – Operating Manual... -
Page 139: Electronic Remote Precision Adjustment (Option)
1. Press the Manual mode key. The LED of the key illuminates. The controller switches to manual mode. 2. Using the arrow keys of the EFE 1000, move the guiding device to the desired position. ekr 500 digital Unit Touch – Operating Manual 139/163... -
Page 140: Extended Device Settings
The selection menu for the public parameter lists appears in the display. The currently selected parameter list is displayed in the editing field. Fig. 83: Selecting the parameter list ① Parameter list selected 140/163 ekr 500 digital Unit Touch – Operating Manual... - Page 141 The input keypad is closed. The edited parameter value is entered into the editing field. 9. Press the button to save the edited parameter values. The Switch positions service display is displayed. ekr 500 digital Unit Touch – Operating Manual 141/163...
-
Page 142: Public Parameters Lists
Speed signal at max- … 10,000 mV max speed imum machine speed 10,000 mV Reverse polarity (OFF) deactivated (OFF) OK-relay Reverse the polarity of OK relay invert the OK relay Reverse polarity (ON) activated 142/163 ekr 500 digital Unit Touch – Operating Manual... - Page 143 Offset value (OFF) deactivated (OFF) setp-offs. fvg Activate offset value act. Offset value Offset value for (ON) activated sensor positioner depending setpoint offs. on the type Enter offset value of sensor positioner ekr 500 digital Unit Touch – Operating Manual 143/163...
- Page 144 Activate lower warning w.low active limit Lower warning (ON) limit activated Web/line width measurement Upper warning (OFF) limit deactivated (OFF) ref width Activate upper warning w.up active limit Upper warning (ON) limit activated 144/163 ekr 500 digital Unit Touch – Operating Manual...
- Page 145 Activation of the with controller interlock position control (ON) activated Setpoint 0 (OFF) deactivated (OFF) Setpoint for sensor3 setp. The value 0 is always sensor 3 zero used as setpoint Setpoint 0 (ON) activated ekr 500 digital Unit Touch – Operating Manual 145/163...
- Page 146 Use calibr. CCD2 ensor 2 Use of linearized (ON) data* * Prerequisite: The CCD camera has been calibrated (see installation and commissioning manual ekr 500 digital Unit Touch, document number MD.497). 146/163 ekr 500 digital Unit Touch – Operating Manual...
-
Page 147: Restoring Factory Default Settings
6. Set the rotary switch S1 to position 1. 7. Close the controller’s housing cover. 8. Switch on the power supply. After restoring factory default settings, it is imperative that the rotary switch S1 be returned to position 1. ekr 500 digital Unit Touch – Operating Manual 147/163... -
Page 148: Maintenance And Cleaning
Risk of injury and material damage caused by incorrect mainten- ance / cleaning! Have the maintenance and cleaning carried out only by ► qualified personnel that have been instructed by BST service personnel or authorized personnel. Carry out the maintenance and cleaning as described in the ►... -
Page 149: Maintenance Table
Clean using a dry, clean and soft cloth. ► Use a commercially available liquid cleaner in event of intensive ► soiling. Observe protection class IP 50 of the control panel. ► ekr 500 digital Unit Touch – Operating Manual 149/163... -
Page 150: Cleaning The Edge Sensor Housing
The housing of the actuator must be cleaned if soiling can be seen on the outside. Clean using a dry, clean and soft cloth. ► Use a commercially available liquid cleaner in event of intensive ► soiling. 150/163 ekr 500 digital Unit Touch – Operating Manual... -
Page 151: Cleaning The Sensor Positioner Housing
Maintenance and Cleaning 6.3.8 Cleaning the Sensor Positioner Housing See separate operating instructions FVG POS 100 sensor positioner, document number MD.476. ekr 500 digital Unit Touch – Operating Manual 151/163... -
Page 152: Troubleshooting
Troubleshooting Troubleshooting WARNING Danger to life and assets caused by incorrect rectification of mal- functions! Only allow qualified personnel instructed by BST service staff or ► authorized personnel to rectify malfunctions. Only rectify malfunctions using the following measures or ►... - Page 153 Deactivate the controller interlock for the auto- ► The controller interlock is active. matic operating mode. See truth table, installa- tion and commissioning manual ekr 500 digital Unit Touch, document number MD.497. ekr 500 digital Unit Touch – Operating Manual 153/163...
- Page 154 The controller gain was inadvertently reduced to Set the controller gain. See Optimizing the ► the minimum value (0.2). No guiding takes place in Controller Gain, page 77. Automatic operating mode. 154/163 ekr 500 digital Unit Touch – Operating Manual...
- Page 155 Shift the guiding setpoint using the poten- ► The optional electronic remote precision adjust- tiometer of the electronic remote precision ad- ment EFE 1 is connected to the controller. justment EFE 1. See EFE 1, page 139. ekr 500 digital Unit Touch – Operating Manual 155/163...
- Page 156 The controller or the control panel has been Maintain a minimum distance of 100 mm to ► mounted in the immediate vicinity of high-voltage high-voltage components or lines. components or lines. 156/163 ekr 500 digital Unit Touch – Operating Manual...
- Page 157 The web edge to be scanned is located outside the Read the separate instruction manual CCD camera ► measuring range of the CCD camera. CCDPro 30000/5000 (document number MD.167) or CCD CAM 100 (document number MD.465). ekr 500 digital Unit Touch – Operating Manual 157/163...
-
Page 158: Customer Services
Serial number and date of manufacture (see name plate) ■ Customer Services Address BST GmbH Service Remusweg 1 D-33729 Bielefeld Germany Tel.: +49 (0) 521 400 70 767 E-Mail: service@bst.group http: www.bst.group 158/163 ekr 500 digital Unit Touch – Operating Manual... -
Page 159: Shutting Down And Disposal
Also note the legal regulations as well as local recycling guidelines for this purpose. Returning the system to BST GmbH is always possible. About this and for all other queries, please contact BST Customer Services, page 158. -
Page 160: Index
Adjustment via touchscreen ...... 78 Function ............ 20 Adjustment with arrow keys...... 78 FVG POS 100 ........... 24 Display...... 36, 37, 38, 39, 40, 77 Optimizing............ 77 Controller interlock........ 134 Customer services......... 158 Guiding functions.......... 21 Guiding mode .......... 21 160/163 ekr 500 digital Unit Touch – Operating Manual... - Page 161 Specifying the target width...... 109 Operating manual Specifying the warning and error limits .. 109 Distribution ............ 6 Link to the company website Latest version........... 8 Displaying............. 129 Storage............. 6 Operating mode Automatic ............ 65 ekr 500 digital Unit Touch – Operating Manual 161/163...
- Page 162 .............. 118 Displaying............. 126 Requirements.......... 116 System information Selecting the positioning speed .... 117 Displaying............. 125 UtilizationFunction........ 115 Product - Use ............ 9 Target group ............. 6 Target width Qualified electricians ........ 14 Specifying............. 106 162/163 ekr 500 digital Unit Touch – Operating Manual...
- Page 163 Activating the warning limits ....... 104 Calibration............ 107 Digital message outputs....... 105 Error limits ........... 102 Function ............ 100 Specifying the error limits...... 104 Specifying the warning limits ....... 104 Warning limits.......... 102 ekr 500 digital Unit Touch – Operating Manual 163/163...
Need help?
Do you have a question about the ekr 500 digital and is the answer not in the manual?
Questions and answers