
Subscribe to Our Youtube Channel
Related Manuals for MasterCraft 055-6792-8


Summary of Contents for MasterCraft 055-6792-8
- Page 1 12 1/2" (31.8 cm) PLANER WITH STAND model no. 055-6792-8 IMPORTANT: INSTRUCTION Please read this manual carefully before running this MANUAL planer and save it for reference.
- Page 2 055-6792-8 | contact us 1-800-689-9928 headline bars TABLE OF CONTENTS headline bars Quick Start Guide Specifications Safety Guidelines continuation tabs continuation tabs Know Your Planer Assembly Instructions Operating Instructions Maintenance notes notes Troubleshooting Exploded View...
- Page 3 055-6792-8 | contact us 1-800-689-9928 • Carefully place the planer on the SPECIFICATIONS top of the work stand . Align Motor 120 V, 60 Hz, 15 A holes on the planer’s base with the holes on the work stand .
- Page 4 055-6792-8 | contact us 1-800-689-9928 SAFETY GUIDELINES GENERAL SAFETY INSTRUCTIONS • KEEP GUARDS IN PLACE and in working order. This manual contains information that relates to PROTECTING PERSONAL SAFETY and PREVENTING EQUIPMENT PROBLEMS. It is very important to read this manual •...
- Page 5 055-6792-8 | contact us 1-800-689-9928 DON’T OVERREACH. Keep proper footing and balance at all times. Never turn the machine "ON" before clearing the table of all objects • • (tools, scraps of wood, etc.). Flying debris can cause serious injury.
- Page 6 055-6792-8 | contact us 1-800-689-9928 switch in the "OFF" position to prevent unauthorized use. Someone The tool is loud and the sound can cause hearing damage. Always else might accidentally start the machine and cause injury to themselves or wear ear protection to help prevent hearing damage and loss.
- Page 7 055-6792-8 | contact us 1-800-689-9928 Check with a qualified electrician or service technician if the grounding instructions • Use only extension cords that are intended for outdoor use. These extension are not completely understood, or if in doubt as to whether the tool is properly cords are identified by a marking "Acceptable for use with outdoor appliances;...
- Page 8 055-6792-8 | contact us 1-800-689-9928 Description Cutter head adjustment handle Carrying handle Depth scale pointer Depth scale continuation tabs continuation tabs Table Work stand Plug cable storage Dust chute Out-feed extension table notes notes...
- Page 9 055-6792-8 | contact us 1-800-689-9928 PACKAGE CONTENTS Depth stop: The depth stop, located on the right side of the planer, has preset measurements for repetitive planing. Description Qty. Illustration Material removal depth scale: The material removal depth scale is located on the front of your planer and Planer assembly measures depth of cuts up to 1/8".
- Page 10 055-6792-8 | contact us 1-800-689-9928 UNPACKING Description Qty. Illustration Carefully lift planer from the carton by the carrying handles on each side of the side cover, and place it on a level work surface. Inspect the unit for damage. If the unit Legs has been damaged in transit, contact the carrier and complete a damage claim.
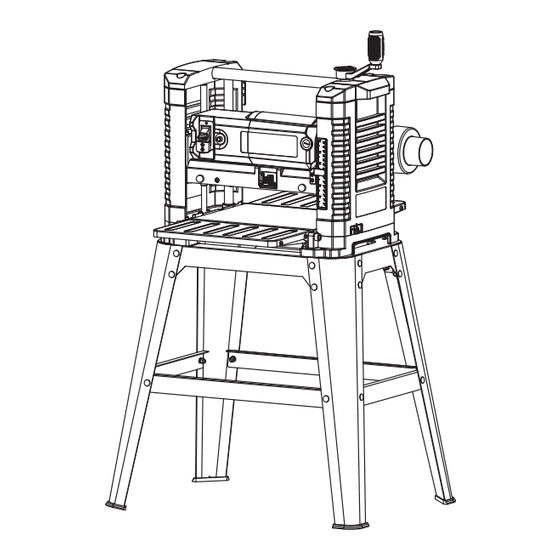
- Page 11 055-6792-8 | contact us 1-800-689-9928 BEFORE YOUR START TRANSPORTING THE PLANER (Fig. 2) This Mastercraft 12 1/2" (31.8 cm) planer finishes rough-cut lumber to size and planes soft and hardwoods up to 6" (15.3 cm) thick and 12 1/2" (31.8 cm) wide.
- Page 12 055-6792-8 | contact us 1-800-689-9928 ASSEMBLING THE WORK STAND • Insert the rubber foot into the bottom (Fig. 4a-4f) of each leg . (Fig. 4f) • Place the stand on a level surface, and •...
- Page 13 055-6792-8 | contact us 1-800-689-9928 INSTALLING THE DUST CHUTE Tighten Screws (Fig. 7a-7d) • Tighten the two screws (1) that secure the dust chute (3) to the rear of the Loosen Screws cutter head assembly.
- Page 14 055-6792-8 | contact us 1-800-689-9928 FINE ADJUSTMENTS (Fig. 8) WARNING! To reduce the risk of serious personal injury, turn unit off and disconnect The cutter head adjustment handle (2) allows for fine adjustments, from 1/64"...
- Page 15 055-6792-8 | contact us 1-800-689-9928 To turn your planer off: TO USE THE MATERIAL REMOVAL DEPTH SCALE (Fig. 12) • Press the switch (2) down to turn it off. • Slide approximately 3" (76 mm) of your material under the middle of the carriage.
- Page 16 055-6792-8 | contact us 1-800-689-9928 See TROUBLESHOOTING for additional information. For best results, plane both TO AVOID SNIPE sides of the workpiece to reach a desired thickness. For example, if you need to Feed the workpiece into the planer so it is level and remains flat against the base at remove 1/8"...
- Page 17 055-6792-8 | contact us 1-800-689-9928 TO PLANE CUPPED WOOD (Fig. 14) MAINTENANCE To obtain the best possible results with cupped wood: WARNING! Rip the material down the middle and plane it as two separate pieces.
- Page 18 055-6792-8 | contact us 1-800-689-9928 CHANGING THE PLANER KNIVES Paste wax should be applied to the planing table surface to ease the movement of workpieces across it, but be careful not to use so much that it will be absorbed into Your planer is equipped with a two-knife cutterhead with two blades that have two the wood and interfere with staining.
- Page 19 055-6792-8 | contact us 1-800-689-9928 IF ONLY ONE EDGE OF THE KNIFE IS • Loosen and remove two bolts (3) using the T-wrench (supplied) to remove the WORN (Fig. 18e–18f) tool tray (4). • Turn the knife around so that the sharp,...
- Page 20 055-6792-8 | contact us 1-800-689-9928 AFTER INSTALLING OR REVERSING THE KNIVES • Cut off the old timing belt (6) with scissors (7) (not supplied) and remove • Replace the tool tray onto the unit.
- Page 21 055-6792-8 | contact us 1-800-689-9928 Problem Possible Causes Solution Problem Possible Causes Solution Snipe (depressions at • Dull cutter blades. • Replace or turn cutter Cutter head height • Dirty elevation spindle. • Clean and lubricate ends of workpiece).
- Page 22 055-6792-8 | contact us 1-800-689-9928 continuation tabs continuation tabs notes notes...
- Page 23 055-6792-8 | contact us 1-800-689-9928 Description Qty. Description Qty. Description Qty. Description Qty. Wrench Cross head screw M5 x 10 Hex nut M6 Flat washer 8 Hex bolt M6 x 20 Spring washer 8...
- Page 24 This Mastercraft product is guaranteed for a period of 3 years from the date of original retail purchase against defects in workmanship and materials, except for...
Need help?
Do you have a question about the 055-6792-8 and is the answer not in the manual?
Questions and answers