Table of Contents
Advertisement
Quick Links
Advertisement
Table of Contents

Subscribe to Our Youtube Channel
Related Manuals for thomann VARYTEC Hero Mirror


Summary of Contents for thomann VARYTEC Hero Mirror
- Page 1 Hero Mirror Moving Head...
- Page 2 Thomann GmbH Hans-Thomann-Straße 1 96138 Burgebrach Germany Telephone: +49 (0) 9546 9223-0 Internet: www.thomann.de 14.08.2023, ID: 531495 (V2)
-
Page 3: Table Of Contents
Table of contents Table of contents General information......................5 1.1 Symbols and signal words................... 5 Safety instructions......................... 6 Features............................8 Installation..........................9 Starting up..........................11 Connections and controls....................12 Operating..........................13 7.1 Starting the device....................... 13 7.2 Main menu........................13 7.3 Operating modes...................... - Page 4 Hero Mirror Moving Head...
-
Page 5: General Information
Our products and documentation are subject to a process of continuous develop‐ ment. They are therefore subject to change. Please refer to the latest version of the documentation, which is ready for download under www.thomann.de. 1.1 Symbols and signal words In this section you will find an overview of the meaning of symbols and signal words that are used in this document. -
Page 6: Safety Instructions
Safety instructions Safety instructions Intended use This device is intended for use as a freely moving reflector. The device is designed for professional use only and is not suitable for use in households. Use the device only as described in this user manual. Any other use or use under other operating conditions is considered to be improper and may result in personal injury or property damage. - Page 7 Safety instructions NOTICE! Risk of fire due to covered vents and neighbouring heat sources! If the vents of the device are covered or the device is operated in the immediate vicinity of other heat sources, the device can overheat and burst into flames. Never cover the device or the vents. Do not install the device in the immediate vicinity of other heat sources.
-
Page 8: Features
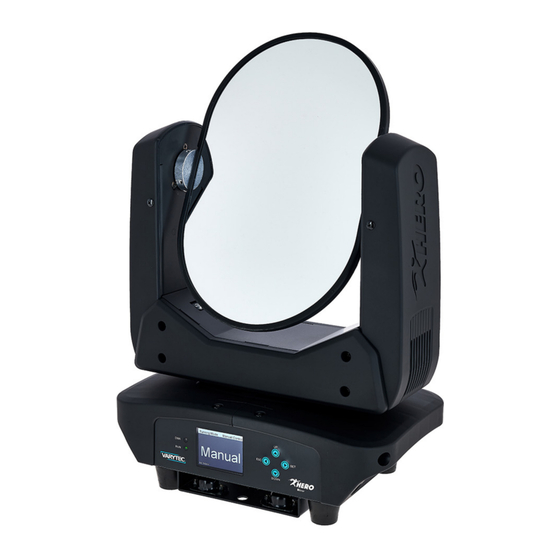
Features Features Special features of the device: Motorized mirror for deflecting light and laser beams Highly reflective, double-sided mirror 99% reflection with little loss of light Two moving axes – Tilt (endless rotation) – Pan (540°) Control via DMX (4 or 8 channels) or buttons and display on the unit Built-in automatic show programmes Sound control Master / Slave mode... -
Page 9: Installation
Installation Installation Unpack and check carefully there is no transportation damage before using the unit. Keep the equipment packaging. To fully protect the product against vibration, dust and moisture during transportation or storage use the original packaging or your own packaging material suitable for transport or storage, respectively. Lift the device only at its base. - Page 10 Installation Mounting options The Quick Lock mounts on the bottom side of the housing (A) allow the secure attachment of the included mounting brackets. There, you can fasten adapters such as half couplers, trigger clamps, c-hooks etc. Safety cables are threaded through the safety eyelets (B) on the bottom side of the housing.
-
Page 11: Starting Up
Starting up Starting up Create all connections while the device is off. Use the shortest possible high-quality cables for all connections. Take care when running the cables to prevent tripping hazards. Connections in DMX mode Connect the DMX input of the device to the DMX output of a DMX controller or another DMX device. -
Page 12: Connections And Controls
Connections and controls Connections and controls ö & PUSH PUSH DOWN Mirror 100-240V~50/60Hz Load: 40W ) * + , -. 1 [DMX] | status LED. The LED lights up as soon as a DMX signal is present. 2 [RUN] | status LED. This LED lights up once the device is operational. 3 Display 4 [UP] | increases the displayed value by one 5 [SET] | activates the main and settings menu. -
Page 13: Operating
Operating Operating 7.1 Starting the device CAUTION! Risk of injury due to unexpected movements of the device! The device head may perform fast movements and generate very bright light. This is the case immediately after the device is switched on, in automatic or remote operation, and when a connected DMX controller is switched off. -
Page 14: Operating Modes
Operating Mode Highest possible DMX address 4-channel mode 8-channel mode 7.3 Operating modes DMX mode Set the DMX mode in the ‘Running Mode’ menu. Press [SET] to activate the main menu. Use [UP] or [DOWN] until the display shows ‘Running Mode’ and confirm with [SET]. - Page 15 Operating Sound control In this mode, the unit follows the rhythm of the background music or sounds detected by the built-in microphone. Press [SET] to activate the main menu. Press [UP] or [DOWN] until the display shows ‘Running Mode’ and confirm with [SET].
-
Page 16: Settings
Operating 7.4 Settings Use the ‘Setting’ menu to adjust the basic device parameters. Press [SET] to activate the main menu. Use [UP] or [DOWN] until the display shows ‘Setting’ and confirm with [SET]. Use [UP] or [DOWN] to select the desired parameter. The following submenus are available: Menu level 2 Menu level 3/4... - Page 17 Operating Menu level 2 Menu level 3/4 Description ‘Max’ Maximum speed ‘Automatic’ Temperature-dependent speed ‘Silent’ Silent mode ‘AutoCorrection’ Auto-correction for pan and tilt ‘ON’ Auto-correction activated. The device returns to its starting position if the head is unintentionally adjusted ‘OFF’ Auto-correction disabled (not recom‐...
-
Page 18: System Information
Operating Setting the start parameters Use the ‘Home Position’ menu to adjust the start parameters of the device. Press [SET] to activate the main menu. Use [UP] or [DOWN] until the display shows ‘Settings’ and confirm the setting with [SET]. Use [UP] or [DOWN] to select the submenu ‘Home Position’... -
Page 19: Menu Overview
Operating 7.6 Menu overview DMX Address Running Mode Setting System Info DMX 4CH Mode Pan Reverse Current Time DMX 8CH Mode Factory Reset AutoCorrection Total Time Auto Current Mode Program Tilt Reverse Temperature Base Display Backlight Software Version Home Position Speed Password Pan Limit... -
Page 20: Functions In 8-Channel Dmx Mode
Operating 7.8 Functions in 8-channel DMX mode Channel Value Function 0…255 Rotation (pan) (0° up to the maximum value of the Pan range) 0…255 Fine adjustment of rotation (pan) 0…255 Inclination (tilt) (0° up to the maximum value of the Tilt area) 0…255 Fine adjustment of inclination (tilt) 0…255... -
Page 21: Technical Specifications
Technical specifications Technical specifications Rotation angle (pan), max. 540° 203 mm Inclination angle (tilt), max. infinite Control DMX, buttons and display on the unit Number of DMX channels 4, 8 Input connections Voltage supply lockable input socket (Power Twist) DMX control 2 ×... -
Page 22: Plug And Connection Assignment
Plug and connection assignment Plug and connection assignment Introduction This chapter will help you select the right cables and plugs to connect your valuable equipment so that a perfect light experience is guaranteed. Please take our tips, because especially in ‘Sound & Light’ caution is indicated: Even if a plug fits into a socket, the result of an incorrect connection may be a destroyed DMX controller, a short circuit or ‘just’... -
Page 23: Troubleshooting
DMX interface circuit. If the procedures recommended above do not succeed, please contact our Service Center. You can find the contact information at www.thomann.de. Hero Mirror Moving Head... -
Page 24: Cleaning
Cleaning Cleaning Optical lenses Clean the optical lenses, that are accessible from the outside, regularly in order to optimize the light output. The frequency of cleaning depends on the operating envi‐ ronment: wet, smoky or particularly dirty surroundings can cause more accumulation of dirt on the optics of the device. -
Page 25: Protecting The Environment
Protecting the environment Protecting the environment Disposal of the packaging material For the transport and protective packaging, environmentally friendly materials have been chosen that can be supplied to normal recycling. Ensure that plastic bags, packaging, etc. are properly disposed of. Do not just dispose of these materials with your normal household waste, but make sure that they are collected for recycling. - Page 26 Notes Hero Mirror Moving Head...
- Page 28 Musikhaus Thomann · Hans-Thomann-Straße 1 · 96138 Burgebrach · Germany · www.thomann.de...
Need help?
Do you have a question about the VARYTEC Hero Mirror and is the answer not in the manual?
Questions and answers