Table of Contents
Advertisement
Available languages
Available languages
Quick Links
INSTRUÇÕES DE UTILIZAÇÃO • INSTRUCTIONS OF USE
INSTRUCTIONS D'USAGE • ISTRUZIONI PER L'USO
BATIDORA ELECTRÓNICA TRITAN
ELECTRONIC INOX BLENDER TRITAN JAR
FRULLATORE ELETTRONICO TRITAN
Electrodomésticos JATA, S.A.
ESPAÑA
Pol. de La Serna, calle D - 31500 TUDELA - Navarra - Spain
Tel. 94 621 55 40 • Fax 94 681 44 44
PORTUGAL
Avenida Engenheiro Duarte Pacheco, Torre 2-3, Sala 3
1070-102 Lisboa
Tel. 213 876 355 • Fax 213 867 398
INSTRUCCIONES DE USO
BEDIENUNGSANLEITUNG
BATEDEIRA ELETRÓNICA TRITAN
BATTEUR ÉLECTRONIQUE
ELEKTRONISCHER MIXER TRITAN
Mod. BT1056
www.jata.es
www.jata.pt
Advertisement
Table of Contents

Related Manuals for Jata electro BT1056


Summary of Contents for Jata electro BT1056
- Page 1 BATEDEIRA ELETRÓNICA TRITAN ELECTRONIC INOX BLENDER TRITAN JAR BATTEUR ÉLECTRONIQUE FRULLATORE ELETTRONICO TRITAN ELEKTRONISCHER MIXER TRITAN Mod. BT1056 Electrodomésticos JATA, S.A. www.jata.es ESPAÑA Pol. de La Serna, calle D - 31500 TUDELA - Navarra - Spain Tel. 94 621 55 40 • Fax 94 681 44 44 PORTUGAL www.jata.pt...
- Page 2 DATOS TÉCNICOS • DADOS TECNICOS • TECHNICAL DATA Enero 2020 Mod BT1056 230 V~ 50 / 60 Hz 2.000 W Los textos, fotos, colores, figuras y datos corresponden al nivel técnico del momento en que se han impreso. Nos reservamos el derecho a modificaciones, motivadas por el desarrollo permanente de la técnica en nuestros...
-
Page 3: Principais Componentes
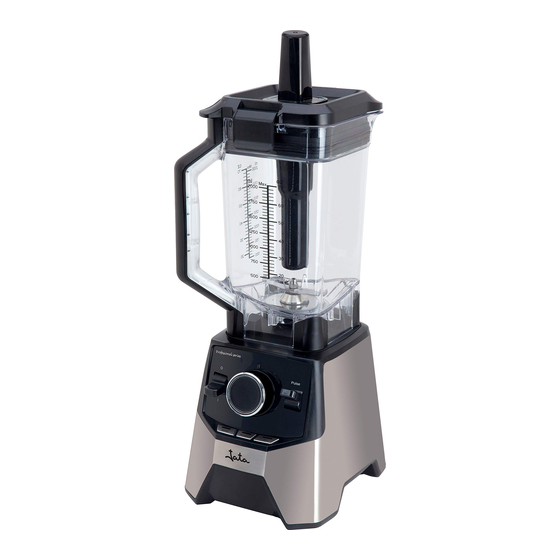
COMPONENTES PRINCIPALES PRINCIPAIS COMPONENTES 1. Tapón dosificador. 1. Tampão doseador 2. Tapa jarra. 2. Tampa do jarro. 3. Jarra. 3. Jarro. 4. Cuerpo principal. 4. Corpo principal. 5. Selector de velocidad. 5. Selector de velocidade. 6. Anillo luminoso. 6. Anel luminoso. 7. - Page 4 ESPAÑOL ATENCIÓN • Lea atentamente estas instrucciones antes de poner su batidora en funcionamiento y guárdelas para futuras consultas. • Este aparato puede ser utilizado por personas cuyas capacidades físicas, sensoriales o mentales estén reducidas o tengan falta de experiencia y conocimiento, si son supervisados o han recibido una instrucción adecuada en lo que respecta al funcionamiento seguro del aparato y entienden los riesgos que entraña.
-
Page 5: Instrucciones De Uso
• Sitúela siempre sobre una superficie plana. • Desconéctela siempre de la red si la deja desatendida y antes del montaje, desmontaje o limpieza. • Los contrastes bruscos de temperatura pueden hacer que la jarra se agriete, evítelos para prolongar la vida útil de su jarra de cristal. -
Page 6: Mantenimiento Y Limpieza
MANTENIMIENTO Y LIMPIEZA • Antes de proceder a su limpieza asegúrese que el aparato está desconectado de la red. • La jarra una vez desmontada puede ser lavada en el lavavajillas. La tapa, el tapón y el resto de componentes de la jarra, puede limpiarlos con agua y jabón, nunca en lavavajillas, procurando aclarar y secar bien a continuación. -
Page 7: Instruções De Utilização
• Não retire os alimentos do jarro sem a lâmina estar totalmente imobilizada e o aparelho desligado. • O manuseamento ou a substituição de qualquer componente deverá ser realizado por um Serviço de Assitência Técnica Autorizado. • Certifique-se que nem o aparelho nem o cabo estejam em contacto com superfícies ou objectos quentes. -
Page 8: Limpeza E Manutenção
BOTÃO ‘BATIDO’ • Pressione este botão e o liquidificador funcionará intermitentemente à sua velocidade máxima. BOTÃO PURÉ • Com este botão a liquidificadora fará 3 ciclos de forma intermitente e, em seguida, funcionará de forma contínua, aproximadamente, durante 1 minuto. Após este período, a liquidificadora para automaticamente o funcionamento. -
Page 9: Instruction Of Use
• This appliance has been designed for domestic only. Do not use for periods of time over 3 minutes. After this time allow to cool for some minutes before using it again. • Under any circumstance introduce your hand on the jug being the appliance switched on. -
Page 10: Maintenance And Cleaning
• Once you have finished, set the speed selector to its “0” position, switch off the appliance and wait for the blade to stop turning completely before removing the jug. KNOBS USING To use any of the 3 knobs, the lever (7) must be activated. PULSE LEVER •... -
Page 11: Conseils D'utilisation
Laissez-le refroidir pendant quelques minutes avant une nouvelle utilisation. • En aucun cas, ne mettre le blender en fonctionnement sans le couvercle et ne jamais introduire la main dans le bol lorsque l’appareil est branché. • Ne jamais laisser fonctionner sans surveillance. •... -
Page 12: Utilisation Des Boutons
deux languettes sur les guides correspondantes du couvercle, puis tournez-le légèrement dans le sens anti- horaire. • Quand vous avez terminé, placez le bouton de vitesse sur la position « 0 », éteignez l’appareil et attendez que la lame ait complètement cessé de tourner avant de retirer le bol. UTILISATION DES BOUTONS Pour utiliser un des trois boutons, le bouton de mise en marche doit être actionné... - Page 13 • Prima di collegare il forno, accertarsi che il voltaggio indicato nella targhetta delle caratteristiche tecniche corrisponda al voltaggio che state utilizzando. • MOLTO IMPORTANTE: Non immergere il corpo base dell’apparecchio in acqua o in altri liquidi. • Questo apparecchio è stato progettato per essere destinato solo all’uso domestico.
-
Page 14: Istruzioni Per L'uso
• Se il cavo di alimentazione é danneggiato, deve essere sostituito dal fabbricante, dal suo servizio tecnico o da personale qualificato, in modo da evitare rischi. ISTRUZIONI PER L’USO • Agganci correttamente la brocca (3) al corpo principale (4) con il manico in avanti. •... - Page 15 DEUTSCH ACHTUNG • Bitte lesen Sie diese Bedienungsanleitung sorgfältig durch, bevor Sie das Gerät in Betrieb nehmen, und bewahren Sie sie für spätere Fragen auf. • Dieses Gerät kann von Personen mit eingeschränkten körperlichen, sensorischen oder geistigen Fähigkeiten, mangelnder Erfahrung bzw. fehlendem Wissen bzgl. des Umgangs mit dem Gerät benutzt werden, wenn Sie beaufsichtigt werden oder eine angemessene Einweisung zur Gewährleistung einer einwandfreien und sicheren...
- Page 16 betrieben werden. Lassen Sie das Gerät nach diesem Zeitraum für einige Minuten abkühlen, ehe Sie es erneut benutzen. • Unter keinen Umständen dürfen Sie mit Ihren Händen in das Gefäss greifen, während sich das Gerät in Betrieb befindet. • Lassen Sie das Gerät nicht unbeaufsichtigt laufen. •...
-
Page 17: Wartung Und Reinigung
• Wenn das Stromkabel beschädigt ist, muss es vom Hersteller, Kundendienst oder ähnlich qualifiziertem Personal ausgetauscht werden, damit Gefahren vermieden werden. BEDIENUNGSANLEITUNG • Setzen Sie den Krug (3) auf den Gerätekörper auf (4). Dabei zeigt der Griff nach vorne. • Geben Sie die Lebensmittel in den Krug und setzen Sie den Deckel auf. Achten Sie dabei darauf, dass die verlängerte Ecke mit dem Griff übereinstimmt. - Page 18 CONDIÇÕES DE GARANTIA - 20 DIAS A MAIS - GARANTIA PLUS • Esta garantia cobre, durante 20 dias de calendário, qualquer defeito de funcionamento, fazendo-se a substituição do aparelho, ou parte dele, na morada do utilizador, sem qualquer custo para este (somente Jata Pae e aquecimento).
- Page 19 CONDICIONES DE GARANTÍA – 20 DÍAS DE PLUS • Esta garantía cubre durante 20 días naturales, cualquier defecto de funcionamiento, haciéndose el cambio del aparato o parte de él, en el domicilio del usuario, sin coste alguno para éste. • Para su aplicación es imprescindible la entrega al mensajero del ticket de compra junto al aparato a devolver. Éste será...
- Page 20 Mod. BT1056 Fecha de compra _ _ _ _ _ _ _ _ _ _ _ _ _ _ _ _ _ _ _ _ _ _ _ _ _ _ _ _ _ _ Certificado de garantía...
Need help?
Do you have a question about the BT1056 and is the answer not in the manual?
Questions and answers