
Subscribe to Our Youtube Channel
Related Manuals for Dolmar TM-98.14 H2D


Summary of Contents for Dolmar TM-98.14 H2D
- Page 1 Betriebsanleitung Manuel d’utilisation Operator’s manual Manuale di istruzioni Manual de instrucciones TM-98.14 H2D http://www.dolmar.com...
- Page 2 Verletzungen durch Riemen vermeiden: Mähwerk nicht ohne Schutzabdeckungen in Betrieb nehmen. Von den Riemen fernbleiden. Éviter d’être happé par les courroies: Ne pas faire fonctionner la machine lorsque les protections ne sont pas en place. Rester à l’écart des courroies. Avoid injury from getting caught in belt: Do not operate the machine without shields in place.
- Page 3 EINFÜHRUNG EINFÜHRUNG Sehr geehrte Kundin, sehr geehrter Kunde, Wir danken Ihnen, dass Sie unseren Produkten den Vorzug gegeben haben und wün- schen Ihnen, dass Ihnen der Gebrauch Ihrer neuen Rasenmähmaschine Freude macht und Ihren Erwartungen vollkommen entspricht. Dieses Handbuch wurde herausgegeben, um Sie mit Ihrer Maschine vertraut zu machen und diese sicher und wirksam einsetzen zu können.
-
Page 4: Table Of Contents
INHALT INHALT 1. SICHERHEITSVORSCHRIFTEN ................3 Enthält die Vorschriften zum sicheren Gebrauch der Maschine 2. KENNZEICHNUNG DER MASCHINE UND IHRER BAUTEILE ......7 Erläutert, wie die Maschine und ihre wesentlichen Bauteile gekennzeichnet sind 3. AUSPACKUNG UND ZUSAMMENBAU ..............9 Erläutert, wie die Verpackung zu entfernen und die Montage der getrennten Bauteile zu vervollständigen ist 4. -
Page 5: Sicherheitsvorschriften
SICHERHEITSVORSCHRIFTEN 1. SICHERHEITSVORSCHRIFTEN 1.1 WIE IST DAS HANDBUCH ZU LESEN Im Text des Handbuches sind einige Abschnitte, die besondere Informationen zum Zweck der Betriebssicherheit enthalten, nach den folgenden Kriterien unterschiedlich hervorgehoben: ANMERKUNG WICHTIG oder Liefert erläuternde Hinweise oder andere Angaben über bereits an früherer Stelle gemachte Aussagen, mit der Absicht, die Maschine nicht zu beschädigen oder Schäden zu vermeiden. - Page 6 SICHERHEITSVORSCHRIFTEN 1.2 ALLGEMEINE B) VORBEREITENDE MASSNAHMEN SICHERHEITSVORSCHRIFTEN 1) Während des Mähens sind immer festes Schuhwerk und lange Hosen zu tragen. Mähen Sie nicht barfüßig oder mit leichten Sandalen bekleidet. ACHTUNG! Vor der Verwendung 2) Überprüfen Sie das zu bearbeitende der Maschine aufmerksam durchle- Gelände und entfernen Sie alles, was von sen.
- Page 7 SICHERHEITSVORSCHRIFTEN 3) Vor dem Starten des Motors alle Mes- – bevor Sie die Maschine überprüfen, rei- ser ausschalten und die Gangschaltung in nigen oder Arbeiten an ihr durchführen; “Leerlauf” stellen. – nachdem ein Fremdkörper getroffen 4) Mähen Sie nicht an Hängen mit einer wurde.
- Page 8 SICHERHEITSVORSCHRIFTEN 1.3 SICHERHEITSSCHILDER Bitte seien Sie bei der Benutzung Ihrer Maschine vorsichtig. Um Sie daran zu erinnern, haben wir auf der Maschine Schilder mit Symbolen angebracht, die Sie auf die wich- tigsten Vorsichtsmaßnahmen beim Gebrauch hinweisen. Diese Schilder sind als wesentlicher Bestandteil der Maschine anzusehen.
-
Page 9: Kennzeichnung Der Maschine Und Ihrer Bauteile
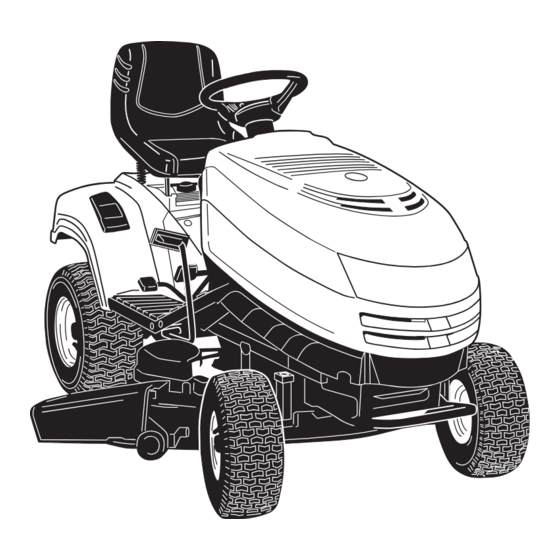
KENNZEICHNUNG DER MASCHINE UND IHRER BAUTEILE 2. KENNZEICHNUNG DER MASCHINE UND IHRER BAUTEILE 2.1 KENNZEICHNUNG DER MASCHINE Das Schild in der Nähe des Batteriegehäuses enthält die wesentlichen Daten jeder Maschine. 1. Schalleistungspegel gemäß Richtli- nie 2000/14/EG 2. Konformitätszeichen gemäß der Richtlinie 98/37/EWG 3. - Page 10 KENNZEICHNUNG DER MASCHINE UND IHRER BAUTEILE 14. Motor: Liefert den Antrieb sowohl für die Messer als auch für die Räder. Seine Eigenschaften und Gebrauchsvorschrif- ten sind in einem besonderen Handbuch beschrieben. 15. Batterie: Liefert die Energie zum Anlas- sen des Motors. Ihre Eigenschaften und Gebrauchsvorschriften sind in einem besonderen Handbuch beschrieben.
-
Page 11: Auspackung Und Zusammenbau
AUSPACKUNG UND ZUSAMMENBAU 3. AUSPACKUNG UND ZUSAMMENBAU Aus Gründen der Lagerung und des Transports werden einige Bauteile der Maschine nicht in der Fabrik eingebaut, sondern müssen nach Entfernung der Verpackung nach den folgenden Anweisungen montiert werden. WICHTIG Die Maschine wird ohne Motoröl und Benzin geliefert. Vor dem Anlassen des Motors ist Motoröl einzufüllen und Benzin zu tanken, wobei die Vor- schriften des Motorhandbuchs zu beachten sind. - Page 12 AUSPACKUNG UND ZUSAMMENBAU Bohrung der Welle in Deckung bringen und den mitgelieferten Stift (3) mit Hilfe eines Hammers eintreiben und dafür sorgen, dass er auf der gegenüberliegenden Seite voll- kommen zum Vorschein kommt. ANMERKUNG Um zu vermeiden, dass das Lenkrad mit dem Hammer beschädigt wird, wird empfohlen, ein Treibwerkzeug oder einen Schraubenzieher mit passendem Durchmesser zu benutzen, um den Stift das letzte Stück einzutreiben 3.3 EINBAU DES SITZES...
- Page 13 AUSPACKUNG UND ZUSAMMENBAU Schelle (3) zu lockern, indem man die interne Lasche mit der Hilfe eines kleinen Schraubenziehers zurückdrückt. Zuerst das rote Kabel (8) an den Pluspol (+) und anschließend das schwarze Kabel (9) an den Minuspol (-) mit den mitgelieferten Schrauben wie angezeigt anschließen.
- Page 14 AUSPACKUNG UND ZUSAMMENBAU 3.6 MONTAGE DES PRALLBLECHS Von der Innenseite des Prallblechs (1) aus die Feder (2) einbauen. Dabei ist das End- stück (2a) in die Bohrung einzuführen und die Feder so zu drehen, dass die Feder (2) wie auch das Endstück (2a) gut in ihre Sitze eingepasst sind.
-
Page 15: Bedienungseinrichtungen Und Kontrollinstrumente
BEDIENUNGSEINRICHTUNGEN UND KONTROLLINSTRUMENTE 4. BEDIENUNGSEINRICHTUNGEN UND KONTROLLINSTRUMENTE 4.1 LENKRAD Lenkt die vorderen Räder. 4.2 GASHEBEL Regelt die Drehzahl des Motors. Die Positionen sind durch ein Schild mit folgenden Symbolen gekennzeichnet: «CHOKE» Kaltstart «LANGSAM» niedrigste Motordrehzahl «SCHNELL» höchste Motordrehzahl – Die Position «CHOKE» bewirkt eine Anreicherung des Gemischs und darf nur für die zum Anlassen des kalten Motors notwendige Zeit benutzt werden. - Page 16 BEDIENUNGSEINRICHTUNGEN UND KONTROLLINSTRUMENTE «STARTEN» schaltet den Anlasser ein. Beim Loslassen des Zündschlüssels von der Position «STARTEN» kehrt dieser auto- matisch in die Position «EIN» zurück. 4.4 HEBEL DER FESTSTELLBREMSE Die Feststellbremse verhindert, dass sich die Maschine in Parkstellung bewegt. Der Bremshebel hat die folgenden zwei Positionen: «A»...
- Page 17 BEDIENUNGSEINRICHTUNGEN UND KONTROLLINSTRUMENTE 4.8 HEBEL ZUR REGULIERUNG DER SCHNITTHÖHE Dieser Hebel hat sieben Stellungen, die auf einem Schild mit den Zahlen von «1» bis «7» angezeigt sind, die ebenso vielen Schnitthöhen zwischen 3 und 8 cm entspre- chen. – Um von einer Position in eine andere zu wechseln, muss zum Entsperren der Druck- knopf am Ende des Hebels gedrückt werden.
- Page 18 BEDIENUNGSEINRICHTUNGEN UND KONTROLLINSTRUMENTE Hydrostatischer Antrieb: 4.31 BREMSPEDAL Dieses Pedal betätigt die Bremse der hinteren Räder. 4.32 ANTRIEBSPEDAL Mit Hilfe dieses Pedals wird der Antrieb auf die Räder übertragen und die Geschwindigkeit der Maschine im Vorwärts- wie im Rückwärtsgang reguliert. – Um den Vorwärtsgang einzulegen, drückt man mit der Fußspitze in Richtung «F»; verstärkt man den Druck auf das Pedal, erhöht man progressiv die Geschwindig- keit der Maschine.
-
Page 19: Gebrauchsanweisung
GEBRAUCHSANWEISUNG 5. GEBRAUCHSANWEISUNG 5.1 EMPFEHLUNGEN FÜR DIE SICHERHEIT GEFAHR! Benutzen Sie die Maschine ausschließlich für den Zweck, für die sie bestimmt ist (Mähen von Gras). Die Sicherheitseinrichtungen, mit denen die Maschine ausgestattet ist, dürfen nicht verändert oder entfernt werden. SEIEN SIE SICH STETS BEWUSST, DASS DER BENUTZER IMMER FÜR DRIT- TEN ZUGEFÜGTE SCHÄDEN VERANTWORTLICH IST. -
Page 20: Vorbereitungen Vor Arbeitsbeginn
GEBRAUCHSANWEISUNG – die Messer ausgeschaltet sein; – der Benutzer auf dem Sitz der Maschine sitzen oder die Feststellbremse angezogen sein. b) Der Motor wird ausgeschaltet, wenn: – der Benutzer den Sitz verlässt und die Messer eingeschaltet sind; – der Benutzer den Sitz verlässt und der Antrieb nicht im “Leerlauf” steht; –... - Page 21 GEBRAUCHSANWEISUNG 5.3.3 Tanken und Öl einfüllen ANMERKUNG Die zu verwendenden Benzin- und Öltypen sind in der Gebrauchs- anweisung des Motors angezeigt. Bei abgestelltem Motor den Stand des Motoröls prüfen. Gemäß den genauen Anga- ben im Handbuch des Motors muss der Ölstand zwischen den Markierungen MIN und MAX des Messstabs liegen.
-
Page 22: Gebrauch Der Maschine
GEBRAUCHSANWEISUNG 5.3.4 Überprüfung des Auswurfschutzes (Prallblech) ACHTUNG! Niemals die Maschine ohne den eingebauten Auswurfschutz verwenden! Sich immer vergewissern, dass die innere Feder des Prallblechs (1) richtig funktioniert und das Prallblech in abgesenkter Position fest hält. 5.3.5 Kontrolle der Sicherheit und Funktionsfähigkeit der Maschine 1. - Page 23 GEBRAUCHSANWEISUNG zu erfolgen! MAN MUSS SICH IMMER BEWUSST SEIN, DASS DIE ABGASE DES MOTORS GIFTIG SIND! Um den Motor anzulassen: – den Benzinhahn (1) ( wenn vorgesehen) öffnen; – den Schalthebel in die Leerlaufstellung («N») ( 4.22 oder 4.32) bringen; –...
- Page 24 GEBRAUCHSANWEISUNG Mechanischer Antrieb: Den Gashebel in eine Stellung zwischen «LANGSAM» und «SCHNELL» und den Schalthebel in die Stellung des 1. Gangs bringen ( 4.22). Bei ganz durchgetretenem Pedal die Feststellbremse lösen, das Pedal langsam loslassen, wobei es von der Funktion «Bremsen» in die Funktion «Kuppeln»...
- Page 25 GEBRAUCHSANWEISUNG 5.4.4 Rückwärtsgang WICHTIG Der Rückwärtsgang darf nur bei stehender Maschine eingelegt werden. Mechanischer Antrieb: Das Pedal solange betätigen, bis die Maschine anhält. Um den Rückwärtsgang einzulegen, den Schalthebel seitlich versetzen und in die Stellung «R» ( 4.22). bringen. Das Pedal allmählich zurücknehmen, um ein- zukuppeln und die Fahrt rückwärts zu beginnen.
- Page 26 GEBRAUCHSANWEISUNG ACHTUNG! Beim Mähen an Hängen muss man die Fahrgeschwindigkeit vermindern, um die Voraussetzungen für die Sicherheit zu erfüllen ( 1.2 - 5.5). In jedem Fall muss man die Geschwindigkeit jedes Mal dann vermindern, wenn man ein Abfallen der Motordrehzahl feststellt. Man muss sich bewusst sein, dass man nie- mals einen guten Schnitt des Rasens erzielt, wenn die Fahrgeschwindigkeit in Bezug auf die Menge des zu mähenden Grases zu hoch ist.
- Page 27 GEBRAUCHSANWEISUNG ACHTUNG! Keine Behälter mit gemähtem Gras im Innern eines Raumes belassen. Die Kunststoffteile der Karosserie mit einem mit Wasser und Waschmittel angefeuchte- ten Schwamm abreiben. Dabei ist darauf zu achten, dass der Motor, die Bauteile der elektrischen Anlage und die elektronische Steuerkarte unter dem Armaturenbrett nicht feucht werden.
- Page 28 GEBRAUCHSANWEISUNG gen, um zu vermeiden, dass bei der Wiederaufnahme der Arbeit eventuell ein Brand ausgelöst wird! Die Maschine an einen trockenen, vor Witterungseinflüssen geschützten Ort abstellen und, wenn möglich, mit einer Plane abdecken ( 8.4). WICHTIG Die Batterie muss an einem kühlen und trockenen Ort aufbewahrt werden.
-
Page 29: Betrieb An Hängen
GEBRAUCHSANWEISUNG Um ... Muss man ... Rückwärts zu fahren ( 5.4.4) Die Maschine anhalten; Mechanischer Antrieb: Auf Leerlauf (N) schalten, das Pedal vollständig durchtreten, den Rückwärtsgang einle- gen ( 4.22) und das Pedal langsam loslassen; Hydrostatischer Antrieb: das Antriebspedal nach hin- ten drücken ( 4.32). -
Page 30: Transport
GEBRAUCHSANWEISUNG bäumen der Maschine zu vermeiden. Vor dem Bergabfahren, Fahrgeschwindig- keit verringern, besonders bei Bergabfahrten. GEFAHR! Niemals den Rückwärtsgang einschalten, um die Geschwin- digkeit bergab zu vermindern: Dies könnte besonders bei rutschigem Unter- grund zu einem Verlust der Fahrzeugkontrolle führen. Mechanischer Antrieb: GEFAHR! Bergab niemals mit dem Schalthebel in Leerlaufstellung... - Page 31 GEBRAUCHSANWEISUNG 4. Der Motor muss mit maximaler Drehzahl laufen, um einen sauberen Schnitt des Grases zu erzielen und um dem geschnittenen Gras einen wirkungsvollen Schub durch den Auswurfkanal zu verleihen. 5. Die Mähfrequenz muss im Verhältnis zum Wachstum des Grases erfolgen, um zu vermeiden, dass das Gras zwischen einem Schnitt und dem andern zu stark wächst.
-
Page 32: Wartung
WARTUNG 6. WARTUNG 6.1 EMPFEHLUNGEN FÜR DIE SICHERHEIT ACHTUNG! Vor jedem Eingriff zur Reinigung oder Wartung sind der Zündschlüssel zu ziehen und die entsprechenden Anweisungen zu lesen. Zweckmäßige Kleidung anziehen und Arbeitsschuhe benutzen in allen Situatio- nen, die Gefahren für die Hände mit sich bringen. ACHTUNG! ! Die Maschine niemals mit abgenutzten oder beschädigten Bauteilen benutzen. - Page 33 WARTUNG Im Handbuch des Motors die komplette Liste und die zeitlichen Abstände für die Arbeiten einsehen. Bei den ersten Anzeichen von Verschleiß austauschen, setzen Sie sich hierfür mit Ihrem Händler in Verbindung. Die allgemeine Schmierung aller Gelenke sollte außerdem vor jedem lang anhalten- den Stillstand der Maschine ausgeführt werden.
- Page 34 WARTUNG 6.2.3 Hinterachse Sie besteht aus einer geschlossenen Einheit und bedarf keiner Wartung. Sie unterliegt einer Dauerschmierung, die weder Auswechselns noch Nachfüllung bedarf. 6.2.4 Batterie Es ist von grundlegender Bedeutung, eine akkurate Wartung der Batterie vor- zunehmen, um sicherzustellen, dass sie eine lange Lebensdauer hat.
-
Page 35: Kontrollen Und Einstellungen
WARTUNG 6.3 KONTROLLEN UND EINSTELLUNGEN 6.3.1 Ausrichten des mähwerks Eine gute Einstellung des Mähwerks ist wichtig, um einen gleichmäßig gemähten Rasen zu erhalten. ANMERKUNG Für die Einstellung müssen die seitlichen Schutzbleche entfernt werden, die nach erfolgter Einstellung wieder montiert werden müssen. ANMERKUNG Um einen guten Schnitt zu 1 - h = 26 mm... -
Page 36: Ausbau Und Ersetzen Von Teilen
WARTUNG 6.4 AUSBAU UND ERSETZEN VON TEILEN 6.4.1 Radwechsel Bei eben abgestellter Maschine Unterlagen unter einem tragenden Element des Fahrgestells auf der Seite des zu wechselnden Rads anbringen. Die Räder werden von einem Sprengring (1) gehal- ten, der mit Hilfe eines Schraubenziehers abgenom- men werden kann. - Page 37 WARTUNG 6.4.4 Auswechseln einer Sicherung An der Maschine sind einige Sicherungen (1) mit verschiedenen Stärken vorgesehen, deren Funktionen und Eigenschaften im Nachfolgenden beschrieben werden: – Sicherung 10 A = Absicherung der all- gemeinen Stromkreise und des Lei- stungskreises der Steuerkarte. Das Ansprechen der Sicherung verursacht den Stillstand der Maschine und das vollständige Ausschalten der Kontroll-...
-
Page 38: Informationen Über Die Kundendienstzentren
WARTUNG 6.5 INFORMATIONEN FÜR DIE KUNDENDIENSTZENTREN Nachfolgend werden die Haupteinstellmaße der Maschine und die Vorgehensweise zur Demontage und Ersatz der Messer beschrieben. ACHTUNG! Diese Arbeiten dürfen nur durch spezialisierte Kundendienst- center ausgeführt werden. Ziehen Sie vor allen Einstell- oder Wartungsarbeiten immer den Zündschlüssel ab. - Page 39 WARTUNG 6.5.2 Demontage, Austausch und Wiedermontage der Messer ACHTUNG! Bei der Handha- bung der Messer Handschuhe anzie- hen. ACHTUNG! Beschädigte oder verbogene Messer sind immer auszu- wechseln; niemals versuchen, sie zu reparieren! STETS ORIGINALMES- SER MIT DER MARKE VERWENDEN ! Die Messer sorgfältig auswuch- ten.
-
Page 40: Anleitung Zum Feststellen Von Störungen
ANLEITUNG ZUM FESTSTELLEN VON STÖRUNGEN 7. ANLEITUNG ZUM FESTSTELLEN VON STÖRUNGEN STÖRUNG MÖGLICHE URSACHE ABHILFE 1. Mit dem Zünd- Auslösen des Schutzes der elektroni- Den Zündschlüssel auf «STOP» stellen schlüssel auf «EIN» schen Steuerkarte wegen: und die Ursachen der Störung suchen: bleibt die Kontroll- lampe ausgeschaltet –... - Page 41 ANLEITUNG ZUM FESTSTELLEN VON STÖRUNGEN STÖRUNG MÖGLICHE URSACHE ABHILFE 7. Der Motor geht Auslösen des Schutzes der elektroni- Den Zündschlüssel auf «STOP» stellen während der Arbeit schen Steuerkarte wegen: und die Fehlerursache suchen: – Batterie enthält Säure, ist aber nicht –...
-
Page 42: Sonderzubehör
SONDERZUBEHÖR 8. SONDERZUBEHÖR 1. KIT VORDERE GEGENGEWICHTE Sie verbessern die Stabilität im vorderen Teil der Maschine, vor allem bei vorwiegendem Gebrauch an Hängen. 2. KIT HINTERER WERKZEUGHALTER Für den Transport von kleinen Gegenständen oder Werkzeugen. ACHTUNG! Die transportierten Gegen- stände dürfen nicht mehr als ein Drittel ihrer Länge überstehen, dürfen nicht die Bedienung und das Führen der Maschine behindern und dürfen bei Unfällen oder Notsituationen nicht... -
Page 43: Technische Daten
TECHNISCHE DATEN 9. TECHNISCHE DATEN Elektrische Anlage ......12 V Mechanischer Antrieb: Batterie ..........18 Ah Vorschubgeschwindigkeit (Richtwert) bei Reifen Vorderräder ....13 x 5.00-6 3000 min oder ........15 x 5.00-6 Im 1. Gang ......2,2 km/h Reifen Hinterräder ....18 x 8.50-8 Im 2. - Page 45 PRÉSENTATION PRÉSENTATION Cher Client, Nous tenons avant tout à vous remercier de la préférence que vous avez accordée à nos produits, et nous souhaitons que votre nouvelle tondeuse vous réserve de grandes satisfactions et réponde pleinement à vos attentes. Ce manuel a été rédigé dans le but de vous permettre de bien connaître votre machine et de l’utiliser en toutes conditions de sécurité...
- Page 46 SOMMAIRE SOMMAIRE 1. CONSIGNES DE SÉCURITÉ ................... 3 Contient les normes d’utilisation de la machine en toute sécurité 2. IDENTIFICATION DE LA MACHINE ET DE SES PIÈCES ........7 Explique comment identifier la machine ainsi que les principaux éléments qui la composent 3.
-
Page 47: Consignes De Sécurité
CONSIGNES DE SÉCURITÉ 1. CONSIGNES DE SÉCURITÉ 1.1 COMMENT CONSULTER LE MANUEL Dans le texte de ce manuel, certains paragraphes contenant des informations particu- lièrement importantes sont marqués par différents degrés de mise en relief dont la signification est la suivante: REMARQUE IMPORTANT ou alors... - Page 48 CONSIGNES DE SÉCURITÉ 1.2 NORMES GÉNÉRALES DE SÉCURITÉ tonte. Ne pas faire fonctionner la machine lorsque l’on est pieds nus ou en sandales. ATTENTION! Lire attentivement 2) Inspecter minutieusement la zone à avant d'utiliser la machine. tondre et éliminer tout objet étranger qui pourrait être projeté...
- Page 49 CONSIGNES DE SÉCURITÉ rieures à 10° (17%). – après avoir heurté un objet étranger. Ins- 5) Se rappeler qu’il n’existe pas de pente pecter la machine pour voir si elle est “sûre”. Se déplacer sur des terrains en endommagée et effectuer les réparations pente demande une attention particulière.
- Page 50 CONSIGNES DE SÉCURITÉ 1.3 ÉTIQUETTES DE SÉCURITÉ Votre machine doit être utilisée avec prudence. Dans ce but, des étiquettes destinées à vous rappeler les principales précautions d’utilisation ont été placées sur la machine sous forme de pictogrammes. Ces étiquettes sont considérées comme faisant partie intégrante de la machine.
-
Page 51: Identification De La Machine Et De Ses Pièces
IDENTIFICATION DE LA MACHINE ET DE SES PIÈCES 2. IDENTIFICATION DE LA MACHINE ET DE SES PIÈCES 2.1 IDENTIFICATION DE LA MACHINE L’étiquette appliquée près du compartiment batterie porte les données essentielles de chaque machine. 1. Niveau de puissance acoustique selon la directive 2000/14/CE 2. - Page 52 IDENTIFICATION DE LA MACHINE ET DE SES PIÈCES 14. Moteur: met en mouvement les lames et permet la rotation des roues; ses carac- téristiques sont décrites dans un manuel à part. 15. Batterie: fournit l'énergie pour le démar- rage du moteur ; ses caractéristiques sont décrites dans un manuel à...
-
Page 53: Déballage Et Montage
DÉBALLAGE ET MONTAGE 3. DÉBALLAGE ET MONTAGE Pour des raisons de stockage et de transport, certains éléments de la machine ne sont pas assemblés directement en usine mais doivent être montés après déballage. Pour leur montage, suivre ces consignes. IMPORTANT La machine est livrée sans huile moteur et sans essence. - Page 54 DÉBALLAGE ET MONTAGE tion pour pouvoir y introduire le goujon de blocage (3) fourni, à l'aide d'un marteau, et s’assurer que l’extrémité sorte complètement du côté opposé. REMARQUE Pour éviter d'abîmer le volant avec le marteau, pousser le goujon à fond avec un pointeau ou un tournevis de diamètre approprié. 3.3 INSTALLATION DU SIÈGE Monter le siège (1) sur la plaque (2) en utili- sant les vis (3).
- Page 55 DÉBALLAGE ET MONTAGE lier (3) en poussant la languette interne à l’aide d’un petit tournevis. Relier d’abord le câble rouge (8) au pôle positif (+), et ensuite le câble noir (9) au pôle négatif (–) à l'aide des vis fournies et en pro- cédant dans l'ordre indiqué.
- Page 56 DÉBALLAGE ET MONTAGE 3.6 MONTAGE DU PARE-PIERRES Depuis l’intérieur du pare-pierres (1), monter le ressort (2) en introduisant l’élément termi- nal (2a) dans le trou et en tournant le ressort de façon à loger correctement dans leurs sièges aussi bien le ressort (2) que l’élément terminal (2a).
-
Page 57: Commandes Et Outils De Contrôle
COMMANDES ET OUTILS DE CONTRÔLE 4. COMMANDES ET OUTILS DE CONTRÔLE 4.1 VOLANT DE DIRECTION Commande le braquage des roues avant. 4.2 LEVIER D’ACCÉLÉRATEUR Règle le nombre de tours du moteur. Les positions sont indiquées sur une plaquette reportant les symboles suivants: «STARTER»... - Page 58 COMMANDES ET OUTILS DE CONTRÔLE «DÉMARRAGE» actionne le démarreur. En relâchant la clé à partir de la position «DÉMARRAGE», elle se remet automatique- ment sur «MARCHE». 4.4 LEVIER DE FREIN DE STATIONNEMENT Ce levier sert à empêcher à la machine de se déplacer lorsqu’elle est à l’arrêt. Le levier d’embrayage a deux positions, correspondant à: «A»...
- Page 59 COMMANDES ET OUTILS DE CONTRÔLE 4.8 LEVIER DE RÉGLAGE DE LA HAUTEUR DE TONTE Ce levier se règle sur sept positions marquées de «1» à «7» sur l’étiquette correspon- dante et indiquant autant de hauteurs de tonte comprises entre 3 et 8 cm. –...
- Page 60 COMMANDES ET OUTILS DE CONTRÔLE Transmission hydrostatique: 4.31 PÉDALE FREIN Cette pédale actionne le frein sur les roues arrière. 4.32 PÉDALE EMBRAYAGE TRACTION Cette pédale embraye la traction des roues et permet de régler la vitesse de la machine, aussi bien en marche avant qu'en marche arrière. –...
-
Page 61: Mode D'emploi
MODE D’EMPLOI 5. MODE D’EMPLOI 5.1 RECOMMANDATIONS POUR LA SÉCURITÉ DANGER! N’utiliser la machine que pour effectuer ce à quoi elle est destinée (tonte de l’herbe). Ne pas modifier ou enlever les dispositifs de sécurité dont la machine est équi- pée. -
Page 62: Opérations À Effectuer Avant De Débuter Le Travail
MODE D’EMPLOI – les lames soient débrayées; – l’opérateur soit assis ou que le frein de stationnement soit enclenché. b) Le moteur s’arrête quand: – l’opérateur abandonne son siège et que les lames sont embrayées; – l’opérateur abandonne son siège et que la transmission n’est pas au “point mort”; –... - Page 63 MODE D’EMPLOI 5.3.3 Ravitaillements en huile et essence REMARQUE Le type d'essence et d'huile à utiliser est indiqué dans le manuel d'instructions du moteur. Couper le contact et contrôler le niveau d'huile du moteur : selon les modalités indiquées dans le manuel du moteur, il doit se trouver entre les encoches MIN et MAX de la jauge.
-
Page 64: Utilisation De La Machine
MODE D’EMPLOI 5.3.4 Vérification de la protection en sortie (pare-pierres) ATTENTION! Ne jamais utiliser la machine sans avoir installé la protec- tion en sortie ! Toujours s’assurer que le ressort interne du pare-pierres (1) agit correctement en mainte- nant ce dernier en position abaissée. 5.3.5 Contrôle de la sécurité... - Page 65 MODE D’EMPLOI tuer en plein air ou en tout lieu suffisamment aéré! NE PAS OUBLIER QUE LES GAZ D’ÉCHAPPEMENT DU MOTEUR SONT TOXIQUES! Pour démarrer le moteur: – ouvrir le robinet d'essence (1) ( si prévu); – mettre le levier de vitesses au point mort («N») ( 4.22 ou 4.32);...
- Page 66 MODE D’EMPLOI Transmission mécanique: Placer la commande de l'accélérateur dans une position intermédiaire entre «LENT» et «RAPIDE» et mettre le levier de vitesse en première ( 4.22). Tenir la pédale appuyée et dégager le frein de stationnement ; relâcher graduelle- ment la pédale, qui passera ainsi de la fonction «frein»...
- Page 67 MODE D’EMPLOI 5.4.4 Marche arrière IMPORTANT L'engagement de la marche arrière doit s'effectuer à l'arrêt. Transmission mécanique: Actionner la pédale jusqu'à ce que la machine s'arrête, enclencher la marche arrière en déplaçant latéralement le levier et en le positionnant sur «R» ( 4.22).
- Page 68 MODE D’EMPLOI ATTENTION! Pour les tontes sur terrains en pente, il faut réduire la vitesse d’avancement pour garantir les conditions de sécurité ( 1.2 - 5.5). Il est dans tous les cas préférable de réduire la vitesse dès que le moteur peine ; ne pas oublier en effet que la tonte ne sera jamais bonne si la vitesse est trop élevée par rapport à...
- Page 69 MODE D’EMPLOI ATTENTION! Ne pas laisser de conteneurs avec l’herbe coupée à l’inté- rieur d’un local Laver les éléments en plastique de la carrosserie à l'aide d'une éponge imbibée d'eau et de détergent; veiller à ne mouiller ni le moteur ni les composants de l'installation électrique ni la carte électronique située sous le tableau de bord.
- Page 70 MODE D’EMPLOI silencieux d’échappement: cela évitera d'éventuels débuts d'incendie au moment de la reprise du travail! Ranger la machine dans un lieu sec, à l’abri des intempéries et, si possible, la recouvrir avec une bâche ( 8.4). IMPORTANT La batterie doit être conservée dans un lieu frais et sec. Avant une longue période d'inactivité...
-
Page 71: Utilisation Sur Terrains En Pente
MODE D’EMPLOI Pour ... Il faut ... Faire marche arrière ( 5.4.4) Arrêter la machine; Transmission mécanique: mettre au point mort (N), appuyer à fond sur la pédale, passer la marche arrière 4.22) et relâcher graduellement la pédale; Transmission hydrostatique: appuyer en avant la pédale de la traction ( 4.32). -
Page 72: Transport
MODE D’EMPLOI faisant très attention pour éviter le cabrage de la machine. Réduire la vitesse d’avancement avant d’affronter une pente, surtout en descente. DANGER! Ne jamais passer la marche arrière pour réduire la vitesse: cela pourrait provoquer la perte de contrôle du véhicule, surtout sur des ter- rains glissants. - Page 73 MODE D’EMPLOI 4. Le moteur doit être utilisé au maximum des tours, aussi bien pour assurer une tonte nette de l’herbe que pour obtenir une bonne poussée de l’herbe coupée à travers la goulotte d’éjection. 5. La fréquence des tontes doit être proportionnelle à la croissance de l’herbe, en évi- tant qu’entre une tonte et l’autre l’herbe pousse trop.
-
Page 74: Entretien
ENTRETIEN 6. ENTRETIEN 6.1 RECOMMANDATIONS POUR LA SÉCURITÉ ATTENTION! Enlever la clé et lire les instructions correspondantes avant d'entamer tout nettoyage ou entretien. Porter des vêtements appropriés et des gants de travail dans toutes les situations entraînant un risque pour les mains. ATTENTION! Ne jamais utiliser la machine si certaines de ses pièces sont usées ou endommagées. - Page 75 ENTRETIEN Consulter le manuel du moteur pour la liste complète et la périodicité. Remplacer, aux premiers signes d'usure, en contactant le Revendeur. Le graissage général devrait également être effectué à chaque fois que l’on prévoit une longue période d’inactivité de la machine. Le but de ce tableau est de vous aider à...
- Page 76 ENTRETIEN 6.2.3 Axe arrière Il est constitué d’un groupe monobloc scellé et ne nécessite pas d’entretien; il est chargé de lubrifiant permanent, qui n’a pas besoin de remplacement ou d’appoint. 6.2.4 Batterie Un entretien soigneux de la batterie est un élément essentiel pour garantir une longue durée de vie.
-
Page 77: Contrôles Et Réglages
ENTRETIEN 6.3 CONTRÔLES ET RÉGLAGES 6.3.1 Alignement du plateau de coupe Pour tondre une pelouse de manière uniforme, il est essentiel que le plateau soit bien réglé. REMARQUE Pour effectuer le réglage, il peut être nécessaire d’enlever les pro- tections latérales; ces dernières devront être remises en place dès que le réglage sera terminé. -
Page 78: Interventions De Démontage Et Remplacement
ENTRETIEN 6.4 INTERVENTIONS DE DÉMONTAGE ET REMPLACEMENT 6.4.1 Remplacement des roues Placer la machine sur une surface plane, disposer des cales sous l’une des pièces portantes du cadre, du côté de la roue à changer. Les roues sont maintenues par un clip élastique (1) qui s'enlève à... - Page 79 ENTRETIEN 6.4.4 Remplacement d’un fusible Différents fusibles (1), de portée différente, sont prévus sur la machine. Leurs fonc- tions et caractéristiques sont les sui- vantes: – Fusible de 10 A = pour protéger les cir- cuits généraux et de puissance de la carte électronique, dont l’intervention provoque l’arrêt de la machine et l’ex- tinction complète du voyant sur le...
-
Page 80: Informations Pour Les Centres D'assistance
ENTRETIEN 6.5 INFORMATIONS POUR LES CENTRES D'ASSISTANCE Nous indiquons ci-après les principales valeurs de réglage de la machine, ainsi que les modalités pour le démontage et le remplacement des lames. ATTENTION! Ces opérations doivent être exécutées seulement dans un Centre spécialisé. Enlever la clé avant d'entamer toute opération de réglage ou d’entretien. - Page 81 ENTRETIEN 6.5.2 Démontage, remplacement et remontage des lames ATTENTION! Porter des gants de travail pour manipuler les lames. ATTENTION! Remplacer tou- jours les lames endommagées ou tordues; ne jamais tenter de les répa- rer! UTILISER TOUJOURS DES LAMES ORIGINALES MARQUÉES ! Faire particulièrement attention à...
-
Page 82: Pannes Et Remèdes
PANNES ET REMÈDES 7. PANNES ET REMÈDES PROBLÈME CAUSE PROBABLE SOLUTION 1. Avec la clé sur Intervention de la protection de la carte Mettre la clé sur «ARRÊT» et chercher «MARCHE», le électronique à cause de: les causes de la panne: voyant reste éteint –... - Page 83 PANNES ET REMÈDES PROBLÈME CAUSE PROBABLE SOLUTION 7. Le moteur s’arrê- Intervention de la protection de la carte Mettre la clé sur «ARRÊT» et chercher te pendant le travail électronique à cause de: les causes de la panne: – batterie activée chimiquement mais –...
- Page 84 ACCESSOIRES OPTIONNELS 8. ACCESSOIRES OPTIONNELS 1. KIT CONTREPOIDS FRONTAUX Améliorent la stabilité avant de la machine notamment lorsque cette dernière est utilisée sur les pentes. 2. KIT PORTE-OBJETS POSTÉRIEUR Pour transporter des objets et des outils de petites dimensions. ATTENTION! Les objets transportés ne doi- vent pas dépasser de plus d’un tiers de leur lon- gueur, ils ne doivent pas gêner l’utilisateur dans...
- Page 85 CARACTÉRISTIQUES TECHNIQUES 9. CARACTÉRISTIQUES TECHNIQUES Installation électrique ......12 V Transmission mécanique: Batterie ..........18 Ah Vitesse de déplacement (indicative) à Pneus avant ......13 x 5.00-6 3000 min ou alors ........ 15 x 5.00-6 en 1ère ....... 2,2 km/h Pneus arrière ......18 x 8.50-8 en 2ème ......
- Page 87 INTRODUCTION INTRODUCTION Dear Customer, Thank you for having chosen one of our products. We hope that you will get complete satisfaction from using your new machine and that it will fully meet all your expecta- tions. This manual has been written to help you become familiar with the machine and use it safely and efficiently.
- Page 88 TABLE OF CONTENTS TABLE OF CONTENTS 1. SAFETY ........................3 Regulations for using the machine safely 2. IDENTIFICATION OF THE MACHINE AND COMPONENTS ........ 7 How to identify the machine and its main components 3. UNPACKING AND ASSEMBLY ................9 How to remove the packing and assemble loose parts 4.
-
Page 89: Safety
SAFETY 1. SAFETY 1.1 HOW TO READ THE MANUAL Some paragraphs in the manual containing important information regarding safety and operation are emphasized in the following ways: NOTE IMPORTANT These give details or further information on what has already been said, in the aim to prevent damage to the machine. WARNING! Non-observance will result in the risk of injury to oneself or others. - Page 90 SAFETY 1.2 GENERAL SAFETY REGULATIONS operate the equipment barefoot or wear- ing open sandals. WARNING! Read carefully 2) Thoroughly inspect the area where the before using the machine. equipment is to be used and remove all objects which can be ejected from the A) TRAINING machine.
- Page 91 SAFETY 10° (17%). 11) Disengage the blades, stop the 5) Remember there is no such thing as engine and remove the ignition key: a “safe” slope. Travelling on grass slopes – before cleaning, checking or servicing requires particular care. To guard against the machine;...
- Page 92 SAFETY 1.3 SAFETY LABELS Your machine must be used with care. This is why labels with illustrations have been placed on the machine, to remind you of the main precautions to take during use. These labels are to be considered an integral part of the machine. Should a label come off or become illegible, contact your dealer to replace it.
-
Page 93: Identification Of The Machine And Components
IDENTIFICATION OF THE MACHINE AND COMPONENTS 2. IDENTIFICATION OF THE MACHINE AND COMPONENTS 2.1 IDENTIFICATION OF THE MACHINE The label located near the battery housing has the essential data of each machine. 1. Acoustic power level according to directive 2000/14/CE 2. - Page 94 IDENTIFICATION OF THE MACHINE AND COMPONENTS 14. Engine: this moves the blades and dri- ves the wheels. Its specifications and regulations for use are described in a specific manual. 15. Battery: provides the energy for starting the engine. Its specifications and regula- tions for use are described in a specific manual.
-
Page 95: Unpacking And Assembly
UNPACKING AND ASSEMBLY 3. UNPACKING AND ASSEMBLY For storage and transport purposes, some components of the machine are not installed in the factory and have to be assembled after unpacking. Follow the instruc- tions below. IMPORTANT The machine is supplied without engine oil or fuel. Before starting the engine, fill with oil and fuel following the instructions given in the engine manual. - Page 96 UNPACKING AND ASSEMBLY with the hole on the shaft and insert the pin (3) using a hammer. Make sure the end comes right through to the opposite side. NOTE To avoid damage to the steering wheel, use a punch or a screw- driver of the same size as the pin when hammering it through the hole.
- Page 97 UNPACKING AND ASSEMBLY on the inner tongue with the help of a small screwdriver. First connect the red wire (8) to the positive pole (+) and then the black wire (9) to the negative pole (–), using the screws supplied as shown.
- Page 98 UNPACKING AND ASSEMBLY 3.6 FITTING THE STONE-GUARD Inside the stone-guard (1), fit the spring (2) by inserting the terminal (2a) into the hole and turning it so that both the spring (2) and the terminal (2a) are securely positoned in their seatings.
-
Page 99: Controls And Instruments
CONTROLS AND INSTRUMENTS 4. CONTROLS AND INSTRUMENTS 4.1 STEERING WHEEL Turns the front wheels. 4.2 THROTTLE This regulates the engine's r.p.m. The positions are indicated on a plate showing the following symbols: «CHOKE» cold starting «SLOW» for minimum engine speed «FAST»... - Page 100 CONTROLS AND INSTRUMENTS «START» connects the starter motor. If you release the key on «START», it will automatically return to «ON». 4.4 PARKING BRAKE This brake stops the machine from moving when it has been parked. There are two positions: «A»...
- Page 101 CONTROLS AND INSTRUMENTS 4.8 CUTTING HEIGHT ADJUSTMENT LEVER There are seven positions for this lever (shown as «1» to «7» on the label), which corre- spond to various heights between 3 and 8 cm. – To go from one height to another, press the release button at the end of the lever. Mechanical transmission 4.21 CLUTCH / BRAKE PEDAL This pedal has two functions: during the first part of its travel it acts as a clutch,...
- Page 102 CONTROLS AND INSTRUMENTS Hydrostatic transmission: 4.31 BRAKE PEDAL This pedal works the brake on the rear wheels. 4.32 DRIVE PEDAL This pedal engages drive in the wheels and controls the machine's forward and reverse speeds. – To engage forward drive, press it towards «F» with your toe-cap. As you increase the pressure on the pedal, the speed of the machine increases.
-
Page 103: How To Use The Machine
HOW TO USE THE MACHINE 5. HOW TO USE THE MACHINE 5.1 SAFETY RECOMMENDATIONS DANGER! The machine must only be used for the purpose for which it was designed (cutting grass). Do not tamper with or remove the safety devices fitted on the machine. REMEMBER THAT THE USER IS ALWAYS RESPONSIBLE FOR DAMAGE AND INJURY TO OTHERS. - Page 104 HOW TO USE THE MACHINE – the blades are not engaged; – the operator is seated or the parking brake is engaged. b) The engine stops when: – the operator leaves his seat when the blades are engaged; – the operator leaves his seat when the transmission is not in “neutral”; –...
- Page 105 HOW TO USE THE MACHINE 5.3.3 Filling with oil and fuel NOTE The engine manual indi- cates what type of oil and fuel you can use. With the engine off, check the oil level. According to the instructions in the engine manual, this must be between the MIN and MAX marks on the dipstick.
-
Page 106: Using The Machine
HOW TO USE THE MACHINE 5.3.4 Checking the protection at the exit (stone-guard) WARNING! Never use the machine without the exit protection in place! Always check that the inner spring of the stone-guard (1) works properly, whilst keep- ing it securely lowered. 5.3.5 Checking machine safety and efficiency 1. - Page 107 HOW TO USE THE MACHINE area! ALWAYS REMEMBER THAT EXHAUST GASES ARE TOXIC! To start the engine: – open the fuel stopcock (1) ( if fitted); – shift in the gear into neutral («N») ( 4.22 or 4.32); – disengage the blades ( 4.7);...
- Page 108 HOW TO USE THE MACHINE Mechanical transmission: Position the throttle between «SLOW» and «FAST», and the gear lever in 1st gear ( 4.22). Keep the pedal pressed down and release the parking brake. Slowly release the pedal to shift from «brake» to «clutch», thus operating the rear wheels ( 4.21).
- Page 109 HOW TO USE THE MACHINE 5.4.4 Reverse IMPORTANT Reverse must be engaged only when the machine has stopped moving. Mechanical transmission: Press the pedal until the machine stops and then go into reverse by shifting the lever sideways and into position «R» ( 4.22).
- Page 110 HOW TO USE THE MACHINE WARNING! When cutting on sloping ground, reduce your speed to ensure safe conditions ( 1.2 - 5.5). Whatever the conditions, always reduce the speed if you notice a drop in engine speed – if you travel too fast compared to the amount of grass being cut, you will not be able to mow the grass well.
- Page 111 HOW TO USE THE MACHINE WARNING! Do not leave containers full of cut grass inside a room. Clean the plastic parts of the body with a damp sponge using water and detergent, taking care not to wet the engine, the electrical parts or the electronic circuit board located under the dashboard.
- Page 112 HOW TO USE THE MACHINE engine or silencer to prevent their catching fire the next time the machine is used! Put the machine away in a dry, sheltered place and preferably covered with a cloth ( 8.4). IMPORTANT The battery must be kept in a cool and dry place.
- Page 113 HOW TO USE THE MACHINE To ... You will need to ... Reverse ( 5.4.4) Stop the machine; Mechanical transmission: shift into neutral (N), push the pedal right down, go into reverse, ( 4.22) and then gradually release the pedal; Hydrostatic transmission: press the drive pedal back- wards ( 4.32).
-
Page 114: Lawn Maintenance
HOW TO USE THE MACHINE prevent the risk of tipping over. Reduce the forward speed before going on a slope, particularly downhill. DANGER! Never use reverse to reduce speed going downhill: this could cause you to lose control of the vehicle, especially on slippery ground. Mechanical transmission: DANGER! Never ride the machine on slopes in neutral or with the... - Page 115 HOW TO USE THE MACHINE 4. The engine must run at full speed, both to ensure a sharp cut of the grass and to get the necessary thrust to push the cuttings through the collector channel. 5. The frequency of mowing should be in relation to the rate of growth of the grass. The grass should not be left to grow too much between one cut and the next.
-
Page 116: Maintenance
MAINTENANCE 6. MAINTENANCE 6.1 SAFETY RECOMMENDATIONS WARNING! Before cleaning or doing maintenance work, take out the ignition key and read the relevant instructions. Wear adequate clothing and work gloves whenever your hands are at risk. WARNING! Never use the machine with worn or damaged parts. Faulty or worn-out parts must always be replaced and not repaired. - Page 117 MAINTENANCE See the engine manual for the full list and frequency. At the first signs of wear, contact your dealer to replace the part. General lubrication of all joints should also be carried out whenever the machine is to be left unused for a long period. The above table is there to help you maintain your machine’s safety and performance.
- Page 118 MAINTENANCE 6.2.3 Rear axle This is a sealed single unit that does not require maintenance. It is permanently lubri- cated and its lubricant does not need changing or topping up. 6.2.4 Battery The battery must be carefully main- tained to ensure long life. The machine battery must always be charged: –...
-
Page 119: Checks And Adjustments
MAINTENANCE 6.3 CHECKS AND ADJUSTMENTS 6.3.1 Cutting deck alignment The cutting deck should be aligned properly set to ensure a good cut NOTE In order to make the adjustment, you may need to remove the lat- eral guides which must be put back afterwards. NOTE For achieving good results 1 - h = 26 mm... - Page 120 MAINTENANCE 6.4 DISMANTLING AND REPLACEMENT 6.4.1 Replacing wheels Stop the machine on flat ground and put a block under a load-bearing part of the frame on the side that the wheel is to be changed. The wheels are held by a snap ring (1) which can be eased off with a screwdriver.
- Page 121 MAINTENANCE 6.4.4 Replacing a fuse The machine is fitted with fuses (1) with different capacities and functions. Specifi- cally: – 10 A fuse = protects the main and power circuits of the electronic circuit board. When it blows, the machine stops and the dashboard light switches off.
-
Page 122: Information For Service Centres
MAINTENANCE 6.5 INFORMATION FOR SERVICE CENTRES Below is a list of specifications for machine adjustments and instructions for disman- tling and replacing the blades. WARNING! These operations must be carried out by a specialized Centre only. Remove the ignition key before doing any adjustments or maintenance. 6.5.1 Adjustments Position Element... - Page 123 MAINTENANCE 6.5.2 Dismantling, replacing and remounting the blades WARNING! Always wear work gloves when handling the blades. WARNING! Damaged or bent blades must always be replaced; never try to repair them! ALWAYS USE ORIGINAL BLADES BEARING THE SYMBOL ! Make sure the blades are correctly balanced.
-
Page 124: Troubleshooting
TROUBLESHOOTING 7. TROUBLESHOOTING PROBLEM LIKELY CAUSE SOLUTION 1. With the key on The safety device of the electronic cir- Turn the key to «STOP» and look for «ON», the light cuit board has cut in due to: the cause of the problem: remains off –... - Page 125 TROUBLESHOOTING PROBLEM LIKELY CAUSE SOLUTION 7. The motor shuts The safety device of the electronic cir- Turn the key to «STOP» and look for down whilst working cuit board has cut in due to: the cause of the problem: – battery contains electrolyte but is not –...
-
Page 126: Accessories On Request
ACCESSORIES ON REQUEST 8. ACCESSORIES ON REQUEST 1. FRONT COUNTERWEIGHTS These improve stability at the front of the machine, particularly when it is used mostly on sloping ground. 2. REAR TOOL HOLDER KIT To carry small tools and objects. WARNING! No objects carried onboard must protrude by over one-third of their length, they must not hinder the driver or compromise... -
Page 127: Specifications
SPECIFICATIONS 9. SPECIFICATIONS Electrical system ....... 12 V Mechanical transmission: Battery ..........18 Ah Forward speed (approximate) at Front tyres ......13 x 5.00-6 3000 min or ......... 15 x 5.00-6 in 1st ........2.2 km/h Rear tyres .......18 x 8.50-8 in 2nd ......... - Page 129 PRESENTAZIONE PRESENTAZIONE Gentile Cliente, vogliamo anzitutto ringraziarla per la preferenza accordata ai nostri prodotti e ci augu- riamo che l’uso di questa sua nuova macchina rasaerba le riservi grandi soddisfazioni e risponda appieno alle sue aspettative. Questo manuale è stato redatto per consentirle di conoscere bene la sua macchina e di usarla in condizioni di sicurezza ed efficienza;...
- Page 130 INDICE INDICE 1. NORME DI SICUREZZA ..................3 Contiene le norme per usare la macchina in sicurezza 2. IDENTIFICAZIONE DELLA MACCHINA E DEI COMPONENTI ......7 Spiega come identificare la macchina e gli elementi principali che la compongono 3. SBALLAGGIO E MONTAGGIO ................9 Spiega come rimuovere l’imballo e completare il montaggio degli elementi staccati 4.
-
Page 131: Norme Di Sicurezza
NORME DI SICUREZZA 1. NORME DI SICUREZZA 1.1 COME LEGGERE IL MANUALE Nel testo del manuale, alcuni paragrafi contenenti informazioni di particolare importan- za, ai fini della sicurezza o del funzionamento, sono evidenziati in modo diverso, secondo questo criterio: NOTA IMPORTANTE oppure Fornisce precisazioni o altri elemen-... - Page 132 NORME DI SICUREZZA 1.2 NORME GENERALI DI SICUREZZA azionare la macchina a piedi scalzi o con sandali aperti. ATTENZIONE! Leggere attenta- 2) Ispezionare a fondo tutta l’area di lavo- mente prima di usare la macchina. ro e togliere tutto ciò che potrebbe venire espulso dalla macchina.
- Page 133 NORME DI SICUREZZA 5) Ricordarsi che non esiste un pendio ed effettuare le necessarie riparazioni “sicuro”. Muoversi su prati in pendenza prima di rimettere in moto e usare nuova- richiede una particolare attenzione. Per mente la macchina; evitare ribaltamenti: – se la macchina comincia a vibrare in –...
- Page 134 NORME DI SICUREZZA 1.3 ETICHETTE DI SICUREZZA La vostra macchina deve essere utilizzata con prudenza. Per ricordarvelo, sulla mac- china sono state poste delle etichette raffiguranti dei pittogrammi, che richiamiamo le principali precauzioni d’uso. Queste etichette sono considerate come parte integrante della macchina.
-
Page 135: Identificazione Della Macchina E Dei Componenti
IDENTIFICAZIONE DELLA MACCHINA E DEI COMPONENTI 2. IDENTIFICAZIONE DELLA MACCHINA E DEI COMPONENTI 2.1 IDENTIFICAZIONE DELLA MACCHINA L’etichetta di identificazione, posta in prossimità del vano batteria, porta i dati essenziali di ogni macchi- 1. Livello potenza acustica secondo la direttiva 2000/14/CE 2. - Page 136 IDENTIFICAZIONE DELLA MACCHINA E DEI COMPONENTI 14. Motore: fornisce il movimento sia delle lame che della trazione alle ruote; le sue caratteristiche e norme d’uso sono descritte in uno specifico manuale. 15. Batteria: fornisce l’energia per l’avvia- mento del motore; le sue caratteristiche e norme d’uso sono descritte in uno specifico manuale.
-
Page 137: Sballaggio E Montaggio
SBALLAGGIO E MONTAGGIO 3. SBALLAGGIO E MONTAGGIO Per motivi di magazzinaggio e trasporto, alcuni componenti della macchina non sono assemblati direttamente in fabbrica, ma devono essere montati dopo la rimozione dal- l’imballo, seguendo le istruzioni seguenti. IMPORTANTE La macchina viene fornita priva di olio motore e benzina. Prima di avviare il motore, effettuare i rifornimenti seguendo le prescrizioni riportate sul manuale del motore. - Page 138 SBALLAGGIO E MONTAGGIO quello dell’albero ed inserire la spina in dotazione (3) per mezzo di un martello, curan- do che l’estremità fuoriesca completamente dal lato opposto. NOTA Per evitare di danneggiare il volante con il martello è bene impie- gare un punteruolo o un cacciavite di diametro adeguato, per spingere la spina nel- l’ultimo tratto.
- Page 139 SBALLAGGIO E MONTAGGIO fascetta (3) spingendo la linguetta interna con l’aiuto di un cacciavite piccolo. Collegare prima il cavo rosso (8) al polo positivo (+) e successivamente il cavo nero (9) al polo negativo (–), utilizzando le viti in dotazione come indicato. Spalmare i morsetti con del grasso siliconico e curare il corretto posizionamento del cap- puccio di protezione del cavo rosso (8).
- Page 140 SBALLAGGIO E MONTAGGIO 3.6 MONTAGGIO DEL PARASASSI Dall'interno del parasassi (1), montare la molla (2) introducendo il terminale (2a) nel foro e ruotandola in modo che sia la molla (2) che il terminale (2a) risultino ben alloggiati nelle rispettive sedi. Posizionare il parasassi (1) in corrispondenza dei supporti (3) del piatto di taglio e, con l'aiuto di un cacciavite, ruotare il secondo...
-
Page 141: Comandi E Strumenti Di Controllo
COMANDI E STRUMENTI DI CONTROLLO 4. COMANDI E STRUMENTI DI CONTROLLO 4.1 VOLANTE DI GUIDA Comanda la sterzata delle ruote anteriori. 4.2 LEVA ACCELERATORE Regola il numero dei giri del motore. Le posizioni, indicate dalla targhetta, corrispondo- no a: «STARTER» avviamento a freddo «LENTO»... - Page 142 COMANDI E STRUMENTI DI CONTROLLO «AVVIAMENTO» inserisce il motorino di avviamento. Rilasciando la chiave dalla posizione «AVVIAMENTO», questa torna automaticamente in posizione «MARCIA». 4.4 LEVA FRENO DI STAZIONAMENTO Il freno di stazionamento impedisce alla macchina di muoversi dopo averla parcheg- giata.
- Page 143 COMANDI E STRUMENTI DI CONTROLLO 4.8 LEVA REGOLAZIONE ALTEZZA TAGLIO Questa leva ha sette posizioni indicate da «1» a «7» sulla relativa targhetta, corrispon- denti ad altrettante altezze di taglio comprese fra 3 e 8 cm. – Per passare da una posizione all’altra occorre premere il pulsante di sblocco posto sull’estremità.
- Page 144 COMANDI E STRUMENTI DI CONTROLLO Trasmissione idrostatica: 4.31 PEDALE FRENO Questo pedale aziona il freno sulle ruote posteriori. 4.32 PEDALE TRAZIONE Tramite questo pedale si inserisce la trazione alle ruote e si regola la velocità della macchina, sia in marcia avanti che in retromarcia. –...
-
Page 145: Norme D'uso
NORME D’USO 5. NORME D’USO 5.1 RACCOMANDAZIONI PER LA SICUREZZA PERICOLO! Usare la macchina unicamente per gli scopi a cui è destinata (taglio dell’erba). Non manomettere o rimuovere i dispositivi di sicurezza di cui la macchina è dotata. RICORDARE CHE L’UTILIZZATORE È SEMPRE RESPONSABILE DEI DANNI ARRECATI A TERZI. -
Page 146: Operazioni Preliminari Prima Di Iniziare Il Lavoro
NORME D’USO – le lame siano disinnestate; – l’operatore sia seduto oppure sia inserito il freno di stazionamento. b) Il motore si arresta quando: – l’operatore abbandona il sedile a lame innestate; – l’operatore abbandona il sedile con la trasmissione non in “folle” –... - Page 147 NORME D’USO 5.3.3 Rifornimento di olio e benzina NOTA Il tipo di olio e di benzina da impiegare è indicato nel manuale di istru- zioni del motore. A motore fermo controllare il livello dell’olio del motore: secondo le precise modalità indicate nel manuale del motore deve essere compreso fra le tacche MIN.
-
Page 148: Uso Della Macchina
NORME D’USO 5.3.4 Verifica della protezione all’uscita (parasassi) ATTENZIONE! Non utilizzare mai la macchina senza aver montato la prote- zione all’uscita! Accertare sempre che la molla interna del parasassi (1) lavori correttamente, mante- nendolo stabilmente in posizione abbassata. 5.3.5 Controllo della sicurezza e dell’efficienza della macchina 1. - Page 149 NORME D’USO luogo ben aerato! RICORDARE SEMPRE CHE I GAS DI SCARICO DEL MOTORE SONO TOSSICI! Per avviare il motore: – aprire il rubinetto della benzina (1) ( se previsto); – mettere la trasmissione in folle («N») ( 4.22 oppure 4.32);...
- Page 150 NORME D’USO Trasmissione meccanica: Portare il comando dell’acceleratore in una posizione intermedia fra «LENTO» e «VELOCE», e la leva del cambio in posizione di 1ª marcia ( 4.22). Tenendo premuto il pedale, disinserire il freno di stazionamento; rilasciare gradual- mente il pedale che passa così dalla funzione «freno» a quella di «frizione», azionan- do le ruote posteriori ( 4.21).
- Page 151 NORME D’USO 5.4.4 Retromarcia IMPORTANTE L’innesto della retromarcia deve sempre avvenire da fermo. Trasmissione meccanica: Azionare il pedale fino ad arrestare la macchi- na, inserire la retromarcia spostando lateralmente la leva e portandola in posizione «R» ( 4.22). Rilasciare gradualmente il pedale per inserire la frizione ed iniziare la retromarcia.
- Page 152 NORME D’USO ATTENZIONE! Nei tagli su terreni in pendenza occorre ridurre la velocità di avanzamento per garantire le condizioni di sicurezza ( 1.2 - 5.5). In ogni caso occorre ridurre la velocità ogni volta che si avverte un calo di giri del motore, tenendo presente che non si otterrà...
- Page 153 NORME D’USO ATTENZIONE! Non lasciare contenitori con l’erba tagliata all’interno di un locale. Ripassare le parti in plastica della carrozzeria con una spugna imbevuta d’acqua e detersivo, facendo ben attenzione a non bagnare il motore, i componenti dell’impianto elettrico e la scheda elettronica posta sotto il cruscotto. IMPORTANTE Non usare mai lance a pressione o liquidi aggressivi per il lavag- gio della carrozzeria e del motore!
- Page 154 NORME D’USO si in prossimità del motore e del silenziatore di scarico; ciò per evitare possibili inneschi di incendio alla ripresa del lavoro! Riporre la macchina in un ambiente asciutto, al riparo dalle intemperie e, possibilmen- te, ricoprirla con un telo ( 8.4).
-
Page 155: Uso Sui Terreni In Pendenza
NORME D’USO Per ... Occorre ... Retrocedere ( 5.4.4) Arrestare la macchina; Trasmissione meccanica: mettere in folle (N), premere a fondo il pedale, inserire la retromarcia ( 4.22) e rila- sciare gradualmente il pedale; Trasmissione idrostatica: premere all’indietro il pedale della trazione ( 4.32). -
Page 156: Trasporto
NORME D’USO particolare cautela per evitare l’impennamento della macchina. Ridurre la velo- cità d’avanzamento prima di affrontare un pendio, specialmente in discesa. PERICOLO! Non inserire mai la retromarcia per ridurre la velocità in discesa: questo potrebbe causare la perdita di controllo del mezzo, special- mente su terreni scivolosi. - Page 157 NORME D’USO 4. Il motore deve essere utilizzato al massimo dei giri, sia per assicurare un taglio netto dell’erba che per ottenere una buona spinta dell’erba tagliata attraverso il canale d’espulsione. 5. La frequenza delle rasature deve essere rapportata alla crescita dell’erba, evitando che tra un taglio e l’altro l’erba cresca troppo.
-
Page 158: Manutenzione
MANUTENZIONE 6. MANUTENZIONE 6.1 RACCOMANDAZIONI PER LA SICUREZZA ATTENZIONE! Togliere la chiave e leggere le relative istruzioni prima di ini- ziare qualsiasi intervento di pulizia o manutenzione. Indossare indumenti ade- guati e guanti di lavoro in tutte le situazioni di rischio per le mani. ATTENZIONE! Non usare mai la macchina con parti usurate o danneggiate. - Page 159 MANUTENZIONE Consultare il manuale del motore per l’elenco completo e la periodicità. Sostituire ai primi cenni di usura, contattando il vostro Rivenditore. La lubrificazione generale di tutte le articolazioni dovrebbe inoltre essere eseguita ogni volta che si prevede una lunga inattività della macchina. La tabella sopra riportata ha lo scopo di aiutarvi a mantenere in efficienza e sicurezza la vostra macchina.
- Page 160 MANUTENZIONE 6.2.3 Asse posteriore È costituito da un gruppo monoblocco sigillato e non richiede manutenzione; è fornito di una carica di lubrificante permanente, che non necessita di sostituzione o rabbocco. 6.2.4 Batteria È fondamentale effettuare un’accurata manutenzione della batteria per garan- tirne una lunga durata.
-
Page 161: Controlli E Regolazioni
MANUTENZIONE 6.3 CONTROLLI E REGOLAZIONI 6.3.1 Allineamento del piatto di taglio Una buona regolazione del piatto è essenziale per ottenere un prato uniformemente rasato. NOTA Per effettuare la regolazione può essere necessario rimuovere le protezioni laterali, che devono essere ripristinate a regolazione avvenuta. NOTA Per ottenere un buon risultato 1 - h = 26 mm... -
Page 162: Interventi Di Smontaggio E Sostituzione
MANUTENZIONE 6.4 INTERVENTI DI SMONTAGGIO E SOSTITUZIONE 6.4.1 Sostituzione delle ruote Con la macchina in piano, sistemare degli spessori sotto un elemento portante del telaio, dal lato della ruota da sostituire. Le ruote sono trattenute da un anello elastico (1) asportabile con l’aiuto di un cacciavite. - Page 163 MANUTENZIONE 6.4.4 Sostituzione di un fusibile Sulla macchina sono previsti alcuni fusibili (1), di diversa portata, le cui funzioni e caratteristiche sono le seguenti: – Fusibile da 10 A = a protezione dei cir- cuiti generali e di potenza della scheda elettronica, il cui intervento provoca l’arresto della macchina e lo spegni- mento completo della spia sul cruscot-...
-
Page 164: Informazioni Per I Centri Di Assistenza
MANUTENZIONE 6.5 INFORMAZIONI PER I CENTRI DI ASSISTENZA Qui di seguito sono riportate le principali quote di regolazione della macchina e le modalità di smontaggio e sostituzione delle lame. ATTENZIONE! Queste operazioni devono essere eseguite solo presso un Centro specializzato. Togliere la chiave prima di iniziare qualsiasi intervento di regolazione o manutenzione. - Page 165 MANUTENZIONE 6.5.2 Smontaggio, sostituzione e rimontaggio delle lame ATTENZIONE! Indossare guanti da lavoro per maneggiare le lame. ATTENZIONE! Sostituire sempre le lame danneggiate o storte; non tentare mai di ripararle! USARE SEM- PRE LAME ORIGINALI MARCATE Curare la bilanciatura delle lame. 1.
-
Page 166: Guida Alla Identificazione Degli Inconvenienti
GUIDA ALLA IDENTIFICAZIONE DEGLI INCONVENIENTI 7. GUIDA ALLA IDENTIFICAZIONE DEGLI INCONVENIENTI INCONVENIENTE CAUSA PROBABILE RIMEDIO 1. Con la chiave su Intervento della protezione della sche- Mettere la chiave in pos. «ARRESTO» «MARCIA», la spia da elettronica a causa di: e cercare le cause del guasto: rimane spenta –... - Page 167 GUIDA ALLA IDENTIFICAZIONE DEGLI INCONVENIENTI INCONVENIENTE CAUSA PROBABILE RIMEDIO 7. Il motore si arre- Intervento della protezione della sche- Mettere la chiave in pos. «ARRESTO» sta durante il lavoro da elettronica a causa di: e cercare le cause del guasto: –...
-
Page 168: Accessori A Richiesta
ACCESSORI A RICHIESTA 8. ACCESSORI A RICHIESTA 1. KIT PESI ANTERIORI Migliorano la stabilità anteriore della macchina, sopra- tutto nell’uso prevalente su terreni in pendenza. 2. KIT PORTAOGGETTI POSTERIORE Per trasportare oggetti e attrezzi di piccole dimensio- ATTENZIONE! Gli oggetti trasportati non devono sporgere per più... -
Page 169: Caratteristiche Tecniche
CARATTERISTICHE TECNICHE 9. CARATTERISTICHE TECNICHE Impianto elettrico ....... 12 V Trasmissione meccanica: Batteria ..........18 Ah Velocità di avanzamento (indicativa) a Pneumatici anteriori ....13 x 5.00-6 3000 min oppure ......... 15 x 5.00-6 in 1ª ........2,2 km/h Pneumatici posteriori ....18 x 8.50-8 in 2ª... - Page 171 PRESENTACIÓN PRESENTACIÓN Estimado Cliente, deseamos ante todo agradecerle por haber preferido nuestros productos y esperamos que el empleo de esta nueva cortadora de césped le reserve grandes satisfacciones y que responda plenamente a sus expectativas. El presente manual ha sido redactado para permitirle conocer bien su máquina y para que la pueda utilizar en condiciones de seguridad y eficiencia.
- Page 172 ÍNDICE ÍNDICE 1. NORMAS DE SEGURIDAD ..................3 Contiene las normas para usar la máquina en modo seguro 2. IDENTIFICACIÓN DE LA MÁQUINA Y DE LOS COMPONENTES ....... 7 Explica cómo identificar la máquina y los elementos principales que la componen 3.
-
Page 173: Normas De Seguridad
NORMAS DE SEGURIDAD 1. NORMAS DE SEGURIDAD 1.1 CÓMO LEER EL MANUAL En el texto del manual, algunos párrafos que contienen información de particular importancia a fines de la seguridad o del funcionamiento están destacados en modo diferente de acuerdo con el siguiente criterio: NOTA IMPORTANTE ó... - Page 174 NORMAS DE SEGURIDAD 1.2 NORMAS GENERALES calzado robusto y pantalones largos. DE SEGURIDAD No utilice la máquina con los pies descal- zos o con sandalias abiertas. 2) Inspeccionar a fondo toda el área de ¡ATENCIÓN! Leer las instruccio- trabajo y quitar todo lo que pudiera ser nes antes de utilizar la máquina.
- Page 175 NORMAS DE SEGURIDAD en punto muerto. motor y quitar la llave: 4) No corte el césped en terrenos con – antes de controlar, limpiar o trabajar una inclinación superior a 10° (17%). con la máquina; 5) Recuerde siempre que no existe una –...
- Page 176 NORMAS DE SEGURIDAD 1.3 ETIQUETAS DE SEGURIDAD La máquina debe ser utilizada con prudencia. Para recordárselo, han sido puestas sobre la máquina etiquetas que representan pictogramas que indican las principales precauciones de uso. Estas etiquetas forman parte integrante de la máquina. Si una etiqueta se despega o se vuelve ilegible, contactar a su Distribuidor para susti- tuirla.
-
Page 177: Identificación De La Máquina Y De Los Componentes
IDENTIFICACIÓN DE LA MÁQUINA Y DE LOS COMPONENTES 2. IDENTIFICACIÓN DE LA MÁQUINA Y DE LOS COMPONENTES 2.1 IDENTIFICACIÓN DE LA MÁQUINA La etiqueta de identificación colocada cerca de la caja de la batería contiene los datos esenciales de cada máquina. 1. - Page 178 IDENTIFICAZIONE DELLA MACCHINA E DEI COMPONENTI 14. Motor: suministra el movimiento ya sea a las cuchillas como a la tracción a las ruedas; sus características y normas de uso se describen en un manual específi- 15. Batería: suministra la energía para el arranque del motor;...
-
Page 179: Desembalaje Y Montaje Final
DESEMBALAJE Y MONTAJE 3. DESEMBALAJE Y MONTAJE Por motivos de almacenamiento y transporte, algunos componentes de la máquina no se ensamblan directamente en fábrica, sino que se deben montar después de la remo- ción del embalaje, siguiendo las instrucciones descritas a continuación. IMPORTANTE La máquina se entrega sin el aceite del motor y sin gasolina. - Page 180 DESEMBALAJE Y MONTAJE del árbol e insertar el pasador suministrado (3) mediante un martillo, teniendo cuidado que el extremo salga completamente por el lado opuesto. NOTA Para evitar dañar el volante con el martillo conviene emplear una punta o un destornillador de diámetro adecuado para empujar el pasador en el últi- mo tramo.
- Page 181 DESEMBALAJE Y MONTAJE lengüeta interna con la ayuda de un destornillador pequeño. Efectuar la conexión del cable rojo (8) al polo positivo (+) y del cable negro (9) al polo negativo (–) utilizando los tornillos suminis- trados como se indica. Repartir la grasa de silicona en los bornes y coloque correctamente el capuchón del cable rojo (8).
- Page 182 DESEMBALAJE Y MONTAJE 3.6 MONTAJE DE LA PANTALLA DE PROTECCIÓN Desde el interior de la pantalla de protección (1), montar el resorte (2) introduciendo el ter- minal (2a) en el orificio y girándolo de mane- ra que tanto el resorte (2) como el terminal (2a) resulten correctamente instalados en los alojamientos correspondientes.
-
Page 183: Mandos E Instrumentos De Control
MANDOS E INSTRUMENTOS DE CONTROL 4. MANDOS E INSTRUMENTOS DE CONTROL 4.1 VOLANTE DE CONDUCCIÓN Controla la dirección de las ruedas anteriores. 4.2 PALANCA DEL ACELERADOR Regula el número de revoluciones del motor. Las posiciones, indicadas en la placa, corresponden a: «CEBADOR»... - Page 184 MANDOS E INSTRUMENTOS DE CONTROL «ARRANQUE» acciona el motor de arranque. Soltando la llave de la posición «ARRANQUE», la misma regresa automáticamente a la posición «MARCHA». 4.4 PALANCA DEL FRENO DE ESTACIONAMIENTO El freno de estacionamiento impide que la máquina se mueva después de haberla estacionado.
- Page 185 MANDOS E INSTRUMENTOS DE CONTROL 4.8 PALANCA DE REGULACIÓN DE LA ALTURA DE CORTE Esta palanca tiene siete posiciones, de «1» a «7» indicadas en la respectiva placa, que corresponden a las siete alturas de corte comprendidas entre 3 y 8 cm. –...
- Page 186 MANDOS E INSTRUMENTOS DE CONTROL Transmisión hidrostática: 4.31 PEDAL DEL FRENO Este pedal acciona el freno en las ruedas posteriores. 4.32 PEDAL DE LA TRACCIÓN Mediante este pedal se engrana la tracción a las ruedas y se ajusta la velocidad de la máquina, en la marcha adelante y en la marcha atrás.
-
Page 187: Normas De Uso
NORMAS DE USO 5. NORMAS DE USO 5.1 MEDIDAS DE SEGURIDAD ¡PELIGRO! Destinar la máquina sólo al uso para la cual ha sido expre- samente proyectada (corte del césped). No manipule o quite los dispositivos de seguridad de la máquina. RECUERDE QUE EL USUARIO ES SIEMPRE EL RESPONSABLE POR LOS DAÑOS ACARRE- ADOS A TERCEROS. -
Page 188: Operaciones Preliminares Antes De Comenzar El Trabajo
NORMAS DE USO – las cuchillas estén desacopladas; – el operador esté sentado o el freno de estacionamiento esté engranado. b) El motor se para cuando: – el operador abandona el asiento de conducción con las cuchillas acopladas; – el operador abandona el asiento de conducción con la transmisión no en “punto muerto”;... - Page 189 NORMAS DE USO 5.3.3 Abastecimiento de aceite y gasolina NOTA El tipo de aceite y de gasolina que se deben emplear está indica- do en el manual de instrucciones del motor. Con el motor parado, controlar el nivel de aceite del motor: según los modos indicados en el manual del motor, debe estar comprendi- do entre las muescas MÍN y MÁX de la varilla.
-
Page 190: Uso De La Máquina
NORMAS DE USO 5.3.4 Inspección de la protección a la salida (pantalla de protección) ¡ATENCIÓN! ¡No utilizar jamás la máquina sin haber montado la protección a la salida! Comprobar siempre que el resorte interior de la pantalla de protección (1) trabaje correcta- mente, manteniéndolo establemente en posi- ción bajada. - Page 191 NORMAS DE USO en un lugar bien ventilado! ¡RECORDAR SIEMPRE QUE LOS GASES DE ESCA- PE DEL MOTOR SON TÓXICOS! Antes de arrancar el motor: – abrir el grifo de la gasolina (1) ( si estuviera previs- to); – accionar la transmisión en punto muerto («N») 4.22 ó...
- Page 192 NORMAS DE USO Transmisión mecánica: Poner el mando del acelerador en una posición intermedia entre «LENTO» y «RÁPIDO», y la palanca del cambio en la posición de la 1a marcha ( 4.22). Manteniendo apretado el pedal quitar el freno de estacionamiento; soltar gradual- mente el pedal que, de ese modo, pasa de la función «freno»...
- Page 193 NORMAS DE USO 5.4.4 Marcha atrás IMPORTANTE La marcha atrás se debe efectuar siempre con la máquina parada Transmisión mecánica: Accionar el pedal hasta parar la máquina, engranar la marcha atrás moviendo lateralmente la palanca y llevándola a la posi- ción «R»...
- Page 194 NORMAS DE USO ¡ATENCIÓN! Durante los cortes en terrenos en pendiente, es necesario disminuir la velocidad de avance para garantizar las condiciones de seguridad 1.2 - 5.5). En todo caso es necesario disminuir la velocidad cuando se percibe una reducción de revoluciones del motor, y recuerde que no se obtendrá...
- Page 195 NORMAS DE USO ¡ATENCIÓN! No dejar los contenedores con la hierba cortada en el interior de un local. Repasar las partes de plástico de la carrocería con una esponja embebida con agua y detergente, prestando atención a no mojar el motor, los componentes de la instalación eléctrica y la tarjeta electrónica colocada debajo del tablero de instrumentos.
- Page 196 NORMAS DE USO del silenciador de descarga para evitar posibles incendios accidentales al rea- nudar el trabajo! Guardar la máquina en un ambiente seco, lejos de la intemperie y posiblemente cubrir- la con una lona ( 8.4). IMPORTANTE La batería se debe guardar en un lugar fresco y seco. Recargar siempre la batería antes de un largo periodo de inactividad (más de 1 mes) y recar- garla de nuevo antes de reanudar la actividad ( 6.2.4).
- Page 197 NORMAS DE USO Para ... Es necesario ... Engranar la marcha atrás ( 5.4.4) Parar la máquina; Transmisión mecánica: poner la máquina en punto muerto (N), apretar a fondo el pedal, engranar la marcha atrás ( 4.22) y soltar el pedal gradualmente; Transmisión hidrostática: apretar hacia atrás el pedal de la tracción ( 4.32).
-
Page 198: Transporte
NORMAS DE USO cha hacia delante con especial atención para evitar que la máquina se pueda empinar. Disminuir la velocidad de avance antes de comenzar una pendiente, especialmente en bajada. ¡PELIGRO! No engranar jamás la marcha atrás para reducir de velocidad en una bajada: ya que podría causar la pérdida de control del medio, especial- mente en terrenos resbaladizos. - Page 199 NORMAS DE USO 4. El motor se debe utilizar al régimen máximo para garantizar un corte neto del cés- ped y obtener un buen empuje del césped cortado a través del canal de expulsión. 5. La frecuencia del corte debe ser adecuada al crecimiento del césped, evitando que entre un corte y el otro el césped crezca demasiado.
-
Page 200: Mantenimiento
MANTENIMIENTO 6. MANTENIMIENTO 6.1 MEDIDAS DE SEGURIDAD ¡ATENCIÓN! Quitar la llave y leer las instrucciones relativas antes de ini- ciar cualquier operación de limpieza o mantenimiento. Llevar ropa adecuada y guantes de trabajo en todas las situaciones de riesgo para las manos. ¡ATENCIÓN! No utilice jamás la máquina con piezas desgastadas o daña- das. - Page 201 MANTENIMIENTO Consultar el manual del motor para la lista completa y la relativa frecuencia Sustituir en los primeros signos de desgaste, contactando a su Distribuidor. La lubricación general de todas las articulaciones debería ser ejecutada cada vez que se prevé un largo periodo de inactividad de la máquina. La tabla arriba indicada tiene el objeto de ayudarle a mantener en eficiencia y seguri- dad su máquina.
- Page 202 MANTENIMIENTO 6.2.3 Eje posterior Está formado por un grupo monobloque sellado que no precisa mantenimiento; está provisto de una carga de lubricante permanente que no necesita sustitución o llenado. 6.2.4 Batería Es fundamental efectuar un cuidadoso mantenimiento de la batería para garantizar una larga duración de la misma.
-
Page 203: Controles Y Regulaciones
MANTENIMIENTO 6.3 CONTROLES Y REGULACIONES 6.3.1 Alineación del plato de corte Una buena regulación del plato es esencial para obtener un prado cortado uniforme- mente. NOTA Para efectuar la regulación puede que sea necesario extraer las protecciones laterales, que deben ajustarse después de dicha regulación. NOTA Para obtener un buen corte, es 1 - h = 26 mm... -
Page 204: Operaciones De Desmontaje Y Sustitución
MANTENIMIENTO 6.4 OPERACIONES DE DESMONTAJE Y SUSTITUCIÓN 6.4.1 Sustitución de las ruedas Con la máquina en una superficie plana, colocar unos espesores debajo de un elemento portante del bastidor, por el lado de la rueda a sustituir. Las ruedas son retenidas por un anillo elástico (1) que se puede extraer utilizando un destornillador. - Page 205 MANTENIMIENTO 6.4.4 Sustitución de un fusible En la máquina están previstos algunos fusibles (1) de diferente capacidad, cuyas funciones y características son las siguientes: – Fusible de 10 A = de protección de cir- cuitos generales y de potencia de la tarjeta electrónica, cuya intervención provoca la parada de la máquina y el apagado completo del indicador lumi-...
-
Page 206: Informaciones Para Centros De Asistencia
MANTENIMIENTO 6.5 INFORMACIONES PARA LOS CENTROS DE ASISTENCIA A continuación se indican las principales cuotas de regulación de la máquina y las modalidades de desmontaje y sustitución de las cuchillas. ¡ATENCIÓN! Estas operaciones deberán efectuarse solo en un Centro especializado. Quitar la llave antes de empezar cualquier intervención de regu- lación o mantenimiento. - Page 207 MANTENIMIENTO 6.5.2 Desmontaje, sustitución y remontaje de las cuchillas ¡ATENCIÓN! Utilizar guantes de trabajo para manipular las cuchillas ¡ATENCIÓN! ¡Sustituir siempre las cuchillas dañadas o torcidas; no intente jamás de repararlas! ¡USAR SIEMPRE CUCHILLAS ORIGINALES DE MARCA ! Prestar atención al equilibrado de las cuchillas 1.
-
Page 208: Guía Para La Identificación De Las Anomalías
GUÍA PARA LA IDENTIFICACIÓN DE LAS ANOMALÍAS 7. GUÍA PARA LA IDENTIFICACIÓN DE LAS ANOMALÍAS ANOMALÍAS CAUSA PROBABLE REMEDIO 1. Con la llave en Intervención de la protección de la tar- Poner la llave en la pos. «PARADA» y «MARCHA», el indi- jeta electrónica a causa de: buscar las causas de la avería: cador permanece... - Page 209 GUÍA PARA LA IDENTIFICACIÓN DE LAS ANOMALÍAS ANOMALÍAS CAUSA PROBABLE REMEDIO 7. El motor se para Intervención de la protección de la tar- Poner la llave en la pos. «PARADA» y durante el trabajo jeta electrónica a causa de: buscar las causas de la avería: –...
-
Page 210: Accesorios Por Encargo
ACCESORIOS POR ENCARGO 8. ACCESORIOS POR ENCARGO 1. KIT DE PESOS ANTERIORES Mejoran la estabilidad anterior de la máquina, princi- palmente cuando el uso principal es en terrenos en pendiente. 2. KIT PORTAOBJETOS POSTERIOR Para transportar objetos y herramientas de pequeñas dimensiones. - Page 211 CARACTERÍSTICAS TÉCNICAS 9. CARACTERÍSTICAS TÉCNICAS Instalación eléctrica ......12 V Transmisión mecánica: Batería ..........18 Ah Velocidad de avance (indicativa) Neumáticos anteriores .... 13 x 5.00-6 a 3000 min ó .......... 15 x 5.00-6 en 1ª ........2,2 km/h Neumáticos posteriores ...18 x 8.50-8 en 2ª...
- Page 213 ANHANG • ANNEXE • ANNEX • ALLEGATO • ANEXO Werkstattservice, Ersatzteile und Garantie EG-KONFORMITÄTSERKLÄRUNG • Service d’atelier, pièces de rechange et garantie DECLARATION DE CONFORMITE CEE • Service, spare parts and guarantee EC DECLARATION OF CONFORMITY • Assistenza tecnica d’officina, parti di ricambio e garanzia DICHIARAZIONE DI CONFORMITÀ...
- Page 214 Geräte, die keinen der oben aufge- Benzin-Rasenmäher: Messer, Messeraufnahme, führten Motoren beinhalten, nicht betroffen. Hier Messerkupplung, Keilriemen, Räder, Lager, Rie- liegt die Zuständigkeit nur bei DOLMAR. menscheibe, Zündkerze, Luftfilter, Ölfilter, Batte- rie, Anwerfvorrichtung, Vergasermembranen, Pri- Ersatzteile mer, Bowdenzug.
- Page 215 Geräte, die keinen der oben Reinigungs-, Pflege- und Einstellarbeiten werden aufgeführten Motoren beinhalten, nicht betrof- nicht als Garantieleistung anerkannt. Jegliche fen. Hier liegt die Zuständigkeit nur bei DOL- Garantiearbeiten sind von einem DOLMAR Fach- MAR. händler auszuführen. Ersatzteile Der zuverlässige Dauerbetrieb und die Sicherheit Ihres Gerätes hängt auch von der Qualität der ver-...
- Page 216 Garantie Tous les travaux non décrits dans ce mode d’em- ploi doivent être exécutés par un atelier spécialisé DOLMAR garantit un qualité irréprochable et sup- en conséquence ou un atelier agréé. porte les frais pour une amélioration par remplace- Le spécialiste dispose de la formation, de l’expé- ment des pièces défectueuses dans le cas de...
- Page 217 • Use of unsuitable or old oil. turer or their authorised service centre is responsi- • Damage related to conditions arising from lease ble for the engine only. DOLMAR is responsible for or rent contracts. the rest of the tool (excluding the engine).
- Page 218 Manutenzione e riparazioni Garanzia La manutenzione e la riparazione di apparecchi La DOLMAR garantisce una qualità ineccepibile e moderni e di aggregati costruttivi di fondamentale si assume i costi per interventi di ripasso con importanza per la sicurezza richiedono una forma-...
- Page 219 Piezas de repuesto de orígen DOLMAR se pueden comprar al comerciante especializado. Tiene las listas de piezas de repuesto con los números de Servicio, piezas de repuesto y garantía pedido requeridos y está siempre al tanto mejora de innovaciones en la oferta de piezas de repue- sto.
- Page 221 •EC DECLARATION OF CONFORMITY •DICHIARAZIONE DI CONFORMITÀ CEE •DECLARACIÓN “CE” DE CONFORMIDAD •Die Firma •La société •The company •La società •La sociedad DOLMAR - Jenfelder Straße 38 D-22045 Hamburg Germany •Bestätigt, dass der Rasenmähtraktor mit Fahrersitz und Verbrennung- TM-98.14 H2D smotor •Atteste que la tondeuse à...
- Page 222 To find your local distributor, please visit www.dolmar.com DOLMAR GmbH • Kann ohne Vorankündigung geändert werden • Sujet à des modifications sans aucun préavis • Subject to modifications without notice • Soggetto a modifiche senza preavvi- Postfach 70 04 20 so •...
Need help?
Do you have a question about the TM-98.14 H2D and is the answer not in the manual?
Questions and answers