Philips EasyKey DDL702 User Manual
Smart video door lock
Hide thumbs
Also See for EasyKey DDL702:
- User manual (30 pages) ,
- User manual (28 pages) ,
- User manual (28 pages)

Related Manuals for Philips EasyKey DDL702


Summary of Contents for Philips EasyKey DDL702
- Page 1 Easy Key 7000 series Smart Video Door Lock DDL702 User manual To register your produc t(s) and get support from below site www. philips.com/suppor t...
-
Page 3: Table Of Contents
Contents 6. Other functions 1. Important information 02 Indoor infrared sensor unlock Security Outside forced lock Caution Mute mode Disposal of used products and batteries Restore to default settings Doorbell Two-way video intercom 2. EasyKey installation Packaging list 7. Indicators meaning Exploded views and usage Pre-installation instructions... -
Page 4: Important Information
Philips. The use of such accessories and ◆ Do not expose products to environments parts may void your warranty. where there is water leakage or splashing. -
Page 5: Easykey Installation
2. EasyKey installation Packaging list The pictures are for reference only, please refer to the actual packaging items. ③ Drilling ① Outside ② Inside ④ Mortise escutcheon with escutcheon with template silicone pad silicone pad Easy Key Easy Key User Warranty Manual Card... -
Page 6: Exploded Views
Exploded views Deco cover *1 Compressed spring *2 M6 connecting screw*1 Square shaft*2 M6 connecting screw tube*1 M5 connecting screw*4 Mounting plate*1 Outside escutcheon*1 Battery cover*1 Mortise*1 Mortise anchor screw* 4 M6 mounting screw*1 Inside escutcheon*1 M5 connecting screw tube*4... - Page 7 Pre-setup instructions Step 1 | Determine door swing direction This product allows you to have your door installed to go in four directions: left outward, right outward, left inward and right inward. Left-handed door Right-handed door Left inward Right inward Left outward Right outward Attention...
-
Page 8: Installation Steps
Installation steps The following installation steps only apply to right-handed doors. For left-handed doors, please read [Pre-installation instructions] carefully and make necessary adjustments. Mark the hole for drilling with Install the connecting screw tubes drilling template and drill the hole on the outside escutcheon, and marked, then mount the mortise put the compressed spring and... - Page 9 Put the compressed spring and Insert the cable of both outside square shaft into the square shaft escutcheon and mortise into the hole of the inside escutcheon corresponding sockets on the accordingly. inside escutcheon. Then insert the square shaft of the inside escutcheon to the rotary hole on the mortise until the inside escutcheon is close to the surface...
-
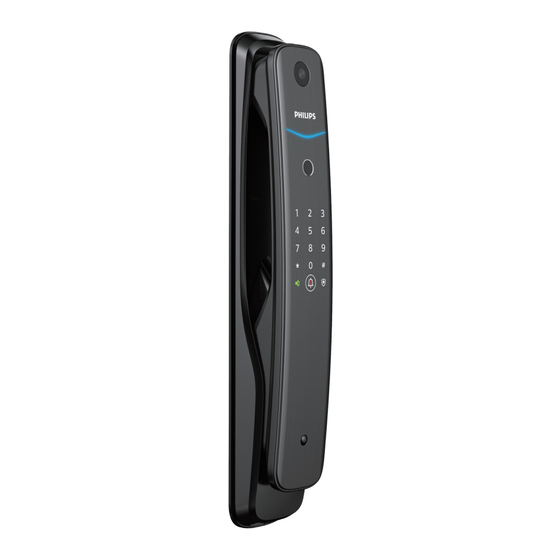
Page 10: Get To Know Your Easykey
3. Get to know your EasyKey The pictures are for reference only, please refer to the actual packaging items. Outside escutcheon Door lock status ① indicator Keypad ② Mute button ③ Doorbell button/Low ④ battery voltage indicator Push-pull handle ⑤ Outside forced lock ⑥... -
Page 11: How To Set Up Your Easykey
4. How to set up your EasyKey Pre-setup instructions ◆ Philips EasyKey comes with two modes: General mode and Dual verification mode. General mode Unlock with any registered identity information Dual verification mode Unlock with the two seperate forms of identification: PIN code + Fingerprint. -
Page 12: Change Master Pin Code
How to enter master Add a new user mode Add a user PIN code Enter [#] and enter master PIN code, then confirm with [#]. Enter [2] to enter user registration and enter [1] to add a new user PIN code, then the system will automatically number it and generate a voice prompt. -
Page 13: Delete A User Record
Add a fingerprint Enter a 2-digit code (user code:00-19) to be deleted and confirm with[#]. After hearing a voice prompt of “Succeeded", Enter [#] and enter master PIN code, press [*] until you finally exit the master then confirm with [#]. mode. -
Page 14: System Settings
System initialization Enter [3] to enter user record deletion and enter [3] to enter user fingerprint deletion, then enter [1] to delete a single fingerprint. Enter a 2-digit code (user code:00-99) to be deleted and confirm with[#]. After hearing a voice prompt of “Succeeded', press [*] until you finally exit the master Remove the battery cover, then double mode. -
Page 15: Extended Functions
Volume settings Locking mode Enter [#] and enter the master PIN Enter [#] and enter master PIN code code, then confirm with [#]. and confirm with [#]. Enter [4] to go to system settings and Enter [4] to go to system settings and enter [4] again to enter the locking then enter [2] to enter volume settings. -
Page 16: System Query
System query Shortcut keys* Security code query Functions Shortcut keys Check serial number 400# Enter [#] and enter master PIN code, Check firmware version 114# then confirm with [#]. Enable video 407# Disable video 408# Enter [6] to go into system query, then enter [1] to check the security code and the system will automatically Attention... - Page 17 ② Sign in to the App, click to “Add a device” on the Homepage, choose [Bluetooth Smart Door Lock] to enter the pairing page, then complete the pairing process according to the App prompts. 2. For Wi-Fi smart door lock(s), facial recognition smart door lock(s) and video smart door lock(s) ①...
-
Page 18: How To Use Easykey
With a functional With an infrared button sensor Philips EasyKey adopts Double press the [OPEN] Philips Easykey has an infrared sensor on the indoor fast opening functional button within handle. When the sensor is mortise. You can unlock one second, then push or... -
Page 19: Lock From Outside Or Inside
Lock from outside or inside The latch bolt will pop up automatically as soon as the door is close and there will be a voice prompt of “Door Close”. Inside deadlock When the EasyKey is locked, long press the [CLOSE] button until the indicator flashes once in red, then there will be a voice prompt of “Inside deadlock enabled". -
Page 20: Other Functions
Infrared sensor How to use: Rear sensing area Philips Easykey has an infrared sensor on the handle. When the sensor is Front sensing area triggered, you can press the sensor module on both sides of the handle simultaneously to unlock the door. -
Page 21: Mute Mode
Mute mode Function: Use only one button to mute the lock and the voice guide will be turned off. This feature applies to the scenes where you don't want to disturb your family. How to use: 1. Mute: When the system is awake, long press the [Mute] button for 2 seconds until it glows green. -
Page 22: Doorbell
Doorbell Function: When the doorbell make sound, it indicates that someone comes in the door. How to use: When the visitor press the doorbell on the keypad, the indoor chime will produce a dingdong bell sound. Meanwhile, the camera of smart lock will capture a video clip of the visitors and send it straight to the paired app. -
Page 23: Indicators Meaning And Usage
7. Indicators meaning and usage Door lock status indicator Blue: When the system wakes up and the light glows blue, it means you can use the lock. Green: When the door is unlocked Door lock and the light glows green, it means status indicator the door is open. -
Page 24: Mute Indicator
Mute mode indicator 1. White: indicates the mute mode is off. 2. Green: indicates the mute mode is on. Mute mode indicator Inside deadlock indicator When the door is under inside deadlock mode, the keypad will lock. If you wake up the system manually, the keypad will show the combination of “15937 (X)”... -
Page 25: [Open/Close] Indicator
[OPEN/CLOSE] indicator 1. Red light flashing twice: indicates that the door is locked successfully. 2. Green light flashing twice: indicates that the door is unlocked successfully. 3. Red light flashing once: indicates that the door is under the deadlock mode. Infrared sensor unlocking indicator 1.Fast flashing in green: infrared sensor unlocking is on. - Page 26 Low battery voltage alert reminds you to replace the batteries Way to trigger: When the system wakes up, it will automatically check the battery voltage. If the voltage is too low, then an alert will be triggered to remind you to replace the batteries.
- Page 27 Motion sensor alert Way to trigger: When an unexpected person shows up and stays outside your home for more than 30 seconds within a certain distance, an alert will be triggered. Way to be alerted: The camera can record 10 seconds of video and send instant sensor notifications to the mobile app.
-
Page 28: How To Charge Easykey In An
How to charge EasyKey in an emergency When the battery voltage is low, and the door cannot be opened from outside, you can power up the lock by plugging 5V power bank into the micro USB. After the door is unlocked, please replace the batteries instantly. -
Page 29: How To Charge Lithium Battery
How to charge the lithium battery Press the button near the bottom of the inside escutcheon, remove the battery cover and take out the lithium battery. You can charge the lithium battery using USB port. Attention 1. Lithium battery is guaranteed for one year and the lithium battery life is 300 times of complete charge and discharge. - Page 30 Philips and the Philips Shield Emblem are registered trademarks of Koninklijke Philips N.V. and are used under license. This product has been manufactured by and is sold under the responsibility of Shenzhen Conex Intelligent Technology Co., Ltd, and Shenzhen Conex Intelligent Technology Co., Ltd is the warrantor in relation to this...
Need help?
Do you have a question about the EasyKey DDL702 and is the answer not in the manual?
Questions and answers