Denon RCD-M37 - CD RECEIVER Manual
- Service manual (86 pages) ,
- Owner's manual (47 pages) ,
- Brochure & specs (2 pages)
Advertisement
- 1 Getting Started
- 2 Connections
- 3 Setup
- 4 Playback
- 5 Setting the Timer
- 6 Convenient Functions
- 7 Troubleshooting
- 8 Specifications
- 9 SAFETY PRECAUTIONS
- 10 IMPORTANT SAFETY INSTRUCTIONS
- 11 NOTE ON USE
- 12 Getting Started
- 13 Connections
- 14 Removing the Speaker Net
- 15 Specifications
- 16 SAFETY PRECAUTIONS
- 17 NOTE ON USE
- 18 Documents / Resources
Getting Started
Thank you for purchasing this DENON product. To ensure proper operation, please read this owner's manual carefully before using the product. After reading them, be sure to keep them for future reference.
Accessories
Check that the following parts are supplied with the product.
 | Remote control (RC-1097) | 1 |
 | R03/AAA batteries | 2 |
 | Power cord (Cord length: Approx. 6.6 ft / 2 m) | 1 |
 | AM loop antenna | 1 |
 | FM indoor antenna  | 1 |
 | Owner's manual | 1 |
 | Warranty (for North America model only) | 1 |
 | Service station list | 1 |
Main Features
- High quality amplifier stressing sound quality
Equippd with 30 W + 30 W (6 Ω/ohms) high quality amplifier circuits. - Tone control and SDB control
Separate bass and treble tone controls for adjusting the tone to your tastes and Super Dynamic Bass (SDB) circuit for producing powerful bass sound even when the volume is low.
Source direct position provided for turning off the SDB and tone control circuitry to make the response flat. - CD player for digital sound
Compact body integrating a CD section in addition to the FM/AM tuner and amplifier, allowing playback of CD-R/RW discs. - Playback of MP3 and WMA files
Supports playback of discs and USB memory devices on which MP3 and WMA files are recorded. The track name and artist name of the currently playing track can be displayed on the set's display.
The characters that can be displayed "Switching the Display" - Low standby power consumption
Designed with considerations on the environment, with the power consumption when the power is in standby kept down to about 0.3 W.
Discs
Discs Usable on the Unit
- Music CDs
Discs marked with the logotype below can be played in this unit.
![]()
- CD-R/CD-RW

NOTE
- Discs with special shapes (heart-shaped discs, octagonal discs, etc.) cannot be played. Do not attempt to play them, as doing so can damage the product.
![]()
- Some discs and some recording formats may not be playable.
- Non-finalized discs cannot be played.

- What is finalization?
Finalization is the process that makes recorded CD-R/CD-RW discs playable on compatible players.
Holding Discs

Do not touch the signal surface.
Loading Discs
- Set the disc with the labeled side facing up.
- Make sure the disc tray is fully open when inserting the disc.
- Place the discs flatly, 12 cm discs in the outer tray guide (Figure 1), 8 cm discs in the inner tray guide (Figure 2).
![]()
- Place 8 cm discs in the inner tray guide without using an adapter.


- "00 Tr 00: 00" is displayed if a disc that cannot be played is loaded.
- "00 Tr 00: 00" is displayed if the disc is loaded upside-down or if no disc is loaded.
NOTE
Do not push the disc tray in by hand when the power is turned off. Doing so could damage the set.
Cautions on Loading Discs
- Only load one disc at a time. Loading two or more discs can damage the unit or scratch the discs.
- Do not use cracked or warped discs or discs that have been repaired with adhesive, etc.
- Do not use discs on which the sticky part of cellophane tape or labels is exposed or on which there are traces of where labels have been removed. Such discs can get caught inside the player and damage it.
Cautions on Handling
- Do not get fingerprints, oil or dirt on discs.
- Take special care not to scratch discs when removing them from their cases.
- Do not bend or heat discs.
- Do not enlarge the hole at the center.
- Do not write on the labeled (printed) surface with ball-point pens, pencils, etc., or stick new labels on discs.
- Water droplets may form on discs if they are moved suddenly from a cold place (outdoors for example) to a warm place, but do not try to dry them off using a hairdryer, etc.
Cautions on Storing Discs
- Be sure to remove discs after using them.
- Be sure to store discs in their cases to protect them from dust, scratches, warping, etc.
- Do not store discs in the following places:
- Places exposed to direct sunlight for long periods of time
- Dusty or humid places
- Places exposed to heat from heating appliances, etc.
Cleaning Discs
- If there are fingerprints or dirt on discs, wipe them off before using the disc. Fingerprints and dirt can impair sound quality and cause interruptions in playback.
- Use a commercially available disc cleaning set or a soft cloth to clean discs.

Gently wipe the disc from the inside towards the outside.

Do not wipe with a circular motion.
NOTE
Do not use record spray, antistatic agents, or benzene, thinner or other solvents.
About the Remote Control Unit
Inserting the Batteries
- Slide the rear lid in the direction of the arrow and remove it.
![]()
- Load the two batteries properly as indicated by the marks in the battery compartment.
![]()
- Put the rear cover back on.


NOTE
- Replace the batteries with new ones if the set does not operate even when the remote control unit is operated close to the unit.
- The supplied batteries are only for verifying operation.
- When inserting the batteries, be sure to do so in the proper direction, following the "
![]() " and "
" and " ![]() " marks in the battery compartment.
" marks in the battery compartment. - To prevent damage or leakage of battery fluid:
- Do not use a new battery together with an old one.
- Do not use two different types of batteries.
- Do not attempt to charge dry batteries.
- Do not short-circuit, disassemble, heat or dispose of batteries in flames.
- If the battery fluid should leak, carefully wipe the fluid off the inside of the battery compartment and insert new batteries.
- Remove the batteries from the remote control unit if it will not be in use for long periods.
 " and "
  " marks in the battery compartment.
Operating Range of the Remote Control Unit

Point the remote control unit at the remote sensor when operating it.
NOTE
The set may function improperly or the remote control unit may not operate if the remote control sensor is exposed to direct sunlight, strong artificial light from an inverter type fluorescent lamp or infrared light.
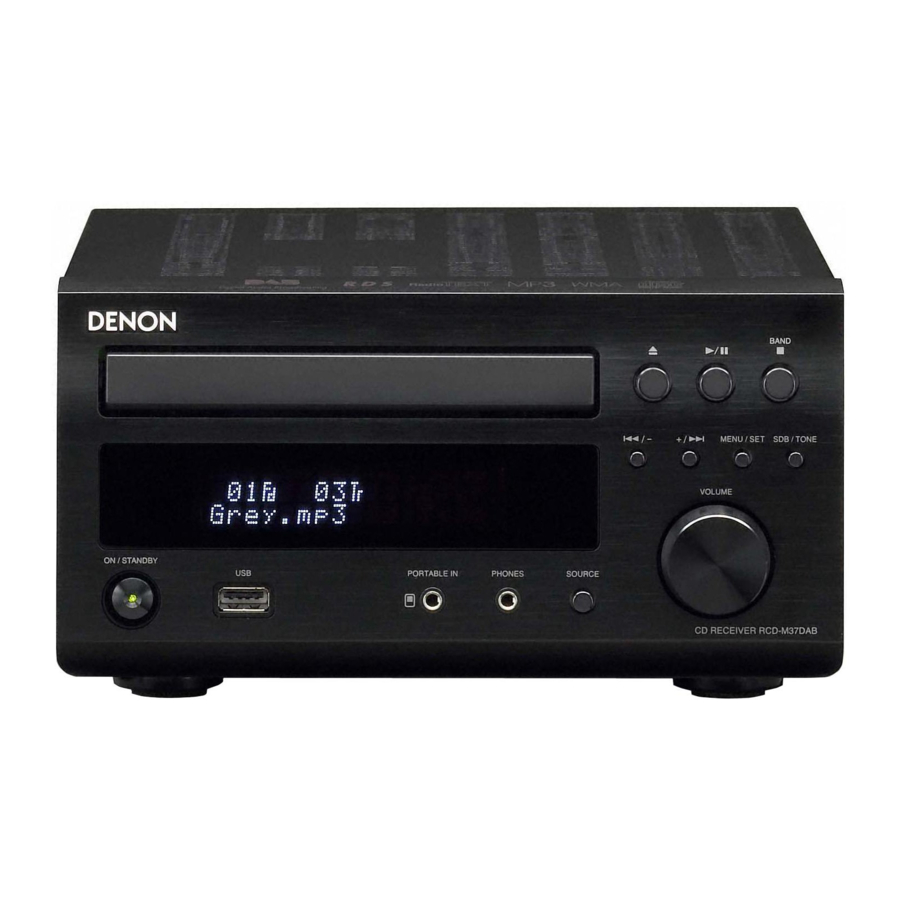
Part Names and Functions
Front Panel

- Power operation button (ON/STANDBY)
- Power indicator
- USB port (USB)
- Display
- Portable jack (PORTABLE IN)
- Headphones jack (PHONES)
- SOURCE button
- Revers-skip/Forward-skip buttons (
![]() ,
, ![]() )
) - Master volume control knob (VOLUME)
- MENU/SET button
- SDB/TONE button
- BAND/Stop button (BAND/
![]() )
) - Play/Pause button (
![]() )
) - Disc tray open/close button (
![]() )
) - Remote control sensor
- Disc tray
 ,
,  )
) )
) )
) )
)
Display

- Information display
Various information is displayed here, depending on the operation mode. ![]() : ( the play indicator) lights when a disc is playing.
: ( the play indicator) lights when a disc is playing.
![]() : ( the pause indicator) lights when a disc is pausing.
: ( the pause indicator) lights when a disc is pausing.- SDB, TONE indicator
- Reception mode indicator
- TOTAL indicator
Lights when the total number of tracks and total time of the CD are displayed. - Play mode indicator
- Timer indicator
![]() : Flashes when remote control signals are received.
: Flashes when remote control signals are received.
 : ( the play indicator) lights when a disc is playing.
 : ( the pause indicator) lights when a disc is pausing.
 : Flashes when remote control signals are received.
Rear Panel

- Monaural audio connector (MONO OUT)
- Speakers terminals
- AC inlet (AC IN)
- FM/AM antenna terminals
- DOCK CONTROL jack
- AUX1/AUX2 Analog audio connectors
Remote Control Unit

Buttons Operable for All Functions (CD, TUNER, iPod and USB)
- DIMMER button
- Master volume control buttons (VOLUME)
- SDB/TONE button
- MENU/SET button
- ON/STANDBY button
- SLEEP button
- MUTE button
- CLOCK button
NOTE
The DAB/RDS button cannot be used.

Buttons Operable When the Function is Set to "CD"
The buttons listed at "Buttons Operable for All Functions" can also be used.
- Number buttons
- PROG/DIRECT button
- RANDOM button
- SOURCE button
- CD
![]() button
button - FOLDER MODE button
- TIME/DISPLAY button
- CLEAR/DEL button
- REPEAT button
- Fast-reversing/Fast-forwarding buttons (
![]() ,
, ![]() )
) - Reverse-skip/Forward-skip buttons (
![]() ,
, ![]() )
) - Stop button (
![]() )
) - Cursor buttons (
![]() )
)
 ,
,  )
)  ,
,  )
) )
) )
)

Buttons Operable When the Function is Set to "TUNER"
The buttons listed at "Buttons Operable for All Functions" can also be used.
- Number buttons
- SOURCE button
- TUNER button
- CLEAR/DEL button
- Tuning +, – buttons (TU+, TU–)
- Channel +, – buttons (CH+, CH–)
- Stop button (
![]() )
) - ENTER/MEMO button
- Cursor buttons (
![]() )
)

Buttons Operable When the Function is Set to "iPod", "USB"
The buttons listed at "Buttons Operable for All Functions" can also be used.
- Number buttons
- RANDOM button
- SOURCE button
- MENU/SET button
- FOLDER MODE button
- TIME/DISPLAY button
- REPEAT button
- Fast-reversing/Fast-forwarding buttons (
![]() ,
, ![]() )
) - Reverse-skip/Forward-skip buttons (
![]() ,
, ![]() )
) - USB
![]() button
button - Stop button (
![]() )
) - iPod
![]() button
button - ENTER/MEMO button
- Cursor buttons (
![]() )
) - REMOTE/BROWSE button
 button
Connections
Connections for all compatible audio signal formats are described in this owner's manual. Please select the types of connections suited for the equipment you are connecting.
With some types of connections, certain settings must be made on the RCD-M37. For details, refer to the instructions for the respective connection items below.
NOTE
- Do not plug in the power cord until all connections have been completed.
- When making connections, also refer to the owner's manual of the other components.
- Be sure to connect the left and right channels properly (left with left, right with right).
- Do not bundle power supply cords together with connection cables. Doing so can result in humming or noise.
Preparations
Cables Used for Connections
Select the cables according to the equipment being connected.
| Audio cables | |
| Analog connections (stereo) Analog connections (subwoofer) Speaker connections | |
| Signal direction | |
 Audio signal |


Using the AM Loop Antenna
- To use suspended on a wall
Suspend directly on the wall without assembling.
![]()
- To use standing alone
Use the procedure below to assemble.
![]()


Assembling the AM Loop Antenna
- Bend in the direction of the arrow.
![]()
- Insert into the hole.
![]()


Speaker Connections

Connecting the Speaker Cables Check the left (L) and right (R) channels and the + (red) and – (black) terminals on the set and the speakers to be used and interconnect the cables to the same polarities.
- Peel off about 10 mm of the sheathing at the tip of the cable, twist the core wire and terminate it.
![]()
- Turn the speaker terminal counterclockwise to loosen it.
![]()
- Insert the speaker cable's core wire into the base of the speaker terminal.
![]()
- Turn the speaker terminal counterclockwise to tighten it.
![]()


| When using a banana plug | |
Tighten the speaker terminal firmly before inserting the banana plug. |
NOTE
- Use speakers with an impedance of 6 to 16 Ω/ohms. The protection circuit may be activated if speakers with an impedance other than specified are used.
- Connect the speaker cables in a way that they do not stick out of the speaker terminals. The protection circuit may be activated if the core wires touch the rear panel or screws or if the + and – sides touch.
![shock hazard]() Never touch the speaker terminals while the power is on. Doing so could cause electric shock.
Never touch the speaker terminals while the power is on. Doing so could cause electric shock.
Protector circuit
The protection circuit will be activated in the following cases:
- When the speaker cable's core wires are touching the rear panel or screws or when the speaker cable's + and – sides are touching
- When the surrounding temperature is extremely high
- When the internal temperature rises due to extended use with a high output
If this happens, unplug the power cord, then check the connections of the speaker cables and input cables. If the set's temperature is extremely high, wait for it to cool off and improve surrounding ventilation. After doing this, plug the power cord back in.
If the protection circuit is activated though there are no problems in ventilation around the set or in connections, the set could be damaged. Turn off the power, then contact a DENON servicing and inquiry outlet.
Connecting the Playback Components

Control Dock for iPod
Use a DENON Control Dock for iPod (ASD-1R or ASD-3N/3W, sold separately) to connect the set with an iPod.
- When using a Control Dock for iPod, the Control Dock for iPod must be set. For details, refer to the operating instructions of the Control Dock for iPod.
- To use an iPod, see "iPod Playback".
Connecting the Recording Components

CD Recorder / MD Recorder / Tape deck
Connections to Other Devices
Antenna Terminals
AM/FM
The AM and FM reception sensitivity depends on the place the antenna is set and the direction in which it is set. Set it so that reception is best.

Note to CATV system installer:
This reminder is provided to call the CATV system installer's attention to Article 820-40 of the NEC which provides guidelines for proper grounding and, in particular, specifies that the cable ground shall be connected to the grounding system of the building, as close to the point of cable entry as practical.
Connecting the AM loop antenna
- Push the lever.
- Insert the conductor.
- Return the lever.
NOTE
- Make sure the AM loop antenna lead terminals do not touch metal parts of the panel.
- Do not connect two FM antennas simultaneously.
USB Port

NOTE
- It is not possible to connect and use a computer via the RCD-M37's USB port using a USB cable.
- For details about USB memory devices, see "Playable USB Memory Formats".
Connecting the Power Cord

NOTE
- Only use the supplied power cord.
- Be sure the power cord is unplugged from the power outlet before connecting or disconnecting it to the AC IN.
Setup

| Symbols used to indicate buttons in this manual | |
| Button located on both the main unit and the remote control unit | BUTTON |
| Button only on the main unit | <BUTTON> |
| Button only on the remote control unit | [BUTTON] |
Setting the Current Time (12-Hour Display)
[Example]
Setting the current time to 10:15 am
- Press ON/STANDBY to turn the power on.
- Press [CLOCK].
The current time is displayed. - Press MENU/SET for over 1 second to set the manual time setting mode.
The "hours" display flashes.
![]()
- Use
![]() ,
, ![]() or [
or [ ![]() ] to set the "hours".
] to set the "hours".
![]()
- Press MENU/SET or [ENTER/MEMO].
The "minutes" display flashes.
![]()
- Use
![]() ,
, ![]() or [
or [ ![]() ] to set the "minutes".
] to set the "minutes".
![]()
- Press MENU/SET or [ENTER/MEMO].
The current time is set, and the normal display reappears.

 ,
,  or [
or [  ] to set the "hours".


- Checking the current time when the power is on
Press [CLOCK].
When pressed again or if a different operation is performed, the normal display reappears. - Checking the current time when the power is set to standby
Press MENU/SET or [CLOCK].
Press again to turn off display.
- Displaying the time when the power is set to standby consumes electricity. To reduce electric consumption, turn the time display off.
- When the function is set to iPod, the current time cannot be set.
Playback
Preparations
Turning the Power On
Press ON/STANDBY.
- The power turns on. Press again to set the power to standby.
| Power indicator | ||
| Standby | Red | |
| Power on | Green | |
| When the timer is set | Orange | |
NOTE
- Power continues to be supplied to some of the circuitry even when the power is in the standby mode. When leaving home for long periods of time or when traveling, either press ON/STANDBY to turn off the power, or unplug the power cord from the power outlet.
- Be sure to stop playback before turning the power off.
- Completely turning off the power
Unplug the power cord from the wall outlet.- Note that the time setting is cleared when the power cord is unplugged from the outlet.
- The settings made for the various functions may be cleared if the power cord is left unplugged from a power outlet for an extended period of time.
Loading Discs
In the stop mode, press <  > to open the disc tray.
- "Loading discs".
- To close the disc tray
Press <![]() > again.
> again. - The disc tray also closes when <
![]() >, [CD
>, [CD ![]() ] or SOURCE is pressed.
] or SOURCE is pressed.
- The disc tray also closes when <
 >, [CD
 NOTE
Do not place any foreign objects in the disc tray. Doing so could damage it.
Operations Possible During Playback
Adjusting the Master Volume
Either turn <VOLUME> or press [VOLUME  ].
].
The volume level is displayed.
[Variable range]

Input Source Switching
Press SOURCE to select the input source.

- "AUX1/Dock" is displayed when a Control Dock for iPod is connected to "AUX1".
- "PORTABLE IN" is only displayed when connected.
Adjusting the Tone
- Select the item to be adjusted with SDB/TONE
![]()

| [About the display] | ||
| When the SDB is on | "SDB" is displayed. | |
| When BASS or TREBLE is set to something other than 0 dB | "TONE" is displayed. | |
- Display the mode you want to adjust, then use
![]() ,
, ![]() and [
and [ ![]() ] to turn on or off and to adjust the tone.
] to turn on or off and to adjust the tone.
- If no operation is performed for 5 seconds, the adjustment is retained and the normal display reappears.
 | Switches Super Dynamic Bass on and off. |
 | Adjusts the bass sound. [Variable range]  |
 | Adjusts the treble sound. [Variable range] |
 | Turns SDB, bass and treble off. |
| Settings made upon purchase: | |
| OFF |
| 0 dB |
| 0 dB |
| OFF |
Turning the Sound Off Temporarily (Muting)
Press [MUTE].
The "MUTE ON" is displayed.
To cancel, press [MUTE] again.
(The mute mode is also canceled when the <VOLUME> control is turned or a [VOLUME ] is pressed.)
Switching the Display's Brightness
Press [DIMMER]
- The display's brightness switches each time the button is pressed.
![]()

Listening with Headphones
Plug the headphones (sold separately) into the <PHONES>.
- The sound from the speakers is automatically cut off.
NOTE
Be careful not to set the volume too high when using headphones.
CD Playback

| Symbols used to indicate buttons in this manual | |
| Button located on both the main unit and the remote control unit | BUTTON |
| Button only on the main unit | <BUTTON> |
| Button only on the remote control unit | [BUTTON] |
Playing CDs
Press <  > or [CD ].
The "1" indicator lights and playback begins.
- If the function is set to something other than "CD", press [CD
![]() ] to switch the function to "CD" and start playback ("Auto Function Selector Function").
] to switch the function to "CD" and start playback ("Auto Function Selector Function"). - The function can also be switched to "CD" using SOURCE.
- Stopping Playback
Press <BAND/![]() > or [
> or [ ![]() ] .
] . - Stopping Playback Temporarily
Press <![]() > or [CD
> or [CD ![]() ].
].
The "![]() " is displayed.
" is displayed. - To resume playback, press <
![]() > or [CD
> or [CD ![]() ].
].
- To resume playback, press <
- Fast-Forwarding and Fast-Reversing (searching)
During playback, press and hold in [![]() ,
, ![]() ].
]. - Moving to the Beginning of Tracks (skipping)
During playback, press![]() .
. - The disc is skipped the number of tracks equal to the number of times the button is pressed.
- When pressed once in the return direction, playback returns to the beginning of the currently playing track.
- To Play the Desired Track (Remote Control Unit Only)
Press [NUMBER] (0 ~ 9, +10) to select the track.
[Example]: Track 4: [4]
[Example]: Track 12: [+10], [2]
[Example]: Track 20: [+10], [+10], [0]
 > or [
  " is displayed.
  ,
,  ].
]. .
.
Playing Repeatedly
<Repeat Playback>
Press [REPEAT].
Playback in the respective repeat mode starts.

| [Selectable items] | |
 1 (Single-track repeat) 1 (Single-track repeat) | Only 1 track is played repeatedly. |
| ALL (All-track repeat) | All tracks are played repeatedly. |
| Repeat off (indicator turns off) | Normal playback resumes. |
Playing Random Order
<Random Playback>
- In the stop mode, press [RANDOM].
The "RANDOM" indicator lights. - Press <
![]() > or [CD
> or [CD ![]() ].
].
The tracks start playing in random order.
NOTE
Random play cannot be set or canceled during playback.
- Canceling Random Playback
In the stop mode, press [RANDOM].
The "RANDOM" indicator turns off.
NOTE
When [REPEAT] pressed during random playback, the tracks are played in a different random order after this turn.
Playing Tracks in the Desired Order
<Program playback>
Up to 25 tracks can be programmed.
- In the stop mode, press [PROG/DIRECT].
The "PGM" indicator lights. - Use [NUMBER] (0 ~ 9, +10) to select the traks.
- [Example]
To program tracks 3, 12, 7 to play in that order:
Press [PROG/DIRECT], [3], [+10], [2], [7].
- [Example]
- Press <
![]() > or [CD
> or [CD ![]() ].
].
Playback starts in the programmed order.
- Checking the order of the programmed tracks
In the stop mode, press![]() or
or ![]() . The track numbers are displayed in the programmed order each time the button is pressed.
. The track numbers are displayed in the programmed order each time the button is pressed. - To clear the last track programmed
In the stop mode, press [CLEAR/DEL] . The last track programmed is cleared each time the button is pressed. - To clear one programmed track at a time
In the stop mode, use![]() or
or ![]() to select the track to be cleared, then press [CLEAR/DEL].
to select the track to be cleared, then press [CLEAR/DEL]. - Clearing the all programmed track
In the stop mode, press [PROG/DIRECT].
The "PGM" indicator turns off.
 or
or  . The track numbers are displayed in the programmed order each time the button is pressed.
When [REPEAT] is pressed, the tracks are played repeatedly in the programmed order.
Switching the Display
Press [TIME/DISPLAY].

- The display switches each time the button is pressed.
Playback of MP3 and WMA Files
There are many music distribution sites on the Internet allowing you to download music files in MP3 or WMA (Windows Media ® Audio) format. The music (files) such sites can be stored on CD-R or CD-RW discs and played on the RCD-M37.
"Windows Media" and "Windows" are registered trademarks or trademarks in the United States and other countries of Microsoft Corporation of the United States.
About the MP3 and WMA Formats That Can be Played
CD-R and CD-RW discs created in the format described below can be played.
Writing software format
ISO9660 level 1
- When written in other formats, it may not be possible to play the disc properly.
Maximum number of playable files and folders
Total number of folders + files: 512
Maximum number of files in a folder: 255
File format
MPEG-1 Audio Layer-3
WMA (Windows Media Audio)
Tag data
ID3-Tag (Ver.1x)
META-Tag (Compatible with title, artist and album names)
| Playable MP3/WMA file | |||
| File format | Sampling frequency | Bit rate | Extension |
| MP3 | 32, 44.1, 48 kHz | 32 ~ 320 kbps | .MP3 |
| WMA | 32, 44.1, 48 kHz | 64 ~ 160 kbps | .WMA |
- Be sure to give files the extension ".MP3" or ".WMA". Files with any other extensions or with no extensions cannot be played.
- Recordings you have made should only be used for your personal enjoyment, and as per copyright laws may not be used in other ways without permission of the copyright holder.
Playing MP3 and WMA Files

| Symbols used to indicate buttons in this manual | |
| Button located on both the main unit and the remote control unit | BUTTON |
| Button only on the main unit | <BUTTON> |
| Button only on the remote control unit | [BUTTON] |
- Load a CD-R or CD-RW disc containing music files in the MP3 or WMA format into the disc tray.
- Press [FOLDER MODE] and select "Folder Mode" or "Disc Mode".
[About the display]
When "Folder Mode" is selected - "FLD" is displayed.
When "Disc Mode" is selected - "FLD" is not displayed.
Folder Mode:
All the files in the selected folder are played.
Disc Mode:
After the selected folder and files are played, all the files in all the folders are played. - Use [
![]() ] to select the folder to be played.
] to select the folder to be played. - Use
![]() ,
, ![]() or [
or [ ![]() ] to select the file to be played.
] to select the file to be played. - Press <
![]() > or [CD
> or [CD ![]() ].
].
 ] to select the folder to be played.
  ] to select the file to be played.
 - To switch the Folder or File During Playback
- Folder
Use [![]() ] to select the folder.
] to select the folder. - File
Use![]() ,
, ![]() to select the file, or use [NUMBER] (0 ~ 9, +10) to select the file number.
to select the file, or use [NUMBER] (0 ~ 9, +10) to select the file number.
- Folder
- The file numbers are set automatically when the disc is loaded.
Copyright-protected files cannot be played.
(The "Not Support" is displayed.)
Note that depending on the software used for burning and other conditions, some files may not play or display correctly.
- Switching the Display
During playback, press [TIME/DISPLAY].
![]()
- The characters that can be displayed are as follows:
A to Z a to z 0 to 9 ^ ' ( ) * +, -. / = (space)
- The characters that can be displayed are as follows:
- To Play Repeatedly
Press [REPEAT].
Playback starts in the respective repeat mode.- The selectable repeat modes differ in the "Folder Mode" and the "Disc Mode".


When "Folder Mode" is selected

When "Disc Mode" is selected
[Selectable items]
When "Folder Mode" is selected:
 : Only the selected track is played repeatedly.
 : All the files in the selected folder are played repeatedly.
 : Folder mode playback resumes.
When "Disc Mode" is selected:
"Playing Repeatedly <Repeat playback>"
- Setting random playback
"Playing Random Order <Random playback>"
Programmed playback is not possible with MP3/WMA discs.
TUNER Playback
Tuning in Broadcast Stations
Connect the antenna beforehand.
- Press [TUNER] or <BAND/
![]() > to select the reception band.
> to select the reception band.
![]()
[About the display]
When FM AUTO is selected - "AUTO" is displayed.
When FM MONO is selected - "MONO" is displayed.
When AM is selected - The reception mode is not displayed. - Use <
![]() > or [TU –, TU +] to select the reception band.
> or [TU –, TU +] to select the reception band.
When a station is received, the "TUNED" indication will light.
 > to select the reception band.
- If the function is set to something other than "TUNER", press [TUNER] to switch the function to "TUNER" (See "Auto Function Selector Function").
- The function can also be switched to "TUNER" using SOURCE.
- To Tune Automatically
Press and hold in <![]() > or [TU –, TU +] to automatically search and tune in broadcast stations.
> or [TU –, TU +] to automatically search and tune in broadcast stations. - Stations whose signal is weak cannot be tuned in.
- To Stop Auto Tuning
Press <![]() > or [TU –, TU +] .
> or [TU –, TU +] . - To Tune Manually
The reception frequency switches each time <![]() > or [TU –, TU +] is pressed.
> or [TU –, TU +] is pressed.
A humming sound may be heard when using a TV nearby while receiving AM programs. If this happens, move the system as far from the TV as possible.
About the FM Broadcast Reception Status Display
The "ST" indicator lights when receiving stereo broadcasts.
If the signal is weak and stable stereo reception is not possible, select "FM MONO" to receive in monaural.
About Switching the Tuning Mode and Preset Mode
Use <  > to perform the tuning and preset channel operations. Switch to the mode to be operated before operating.
- To switch to the preset mode
Press <![]() > while pressing <BAND/
> while pressing <BAND/ ![]() >.
>.
The "PRESET" indicator flashes for about 5 seconds. - To switch to the tuning mode
Press <![]() > while pressing <BAND/
> while pressing <BAND/ ![]() >.
>.
The "TUNING" indicator flashes for about 5 seconds.
 > while pressing <BAND/
  > while pressing <BAND/
Automatically Presetting FM Stations (Auto Preset)
Up to 40 stations can be preset.
Auto preset is not possible with AM broadcast stations.
- Press [TUNER] to select "FM AUTO" or "FM MONO".
- Press and hold in MENU/SET.
The "AUTO PRESET" is displayed. - Press MENU/SET again.
"Search" flashes and auto presetting starts.
Broadcast stations whose antenna signal are weak cannot be preset automatically. If you wish to preset such stations, tune them in manually.
- To Cancel Auto Presetting Press <BAND/
![]() > or [
> or [ ![]() ].
].
The "Search" indicator turns off.
Presetting FM/AM Stations Manually
Up to 40 stations (total for AM and FM) can be preset.
- Tune in the station.
- Press [ENTER/MEMO].
The smallest non-registered preset number flashes. - Use <
![]() >, [CH –, CH +] or [
>, [CH –, CH +] or [ ![]() ] to select the number, then press [ENTER/MEMO].
] to select the number, then press [ENTER/MEMO].
The preset number, reception band and reception frequency are displayed.
Listening to Preset Stations

| Symbols used to indicate buttons in this manual | |
| Button located on both the main unit and the remote control unit | BUTTON |
| Button only on the main unit | <BUTTON> |
| Button only on the remote control unit | [BUTTON] |
Use < >, [CH –, CH +] or [NUMBER] (0 ~ 9, +10) to select the preset number.
- Operate <
![]() > after switching to the preset mode.
> after switching to the preset mode.
Naming the Currently Tuned in Broadcast Station
Names of up to 8 characters can be input.
- Press [NUMBER] (0 ~ 9, +10) for the preset number to be named.
- Press MENU/SET three times.
The "STATION NAME" is displayed.- Operate within 5 seconds.
- Press [
![]() ].
].
The name input mode is set. - Use set. [
![]() ] to select the character, then press [
] to select the character, then press [ ![]() ] to set.
] to set. - Characters that can be input.
A to Z a to z 0 to 9 ^ ' ( ) * +, -. / = (space) - Press [
![]() ] to move the cursor.
] to move the cursor.
Use this to correct input characters.
- Characters that can be input.
- Press [ENTER/MEMO].
Naming mode is finished.
 ] to set.
 - Changing the Broadcast Station Name
- Call out the preset name to be changed, then press MENU/SET three times.
- Perform steps 3, 4 and 5 at "Naming the Currently Tuned In Broadcast Station".
- Press [CLEAR/DEL] to delete the characters.
iPod Playback
With the RCD-M37, you can listen to music on an iPod. It is also possible to operate the iPod from the main unit or remote control unit.
- The iPod may only be used to copy or play contents that are not copyrighted or contents for which copying or playback is legally permitted for your private use as an individual. Be sure to comply with applicable copyright legislation.
Preparations
- Set the iPod on the DENON Control Dock for iPod.
(See the Control Dock for iPod's operating instructions.) - Press SOURCE to select "AUX1/Dock".
- Press [REMOTE/BROWSE] to select the display mode.
The mode switches each time the button is pressed.
| [Selectable mode] | Browse mode | Remote mode | |
| Display location | Main unit display | iPod display | |
| Playable files | Audio file |  | |
| Video file | x | * | |
| Active buttons | Remote control unit (RCD-M37) | | |
| iPod | x | | |
*: Video may not be output, depending on the combination of ASD- 1R and iPod.
Listening to Audio
- Use [
![]() ] to select the item, then press [ENTER/ MEMO] or [
] to select the item, then press [ENTER/ MEMO] or [ ![]() ] to select the music file to be played.
] to select the music file to be played. - Press [iPod
![]() ].
].
Playback starts.
 ] to select the item, then press [ENTER/ MEMO] or [
  ] to select the music file to be played.
- If the function is set to something other than "AUX1/Dock", press [iPod
![]() ] to switch the function to "AUX1/Dock" and start playback. (See "Auto Function Selector Function")
] to switch the function to "AUX1/Dock" and start playback. (See "Auto Function Selector Function") - The function can also be switched to "AUX1/Dock" using SOURCE
Remote control and iPod button relations
| Remote control unit buttons | iPod buttons | Operation on the RCD-M37 |
| iPod | | Play the track. b Play/Pause in remote mode |
 | | Play the track from the beginning/ Play the next track. |
 | Fast-reverse the track/ Fast-forward the track. | |
 | Click Wheel | Select an item. |
| ENTER/MEMO | Select | Enter the selection or plays the track. |
| REMOTE/ BROWSE | – | Switch between the browse mode and the remote mode. |
| REPEAT | – | Switch the repeat function |
| RANDOM | – | Switch the shuffle function |
| MENU/SET | MENU | Display the menu or return to the previous menu. |
NOTE
- DENON will accept no responsibility whatsoever for any loss of iPod data.
- Depending on the type of iPod and the software version, some functions may not operate.
To Switch the Display
During playback, press [TIME/DISPLAY].
The display switches each time the button is pressed.

Disconnecting the iPod
- Press ON/STANDBY to set the standby mode.
- Remove the iPod from the Control Dock for iPod.
Playing a Portable Audio
Your portable audio player can be connected to the RCD- M37's portable jack to play tracks on the portable audio player.
Connecting a Portable Player

Connect the RCD-M37 and portable audio player using a separately sold mini-stereo audio cable.
Playing the Portable Player
- Press SOURCE to select "PORTABLE IN".
- Play the portable audio player.
The Portable Audio are output.- Also read the portable audio player's operating instructions.
NOTE
When using the portable player's headphones jack, set the volume on the portable player to an appropriate level.
USB Playback

| Symbols used to indicate buttons in this manual | |
| Button located on both the main unit and the remote control unit | BUTTON |
| Button only on the main unit | <BUTTON> |
| Button only on the remote control unit | [BUTTON] |
Playable USB Memory Formats
Files stored on USB memory devices created in the formats below can be played.
USB-Compatible File Systems
"FAT16" or "FAT32"
- If the USB memory device is divided into multiple partitions, only the top drive can be selected.
Maximum number of playable files and folders
Maximum number of files in a folder: 255
Maximum number of folders: 255
File Format
MPEG-1 Audio Layer-3
WMA (Windows Media Audio)
Tag Data
ID3-Tag (Ver.1x)
META-Tag (Compatible with title, artist and album names)
| Playable MP3/WMA file | |||
| File format | Sampling frequency | Bit rate | Extension |
| MP3 | 32, 44.1, 48 kHz | 32 ~ 320 kbps | .mp3 |
| WMA | 32, 44.1, 48 kHz | 64 ~ 192 kbps | .wma |
Only music files that are not copyright-protected can be played on this set.
- Contents pay sites on the Internet are copyright protected. Also, files encoded in WMA format when ripped from a CD, etc., on a computer may be copyright protected, depending on the computer's settings.
Basic Operation
Set the USB port to be used.
Playback starts automatically.
- When a USB memory device is connected, playback starts automatically when the operation below is performed.
- Switch the function to "USB" using SOURCE .
- Press [USB
![]() ].
].
 ].
].
- If the function is set to something other than "USB", press [USB
![]() ] to switch the function to "USB" and start playback. (See "Auto Function Selector Function")
] to switch the function to "USB" and start playback. (See "Auto Function Selector Function") - The function can also be switched to "USB" using SOURCE .
- To Switch the "Folder Mode" or "Memory Mode"
Press [FOLDER MODE].
[About the display]
When "Folder Mode" is selected - "FLD" is displayed.
When "Memory Mode" is selected - "FLD" is not displayed.
Folder Mode:
All the files in the selected folder are played.
Memory Mode:
After the selected folder and files are played, all the files in all the folders are played. - To Switch the Folder or File During Playback
- Folder
Use [![]() ] to select the folder.
] to select the folder. - File
Use![]() to select the file, or use [NUMBER] (0 ~ 9, +10) to select the file number.
to select the file, or use [NUMBER] (0 ~ 9, +10) to select the file number.
- Folder
- Stopping Playback
Press <BAND/![]() > or [
> or [ ![]() ].
]. - Stopping Playback Temporarily
Press <![]() > or [USB
> or [USB ![]() ].
].
The "![]() " is displayed.
" is displayed. - To resume playback, press <
![]() > or [USB
> or [USB ![]() ].
].
- To resume playback, press <
- Fast-Forwarding and Fast-Reversing (searching)
During playback, press and hold in [![]() ].
]. - Playing Repeatedly (Memory mode only)
Press [REPEAT]. - Playing Random Order (Memory mode only)
In the stop mode, press [RANDOM] - Switching the Display
During playback, press [TIME/DISPLAY].
![]()
 ] to select the folder.
 to select the file, or use [NUMBER] (0 ~ 9, +10) to select the file number.
 > or [
  " is displayed.
  ].
].
- The characters that can be displayed are as follows:
A to Z a to z 0 to 9 ^ ' ( ) * +, -. / = (space)
NOTE
- DENON will take no responsibility whatsoever for any loss or damage to data on USB memory devices when using the USB memory device connected to the RCD-M37.
- USB memory devices will not work via a USB hub.
- DENON does not guarantee that all USB memory devices will operate or be suppled power. When using a USB connection type portable hard disk of the type for which power can be supplied by connecting an AC adapter, we recommend using the AC adapter.
Setting the Timer

| Symbols used to indicate buttons in this manual | |
| Button located on both the main unit and the remote control unit | BUTTON |
| Button only on the main unit | <BUTTON> |
| Button only on the remote control unit | [BUTTON] |
Timer Playback
The everyday timer, once timer and sleep timer can be set.
Timer order of priority
Timer order of priority The order of priority when the times set for the different timers overlap is as follows:
- Sleep timer
- Once timer
- Everyday timer
Setting the Timer
- Everyday timer playback
Playback starts (the power turns on) and stops (the power turns off) at the set times each day. - Once timer playback
Playback starts (the power turns on) and stops (the power turns off) once only at the set times.
- Press MENU/SET.
The "TIMER" is displayed.- Operate within 5 seconds.
- Use
![]() or mode. [
or mode. [ ![]() ] to select the timer play mode.
] to select the timer play mode.
ONCE![]() EVERYDAY
EVERYDAY
*"1": Once timer, "E": Everyday timer
![]()
- Press MENU/SET or [ENTER/MEMO].
The timer play mode is set. - Use
![]() or [
or [ ![]() ] to select the function to be played.
] to select the function to be played.
![]()
- Press MENU/SET or [ENTER/MEMO]
The function to be played is set.- If the function is set to anything other than the tuner, the setting display shown in step 7 is displayed.
- [Only when the "TUNER" function is selected]
- Use
![]() or [
or [ ![]() ] to select the preset number.
] to select the preset number.
![]()
- Press MENU/SET or [ENTER/MEMO]
The broadcast station for the selected preset number is set.
- Use
- Use
![]() or [
or [ ![]() ] to set the "hours" for the timer start time.
] to set the "hours" for the timer start time.
![]()
- Press MENU/SET or [ENTER/MEMO]
The "hours" for the timer start time are set. - Use
![]() or [
or [ ![]() ] to set the "minutes" for the timer start time.
] to set the "minutes" for the timer start time.
![]()
- Press MENU/SET or [ENTER/MEMO]
The "minutes" for the timer start time are set. - Use
![]() or [
or [ ![]() ] to set the "hours" for the timer stop time.
] to set the "hours" for the timer stop time.
![]()
- Press MENU/SET or [ENTER/MEMO]
The "hours" for the timer stop time are set. - Use
![]() or [
or [ ![]() ] to set the "minutes" for the timer stop time.
] to set the "minutes" for the timer stop time.
![]()
- Press MENU/SET or [ENTER/MEMO].
The "minutes" for the timer stop time are set. - Use
![]() or [
or [ ![]() ] to turn timer playback on.
] to turn timer playback on.
![]()
 ] to select the timer play mode.
 EVERYDAY


| Display | Once timer | Everyday timer |
| 1_off/E_off | OFF | OFF |
| 1_on/E_on | ON | ON |
| 1_off/E_on | OFF | ON |
| 1_on/E_off | ON | OFF |
- When turned on, "
![]() " lights.
" lights.
 " lights.
- Press MENU/SET or [ENTER/MEMO].
The timer setting is set. - Adjust the volume for when the timer starts using VOLUME.
- Set the power to standby.
The timer playback standby mode is set.
- Canceling the timer
Press MENU/SET twice.
At step 15 under "Setting the Timer", use![]() or [
or [ ![]() ] to turn off the timer on/off indicator and turn off "
] to turn off the timer on/off indicator and turn off " ![]() "
" - To check the timer settings
- Press MENU/SET .
The "TIMER" is displayed. - Press
![]() or [
or [ ![]() ].
].
The "EVERYDAY" or "ONCE" is displayed. - Press MENU/SET . The display switches each time the button is pressed.
- Press MENU/SET .
- To change the timer settings
Repeat the procedure under "Setting the Timer". - To change the setting while setting the timer
Press <BAND/![]() > or [
> or [ ![]() ].
].
Return to step 2 under "Setting the Timer". Repeat the procedure. - To clear the timer settings
- Press MENU/SET.
The "TIMER" is displayed. - Press
![]() or [
or [ ![]() ].
].
The "EVERYDAY" or "ONCE" is displayed. - While "EVERYDAY" or "ONCE" is displayed, press <BAND/
![]() > or [
> or [ ![]() ] for at least 2 seconds.
] for at least 2 seconds.
- Press MENU/SET.
- If there is a power failure
The time setting and the timer settings are cleared. Reset the current time, then reset the timer. - When performing a timer setting with DENON control dock for iPod (ASD-3N or ASD-3W)
Pause the track you want to play, and keep the power on for DENON control dock for iPod.
 > or [
When the function is set to iPod, the timer cannot be set. To set the timer, first switch to a function other than iPod.
Sleep Timer Playback
Use this function to automatically switch the power to the standby mode after a specific amount of time (minutes).
The sleep timer can be set to up to 90 minutes, in steps of 10 minutes.
- Select and play the desired function.
- Press [SLEEP] and select the setting time.
The "SLEEP" indicator flashes.
![]()
- Press [SLEEP] while the "SLEEP" indicator is flashing.
The set time is displayed.- After about 5 seconds, the set returns to as it was before the sleep timer was set, and the "SLEEP" indicator lights.

- Canceling the sleep timer
Either press [SLEEP] at step 2 under "Sleep Timer Playback" until "OFF" is displayed, or press ON/STANDBY. - To change the setting while the sleep timer is set
Press [SLEEP]. - Checking the time remaining until the sleep timer starts
Press [SLEEP].
Return to step 2 under "Sleep Timer Playback".
Convenient Functions

| Symbols used to indicate buttons in this manual | |
| Button located on both the main unit and the remote control unit | BUTTON |
| Button only on the main unit | <BUTTON> |
| Button only on the remote control unit | [BUTTON] |
Auto Power On
When the power is in standby, the power turns on when any of the buttons below other than ON/STANDBY is operated, and the respective operation is performed.
| The disc tray opens. |
| Playback of that source starts. |
| Playback of the tuner starts. |
 >
> for the different functions
NOTE
The Auto Power On function cannot be used with iPods.
Auto Function Selector Function
When one of the buttons below is pressed, the function switches to the respective function and playback of that source starts.
| The function switches to "CD" and the CD starts playing. |
| The function switches to "USB" and the USB starts playing. |
| The function switches to "AUX1/Dock" and the iPod starts playing. |
| The functions switches to "TUNER" and the band last set is tuned in. |
Last Function Memory
This stores the settings as they were directly before the standby mode was set.
When the power is turned back on, the settings are restored to as they were directly before the standby mode was set.
Resetting the Microprocessor
Perform this procedure if the display is abnormal or if operations cannot be performed.
When the microprocessor is reset, all the settings are reset to their default values.
- Unplug the power cord.
- Plug the power cord into a power outlet while pressing <
![]() > and <MENU/SET> simultaneously.
> and <MENU/SET> simultaneously. - Press [CLOCK].
The "AM12:00" display flashes.
 > and <MENU/SET> simultaneously.
If "AM12:00" is not flashed in step 3, start over from step 1.
Using an Optimizing Filter
An optimizing filter suited for the properties of the speakers (SC-M37) can be used.
- Press MENU/SET to select "SP OPTIMISE".
- Use <
![]() > or [
> or [ ![]() ] to select "ON" or "OFF".
] to select "ON" or "OFF". - Press MENU/SET to set.
 > or [
| [Selectable items] | |
| ON | The response is optimized for the speakers (SC-M37, supplied) |
| OFF | The response is flat. |
When the function is set to iPod, the set cannot be switched between on and off.
Troubleshooting
If a problem should arise, first check the following:
- Are the connections correct?
- Is the set being operated as described in the owner's manual?
- Are the other components operating properly?
If this unit does not operate properly, check the items listed in the table below. Should the problem persist, there may be a malfunction.
In this case, disconnect the power immediately and contact your store of purchase.
| [General] | ||
| Symptom | Cause | Countermeasure |
| Set does not operate properly. |
|
|
| Display not lit and sound not produced when power switch set to on. |
|
|
| Display lit but sound not produced. |
|
|
|
| |
|
| |
| Display is off. |
|
|
| Power turns off suddenly and power indicator flashes red. |
|
|
|
| |
| [Remote Control Unit] | ||
| Symptom | Cause | Countermeasure |
| Set does not work properly when remote control unit operated. |
|
|
|
| |
|
| |
|
| |
|
| |
| [CD] | ||
| Symptom | Cause | Countermeasure |
| "00 Tr 00: 00" is shown on the display even though a CD is loaded. |
|
|
Disc is not played when CD  button is pressed. button is pressed. |
|
|
| A specific part of a disc is not played. |
|
|
| A CD-R or CD-RW disc cannot be played. |
|
|
|
| |
| MP3 and WMA files cannot be played. |
|
|
| [Tuner] | ||
| Symptom | Cause | Countermeasure |
| Continuous noise is heard when receiving FM programs. |
|
|
| Hissing or continuous noise is heard when receiving AM programs. |
|
|
| [iPod] | ||
| Symptom | Cause | Countermeasure |
| iPod cannot be played. |
|
|
|
| |
|
| |
| [USB] | ||
| Symptom | Cause | Countermeasure |
| When a USB memory device is connected, "USB" is not displayed. |
|
|
|
| |
|
| |
|
| |
| Files on a USB memory device cannot be played. |
|
|
|
| |
|
| |
|
| |
Specifications
| Audio section | |
| 30 W + 30 W (6 Ω/ohms, 1 kHz T.H.D 10%) |
| Tuner section | |
| Reception frequency range: | FM: 87.5 MHz ~ 107.9 MHz AM: 520 kHz ~ 1710 kHz |
| Receiving sensitivity: | FM: 1.5 μV/75 Ω/ohms AM: 20 μV |
| FM stereo separation: | 35 dB (1 kHz) |
| CD section | |
| Playback frequency response: | 2 Hz ~ 20 kHz |
| Wow & flutter: | Below measurable limits (± 0.001%) |
| Sampling frequency: | 44.1 kHz |
| Clock/Timer section | |
| Clock method: | Crystal oscillator (Within 1 ~ 2 minutes per month) |
| Timer: | Everyday/Once timer: One system each Sleep timer: 90 minutes, maximum |
| General | |
| Power supply: | AC 120 V, 60 Hz |
| Power consumption: | 65 W Approx. 0.3 W (standby) |
| Maximum external dimensions: | 210 (W) x 115 (H) x 308.5 (D) mm (8-17/64" x 4-33/64" x 12-9/64") |
| Weight: | 4.3 kg (9 lbs 7 oz) |
| Remote control unit (RC-1097) | |
| Remote control method: | IR pulse method |
| Power supply: | R03/AAA Type (two batteries) |
| Maximum external dimensions: | 49 (W) x 220 (H) x 24 (D) mm (1-59/64" x 8-21/32" x 15/16") |
| Weight: | 110 g (Approx. 3 oz) (including batteries) |
- For purposes of improvement, specifications and design are subject to change without notice.
SAFETY PRECAUTIONS

RISK OF ELECTRIC SHOCK
DO NOT OPEN
TO REDUCE THE RISK OF ELECTRIC SHOCK, DO NOT REMOVE COVER (OR BACK). NO USER-SERVICEABLE PARTS INSIDE. REFER SERVICING TO QUALIFIED SERVICE PERSONNEL.
 | The lightning flash with arrowhead symbol, within an equilateral triangle, is intended to alert the user to the presence of uninsulated "dangerous voltage" within the product's enclosure that may be of sufficient magnitude to constitute a risk of electric shock to persons. |
 | The exclamation point within an equilateral triangle is intended to alert the user to the presence of important operating and maintenance (servicing) instructions in the literature accompanying the appliance. |


TO REDUCE THE RISK OF FIRE OR ELECTRIC SHOCK, DO NOT EXPOSE THIS APPLIANCE TO RAIN OR MOISTURE.

USE OF CONTROLS OR ADJUSTMENTS OR PERFORMANCE OF PROCEDURES OTHER THAN THOSE SPECIFIED HEREIN MAY RESULT IN HAZARDOUS RADIATION EXPOSURE.
THIS PRODUCT SHOULD NOT BE ADJUSTED OR REPAIRED BY ANYONE EXCEPT PROPERLY QUALIFIED SERVICE PERSONNEL.
- Laser Class (IEC 60825-1:2001)
![]()

Cautions on Handling
- Before turning the power switch on
Check once again that all connections are correct and that there are no problems with the connection cables. - Power is supplied to some of the circuitry even when the unit is set to the standby mode. When traveling or leaving home for long periods of time, be sure to unplug the power cord from the power outlet.
- Sufficiently ventilate the place of installation
If the unit is left in a room full of the smoke from cigarettes, etc., for long periods of time, the surface of the optical pickup could get dirty, in which case it will not be able to read the signals properly. - About condensation
If there is a major difference in temperature between the inside of the unit and the surroundings, condensation (dew) may form on the operating parts inside the unit, causing the unit not to operate properly. If this happens, let the unit sit for an hour or two with the power turned off and wait until there is little difference in temperature before using the unit. - Cautions on using mobile phones
Using a mobile phone near this unit may result in noise. If so, move the mobile phone away from this unit when it is in use. - Moving the unit
Turn off the power and unplug the power cord from the power outlet. Next, disconnect the connection cables to other system units before moving the unit. - Note that the illustrations in these instructions may differ from the actual unit for explanation purposes.
Cautions on Installation
Note:
For proper heat dispersal, do not install this unit in a confined space, such as a bookcase or similar enclosure.

IMPORTANT SAFETY INSTRUCTIONS
- Read these instructions.
- Keep these instructions.
- Heed all warnings.
- Follow all instructions.
- Do not use this apparatus near water.
- Clean only with dry cloth.
- Do not block any ventilation openings. Install in accordance with the manufacturer's instructions.
- Do not install near any heat sources such as radiators, heat registers, stoves, or other apparatus (including amplifiers) that produce heat.
- Do not defeat the safety purpose of the polarized or grounding-type plug. A polarized plug has two blades with one wider than the other. A grounding type plug has two blades and a third grounding prong. The wide blade or the third prong are provided for your safety. If the provided plug does not fit into your outlet, consult an electrician for replacement of the obsolete outlet.
- Protect the power cord from being walked on or pinched particularly at plugs, convenience receptacles, and the point where they exit from the apparatus.
- Only use attachments/accessories specified by the manufacturer.
- Use only with the cart, stand, tripod, bracket, or table specified by the manufacturer, or sold with the apparatus. When a cart is used, use caution when moving the cart/ apparatus combination to avoid injury from tip-over.
![]()
- Unplug this apparatus during lightning storms or when unused for long periods of time.
- Refer all servicing to qualified service personnel. Servicing is required when the apparatus has been damaged in any way, such as power-supply cord or plug is damaged, liquid has been spilled or objects have fallen into the apparatus, the apparatus has been exposed to rain or moisture, does not operate normally, or has been dropped.
- Batteries shall not be exposed to excessive heat such as sunshine, fire or the like.

- The ventilation should not be impeded by covering the ventilation openings with items, such as newspapers, tablecloths, curtains, etc.
- No naked flame sources, such as lighted candles, should be placed on the unit.
- Observe and follow local regulations regarding battery disposal.
- Do not expose the unit to dripping or splashing fluids.
- Do not place objects filled with liquids, such as vases, on the unit.
NOTE ON USE
- Avoid high temperatures. Allow for sufficient heat dispersion when installed in a rack.
![]()
- Handle the power cord carefully. Hold the plug when unplugging the cord.
![]()
- Keep the unit free from moisture, water, and dust.
![]()
- Unplug the power cord when not using the unit for long periods of time.
![]()
- Do not obstruct the ventilation holes.
* (For apparatuses with ventilation holes)
![]()
- Do not let foreign objects into the unit.
![]()
- Do not let insecticides, benzene, and thinner come in contact with the unit.
![]()
- Never disassemble or modify the unit in any way.
![]()


Getting Started
Thank you for purchasing this DENON product. To ensure proper operation, please read this owner's manual carefully before using the product. After reading them, be sure to keep them for future reference.

Note that the illustrations in this instructions may differ from the actual set for explanation purposes.
Accessories
Check that the following parts are attached in addition to the main unit:
 | Owner's Manual | 1 |
 | Service station list | 1 |
 | Speaker cable (Approx. 9.8 ft / 3 m) | 2 |
 | Foam plug | 2 |
 | Anti-slip pads (8 pcs. / 1sheet) | 1 |
Before Using
Cautions on Installation
The quality of the sound produced from the speaker is affected by the size and type of the room, as well as by the method of installation. Consider the points listed below before installing the speaker.
- If the bass sound is overemphasized when the speakers are installed directly on the floor, set them on concrete blocks or other hard stands.
- Note that placing the speaker on the same stand or shelf as a record player may result in howling.
- Also note that if there is a magnet or any device generating magnetic force nearby, interaction between this device and the speakers can cause the colors on the TV to become blotchy.

- Fasten the speaker cables to the wall, etc., to avoid catching them on your hands or feet and causing the unit to fall.
- Be sure to check for safety after installing the speakers. Afterwards, perform safety inspections at regular intervals to make sure there at the speakers will fall.
DENON will accept no responsibility for damages or accidents caused by inappropriate choice of the place of installation or improper installation procedures.
Acoustic Sponge
When installing on a desktop or in the corner of your room, the bass may emphasized. Insert sound foam plug in the bass-reflex duct at the back of the SC-M37.
You can adjust the bass sound with the amount of sound foam plug you insert.

- Do not insert the foam plug too deep. The foam plug could fall in and get stuck inside.
- If the foam plug cannot be removed or falls inside, stop using the unit immediately and consult your store of purchase or your nearest repair and inquiry center.
How to Install

Attach four of the included anti-slip pads to the bottom of the unit as shown on the diagram above.
Cleaning
- Use a wiping cloth and wipe lightly to remove dirt from the cabinet and operation panel.
- When using chemically treated cloths, follow the precautions that have been written for them.
- Do not use benzene, thinners, or other organic solvents or insecticides on the main unit since they may cause a change in quality or color.
Other Cautions
- Raising the amplifier's volume excessively and playing with distorted sound could damage the amplifier and speakers. Enjoy the sound at a reasonable volume level.
- When moving the unit, note that applying strong force to the surface of the speaker through the saran net could damage the speaker.
Connections
When connecting, be sure to read the amplifier's owner's manual carefully and connect properly.
- Connect the input terminals on the rear panel of the speaker with the speaker output terminals on the amplifier, using the speaker cables (Supplied).
- Connect the speaker for the left channel to the "L" terminal on the amplifier, the speaker for the right channel to the "R" terminal on the amplifier, making sure to check the polarities ("+" and "–").
- There are various types of speaker output terminals on amplifiers. Check your amplifier's owner's manual.
- Be sure to turn the amplifier's power off before connecting the speakers to the amplifier.
- If the polarities are inverted, the phase may be off and the sound may have no bass component, making it seem unnatural. Be sure to connect the polarities properly.
Connections
Use the included speaker cable to connect the input terminals on the back of the speakers to the amplifier's speaker output terminals.

- Twist firmly the wires by hand so that they do not stick out and cause short-circuits.
![]()
- Loosen the terminal by turning to the left and insert the speaker cable through the hole in the speaker terminal.
- Tighten the terminal by turning to the right and check that the core wire is not protruding from the hole.

Once connections are completed, pull gently on the speaker cables to check that they are securely connected.
Do not let the core wires of two speaker cables touch each other. Doing so will short-circuit the amplifier circuitry and damage the amplifier.
Removing the Speaker Net
- The net on the front of the speakers can be removed.
- To remove, grasp both sides of the net and pull forward.
- To mount, line up the projecting pieces in the four corners of the speaker net with the holes in the four corners of the cabinet and press in.
Specifications
| Type: | 2-way · 2-speakers Low-leakage-flux, Reflex box |
| Frequency range: | 45 Hz ~ 40 kHz |
| Input impedance: | 6 Ω/ohms |
| Max. input: | 60 W (IEC), 120 W (PEAK) |
| Sensitivity: | 86 dB (1 W · 1 m) |
| Crossover frequency: | 3 kHz |
| Speakers: | 12 cm (4-3/4") cone bass-mid x 1 2.5 cm (1") soft dome high range x 1 |
| Maximum external dimensions: | 145 (W) x 233 (H) x 234 (D) mm (5-45/64" x 9-11/64" x 9-7/32") |
| Weight: | 3.8 kg (8 lbs 6 oz) |
- For improvement purposes, specifications and design are subject to change without notice.
SAFETY PRECAUTIONS
RISK OF ELECTRIC SHOCK
DO NOT OPEN
TO REDUCE THE RISK OF ELECTRIC SHOCK, DO NOT REMOVE COVER (OR BACK). NO USER-SERVICEABLE PARTS INSIDE. REFER SERVICING TO QUALIFIED SERVICE PERSONNEL.
| The lightning flash with arrowhead symbol, within an equilateral triangle, is intended to alert the user to the presence of uninsulated "dangerous voltage" within the product's enclosure that may be of sufficient magnitude to constitute a risk of electric shock to persons. |
| The exclamation point within an equilateral triangle is intended to alert the user to the presence of important operating and maintenance (servicing) instructions in the literature accompanying the appliance. |
TO REDUCE THE RISK OF FIRE OR ELECTRIC SHOCK, DO NOT EXPOSE THIS APPLIANCE TO RAIN OR MOISTURE.
NOTE ON USE
- Avoid high temperatures. Allow for sufficient heat dispersion when installed in a rack.
![]()
- Handle the power cord carefully. Hold the plug when unplugging the cord.
![]()
- Keep the unit free from moisture, water, and dust.
![]()
- Unplug the power cord when not using the unit for long periods of time.
![]()
- Do not obstruct the ventilation holes.
* (For apparatuses with ventilation holes)
![]()
- Do not let foreign objects into the unit.
![]()
- Do not let insecticides, benzene, and thinner come in contact with the unit.
![]()
- Never disassemble or modify the unit in any way.
![]()
- The ventilation should not be impeded by covering the ventilation openings with items, such as newspapers, tablecloths, curtains, etc.
- No naked flame sources, such as lighted candles, should be placed on the apparatus.
- Attention should be drawn to the environmental aspects battery disposal.
- Do not expose the set to dripping or splashing fluids.
- No objects filled with liquids, such as vases, shall be placed on the apparatus.

Documents / ResourcesDownload manual
Here you can download full pdf version of manual, it may contain additional safety instructions, warranty information, FCC rules, etc.
Advertisement


Need help?
Do you have a question about the RCD-M37 and is the answer not in the manual?
Questions and answers