Table of Contents
Advertisement
Quick Links
Advertisement
Table of Contents

Related Manuals for Denon D RCD-M37


Summary of Contents for Denon D RCD-M37
- Page 1 CD RECEIVER RCD-M37 Owner’s Manual Manuel de l’Utilisateur Manual del usuario...
- Page 2 ENGLISH FRANCAIS ESPAÑOL SAFETY PRECAUTIONS CAUTION RISK OF ELECTRIC SHOCK DO NOT OPEN CAUTION: TO REDUCE THE RISK OF ELECTRIC SHOCK, DO NOT REMOVE COVER (OR BACK). NO USER-SERVICEABLE PARTS INSIDE. REFER SERVICING TO QUALIFIED SERVICE PERSONNEL. The lightning flash with arrowhead symbol, within an equilateral triangle, is intended to alert the user to the presence of uninsulated “dangerous voltage”...
- Page 3 2. IMPORTANT NOTICE: DO NOT MODIFY THIS PRODUCT This product, when installed as indicated in the instructions contained in this manual, meets FCC requirements. Modification not expressly approved by DENON may void your authority, granted by the FCC, to use the product. 3. NOTE This product has been tested and found to comply with the limits for a Class B digital device, pursuant to Part 15 of the FCC Rules.
- Page 4 ENGLISH FRANCAIS ESPAÑOL NOTE ON USE / OBSERVATIONS RELATIVES A L’UTILISATION / NOTAS SOBRE EL USO • Keep the unit free from moisture, water, and dust. • Protéger l’appareil contre l’humidité, l’eau et la poussière. • Mantenga el equipo libre de humedad, •...
-
Page 5: Table Of Contents
n Contents Getting Started Accessories ······················································································2 Cautions on Handling ·····································································2 Cautions on Installation ·································································2 Main Features ·················································································2 Discs ·································································································2 Discs usable on the RCD-M37 ·······················································2 Holding Discs ·················································································3 Loading Discs ·················································································3 Cautions on Loading Discs ·····························································3 Cautions on Handling ·····································································3 Cautions on Storing Discs ······························································3 Cleaning Discs ···············································································3 About the Remote Control Unit ····················································3... -
Page 6: Getting Started
ENGLISH Getting Started Thank you for purchasing this DENON product. To ensure proper operation, please read this owner’s manual carefully before using the product. After reading them, be sure to keep them for future reference. Accessories Check that the following parts are supplied with the product. -
Page 7: Holding Discs
NOTE • Discs with special shapes (heart-shaped discs, octagonal discs, etc.) cannot be played. Do not attempt to play them, as doing so can damage the product. • Some discs and some recording formats may not be playable. • Non-finalized discs cannot played. -
Page 8: Operating Range Of The Remote Control Unit
ENGLISH NOTE • Replace the batteries with new ones if the set does not operate even when the remote control unit is operated close to the unit. • The supplied batteries are only for verifying operation. • When inserting the batteries, be sure to do so in the proper direction, following the “q”... -
Page 9: Display
Display Information display Various information is displayed here, depending on the operation mode. : ( the play indicator) lights when a disc is playing. : ( the pause indicator) lights when a disc is pausing. SDB, TONE indicator ………………………(13) Reception mode indicator …………………(17) TOTAL indicator Lights when the total number of tracks and total... -
Page 10: Remote Control Unit
ENGLISH Remote Control Unit Buttons Operable for All Functions (CD, TUNER, iPod and USB) Buttons Operable When the Function is Set to “CD” The buttons listed at “Buttons Operable for All Functions” can also be used. DIMMER button ·········································· (13) Master volume control buttons (VOLUME) ···················································... - Page 11 Buttons Operable When the Function is Set to “TUNER” The buttons listed at “Buttons Operable for All Functions” can also be used. Number buttons ········································· (18) SOURCE button ·········································· (17) TUNER button ············································· (17) CLEAR/DEL button ····································· (18) Tuning +, – buttons (TU+, TU–) ·················· (17) Channel +, –...
-
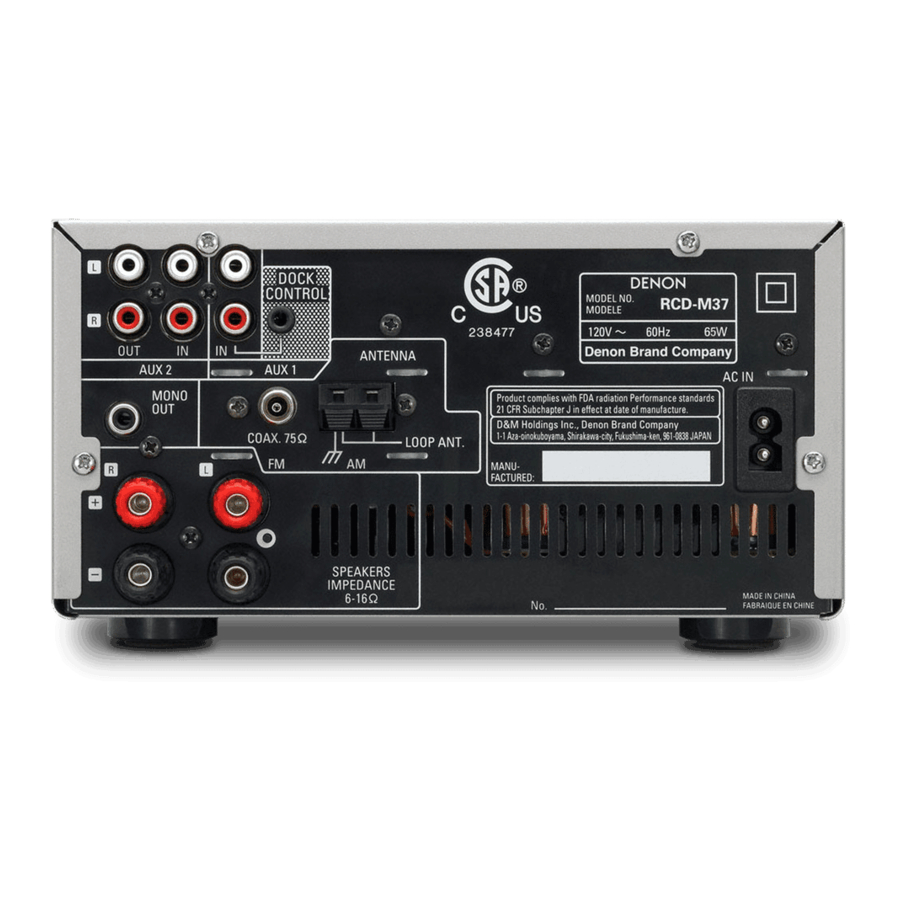
Page 12: Connections
ENGLISH Connections Connections for all compatible audio signal formats are described in this owner’s manual. Please select the types of connections suited for the equipment you are connecting. With some types of connections, certain settings must be made on the RCD-M37. For details, refer to the instructions for the respective connection items below. -
Page 13: Speaker Connections
After doing this, plug the power cord back in. If the protection circuit is activated though there are no problems in ventilation around the set or in connections, the set could be damaged. Turn off the power, then contact a DENON servicing and inquiry outlet. ENGLISH... -
Page 14: Connecting The Playback Components
Connecting the Playback Components Control Dock for iPod Use a DENON Control Dock for iPod (ASD-1R or ASD-3N/3W, sold separately ) to connect the set with an iPod. iPod • When using a Control Dock for iPod, the Control Dock for iPod must be set. -
Page 15: Usb Port
n Connecting the AM loop antenna Push the lever. Insert the conductor. Return the lever. NOTE • Make sure the AM loop antenna lead terminals do not touch metal parts of the panel. • Do not connect two FM antennas simultaneously. USB Port NOTE •... -
Page 16: Setting Current Time
ENGLISH Setup Symbols used to indicate buttons in this manual Button located on both the main unit and the remote control unit <BUTTON> Button only on the main unit Button only on the remote control unit <5> <1/3> 8, 9 ON/STANDBY <PHONES>... -
Page 17: Playback
Playback Preparations Turning the Power On ON/STANDBY Press • The power turns on. Press again to set the power to standby. • Power indicator Standby ∙∙∙∙∙∙∙∙∙∙∙∙∙∙∙∙∙∙∙∙∙∙∙∙∙∙∙∙∙∙∙∙∙∙Red Power on ∙∙∙∙∙∙∙∙∙∙∙∙∙∙∙∙∙∙∙∙∙∙∙∙∙∙∙∙∙∙∙∙Green When the timer is set ∙∙∙∙∙∙∙∙∙∙∙∙Orange NOTE • Power continues to be supplied to some of the circuitry even when the power is in the standby mode. -
Page 18: Cd Playback
ENGLISH Symbols used to indicate buttons in this manual Button located on both the main unit and the remote control unit <BUTTON> Button only on the main unit Button only on the remote control unit 8, 9 <1/3> <BAND/2> SOURCE [NUMBER] [CLEAR/DEL] [RANDOM]... -
Page 19: Playing Tracks In The Desired Order
Playing Tracks in the Desired Order <Program playback> Up to 25 tracks can be programmed. [PROG/DIRECT] In the stop mode, press The “PGM” indicator lights. [NUMBER] ) to select the traks. b GExampleH To program tracks 3, 12, 7 to play in that order: [PROG/DIRECT] [+10] Press... -
Page 20: Playing Mp3 And Wma Files
ENGLISH Symbols used to indicate buttons in this manual Button located on both the main unit and the remote control unit <BUTTON> Button only on the main unit Button only on the remote control unit SOURCE <1/3> <BAND/2> 8, 9 MENU/SET [NUMBER] [REPEAT]... -
Page 21: Tuner Playback
TUNER Playback Tuning in Broadcast Stations Connect the antenna beforehand (vpage 10). [TUNER] <BAND/2> Press to select the reception band. FM AUTO FM MONO GAbout the displayH When FM AUTO is selected∙∙∙∙∙∙∙∙∙∙∙∙∙∙“AUTO” is displayed. When FM MONO is selected ∙∙∙∙∙∙∙∙∙∙∙“MONO” is displayed. When AM is selected ∙∙∙∙∙∙∙∙∙∙∙∙∙∙∙∙∙∙∙∙∙∙∙... -
Page 22: Listening To Preset Stations
Be sure to comply with applicable copyright legislation. Preparations Set the iPod on the DENON Control Dock for iPod. (vSee the Control Dock for iPod’s operating instructions.) SOURCE Press to select “AUX1/Dock”. -
Page 23: Listening To Audio
Display the menu or return to the MENU/SET MENU previous menu. NOTE • DENON will accept no responsibility whatsoever for any loss of iPod data. • Depending on the type of iPod and the software version, some functions may not operate. To Switch the Display... -
Page 24: Usb Playback
ENGLISH Symbols used to indicate buttons in this manual Button located on both the main unit and the remote control unit <BUTTON> Button only on the main unit Button only on the remote control unit <1/3> 8, 9 SOURCE <BAND/2> [NUMBER] [REPEAT] [RANDOM]... - Page 25 A to Z a to z 0 to 9 ^ ’ ( ) * + , - . / = (space) NOTE • DENON will take no responsibility whatsoever for any loss or damage to data on USB memory devices when using the USB memory device connected to the RCD-M37 .
-
Page 26: Setting The Timer
ENGLISH Setting the Timer Symbols used to indicate buttons in this manual Button located on both the main unit and the remote control unit <BUTTON> Button only on the main unit Button only on the remote control unit MENU/SET <BAND/2> ON/STANDBY 8, 9 VOLUME... -
Page 27: Sleep Timer Playback
When performing a timer setting with DENON control dock for iPod (ASD-3N or ASD-3W) Pause the track you want to play, and keep the power on for DENON control dock for iPod. When the function is set to iPod, the timer cannot be set. To set the timer, first switch to a function other than iPod. -
Page 28: Other Functions
ENGLISH Other Functions Symbols used to indicate buttons in this manual Button located on both the main unit and the remote control unit <BUTTON> Button only on the main unit Button only on the remote control unit <5> MENU/SET ON/STANDBY <... -
Page 29: Troubleshooting
• Set is damaged. • Turn off the power and contact a DENON service center. GRemote Control UnitH Symptom Set does not work properly when remote control unit operated. -
Page 30: Specifications
Remote control method: Power supply: class or MTP standards. Maximum external dimensions: • This is not a malfunction. DENON – Weight: does not guarantee that all USB memory devices will operate or b For purposes of improvement, specifications and design are subject to change without notice. - Page 31 Denon Brand Company, D&M Holdings Inc. Printed in China 5411 10028 000D...
- Page 32 SPEAKER SC-M37 Owner’s Manual Bedienungsanleitung Manuel de l’Utilisateur Manuale delle istruzioni Manual del usuario Gebruiksaanwijzing Bruksanvisning...
- Page 33 • ÖVERENSSTÄMMELSESINTYG Härmed intygas helt på eget ansvar att denna produkt, vilken detta intyg avser, uppfyller följande standarder: EN55013 och EN55020. Enligt stadgarna i direktiv 2004/108/EC. DENON Europe Division of D&M Germany GmbH An der Landwehr 19, Nettetal, D-41334 Germany...
- Page 34 NOTE ON USE / HINWEISE ZUM GEBRAUCH / OBSERVATIONS RELATIVES A L’UTILISATION / NOTE SULL’USO / NOTAS SOBRE EL USO / ALVORENS TE GEBRUIKEN / OBSERVERA • Keep the apparatus free from moisture, water, and dust. • Avoid high temperatures. •...
-
Page 35: Before Using
Note that the illustrations in this instructions may differ from the actual set for explanation purposes. Getting Started Thank you for purchasing this DENON product. To ensure proper operation, please read this owner’s manual carefully before using the product. After reading them, be sure to keep them for future reference. -
Page 36: Acoustic Sponge
Acoustic Sponge When installing on a desktop or in the corner of your room, the bass may emphasized. Insert sound foam plug in the bass-reflex duct at the back of the SC-M37 . You can adjust the bass sound with the amount of sound foam plug you insert. -
Page 37: Connections
ENGLISH Connections When connecting, be sure to read the amplifier’s owner’s manual carefully and connect properly. • Connect the input terminals on the rear panel of the speaker with the speaker output terminals on the amplifier, using the speaker cables (Supplied). -
Page 38: Specifications
Specifications Type: 2-way · 2-speakers Low-leakage-flux, Reflex box 45 Hz ~ 40 kHz Frequency range: Input impedance: 6 Ω/ohms Max. input: 60 W (IEC), 120 W (PEAK) Sensitivity: 86 dB (1 W · 1 m) 3 kHz Crossover frequency: Speakers: 12 cm (4-3/4”) cone bass-mid x 1 2.5 cm (1”) soft dome high range x 1 145 (W) x 233 (H) x 234 (D) mm... - Page 39 Denon Brand Company, D&M Holdings Inc. Printed in China 5411 10061 007D...
Need help?
Do you have a question about the D RCD-M37 and is the answer not in the manual?
Questions and answers