Table of Contents
Advertisement
Quick Links
Advertisement
Table of Contents

Related Manuals for Gaggenau RC202


Summary of Contents for Gaggenau RC202
- Page 1 Gaggenau Information for Use RC202, Refrigerator...
-
Page 2: Table Of Contents
Table of contents 1 Safety ........... 4 8 Additional functions .... 15 1.1 General information.... 4 8.1 Fast cooling ...... 15 1.2 Intended use...... 4 8.2 Rest mode ....... 16 1.3 Restriction on user group.. 4 9 Alarm.......... 16 1.4 Safe transport ...... 4 9.1 Door alarm ...... - Page 3 14.4 Removing the fittings..... 21 14.5 Removing appliance com- ponents........ 22 15 Troubleshooting...... 23 16 Storage and disposal.... 25 16.1 Taking the appliance out of operation ....... 25 16.2 Disposing of old appliance ... 25 17 Customer Service.... 25 17.1 Product number (E-Nr.), production number (FD) and consecutive numbering (Z-Nr.) ........
-
Page 4: Safety
en Safety 1 Safety Observe the following safety instructions. 1.1 General information Read this instruction manual carefully. ¡ Keep the instruction manual and the product information safe ¡ for future reference or for the next owner. Do not connect the appliance if it has been damaged in transit. ¡... -
Page 5: Safe Installation
Safety en 1.5 Safe installation WARNING ‒ Risk of electric shock! Incorrect installation is dangerous. Connect and operate the appliance only in accordance with the ▶ specifications on the rating plate. Connect the appliance to a power supply with alternating cur- ▶ rent only via a properly installed socket with earthing. The protective conductor system of the domestic electrical in- ▶... -
Page 6: Safe Use
en Safety Portable multiple socket strips or portable power supply units may overheat and cause a fire. Do not place portable multiple socket strips or power supply ▶ units on the back of the appliance. 1.6 Safe use WARNING ‒ Risk of electric shock! An ingress of moisture can cause an electric shock. -
Page 7: Damaged Appliance
Safety en WARNING ‒ Risk of fire! Electrical devices within the appliance may cause a fire, e.g. heat- ers or electric ice makers. Do not operate electrical devices within the appliance. ▶ WARNING ‒ Risk of injury! Injury to the eyes caused by escaping flammable refrigerant and hazardous gases. - Page 8 en Safety Call customer services. → Page 25 ▶ Improper repairs are dangerous. Repairs to the appliance should only be carried out by trained ▶ specialist staff. Only use genuine spare parts when repairing the appliance. ▶ If the power cord or the appliance power cable of this appliance ▶...
-
Page 9: Preventing Material Damage
Preventing material damage en 3.2 Saving energy Preventing material damage 2 Preventing material If you follow these instructions, your damage appliance will use less power. Preventing material damage Selecting the installation location ATTENTION! Using the base, runners or appliance Keep the appliance out of direct ¡... -
Page 10: Installation And Connection
en Installation and connection The weight of the appliance ex works Installation and connection 4 Installation and con- may be up to 40 kg depending on the model. nection The subfloor must be sufficiently stable to bear the weight of the appli- Installation and connection 4.1 Scope of delivery ance. -
Page 11: Installing The Appliance
Installation and connection en Insert the mains plug of the appli- Niche width ance's power cable in a socket An inside niche width of at least nearby. 600 mm is required for the appli- ance. The connection data of the appli- ance can be found on the rating Over-and-under and side-by-side plate. -
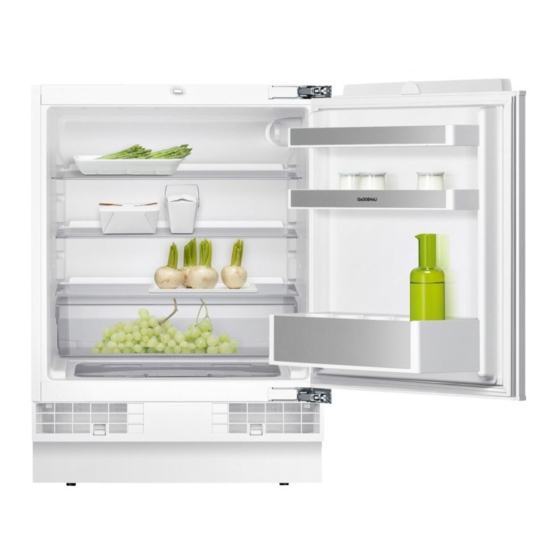
Page 12: Familiarising Yourself With Your Appliance
en Familiarising yourself with your appliance Familiarising yourself with your appliance 5 Familiarising yourself with your appliance Familiarising yourself with your appliance 5.1 Appliance You can find an overview of the parts of your appliance here. Note: Deviations between your appliance and the diagrams may differ with re- gard to their features and size. -
Page 13: Control Panel
Familiarising yourself with your appliance en Lighting Exterior ventilation grille Storage container Variable door rack → Page 14 → Page 14 Door rack for large bottles Rating plate → Page 26 → Page 14 5.2 Control panel You can use the control panel to configure all functions of your appliance and to obtain information about the operating status. -
Page 14: Features
en Features 6.3 Door rack Features 6 Features To adjust the door rack as required, The features of your appliance de- Features you can remove the door rack and pend on the model. re-insert elsewhere. → "Removing door rack", Page 21 6.1 Shelf 6.4 Variable door rack To vary the shelf as required, you can remove the shelf and re-insert it To adjust the variable door rack as... -
Page 15: Basic Operation
Basic operation en Fill the ice cube tray with drinking The temperature in the appliance ¡ water up to ¾ and place in the varies due to the following condi- freezer compartment. tions: – How often the appliance is If the ice cube tray is stuck to the opened freezer compartment, loosen it with –... -
Page 16: Rest Mode
en Alarm Switching on Fast cooling Alarm 9 Alarm Press repeatedly until lights ▶ Alarm 9.1 Door alarm Note: After approx. 6 hours, the ap- pliance switches to normal operation. If the appliance door is open for a while, the door alarm switches on. Switching off Fast cooling A warning tone sounds and lights Press... -
Page 17: Home Connect
Home Connect en Tip: Please also follow the instruc- Follow the instructions in the tions in the Home Connect app. Home Connect app. Notes 10.3 Switching on the con- Please note the safety precautions ¡ in this instruction manual and nection to the WLAN make sure that they are also ob- home network (Wi-Fi) served when operating the appli- ance via the Home Connect app. -
Page 18: Data Protection
en Refrigerator compartment term. The lower the selected temper- 10.7 Data protection ature, the longer the food remains Please see the information on data fresh. protection. The first time your appliance is 11.1 Tips for storing food in registered on a home network the refrigerator compart- connected to the Internet, your ment... -
Page 19: Ok" Sticker
Floor area en 11.3 "OK" sticker 12.1 Storing food in the floor area The "OK" sticker lets you check whether the refrigerator compartment To store food in the floor area, ▶ reaches the safe temperature ranges slide the cover backwards over the of +4 °C or colder recommended for floor area. -
Page 20: Cleaning And Servicing
en Cleaning and servicing ATTENTION! Cleaning and servicing 14 Cleaning and servi- Unsuitable cleaning products may damage the surfaces of the appli- cing ance. Do not use hard scouring pads or To keep your appliance working effi- Cleaning and servicing ▶ cleaning sponges. ciently for a long time, it is important Do not use harsh or abrasive de- to clean and maintain it carefully. -
Page 21: Removing The Fittings
Cleaning and servicing en Carefully clean the condensation Removing door rack channel and the drainage hole, Lift the door rack and remove it. ▶ e.g. using a cotton bud. Removing the storage container 14.4 Removing the fittings Pull out the storage container as far as it will go. -
Page 22: Removing Appliance Components
en Cleaning and servicing 14.5 Removing appliance components If you want to clean your appliance thoroughly, you can remove certain components from your appliance. Removing the door rack rail Lift the door rack rail upwards and ▶ remove it. Removing the cover over the floor area Remove the door rack for large bottles. -
Page 23: Troubleshooting
Troubleshooting en Troubleshooting 15 Troubleshooting You can rectify minor faults on your appliance yourself. Read the troubleshoot- Troubleshooting ing information before contacting after-sales service. This will avoid unneces- sary costs. WARNING Risk of electric shock! Improper repairs are dangerous. Repairs to the appliance should only be carried out by trained specialist ▶... - Page 24 en Troubleshooting Fault Cause and troubleshooting The appliance hums, Not a fault. A motor is running, e.g. refrigerating unit, bubbles, buzzes, fan. Refrigerant flows through the pipes. The motor, gargles or clicks. switches or solenoid valves are switching on or off. No action required.
-
Page 25: Storage And Disposal
Storage and disposal en Cut through the power cord. Storage and disposal 16 Storage and disposal Dispose of the appliance in an en- vironmentally friendly manner. Storage and disposal Information about current disposal 16.1 Taking the appliance out methods are available from your of operation specialist dealer or local authority. -
Page 26: Product Number (E-Nr.), Production Number (Fd) And Consecutive Numbering (Z-Nr.)
A detailed RED Declaration of Con- This product includes software com- formity can be found online at ponents that are licensed by the www.gaggenau.com among the addi- copyright holders as free or open tional documents on the product source software. -
Page 27: Declaration Of Conformity
Declaration of Conformity en UK (NI) 5 GHz WLAN (Wi-Fi): For indoor use only. 5 GHz WLAN (Wi-Fi): For indoor use only. - Page 28 BSH Hausgeräte GmbH Carl-Wery-Straße 34 81739 München, GERMANY www.gaggenau.com...
Need help?
Do you have a question about the RC202 and is the answer not in the manual?
Questions and answers