Table of Contents
Advertisement
Quick Links
THE SINGER'S ULTIMATE CHOICE
FEATURES:
• Multi Format Player supports DVD, MP3, CD, CD+G, VCD, CD-R/RW and
even MP4
• Allows you to change up to 4 discs WHILE a disc is still playing.
• 2 Microphone inputs with individual Volume controls
• ±7 half-step Digital Key Controller
• Echo, Bass, and Treble controls for vocal enhancement
• Direct track access controls.
• Full-function remote control for ease of operation of all system features
• PAL/NTSC switchable
• Audio Outputs: 5.1 Channel, Digital Coaxial, Digital Optical, and 2 (RCA) Stereo
L/R
• Video Outputs: Component (Y/Cb/Cr) Video, Composite RCA, S-Video, VGA and
SCART.
R
V I D E O
POWER
1
2
3
ON / OFF
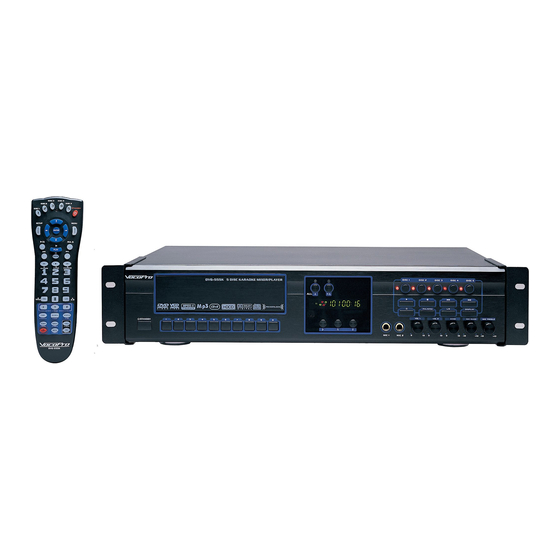
5 Disc DVD/CDG/VCD/MP3/MP4/Photo CD Karaoke Changer
DVG-555K
5 DISC KARAOKE MIXER/PLAYER
CD+G
4
5
6
7
8
9
0
DVG-555K
R
TM
DISC 1
DISC 2
ALL
PAL/NTSC
VOL 1
#
MIC 1
MIC 2
0
10
DISC 3
DISC 4
DISC 5
L/R
DISPLAY
VOL 2
ECHO
MIC BASS
MIC TREBLE
0
10
0
10
-10
+10
-10
+10
Advertisement
Table of Contents
Troubleshooting

Related Manuals for VocoPro DVG-555K


Summary of Contents for VocoPro DVG-555K
- Page 1 • Full-function remote control for ease of operation of all system features • PAL/NTSC switchable • Audio Outputs: 5.1 Channel, Digital Coaxial, Digital Optical, and 2 (RCA) Stereo • Video Outputs: Component (Y/Cb/Cr) Video, Composite RCA, S-Video, VGA and SCART. DVG-555K CD+G V I D E O POWER ON / OFF...
-
Page 2: Table Of Contents
DVG-555K Table of contents Introduction Specifications Safety instructions Welcome Listening for a lifetime Mounting the DVG-555K Getting Connected Audio connections Video connections Microphone connections Controls and Functions Front panel Rear panel Remote control (basic) Remote control (complex) Operations Basic operations... -
Page 3: Safety Instructions
Safety Instructions CAUTION RISK OF SHOCK CAUTION: To reduce the risk of electric shock, do not remove cover (or back). No user- serviceable parts inside. Only refer servicing to qualified service personnel. Explanation of Graphical Symbols The lightning flash & arrowhead symbol, within an equilateral triangle, is intended to alert you to the presence of danger. - Page 4 UNIT!: This product, when installed as indicated in the instructions contained in this manual, meets FCC requirements. Modifications not expressly approved by Vocopro may void your authority, granted by the FCC, to use this product. 2. IMPORTANT: When connecting this product to accessories and/or another product use only high quality shielded cables.
-
Page 5: Welcome
And while you're there don't forget to check out our Club VocoPro for Karaoke news and events, chat rooms, club directories and even a Service directory! We look forward to hearing you sound like a PRO, with VocoPro, your ultimate choice in Karaoke entertainment. -
Page 6: Listening For A Lifetime
Now it's time to consider how you can maximize the fun and excitement your equipment offers. VocoPro and the Electronic Industries Association's Consumer Electronics Group want you to get the most out of your equipment by playing it at a safe level. One that lets the sound come through loud and clear without annoying blaring or distortion and, most importantly, without affecting your sensitive hearing. -
Page 7: Mounting The Dvg-555K
Position the mounting brackets on the DVG-555K with the tabs facing away from the player. Line up the four holes on the mounting bracket with four holes on the sides of the DVG-555K. Use the included screws to secure the brackets on each side of the DVG-555K. -
Page 8: Getting Connected
DVG-555k while VOCAL OUT outputs vocals independently. Connect one set of red & white RCA cables to the RCA audio OUTPUT jacks on the DVG-555K. OUTPUT jacks to output the audio from DVDs and CDs. Use the VOCAL OUTPUT jacks to separately output the microphone channels to an amplifier/mixer. - Page 9 Using either an RCA-ended COAXIAL cable suited for digital audio use or an OPTICAL cable, connect one end to the appropriate jack on the DVG-555K (Coaxial or Optical) and the other end to the appropriate jack on the AC-3 decoder/receiver (Coaxial or Optical). If you have both coaxial and optical inputs on your AC-3 decoder/receiver, it is recommended to use an optical connection as those cables eliminate the possibility of EMI (electromagnetic interference).
-
Page 10: Video Connections
Connecting to a Monitor using VGA Using a VGA cable, connect one end to the DVG-555K’s VGA output jack and connect the other end to the VGA IN jack on your HDTV/VIDEO monitor Connecting to an TV with Component Video... -
Page 11: Microphone Connections
Getting connected cont Connecting to a TV System using a SCART Connection Using a SCART cable, connect one end to the DVG-555K’s EURO SCART output jack and connect the other end to the SCART IN jack on your TV System. -
Page 12: Front Panel
- This is used for inserting and removing up to five discs. The DISC TRAY is operated using the EJECT ALL (^ ALL) or EJECT/PLAY (^/ >) button on the DVG-555K or remote. Use the DISC TRAY SELECT buttons (1-5) to select which DISC TRAY to play. Each DISC TRAY in the DISC TRAY compartment has a number on it that corresponds to the DISC TRAY SELECT buttons. - Page 13 Single-digit tracks: i.e. To jump to track 3, either press 3 and wait two seconds or press 003. Double-digit tracks: i.e. To jump to track 33, either press 33 and wait two seconds or press 033. Triple-digit tracks: i.e. To jump to track 333, press 333. DVG-555K CD+G V I D E O...
-
Page 14: Front Panel
Turn the control clockwise to INCREASE the mic treble level and counter-clockwise to DECREASE the mic treble level. V I D E O POWER ON / OFF buttons - These buttons direct the DIGITAL KEY CONTROLLER to shift the DVG-555K 5 DISC KARAOKE MIXER/PLAYER CD+G DISC 1 DISC 2 DISC 3... -
Page 15: Rear Panel
Rear panel controls and functions 1. AC IN connection - Connect AC Power Cord from the wall outlet to this connection. 2. COMPONENT VIDEO OUT COMPONENT VIDEO outputs the different color signals (B and R) and luminance signal (Y) separately in order to achieve high fidelity in reproducing colors. - Page 16 Rear panel controls and functions cont 7. S-VIDEO output jack - This jack outputs to a display device (TV, TFT, etc.) using an S-VIDEO cable. S- VIDEO provides better color separation and better resolution by separating the color and picture signals of a composite-video signal.
-
Page 17: Remote Control Functions
DISC TRAY SELECT but- tons. 2. POWER/STANDBY - Use this button to turn the DVG-555K ON or place it in STANDBY mode. NOTE: When the power is turned on, the unit will automatically begin loading the first disc. -
Page 18: Remote Control (Complex)
Remote control functions cont 13. < < button - This button is used to scan BACKWARD through a track on a disc while it is playing. 14. > > button - This button is used to scan FORWARD through a track on a disc while it is playing. - Page 19 Remote control functions cont 23. SEARCH button - Use this button to navigate through a DVD without going back to the DVD menu. Press SEARCH once to search through a DVD by chapter or press it a second time to search through a DVD by time.
- Page 20 Remote control [complex functions] To access the complex functions on the DVG-555K’s remote con- trol you need to hold down the red +SHIFT button on the remote and press the button that corresponds to your desired funtion. A sub-function is present where ever there is a + and a function name below a button.
- Page 21 Remote control [complex functions] cont 8. VGA button - Use this button to select VGA mode if you are outputting video to a VGA monitor. Press the VGA button once to select VGA mode and then again to return to standard mode.
-
Page 22: Basic Operations
Initial Playback Getting ready to play --Turn on the TV and set its video source to (VIDEO 1, Video 2, etc.) the channel that the DVG-555K is con- nected to. --Turn on the audio equipment connected to the unit. Set its input source to the channel that the DVG- 555K is connected to. -
Page 23: Advanced Operations
To return to normal playback press SLOW until the display says PLAY or simply press the PLAY button on the remote or DVG-555K. On Music discs the SLOW button only allows you to toggle between SF 2X, SF 4X, SF 8X, and PLAY. - Page 24 Advanced operations cont Searching by time Press the SEARCH button on the remote twice during playback. A search window will appear on screen with an input box for title and time. Enter the time that you would like to start at, us- ing the number buttons on the remote.
-
Page 25: Advanced Operations
Advanced operations cont Changing Angles When playing a DVD with multi-angles recorded, you can select the angle you want to view. During playback, when a multi-angle scene comes on, the angle symbol is displayed to queue you that more viewing angles are available. -
Page 26: Setting Up Preferences (On Screen Display)
DEFAULT mode meaning that the most common settings will already be active when you first buy the DVG- 555K. It may not be necessary to make any changes for the DVG-555K to work correctly. To exit the SETUP screen simply press SETUP on your remote or scroll down to EXIT SETUP on the MENU MAIN PAGE and press ENTER on your remote. - Page 27 Setting up preferences cont 2. Setting ANGLE MARK. GENERAL PAGE PIC MODE ANGLE MARK OSD LANG CAPTIONS SCR SAVER MAIN PAGE 3. Setting OSD LANGUAGE. GENERAL PAGE PIC MODE ANGLE MARK ENGLISH OSD LANG CAPTIONS FRENCH GERMAN SCR SAVER ITALIAN PORTUGESE MAIN PAGE SPANISH...
- Page 28 Setting up preferences cont SPEAKER SETUP SPEAKER SETUP DOWNMIX LT/RT CENTER STEREO REAR SUBWOOFER CENTER DELAY REAR DELAY TEST TONE MAIN PAGE SPEAKER SETUP DOWNMIX CENTER REAR SUBWOOFER CENTER DELAY REAR DELAY TEST TONE MAIN PAGE SPEAKER SETUP DOWNMIX CENTER REAR 15MS SUBWOOFER...
- Page 29 Setting up preferences cont AUDIO SETUP AUDIO SETUP SPDIF OUTPUT DUAL MONO COMPRESSION MAIN PAGE AUDIO SETUP SPDIF OUTPUT STEREO DUAL MONO COMPRESSION L-MONO R-MONO MX-MONO MAIN PAGE AUDIO SETUP SPDIF OUTPUT FULL DUAL MONO COMPRESSION MAIN PAGE KARAOKE SETUP 1.
-
Page 30: Preference Page
2. TV TYPE Set the DVG-555K’s output to match your TV set’s system format. For example, NTSC for 3. VIDEO OUTPUT Choose the video output connection type. - Page 31 To CHANGE PASSWORD, use this menu and type in 3308 to access CHANGE. 9. DEFAULTS To reset the DVG-555K’s preferences to the original factory presets, highlight RESET and press ENTER. 10. SMART NAVI You can choose to have an MP3 disc play in a similar mode to a...
-
Page 32: Mp3 Functions And Operations
- The maximum allowable depth of a nested folder is 127, including files. - If a disc contains both audio as well as MP3 tracks, it will not play in the DVG-555K. - Multi-session discs are limited to a total of 20 sessions. - Page 33 There are 7 available MP3 playback modes to choose from. You can choose between these different modes by pressing the REPEAT button on your DVG-555K remote after an Mp3 disc has been loaded in the player and is ready to play. The Mp3 disc is ready to play when the SMART NAVI navigation screen is displayed.
-
Page 34: Troubleshooting
(Reconnect video connections to make sure.) - Is the disc dirty? (Ensure the disc is not dirty and clean it if necessary.) - Is the DVG-555K connected directly to a television selector switch or a television with a built-in video deck? -
Page 35: Troubleshooting
- Are the remote control batteries installed cor- rectly? (Check battery polarities.) - Is the remote control too far from the DVG-555K? Is there something in the way? (Get within the recommended operating range of the remote control; remove obstacles.) - Are the remote control batteries getting weak? (Change the new batteries.) - Page 36 THE SINGER'S ULTIMATE CHOICE VOCOPRO 2005 Version 1.0 www.vocopro.com...
Need help?
Do you have a question about the DVG-555K and is the answer not in the manual?
Questions and answers