Vivitar Vivicam 5399 User Manual
Vivitar vivicam 5399: user guide
Hide thumbs
Also See for Vivicam 5399:
- Owner's manual (66 pages) ,
- Manual (31 pages) ,
- Instruction manual (12 pages)
Table of Contents
Advertisement
I Getting to know your camera..........................1
1. Configuration & installation...........................1
2. Monitor screen display..............................2
3. Preparation before capture..........................2
4. Shooting...................................................3
5. Video& Audio recording............................7
6. Audio input /output......................................8
7. Image review setup.................................10
8. Other setup.............................................12
II Software & Download....................................15
1 PC-CAM driver installation.......................15
2 How to use PC CAM function.....................22
3 How to download the photos........................23
III Maintenance.................................................23
IV Specification and system requirement.............27
CONTENTS
English
Advertisement
Table of Contents

Related Manuals for Vivitar Vivicam 5399


Summary of Contents for Vivitar Vivicam 5399
-
Page 1: Table Of Contents
I Getting to know your camera……………………..1 1. Configuration & installation…………………..….1 2. Monitor screen display……………….….…….2 3. Preparation before capture……………………..2 4. Shooting……………………………………………3 5. Video& Audio recording…………………….…7 6. Audio input /output………………………………..8 7. Image review setup……………………….…..10 8. Other setup………………………………………12 II Software & Download………………………………15 1 PC-CAM driver installation…………………..15 2 How to use PC CAM function…………………22 3 How to download the photos………………...23 III Maintenance…………………………………….……23... -
Page 2: I Getting To Know Your Camera
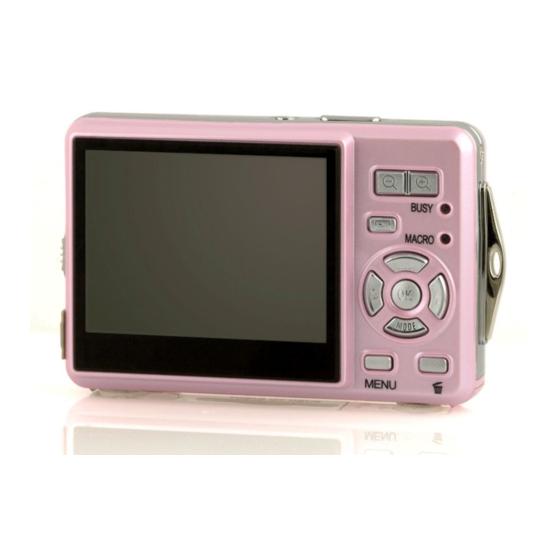
I Getting to know your camera 1. Configuration & installation Shutter button Power button Flash light Macro switch USB jack Lens TFT monitor screen Left/self-timer button Playback button Zoom out button Zoom in button Busy light Macro light Up/Display button Ok button Right / Flash button Down/Mode button... -
Page 3: Monitor Screen Display
English Monitor screen display 3. Preparation before capture 3.1 Battery It’s optional to use AAA alkaline batteries or rechargeable batteries. Open the battery cover and load the batteries according to the polarity indicated on the battery door. 3.2 Insert the memory card Insert the memory card to the card slot carefully. -
Page 4: Shooting
4. Shooting 1): Press POWER button to enter the default capture mode; 2): Press the SHUTTER button to take pictures. Attention: Do not take the memory card or battery out when camera is saving the image, otherwise, the image won't be saved completely. The screen will power off automatically if the camera is not in working status for 30 seconds. - Page 5 A. Resolution: a) Press the UP or DOWN button then press the RIGHT button 2048*1536,1600*1200,1280*960,640*480. DOWN button b) press the “OK” button to confirm and press “MENU” button to exit. B. Quality: a) Press the UP or DOWN button the RIGHT button b) Press the UP or DOWN button c) Press the OK button to confirm and press the MENU button to exit.
- Page 6 E. Exposure: a) Press the UP or DOWN button press the RIGHT button b) Press the LEFT or RIGHT button -2.0 to +2.0; then press the “OK” button to confirm. F. Date Stamp: Set up "date stamp" if you would like to show the “date" on you picture a) Press the UP or DOWN button RIGHT button to select;...
- Page 7 Press the “OK” button to confirm and press the MENU button to exit. Flashlight In capture mode, press the FLASH button ● The screen is in blank when the flash is in charge status, the next image can be shot only when the charge is completed. ●If shooting with flash under a bright environment, the facular in the image will cause the incorrect exposure.
-
Page 8: Video& Audio Recording
English 5. Video recording: 1): Press the “MODE” button to select video mode“ ” ; 2): Press the SHUTTER button to start video recording; 3): Press the SHUTTER button again to stop recording. 5.1 Play video files a) Press the PLAYBACK button to view the video file. b): Press the LEFT or RIGHT button to select the video file;... -
Page 9: Audio Input /Output
b) Press the UP or DOWN button c) Press the OK button to confirm and press the MENU button to exit. B: Frame rate: a) Press the UP or DOWN button RIGHT button for 2 options: 30FPS or 15FPS; b) Press the UP or DOWN button c) Press the OK button to confirm and press the MENU button to exit. - Page 10 d): Press the SHUTTER button again to stop recording. 6.2 Delete audio files See page 4 for detail set up 6.3. Play video /audio file on TV You can play video/audio file on TV by connecting the AV cable: a): Power on TV and switch to AV mode; b): Power on the camera and connect it to TV by the AV cable;...
-
Page 11: Image Review Setup
7:Image review setup: In image playback mode, press the “MENU” button to enter the main menu for 2 options: “play” and “Setup”. There are 8 Options in “play” mode: Delete Current, Delete All, lock, thumbnail, set logo, rotate, slideshow. 7.1 Delete image a) Press the UP or DOWN button “delete all”. - Page 12 enter thumbnail mode; b) Press the LEFT, RIGHT, UP and DOWN button image, then press the OK button to restore the original size. 7.4 Set Logo: You can set the picture you like as the startup logo. a) Press the UP or DOWN button RIGHT button Press the UP or DOWN button Press the OK button to confirm and back to playback mode.
-
Page 13: Other Setup
8. Other settings A: Language (Abc): a) Power on and press the “MENU” button to enter “Image” and “Setup”; b) Press RIGHT button c) Press the UP or DOWN button d) Press the RIGHT button e) Press the UP or DOWN button then press the OK button to confirm. - Page 14 D: Play Logo a) Press the UP or DOWN button b) Press the RIGHT button c) Press the UP or DOWN button then press the OK button to confirm. d) Press the MENU button to exit. Attention: No startup screen is displayed when you select “Disable” E: Light Frequency a) Power on and press the “MENU”...
- Page 15 a) Power on and press the “MENU” button to select “Setup” mode; b) Press the UP or DOWN button button to select “Enable” or “Disable”, and then press the OK button to confirm. c) Press the MENU button to exit. H: Format a) Power on and press the “MENU”...
-
Page 16: Software & Download
Select “PC Camera” mode when you use this camera as a PC camera. Select “Mass Storage” mode when you download, delete or upload file, it can also be used as a removable disk. a) Power on and press the “MENU” button to enter “Setup”; b) Press the UP or DOWN button c) Press RIGHT button d) Press UP or DOWN button... - Page 17 English Select the installed language...
- Page 18 English Connect the camera with PC by USB cable, Power on the camera, then press “mode” button to select “PC CAMERA”...
- Page 19 English An interface “Found new hardware Wizard” appears, select “Yes, this time only”, then click “next”; Select “install the software automatically (Recommended)”, click “next”;...
- Page 20 English If “hardware installation” interface appears, click “Continue Anyway” ;...
- Page 21 English If the following interface appears, click “cancel”; An interface “Found new hardware Wizard” appears, select “Yes, this time only”, then click “next”; Select “install the software automatically (Recommended)”, click “next”;...
- Page 22 English If “hardware installation” interface appears, click “Continue Anyway”;...
-
Page 23: How To Use Pc Cam Function
Power on the camera, Press the “mode” button to Select “PC camera” Double click the icon “my computer” on the desktop of PC Double click the icon “Vivicam 5399 video camera”, Then you can start to use the pc-cam function... -
Page 24: How To Download The Photos
III. Maintenance Always keep your camera and accessories in proper condition. 1. Camera Use dry, soft and clean cloths to wipe out the fingerprint and the dust on the Vivicam 5399 ” icon English... - Page 25 lens and LCD. Do not use rough cloths or abrasive of laundry to avoid the surface scrape of the camera. Do not put the camera in the sun or under the high-temperature environment (such as high temperature tool bag, trolley case and so on). Wait few minutes before use when you bring the camera from a low temperature environment to a warm environment.
- Page 26 internal settings and functions of the camera; The following situation will affect the lifetime of the battery: LCD turn on; LCD in playback status for a long time. Please replace new battery when battery low, and follow the battery instruction on when using. Please take out the battery if you won’t use the camera for a long time.
- Page 27 Insert the card into the camera; Power on Press the “MENU” button to enter “setup”: Press the UP or DOWN button Press the RIGHT button for 2 options: “Yes”, “No”. Then press the UP or DOWN button to select “yes”; Press the OK button to format the memory card.
-
Page 28: Specification And System Requirement
IV. Specifications & system requirement: 1 . Specifications of the camera sensor Image resolution storage File format Capture Video Quality snapshot speed Self timer zoom White balance exposure control flash mode illumination PC-Camera mode interface TV output TFT monitor screen power OSD language focal range... - Page 29 Auto power System required Weight Dimensions Attention: The product design and the specifications are subject to change without prior notice. 2. System required: Windows 98SE/2000/ME/XP/Vista CPU: Pentium III 800MHz and upper Memory:64 MB and upper memory Disk space:At least 128 MB space free 60sec/120sec WIN98SE /2000/ME/XP/Vista Approx.
Need help?
Do you have a question about the Vivicam 5399 and is the answer not in the manual?
Questions and answers