Advertisement
Table of Contents
- 1 Table of Contents
- 2 What Your Camera Includes
- 3 Computer System Requirements
- 4 A Quick Look at Your Camera
- 5 Preparing Your Camera for Use
- 6 Starting Your Camera
- 7 The Camera's Modes
- 8 Operating Your Camera
- 9 Software & Camera Driver Installation
- 10 Downloading Photos
- 11 Specifications
- 12 Appendix A: Technical Speci Cations
- Download this manual
Advertisement
Table of Contents

Related Manuals for Vivitar CV-1025V


Summary of Contents for Vivitar CV-1025V
- Page 1 10x25 Digital Camera Binoculars INSTRUCTION MANUAL...
- Page 2 Vivitar warrants this quality product to be free of defects in material and workmanship for a period of one year from the date of purchase. During the period, Vivitar will repair or replace the product at no charge for parts or labor.
- Page 3 When service is complete, the product will be returned to you shipping prepaid. In the event the product is deemed to be not faulty or the defect is a result in wear and tear, Vivitar may levy a handling charge for the return ofthe product.
-
Page 4: Table Of Contents
Table of Contents What your camera includes:... 4 Computer System Requirements ... 4 A Quick Look at Your Camera... 5 Preparing Your Camera for Use ...6 Starting Your Camera... 7 The Camera’s Modes...8 Operating Your Camera... 9 Software & Camera Driver Installation ... 14 Downloading Photos ... -
Page 5: What Your Camera Includes
What Your Camera Includes 1)One digital 10 x 25 camera binoculars 2)One USB connection cable 3)One software and driver CD 4)One product manual Minimum System Requirements Windows 2000, XP -Pentium III Processor or Equivalent -128MB RAM -150MB Free Hard Disk Drive Space -CD/DVD ROM Drive -Available USB Port -1024x768 Screen Resolution... -
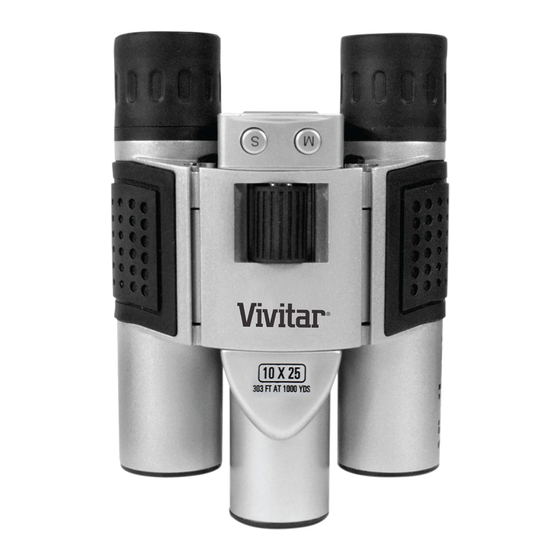
Page 6: A Quick Look At Your Camera
A Quick Look at Your Camera Startup Button/Mode Button LCD Display Screen Optical Shooting Lens USB Socket Telescope and View nder Battery Compartment Shutter Button/”OK” button... -
Page 7: Preparing Your Camera For Use
Preparing Your Camera For Use Battery Installation Your camera requires two AAA alkaline batteries, which must be inserted as follows: 1. Slide open the battery compartment at the bottom of the camera. 2. Insert the batteries in accordance with the polarity (+/-) shown on the inside of the cover. 3. -
Page 8: Starting Your Camera
Starting Your Camera Press and hold down the mode button (for about 2 seconds) to start the camera. • The camera will sound a beep to confirm that it is ready for use. • The LCD display will indicate the number of photos that can be taken before it becomes necessary to download them to your PC. -
Page 9: The Camera's Modes
The Camera’s Modes When your camera is turned on, you will see the following symbols on the LCD display screen: When you see a number on the screen, it indicates the number of photos remaining to take. OFF..turns your camera o . St..turns on the self timer Ct..Continuous shooting mode. -
Page 10: Operating Your Camera
Operating Your Camera If the camera is powered o , hold down the mode button once to turn on power to your camera. Turning your Camera O 1. Press the mode button repeatedly until the OFF symbol shows on the LCD display screen. 2. - Page 11 Operating Your Camera (continued) Deleting All Photos 1. Press the mode button repeatedly until the CA symbol shows on the LCD display screen. 2. Press the shutter button within 5 seconds, the photo counter will ash. Press the shutter button again within 5 seconds and all photos will be deleted from the camera’s memory.
- Page 12 Operating Your Camera (continued) Photo Resolution Your camera can tak photos in either VGA (640x480 pixels) or QVGA (320x240 pixels) resolution. In order to change the resolution, follow the steps below: 1. Press the mode button repeatedly until the “LR” symbol is displayed on the LCD display screen. 2.
- Page 13 Operating Your Camera (continued) Photo Storage The number of photos that can be taken will vary according to the resolution and compression ratio of the photos. The LCD display screen will show the current resolution and how many more photos you can take at this resolution. The maximum numbers of photos your camera can store is: 20 photos --- “Hr”...
- Page 14 Operating Your Camera (continued) Video Recording Mode Press the mode button repeatedly to select the A1 symbol on the LCD display screen. Press the shutter button to start recording, the LCD will blink at the same time. Once recording gets started, It will not stop recording until you release the shutter button or the “number of photos”...
-
Page 15: Software & Camera Driver Installation
Software and Camera Driver Installation IMPORTANT: Before attempting to install the software, ensure that you do not have the camera attached to your computer. This will a ect the installation process and could cause your installation to fail. Do not connect the cable to the computer until the entire installation process has been completed. - Page 16 Software and Camera Driver Installation (continued) 4. Please review the license terms and click the 3. On the “PhoTags Express" screen, click “Agree” button to continue. the “Next” button. -15-...
- Page 17 Software and Camera Driver Installation (continued) 5. Let the “PhoTags Express” installer create the folder where the program will be installed to, and then click “Install” 6. Click “Finish” to let the “PhoTags Express” installer nish the installation program. -16-...
- Page 18 Software and Camera Driver Installation (continued) 7. This will automatically launch the Install shield for the camera driver. Click “Next” to continue. Congratulations!! You have successfully installed the “PhoTags Express” software, the “PhoTags WebCam Express” program and the camera’s driver. -17- 8.
- Page 19 Downloading Photos Use the “PhoTags Express” program to import the photos from your camera. 1. Plug one end of the USB cable into the USB slot on your camera. 2. Plug the other end of the USB cable into a USB port on your computer.
-
Page 20: Downloading Photos
Downloading Photos (continued) 6. The “Get photos” wizard will appear 5. Click on the “Get Photos” with the correct name of your camera button on the Main Menu. device selected in the “Active devices” list in the “Express” mode. Click the “Next” button to proceed. - Page 21 Downloading Photos (continued) 7. On the next screen, choose where you want to place your photos and click the “Finish” button to copy the photos to your computer. 8. All of the pictures you imported will then appear in the “Select photos” mode’s main window.
-
Page 22: Appendix A: Technical Speci Cations
Specifications Internal Memory: 16Mbit SDRAM Memory Capacity: VGA: 20 photos (no compression) QVGA: 40 photos (no compression) Lens: 1/4 inch xed lens Aperture: 2.8 Exposure Value: Automatic White Balance: Automatic Self Timer Duration: 10 seconds Communication Interface: USB standard interface Image Sensor: 1/4 inch CMOS Shooting Modes: Single photo/delayed self timer/continuous shooting/continuous short video recording (AVI mode)
Need help?
Do you have a question about the CV-1025V and is the answer not in the manual?
Questions and answers