
Related Manuals for Russell Hobbs RH77IH511B


Summary of Contents for Russell Hobbs RH77IH511B
- Page 1 Electric Induction Hob Instruction Manual Model number(s): RH77IH511B For Customer Services & Spare Parts please call 0345 208 8750 or visit us at mda.russellhobbs.com IMPORTANT: RETAIN FOR FUTURE REFERENCE...
-
Page 2: Table Of Contents
Contents Safety Instructions ………………………………………. Product Overview ………………………………………. Positioning ………………………………………. Installation ………………………………………. 9-10 Induction Introduction ………………………………………. Pans & Energy Saving ………………………………………. 12-13 Usage ………………………………………. 14-31 Cleaning & Maintenance ………………………………………. 32-34 Trouble shooting ………………………………………. Fault codes ………………………………………. Guarantee ………………………………………. Technical specification ………………………………………. Notes ………………………………………. -
Page 3: Safety Instructions
Safety Instructions Important note: Please read this booklet before installing and switching on this appliance. The manufacturer assumes no responsibility for incorrect installation and usage as described in this booklet. This appliance can be used by children aged from 8 years and above and persons with reduced physical, sensory or mental capabilities or lack of experience and knowledge if they have been given supervision or instruction concerning use of the appliance in a safe way and understand... - Page 4 Safety Instructions • This appliance can only be installed in a well-ventilated place. • This appliance is intended for domestic use and the household environment only. The appliance is not intended for use outside. • Do not tamper with the appliance's interior. If necessary, call our customer helpline.
- Page 5 Safety Instructions • Cracks or fractures in the glass ceramic may cause electric shocks. Switch off the circuit breaker in the fuse box. Contact customer services. • Parts and components on the appliance may have sharp edges. Wear protective gloves. •...
-
Page 6: Product Overview
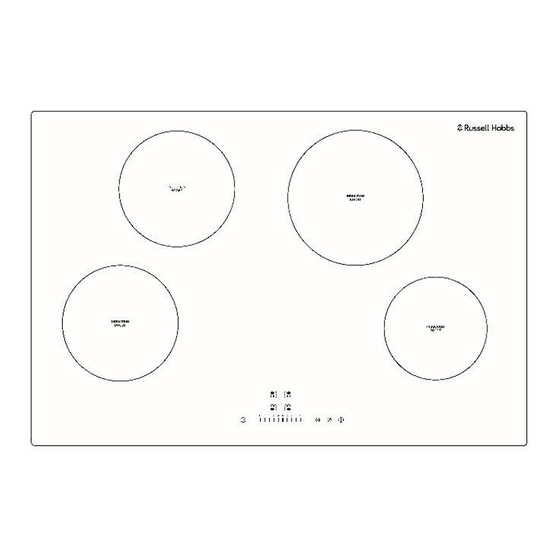
Product overview 1800W/2300W (max) Power level controls 1800W/2300W (max) Boost function control, 2200W/2600W (max) child lock control & 1200W/1500W (max) ON/OFF button Timer indicator & control 2 x Brackets Zone indicator controls & 10. 2 x Screws power level indicator Unit &... -
Page 7: Positioning
Positioning • This appliance is to be installed in a counter top. • Ensure no occurs to the appliance during installation. • The appliance can only be used safely if it is correctly installed according to the safety instructions. The installer is responsible for ensuring that the appliance works correct when installed. - Page 8 Positioning • Be sure the thickness of the work surface is at least 30mm • You must have a gap of a minimum gap of 25mm between the underside of the appliance and any surface below it. Note: • Select heat-resistant work surface material to avoid larger deformation caused by the heat radiation from the appliance.
-
Page 9: Installation
Installation Preparation & installation Ensure that there are no electric wires, gas or water pipes in the area where holes are to be made. Components of the appliance may have sharp edges. Wear protective gloves. 1. Ensure that there is an electrical connection within adequate distance of the hob after it has been installed. - Page 10 Installation Electrical connection • WARNING- THIS APPLIANCE MUST BE EARTHED • This appliance is designed to be connected to a 220-240V~50Hz AC electricity supply. • Before proceeding with the electrical connection, verify that the current carrying capacity of the system and the isolator / main switch is adequate for the maximum power rating of the hob.
-
Page 11: Induction Introduction
Induction introduction Induction hobs only heat the pan rather than the cooking surface heating up like a standard electric hob. They do this by creating a magnetic field between the pan base and an element underneath the glass top; this makes induction hobs safer and cheaper to run as they use only the precise amount of energy you need. -
Page 12: Pans & Energy Saving
Pans & Energy Saving • Only use cookware with a base suitable for induction cooking. Look for the induction symbol on the packaging or on the bottom of the pan. • You can check whether your cookware is suitable by carrying out a magnet test. Move a magnet towards the base of the pan. - Page 13 Pans & Energy Saving Do not use small pans on large Always use pans that are the zones right size for each zone Do not cook without a lid or with the lid half off, as this Place a lid on pans wastes energy Do not use damaged pans, Only use pans with a thick,...
-
Page 14: Usage
Usage Controls The appliance has 4 cooking zones and these are controlled by the touch controls at the bottom of the hob. Just above the cooking zone power controls there are the cooking zone selection controls and to the left of the cooking zone controls is the timer indicator: 3 4 5 The function of each touch control and the meaning of each icon is explained... - Page 15 Usage Using the touch controls The controls respond to touch, so you don’t need to apply pressure to them. Below are tips on how to use the controls: • Use the ball of your finger, not its tip. • You will hear a beep each time a touch is registered. •...
- Page 16 Usage Power levels The settings below are guidelines only, the exact setting you will require will depend on several factors, including your cookware and the amount you are cooking. Experiment with the hob to find the settings that best suit you. Heat setting Suitability Delicate warming for small amounts of food...
- Page 17 Usage To use a cooking zone Note: • When you touch a symbol, the respective function is activated. • Always keep the controls dry. Moisture reduces their effectiveness. • Do not pull pans close to the displays and sensors. The electronics could overheat.
- Page 18 Usage 4. Select the cooking zone you want by touching the required cooking zone control and the indicator of the zone you have selected will flash. 5. Use the power level controls to select the required power, this will be shown on the cooking zone indicator of the cooking zone that is being used.
- Page 19 Usage 7. To switch the cooking zone off, you can either touch the 0 power level indicator line (after touching/selecting the required cooking zone control) and ensure ‘0’ is shown in the cooking zone indicator. Alternatively you touch the power control and turn the hob off completely.
- Page 20 Usage Boost function The function is available on all cooking zones and will increase the power of the selected zone to its maximum power. 1. Follow steps 1 – 5 from pages 17 and 18. 2. Touch the cooking zone control you want to apply the boost function (maximum power) to.
- Page 21 Usage • The Boost function can work in any cooking zone • The Boost function can be set to 2 cooking zones at the same time if required. 1 of cooking zones A or B can be set and 1 cooking zone from C or D can be set Note that this will mean that the maximum power level setting of the other 2 zones can be setting 2 if they are in use or powered on.
- Page 22 Usage Using the Timer You can use the timer in two different ways: 1. As a minute minder - in this case, the timer will not turn any cooking zone off when the set time is up. 2. To turn one cooking zone off after the set time is up. Note: You can set the timer for up to 99 minutes.
- Page 23 Usage 4. Set the time by touching power controls. Once you have selected your required time do not press another button and the timer will be set. 5. When the time is set, it will begin to count down immediately. The display will show the remaining time and the timer indicator will flash for 5 seconds.
- Page 24 Usage Setting the timer to turn one cooking zone off Make sure the hob is turned on and that a suitable pan has been placed on the zone you wish to use. Make sure the bottom of the pan and the surface of the pan support are clean and dry.
- Page 25 Usage 6. Set the time by touching power controls. 7. When the time is set, it will begin to count down immediately. Please note that the red dot next to power level indicator will illuminate indicating that zone is selected. The display will show the remaining time and the timer indicator will flash for 5 seconds.
- Page 26 Usage If the timer is set on more than one zone 1. When you set the time for multiple cooking zones simultaneously, the dots of the relevant cooking zones are on. The minute display shows the time of the lowest time that has been set. Touch the cooking zone that has a timer set on cooking zone selection control, the corresponding timer will be shown in the timer indicator.
- Page 27 Usage Cancel the timer 1. Touching the heating zone selection control that you want to cancel the timer 2. Touching the timer control, the indicator flash 3. Touch the slider control to set the timer to ”00”, the timer is cancelled...
- Page 28 Usage Residual heat warning When the hob has been operated there will be some residual heat. The display of controls of which ever cooking zone has been used will show a ‘H’ symbol to warn you of the residual heat and to keep away from it. The ‘H’...
- Page 29 Usage Cooking recommendations: The following advice is to help you get the best cooking performance/results: Zone Very high, High Medium Boiling, steaming, griddling, Reheating and keeping things hot: toasting, paellas, Asian food cooked and pre-cooked dishes. (wok). 1800W - 2600W (max) Escalopes, steaks, omelettes, Rice, white sauce...
- Page 30 Usage Cooking guidelines: Cooking Tips • When food comes to the boil, reduce the temperature setting. • Using a lid will reduce cooking times and save energy by retaining the heat. • Minimise the amount of liquid or fat to reduce cooking times. •...
- Page 31 Usage For stir-frying 1. Choose an induction compatible flat-based wok or a large frying pan. 2. Have all the ingredients and equipment ready. Stir-frying should be quick. If cooking large quantities, cook the food in several smaller batches. 3. Preheat the pan briefly and add two tablespoons of oil. 4.
-
Page 32: Cleaning & Maintenance
Cleaning and Maintenance: Important notes: • The appliance will become hot during operation, allow the appliance to cool down before cleaning. • Do not use any high-pressure cleaners or steam cleaners. • Wash new sponge cloths thoroughly before use. • Follow all instructions and warnings included with the cleaning agents. How to clean Observe the information below to ensure the surfaces are not damaged by using the wrong type of cleaning agent. - Page 33 Cleaning and Maintenance: • When the power to the hob is switched off, there Switch the power off the hob will be no ‘hot surface’ indication but the cooking zone may still be hot! Take extreme care. Apply a hob cleaner while the glass is Everyday soiling on glass •...
- Page 34 Cleaning and Maintenance: Causes of damage: • Rough pot and pan bases scratch the ceramic. • Avoid boiling pots dry. This may cause damage. • Sugar can cause the surface to blister if not removed immediately • Never place hot pots or pans on the control panel, the display area or the surround.
-
Page 35: Trouble Shooting
Trouble Shooting: Problem Solution The circuit breaker is defective or turned off check circuit breaker is in working order and that it is not switched off. No power Power cut or faulty fuse Check whether other kitchen appliances are working or check in the fuse box to make sure that the fuse for the appliance is working The child lock/control lock is operational... -
Page 36: Fault Codes
Fault codes: The hob is equipped with a self diagnostic function and the table below shows the fault codes and the actions that should be taken. Failure code Problem Solution Auto-Recovery Please inspect whether Supply voltage is above the rated power supply is normal. -
Page 37: Guarantee
Guarantee This product is guaranteed for 12 months from the date of the original purchase. If any defect arises due to faulty materials or workmanship you must contact Product Care with the original proof of purchase so a replacement or refund can be arranged. Refund or replacement is at the discretion of Product Care. -
Page 38: Technical Specification
Technical Specification Model number RH77IH511B Rated Voltage 220V – 240V ~ 50Hz External Dimensions(HxWxD) 60mm x 770mm x 520mm Information for domestic electric hobs Symbol Symbol Value Unit Symbol Value Unit Value Unit Model identification RH77IH511B Type of hob Built-in hob... -
Page 39: Notes
Notes... - Page 40 Russell Hobbs is a registered trademark used under license from Spectrum Brands (UK) Ltd. Made under license by Product Care Trading Limited, Wigan, WN2 4AY/ PCT (NI) Ltd, Belfast, BT5 5AD Russell Hobbs Support: call 0345 208 8750 or visit: mda.russellhobbs.com The ‘wheelie bin’...
Need help?
Do you have a question about the RH77IH511B and is the answer not in the manual?
Questions and answers